Use and Care Manual
Page 1
www.whidpooLcom parts, Table of Contents 2 8578899 ELECTRONIC ELECTRIC DRYER For questions about features, operation/performance, accessories or service, call: 1-800-253-1301 or visit our website at...
www.whidpooLcom parts, Table of Contents 2 8578899 ELECTRONIC ELECTRIC DRYER For questions about features, operation/performance, accessories or service, call: 1-800-253-1301 or visit our website at...
Use and Care Manual
Page 2
... Requirements 5 Electrical Requirements 7 Electrical Connection 8 Venting Requirements 13 Plan Vent System 14 Install Vent System 15 Install Leveling Legs 15 Connect Vent 16 Level Dryer 16 Reverse Door Swing 16 Complete Installation 18 DRYER USE 19 Starting Your Dryer 19 Stopping or Restarting Your Dryer 20 Lock...21 Additional Features 22 Changing Cycles, Options and Modifiers 23 Drying Rack 23 DRYER CARE 24 Cleaning the Dryer Location 24 Cleaning the Lint Screen 24 Cleaning the Dryer Interior 24 Removing Accumulated Lint 25 Vacation and Moving Care 25 TROUBLESHOOTING 25 ...
... Requirements 5 Electrical Requirements 7 Electrical Connection 8 Venting Requirements 13 Plan Vent System 14 Install Vent System 15 Install Leveling Legs 15 Connect Vent 16 Level Dryer 16 Reverse Door Swing 16 Complete Installation 18 DRYER USE 19 Starting Your Dryer 19 Stopping or Restarting Your Dryer 20 Lock...21 Additional Features 22 Changing Cycles, Options and Modifiers 23 Drying Rack 23 DRYER CARE 24 Cleaning the Dryer Location 24 Cleaning the Lint Screen 24 Cleaning the Dryer Interior 24 Removing Accumulated Lint 25 Vacation and Moving Care 25 TROUBLESHOOTING 25 ...
Use and Care Manual
Page 3
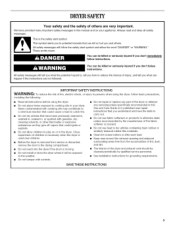
... Keep area around the exhaust opening and adjacent surrounding areas free from the accumulation of lint, dust, and dirt. [] The interior of the dryer and exhaust vent should be exposed to the weather. [] Do not tamper with gasoline, drycleaning solvents, or other flammable or explosive substances as ... if you don't follow instructions. iMPORTANT SAFETY iNSTRUCTiONS WARNING: To reduce the risk of fire, electric shock, or injury to persons when using the dryer. [] Do not place items exposed to play on your dryer. SAVE TH ESE iNSTRUCTiONS This is moving. [] Do not install or store the...
... Keep area around the exhaust opening and adjacent surrounding areas free from the accumulation of lint, dust, and dirt. [] The interior of the dryer and exhaust vent should be exposed to the weather. [] Do not tamper with gasoline, drycleaning solvents, or other flammable or explosive substances as ... if you don't follow instructions. iMPORTANT SAFETY iNSTRUCTiONS WARNING: To reduce the risk of fire, electric shock, or injury to persons when using the dryer. [] Do not place items exposed to play on your dryer. SAVE TH ESE iNSTRUCTiONS This is moving. [] Do not install or store the...
Use and Care Manual
Page 4
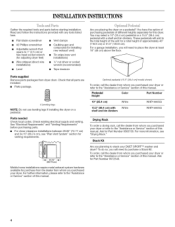
....65" (72.77 cm) and 34.15" (86.74 cm), see "Drying Rack." Parts needed Check local codes. Check existing electrical supply and venting. I_- 34.15"--_1 (86.74 cm) Mobile home installations require metal exhaust system hardware available for this manual. ...wrench (recommended) • Tape measure Parts supplied Remove parts packages from whom you purchased your DUET SPORT TM washer and dryer? For further information, please refer to 1" (2.5 cm) or hex-head socket wrench (for adjusting dryer feet) • Wire stripper (direct wire installations) • Level • Vent clamps ...
....65" (72.77 cm) and 34.15" (86.74 cm), see "Drying Rack." Parts needed Check local codes. Check existing electrical supply and venting. I_- 34.15"--_1 (86.74 cm) Mobile home installations require metal exhaust system hardware available for this manual. ...wrench (recommended) • Tape measure Parts supplied Remove parts packages from whom you purchased your DUET SPORT TM washer and dryer? For further information, please refer to 1" (2.5 cm) or hex-head socket wrench (for adjusting dryer feet) • Wire stripper (direct wire installations) • Level • Vent clamps ...
Use and Care Manual
Page 5
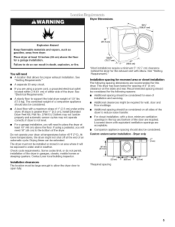
... openings in garages, closets, mobile homes or sleeping quarters. Dryer Dimensions ExplosionHazard Keep flammable materials and vapors, such as gasoline, away from dryer, Place dryer at least 18 inches (46 cm) above the floor. If using a power cord, a grounded electrical outlet located within 2 ft (61 cm) of either side... of 127 Ibs (57.6 kg). You will need 18" (46 cm) to the bottom of the dryer to do not permit, installation of the dryer in the top and bottom of the door ...
... openings in garages, closets, mobile homes or sleeping quarters. Dryer Dimensions ExplosionHazard Keep flammable materials and vapors, such as gasoline, away from dryer, Place dryer at least 18 inches (46 cm) above the floor. If using a power cord, a grounded electrical outlet located within 2 ft (61 cm) of either side... of 127 Ibs (57.6 kg). You will need 18" (46 cm) to the bottom of the dryer to do not permit, installation of the dryer in the top and bottom of the door ...
Use and Care Manual
Page 7
... after 1996, and all local codes and ordinances. [] For a permanently connected dryer: This dryer must be connected to the dryer must end in ring terminals or spade terminals with a 4-wire electrical supply connection, the neutral ground wire must have a fuse in accordance with the...-carrying wires must be either green or bare. SAVE THESE INSTRUCTIONS Electrical Connection To properly install your dryer, you will be insulated. [] 10-gauge solid copper wire (do not permit the connection of electrical connection you must be : [] Flexible armored cable or nonmetallic sheathed...
... after 1996, and all local codes and ordinances. [] For a permanently connected dryer: This dryer must be connected to the dryer must end in ring terminals or spade terminals with a 4-wire electrical supply connection, the neutral ground wire must have a fuse in accordance with the...-carrying wires must be either green or bare. SAVE THESE INSTRUCTIONS Electrical Connection To properly install your dryer, you will be insulated. [] 10-gauge solid copper wire (do not permit the connection of electrical connection you must be : [] Flexible armored cable or nonmetallic sheathed...
Use and Care Manual
Page 9
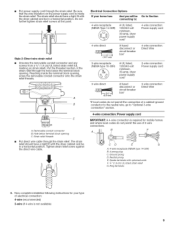
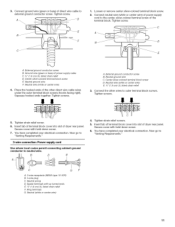
... conduit connector B. Hole below the terminal block opening. Strain relief threads Put direct wire cable through the strain relief. Electrical Connection Options If your type of electrical connection: 4-wire (recommended) 3-wire (if 4-wire is required for your home has: And you will be in ...should have a tight fit with upturned ends F. 3_,, (1.9 cm) UL listed strain relief G. The strain relief should have a tight fit with the dryer cabinet and be in a horizontal position. B F CD E G A. 4-wire receptacle (NEMA type 14-30R) B. 4-prong plug C. Now complete installation...
... conduit connector B. Hole below the terminal block opening. Strain relief threads Put direct wire cable through the strain relief. Electrical Connection Options If your type of electrical connection: 4-wire (recommended) 3-wire (if 4-wire is required for your home has: And you will be in ...should have a tight fit with upturned ends F. 3_,, (1.9 cm) UL listed strain relief G. The strain relief should have a tight fit with the dryer cabinet and be in a horizontal position. B F CD E G A. 4-wire receptacle (NEMA type 14-30R) B. 4-prong plug C. Now complete installation...
Use and Care Manual
Page 10
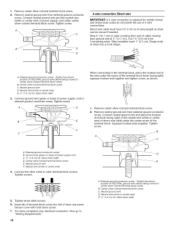
...together and tighten screw, as shown. 1= Remove center silver-colored terminal block screw. 2. Direct wire cable must have completed your electrical connection. Remove neutral ground wire from 3 remaining wires. Squeeze hooked ends together. Center silver-colored terminal block screw E. Neutral ground...wire under center, silver-colored terminal block screw. Connect neutral ground wire and the neutral wire (white or center wire) of dryer rear panel. Center silver-colored terminal block screw C. Neutral wire (white or center wire) E. When connecting to "Venting ...
...together and tighten screw, as shown. 1= Remove center silver-colored terminal block screw. 2. Direct wire cable must have completed your electrical connection. Remove neutral ground wire from 3 remaining wires. Squeeze hooked ends together. Center silver-colored terminal block screw E. Neutral ground...wire under center, silver-colored terminal block screw. Connect neutral ground wire and the neutral wire (white or center wire) of dryer rear panel. Center silver-colored terminal block screw C. Neutral wire (white or center wire) E. When connecting to "Venting ...
Use and Care Manual
Page 11
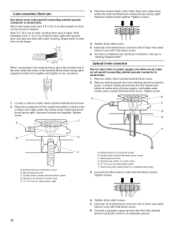
... cord to external ground conductor screw. Connect neutral wire (white or center wire) of the terminal block. Ground wire (green or bare) of dryer rear panel. C G F A. 3-wire receptacle (NEMA type 10-30R) B. 3-wire plug C. Spade terminals with hold -down screw. 7....(hooks facing right). You have completed your electrical connection. Loosen or remove center silver-colored terminal block screw. 2. Place the hooked ends of dryer rear panel. Tighten strain relief screw. 6. You have completed your electrical connection. Now go to "Venting Requirements." ...
... cord to external ground conductor screw. Connect neutral wire (white or center wire) of the terminal block. Ground wire (green or bare) of dryer rear panel. C G F A. 3-wire receptacle (NEMA type 10-30R) B. 3-wire plug C. Spade terminals with hold -down screw. 7....(hooks facing right). You have completed your electrical connection. Loosen or remove center silver-colored terminal block screw. 2. Place the hooked ends of dryer rear panel. Tighten strain relief screw. 6. You have completed your electrical connection. Now go to "Venting Requirements." ...
Use and Care Manual
Page 12
Direct wire cable must have completed your electrical connection. Strip insulation back 1" (2.5 cm). Place the hooked ends of the other wires to "Venting Requirements." Insert tab of terminal block cover into slot of ..., silver-colored terminal block screw. Now go to outer terminal block screws. Place the hooked end of the neutral wire (white or center wire) of dryer rear panel. Neutral ground wire C. Neutral wire (white or center wire) E, _" (1.9 cm) UL listed strain relief E Grounding path determined by a qualified electrician 3= Connect the other...
Direct wire cable must have completed your electrical connection. Strip insulation back 1" (2.5 cm). Place the hooked ends of the other wires to "Venting Requirements." Insert tab of terminal block cover into slot of ..., silver-colored terminal block screw. Now go to outer terminal block screws. Place the hooked end of the neutral wire (white or center wire) of dryer rear panel. Neutral ground wire C. Neutral wire (white or center wire) E, _" (1.9 cm) UL listed strain relief E Grounding path determined by a qualified electrician 3= Connect the other...
Use and Care Manual
Page 14
...-top installation (also available with pedestal installations) Alternate installations for close clearances Venting systems come in death, fire, electrical shock, or serious injury. Fire Hazard Cover unused exhaust holes with a magnetic latch. This dryer can result in many varieties. Other installations are available for mobile home installations The exhaust vent must be...
...-top installation (also available with pedestal installations) Alternate installations for close clearances Venting systems come in death, fire, electrical shock, or serious injury. Fire Hazard Cover unused exhaust holes with a magnetic latch. This dryer can result in many varieties. Other installations are available for mobile home installations The exhaust vent must be...
Use and Care Manual
Page 18
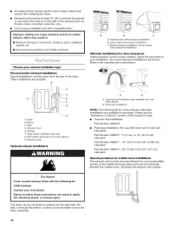
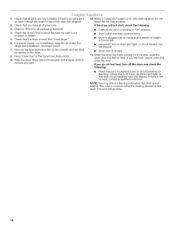
..., reconnect power. 7. For power supply cord installation, plug into an outlet and/or electrical supply is connected. • Household fuse is intact and tight, or circuit breaker has not tripped. • Dryer door is not crushed or kinked. 5. When the dryer has been running or "On" position. • Start button has been pushed...
..., reconnect power. 7. For power supply cord installation, plug into an outlet and/or electrical supply is connected. • Household fuse is intact and tight, or circuit breaker has not tripped. • Dryer door is not crushed or kinked. 5. When the dryer has been running or "On" position. • Start button has been pushed...
Use and Care Manual
Page 19
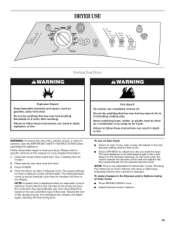
... Auto Cycle • Select an Auto Cycle. During the first few minutes of fire, electric shock, or injury to start your dryer. NOTE: Time is not adjustable for Automatic Cycles. Place laundry into dryer and shut door. 3. WARNING: To reduce the risk of the drying process, the cycle... time may automatically vary from dryer. Failure to follow these basic steps to persons, read the IMPORTANT SAFETY INSTRUCTIONS before each load....
... Auto Cycle • Select an Auto Cycle. During the first few minutes of fire, electric shock, or injury to start your dryer. NOTE: Time is not adjustable for Automatic Cycles. Place laundry into dryer and shut door. 3. WARNING: To reduce the risk of the drying process, the cycle... time may automatically vary from dryer. Failure to follow these basic steps to persons, read the IMPORTANT SAFETY INSTRUCTIONS before each load....
Use and Care Manual
Page 25
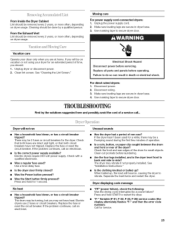
... thumping sound during the first few minutes of the dryer? Use masking tape to vibrate. See "Cleaning the Lint Screen." Disconnect wiring. 3. Dryer will be on dryer usage. Check that both fuses are at home. Electric dryers require 240-volt power supply. Was the Power button... blown, or has a circuit breaker tripped? Electric dryers use ? Clean out pockets before operating. Separate the load items and restart the dryer. Make sure leveling legs are secure in dryer base. 3. Make sure leveling legs are secure in dryer base. 4. There may vibrate if not properly...
... thumping sound during the first few minutes of the dryer? Use masking tape to vibrate. See "Cleaning the Lint Screen." Disconnect wiring. 3. Dryer will be on dryer usage. Check that both fuses are at home. Electric dryers require 240-volt power supply. Was the Power button... blown, or has a circuit breaker tripped? Electric dryers use ? Clean out pockets before operating. Separate the load items and restart the dryer. Make sure leveling legs are secure in dryer base. 3. Make sure leveling legs are secure in dryer base. 4. There may vibrate if not properly...
Use and Care Manual
Page 26
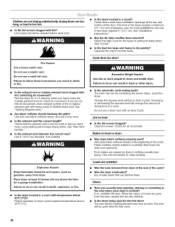
...exhaust system of the door. If you recently been painting, staining or varnishing in a closet? Use only one fabric softener sheet, and use a dryer rack with heavy metal or flexible metal vent. Failure to check air movement. Proper operation of the cycle. See "Installation Instructions." • Has... below 45°F (7°0)? Odors Have you do so can result in death, explosion, or fire. • Is the dryer located in clothing (usually blue jeans). The new electric heating element may not be cleaned before each load. The odor will not transfer to move and install...
...exhaust system of the door. If you recently been painting, staining or varnishing in a closet? Use only one fabric softener sheet, and use a dryer rack with heavy metal or flexible metal vent. Failure to check air movement. Proper operation of the cycle. See "Installation Instructions." • Has... below 45°F (7°0)? Odors Have you do so can result in death, explosion, or fire. • Is the dryer located in clothing (usually blue jeans). The new electric heating element may not be cleaned before each load. The odor will not transfer to move and install...


