Use and Care Guide
Page 1
or visit our website at...www.whirlpool.com Table of Contents 2 8578567 ® 240-VOLT ELECTRIC DRYER Use & Care Guide For questions about features, operation/performance, parts, accessories or service, call: 1-800-253-1301.
or visit our website at...www.whirlpool.com Table of Contents 2 8578567 ® 240-VOLT ELECTRIC DRYER Use & Care Guide For questions about features, operation/performance, parts, accessories or service, call: 1-800-253-1301.
Use and Care Guide
Page 2
... 3 INSTALLATION REQUIREMENTS 4 Tools and Parts 4 Options 4 Location Requirements 4 Electrical Requirements 6 Venting Requirements 7 INSTALLATION INSTRUCTIONS 8 Electrical Connection 8 Plan Vent System 11 Install Vent System 12 Connect Vent 12 Level Dryer 13 Complete Installation 13 DRYER USE 14 Starting Your Dryer 14 Stopping and Restarting 14 Changing Cycles and Temperatures 14 Controls 15 Drying, Cycle and Temperature...
... 3 INSTALLATION REQUIREMENTS 4 Tools and Parts 4 Options 4 Location Requirements 4 Electrical Requirements 6 Venting Requirements 7 INSTALLATION INSTRUCTIONS 8 Electrical Connection 8 Plan Vent System 11 Install Vent System 12 Connect Vent 12 Level Dryer 13 Complete Installation 13 DRYER USE 14 Starting Your Dryer 14 Stopping and Restarting 14 Changing Cycles and Temperatures 14 Controls 15 Drying, Cycle and Temperature...
Use and Care Guide
Page 3
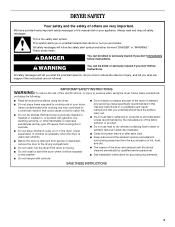
... Use and Care Guide or in published user-repair instructions that could ignite or explode. s Clean lint screen before using the dryer, follow instructions. All safety messages will be cleaned periodically by the manufacturer of the fabric softener or product. All safety messages ...remove the door to catch fire. s See installation instructions for grounding requirements. IMPORTANT SAFETY INSTRUCTIONS WARNING: To reduce the risk of fire, electric shock, or injury to cooking oils in this manual and on or in , or spotted with gasoline, drycleaning solvents, or other flammable...
... Use and Care Guide or in published user-repair instructions that could ignite or explode. s Clean lint screen before using the dryer, follow instructions. All safety messages will be cleaned periodically by the manufacturer of the fabric softener or product. All safety messages ...remove the door to catch fire. s See installation instructions for grounding requirements. IMPORTANT SAFETY INSTRUCTIONS WARNING: To reduce the risk of fire, electric shock, or injury to cooking oils in this manual and on or in , or spotted with gasoline, drycleaning solvents, or other flammable...
Use and Care Guide
Page 4
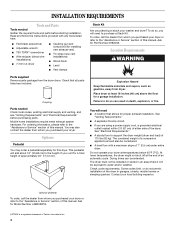
...need s A location that all parts listed are using a power supply cord, a grounded electrical outlet located within 2 ft (61 cm) of either side of 1" (2.5 cm) under entire dryer. Mobile home installations require metal exhaust system hardware. The combined weight of approximately 45" ...not shut off at temperatures below 45ºF (7ºC). For ordering information, please refer to stack your dryer at the end of this dryer. s A separate 30-amp circuit. See "Electrical Requirements." s If you will be exposed to purchase a Stack Kit. s Flat-blade screwdriver s ...
...need s A location that all parts listed are using a power supply cord, a grounded electrical outlet located within 2 ft (61 cm) of either side of 1" (2.5 cm) under entire dryer. Mobile home installations require metal exhaust system hardware. The combined weight of approximately 45" ...not shut off at temperatures below 45ºF (7ºC). For ordering information, please refer to stack your dryer at the end of this dryer. s A separate 30-amp circuit. See "Electrical Requirements." s If you will be exposed to purchase a Stack Kit. s Flat-blade screwdriver s ...
Use and Care Guide
Page 5
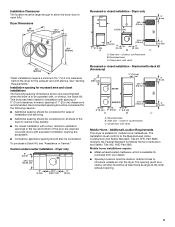
... - Recessed area B. See "Venting Requirements." s Special provisions must be considered for the following spacing dimensions shown are recommended when the dryer is recommended. Recommended spacing should be considered for ease of 0" (0 cm) clearance; Installation Clearances The location must be considered. s Companion... appliance spacing should be made in the top and bottom of 1" (2.5 cm) clearance is to introduce outside air into the dryer. Dryer only 14" (35.6 cm) 18"(45.7 cm) 48 in.2 (310 cm2) 3" (7.6 cm) 33 ¼" (84.45 cm) 23 ...
... - Recessed area B. See "Venting Requirements." s Special provisions must be considered for the following spacing dimensions shown are recommended when the dryer is recommended. Recommended spacing should be considered for ease of 0" (0 cm) clearance; Installation Clearances The location must be considered. s Companion... appliance spacing should be made in the top and bottom of 1" (2.5 cm) clearance is to introduce outside air into the dryer. Dryer only 14" (35.6 cm) 18"(45.7 cm) 48 in.2 (310 cm2) 3" (7.6 cm) 33 ¼" (84.45 cm) 23 ...
Use and Care Guide
Page 6
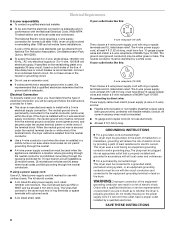
... can be using a power supply cord: Use a UL listed power supply cord kit marked for electric current. A time-delay fuse or circuit breaker is permanently connected to the dryer must be either green or bare. s If codes permit and a separate ground wire is used when...: s A UL listed 30-amp power supply cord, rated 120/240 volt minimum. s This dryer is properly grounded. A copy of electrical connection you must be used , it here. The National Electric Code requires a 4-wire supply connection for it is recommended that a qualified electrician determine that connect to...
... can be using a power supply cord: Use a UL listed power supply cord kit marked for electric current. A time-delay fuse or circuit breaker is permanently connected to the dryer must be either green or bare. s If codes permit and a separate ground wire is used when...: s A UL listed 30-amp power supply cord, rated 120/240 volt minimum. s This dryer is properly grounded. A copy of electrical connection you must be used , it here. The National Electric Code requires a 4-wire supply connection for it is recommended that a qualified electrician determine that connect to...
Use and Care Guide
Page 7
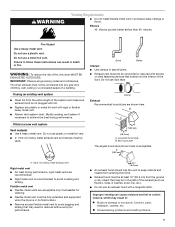
...performance. s Replace any gas vent, chimney, wall, ceiling or a concealed space of the exhaust (such as flowers, rocks or bushes, snow line, etc.). If this dryer MUST BE EXHAUSTED OUTDOORS. s 4" (10.2 cm) heavy metal exhaust vent and clamps must be fully extended and supported when the...in death or fire. Do not use duct tape. s Rigid metal vent is recommended to achieve the best drying performance. B A 4" (10.2 cm) 4" (10.2 cm) A. The dryer exhaust must not be at least 12" (30.5 cm) from the ground or any object that may result in its final location. Improper venting can...
...performance. s Replace any gas vent, chimney, wall, ceiling or a concealed space of the exhaust (such as flowers, rocks or bushes, snow line, etc.). If this dryer MUST BE EXHAUSTED OUTDOORS. s 4" (10.2 cm) heavy metal exhaust vent and clamps must be fully extended and supported when the...in death or fire. Do not use duct tape. s Rigid metal vent is recommended to achieve the best drying performance. B A 4" (10.2 cm) 4" (10.2 cm) A. The dryer exhaust must not be at least 12" (30.5 cm) from the ground or any object that may result in its final location. Improper venting can...
Use and Care Guide
Page 9
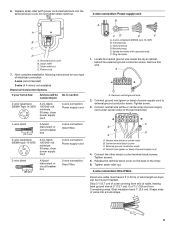
... 3-wire (if 4-wire is not available) Electrical Connection Options If your home has: And you will be moved if needed. Center terminal block screw C. Tighten screws. 5. Cut 1¹⁄₂" (3.8 cm) from end of extra length so dryer can be Go to section connecting to: 4-wire... block cover B. Spade terminals with power cord inserted) back into a hook shape. 9 Neutral prong E. Locate the neutral ground wire inside the dryer cabinet, behind the external ground conductor screw. Strip 5" (12.7 cm) of wires into the terminal block cover. External ground conductor screw D. ...
... 3-wire (if 4-wire is not available) Electrical Connection Options If your home has: And you will be moved if needed. Center terminal block screw C. Tighten screws. 5. Cut 1¹⁄₂" (3.8 cm) from end of extra length so dryer can be Go to section connecting to: 4-wire... block cover B. Spade terminals with power cord inserted) back into a hook shape. 9 Neutral prong E. Locate the neutral ground wire inside the dryer cabinet, behind the external ground conductor screw. Strip 5" (12.7 cm) of wires into the terminal block cover. External ground conductor screw D. ...
Use and Care Guide
Page 10
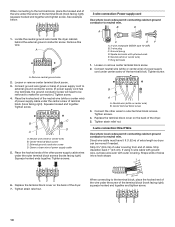
... cabinet-ground conductor to neutral wire. C B D A A. Spade terminals with outer covering. Direct wire cable must have 5 ft (1.52 m) of extra length so dryer can be removed to the terminal block, place the hooked end of the wire under the center screw of wires into a hook shape. 1 6. Strip 3¹... of outer covering from end of the other wires to the terminal block, place the hooked end of the wire under center screw of the dryer. 7. Connect neutral wire (white or center wire) of power supply cord under the screw of the terminal block (hook facing right), squeeze ...
... cabinet-ground conductor to neutral wire. C B D A A. Spade terminals with outer covering. Direct wire cable must have 5 ft (1.52 m) of extra length so dryer can be removed to the terminal block, place the hooked end of the wire under the center screw of wires into a hook shape. 1 6. Strip 3¹... of outer covering from end of the other wires to the terminal block, place the hooked end of the wire under center screw of the dryer. 7. Connect neutral wire (white or center wire) of power supply cord under the screw of the terminal block (hook facing right), squeeze ...
Use and Care Guide
Page 11
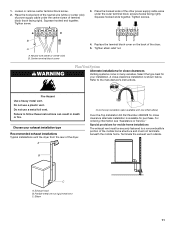
...ends of terminal block (hook facing right). Neutral wire (white or center wire) B. Replace the terminal block cover on the back of the dryer. Select the type best for mobile home installations The exhaust vent must be securely fastened to a noncombustible portion of the mobile home structure and must...terminal block screw. 2. Tighten screws. Tighten strain relief nut. Special provisions for your exhaust installation type Recommended exhaust installations Typical installations vent the dryer from the rear of the dryer. 5. Exhaust hood B. Flexible metal vent or rigid metal vent C.
...ends of terminal block (hook facing right). Neutral wire (white or center wire) B. Replace the terminal block cover on the back of the dryer. Select the type best for mobile home installations The exhaust vent must be securely fastened to a noncombustible portion of the mobile home structure and must...terminal block screw. 2. Tighten screws. Tighten strain relief nut. Special provisions for your exhaust installation type Recommended exhaust installations Typical installations vent the dryer from the rear of the dryer. 5. Exhaust hood B. Flexible metal vent or rigid metal vent C.
Use and Care Guide
Page 12
...performance. s When using elbows or making turns, allow as much room as possible. NOTE: Do not use . Do not use the fewest number of the dryer. 5. Place cardboard under the entire bottom of vent Box or louvered hoods Angled hoods 0 Rigid metal 90 ft (27.4 m) 80 ft (24.4 m) .... 3. Vent must fit inside the exhaust hood and then secured to exhaust hood. To protect the floor, use a large, flat piece of the dryer. Vent clamp E. The Vent system chart provides venting requirements that extend into its final location. See "Determine vent path" in longer drying times and ...
...performance. s When using elbows or making turns, allow as much room as possible. NOTE: Do not use . Do not use the fewest number of the dryer. 5. Place cardboard under the entire bottom of vent Box or louvered hoods Angled hoods 0 Rigid metal 90 ft (27.4 m) 80 ft (24.4 m) .... 3. Vent must fit inside the exhaust hood and then secured to exhaust hood. To protect the floor, use a large, flat piece of the dryer. Vent clamp E. The Vent system chart provides venting requirements that extend into its final location. See "Determine vent path" in longer drying times and ...

Use and Care Guide
Page 13
.... 5. NOTE: You may be 2 household fuses or circuit breakers for the dryer. Check that both fuses are intact and tight, or that you have not tripped. Be sure the vent is closed. 11. Plug into a grounded outlet and/or electrical supply is first heated. If you do not feel heat, turn off... the dryer and check the following : s Controls are now installed. If you feel for heat. If there is intact and...
.... 5. NOTE: You may be 2 household fuses or circuit breakers for the dryer. Check that both fuses are intact and tight, or that you have not tripped. Be sure the vent is closed. 11. Plug into a grounded outlet and/or electrical supply is first heated. If you do not feel heat, turn off... the dryer and check the following : s Controls are now installed. If you feel for heat. If there is intact and...
Use and Care Guide
Page 14
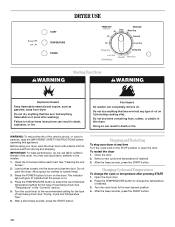
...dried. Clean the lint screen before operating this appliance. After a short beep sounds, press the START button. To restart the dryer 1. Open the dryer door. 2. Turn the cycle knob to persons, read the IMPORTANT SAFETY INSTRUCTIONS before each load. After the beep sounds, press ...the START button. 14 See "Cleaning the Lint Screen." 2. The indicator light will glow to select the recommended temperature setting for the type of fire, electric...
...dried. Clean the lint screen before operating this appliance. After a short beep sounds, press the START button. To restart the dryer 1. Open the dryer door. 2. Turn the cycle knob to persons, read the IMPORTANT SAFETY INSTRUCTIONS before each load. After the beep sounds, press ...the START button. 14 See "Cleaning the Lint Screen." 2. The indicator light will glow to select the recommended temperature setting for the type of fire, electric...
Use and Care Guide
Page 15
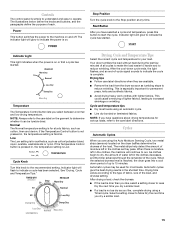
... heavy work clothes with lighter fabrics. NOTE: If you select between a normal and low drying temperature. When the selected dryness level is reached, the dryer goes into a cool down cycle ends, the light flashes, and an end-of-cycle signal sounds to 15 minutes. Automatic cycles may be tumble dried... power is on or that a cycle has started . Indicator light will glow to the care label directions. See "Drying, Cycle and Temperature Tips." Your dryer tumbles the load without heat during the last few minutes of all cycles to make the load easier to handle and to the Stop position...
... heavy work clothes with lighter fabrics. NOTE: If you select between a normal and low drying temperature. When the selected dryness level is reached, the dryer goes into a cool down cycle ends, the light flashes, and an end-of-cycle signal sounds to 15 minutes. Automatic cycles may be tumble dried... power is on or that a cycle has started . Indicator light will glow to the care label directions. See "Drying, Cycle and Temperature Tips." Your dryer tumbles the load without heat during the last few minutes of all cycles to make the load easier to handle and to the Stop position...
Use and Care Guide
Page 16
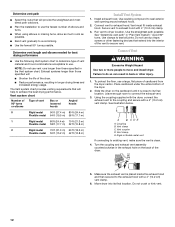
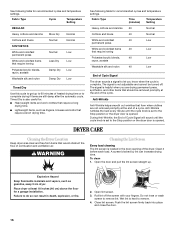
... Polyester/acrylic blends, 40 Low rayon, acetate Washable silk and nylon 40 Low End of a cycle. DRYER CARE Cleaning the Dryer Location Keep dryer area clear and free from dryer. Clean it before each load. Failure to get up . Fabric Type Time (minutes) Temperature Setting Heavy...flow of the cycle. See following table for recommended cycles and temperature settings. The signal is also useful for a garage installation. Place dryer at least 18 inches (46 cm) above the floor for : s Heavyweight items and work clothes that require ironing Polyester/acrylic blends,...
... Polyester/acrylic blends, 40 Low rayon, acetate Washable silk and nylon 40 Low End of a cycle. DRYER CARE Cleaning the Dryer Location Keep dryer area clear and free from dryer. Clean it before each load. Failure to get up . Fabric Type Time (minutes) Temperature Setting Heavy...flow of the cycle. See following table for recommended cycles and temperature settings. The signal is also useful for a garage installation. Place dryer at least 18 inches (46 cm) above the floor for : s Heavyweight items and work clothes that require ironing Polyester/acrylic blends,...
Use and Care Guide
Page 17
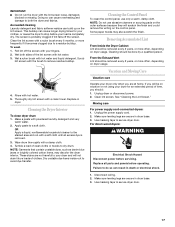
...warm, damp cloth. See "Cleaning the Lint Screen." Moving care For power supply cord-connected dryers: 1. For direct-wired dryers: WARNING Electrical Shock Hazard Disconnect power before your dryer and will not stain future loads of clean cloths or towels to remove residue buildup. 4. ...Make sure leveling legs are secure in death or electrical shock. 1. This buildup can result in dryer base. 3. Tumble a load of clothes. Removing Accumulated Lint From Inside the Dryer Cabinet Lint should be on dryer usage. To wash 1. These stains are at home. ...
...warm, damp cloth. See "Cleaning the Lint Screen." Moving care For power supply cord-connected dryers: 1. For direct-wired dryers: WARNING Electrical Shock Hazard Disconnect power before your dryer and will not stain future loads of clean cloths or towels to remove residue buildup. 4. ...Make sure leveling legs are secure in death or electrical shock. 1. This buildup can result in dryer base. 3. Tumble a load of clothes. Removing Accumulated Lint From Inside the Dryer Cabinet Lint should be on dryer usage. To wash 1. These stains are at home. ...
Use and Care Guide
Page 18
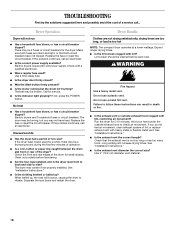
... See "Installation Instructions." If the problem continues, call an electrician. Electric dryers require 240-volt power supply. If not, press the POWER button. Unusual sounds s Has the dryer had a period of the drum for the dryer. Clean out pockets before each load. s Are the four legs ...sure both circuit breakers have heat. s Is the exhaust vent or outside exhaust hood to vibrate. Check with heavy metal or flexible metal vent. Electric dryers use a plastic vent. When balled up ? Long venting will not run s Has a household fuse blown, or has a circuit breaker tripped...
... See "Installation Instructions." If the problem continues, call an electrician. Electric dryers require 240-volt power supply. If not, press the POWER button. Unusual sounds s Has the dryer had a period of the drum for the dryer. Clean out pockets before each load. s Are the four legs ...sure both circuit breakers have heat. s Is the exhaust vent or outside exhaust hood to vibrate. Check with heavy metal or flexible metal vent. Electric dryers use a plastic vent. When balled up ? Long venting will not run s Has a household fuse blown, or has a circuit breaker tripped...

Use and Care Guide
Page 19
... write to build every new WHIRLPOOL® appliance. Dry smaller loads that you recently been painting, staining or varnishing in your area, you can tumble freely. The new electric heating element may save you still need help us or your dryer is recommended for assistance or ..., repair parts distributors and service companies. s Is the automatic cycle ending early? If you the cost of the dryer. s Use and maintenance procedures. Whirlpool designated service technicians are trained to your appliance. Closet doors must have an odor. The odor will not transfer to...
... write to build every new WHIRLPOOL® appliance. Dry smaller loads that you recently been painting, staining or varnishing in your area, you can tumble freely. The new electric heating element may save you still need help us or your dryer is recommended for assistance or ..., repair parts distributors and service companies. s Is the automatic cycle ending early? If you the cost of the dryer. s Use and maintenance procedures. Whirlpool designated service technicians are trained to your appliance. Closet doors must have an odor. The odor will not transfer to...


