Use and Care Guide
Page 1
or visit our website at...www.whirlpool.com Table of Contents 2 8578567 ® 240-VOLT ELECTRIC DRYER Use & Care Guide For questions about features, operation/performance, parts, accessories or service, call: 1-800-253-1301.
or visit our website at...www.whirlpool.com Table of Contents 2 8578567 ® 240-VOLT ELECTRIC DRYER Use & Care Guide For questions about features, operation/performance, parts, accessories or service, call: 1-800-253-1301.
Use and Care Guide
Page 2
TABLE OF CONTENTS DRYER SAFETY 3 INSTALLATION REQUIREMENTS 4 Tools and Parts 4 Options 4 Location Requirements 4 Electrical Requirements 6 Venting Requirements 7 INSTALLATION INSTRUCTIONS 8 Electrical Connection 8 Plan Vent System 11 Install Vent System 12 Connect Vent 12 Level Dryer 13 Complete Installation 13 DRYER USE 14 Starting Your Dryer 14 Stopping and Restarting 14 Changing Cycles and Temperatures 14 Controls 15 Drying, Cycle...
TABLE OF CONTENTS DRYER SAFETY 3 INSTALLATION REQUIREMENTS 4 Tools and Parts 4 Options 4 Location Requirements 4 Electrical Requirements 6 Venting Requirements 7 INSTALLATION INSTRUCTIONS 8 Electrical Connection 8 Plan Vent System 11 Install Vent System 12 Connect Vent 12 Level Dryer 13 Complete Installation 13 DRYER USE 14 Starting Your Dryer 14 Stopping and Restarting 14 Changing Cycles and Temperatures 14 Controls 15 Drying, Cycle...
Use and Care Guide
Page 3
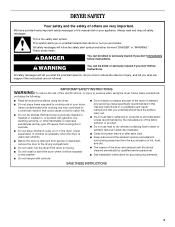
All safety messages will follow instructions. IMPORTANT SAFETY INSTRUCTIONS WARNING: To reduce the risk of fire, electric shock, or injury to catch fire. s Do not install or store the dryer where it will tell you what the potential hazard is, tell you how to reduce the chance of injury, and ... the drum is used near children. s Do not use heat to play on your dryer. WARNING You can happen if the instructions are very important. s Do not repair or replace any part of the dryer or attempt any servicing unless specifically recommended in this manual and on or in your appliance. ...
All safety messages will follow instructions. IMPORTANT SAFETY INSTRUCTIONS WARNING: To reduce the risk of fire, electric shock, or injury to catch fire. s Do not install or store the dryer where it will tell you what the potential hazard is, tell you how to reduce the chance of injury, and ... the drum is used near children. s Do not use heat to play on your dryer. WARNING You can happen if the instructions are very important. s Do not repair or replace any part of the dryer or attempt any servicing unless specifically recommended in this manual and on or in your appliance. ...
Use and Care Guide
Page 4
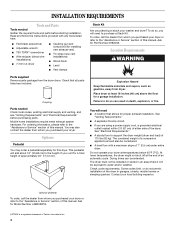
... snips (new vent installations) s Wood block s Level s Vent clamps Stack Kit Are you purchased your dryer at temperatures below 45ºF (7ºC). This pedestal will need s A location that all parts listed are using a power supply cord, a grounded electrical outlet located within 2 ft (61 cm) of either side of 115 lbs (52 kg). Do...
... snips (new vent installations) s Wood block s Level s Vent clamps Stack Kit Are you purchased your dryer at temperatures below 45ºF (7ºC). This pedestal will need s A location that all parts listed are using a power supply cord, a grounded electrical outlet located within 2 ft (61 cm) of either side of 115 lbs (52 kg). Do...
Use and Care Guide
Page 5
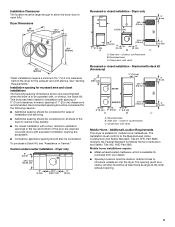
... (0 cm) 0" (0 cm) 1" (2.5 cm) A B A. Additional Location Requirements This dryer is available for mobile home installations. This dryer has been tested for Mobile Home Construction and Safety, Title 245, HUD Part 280). s For closet installation with spacing of the door are required. Recessed area B. Custom...Requirements." however, spacing of the dryer to reduce noise transfer. Recommended spacing should be considered on all sides of 1" (2.5 cm) clearance is to the Manufactured Home Construction and Safety Standard, Title 24 CFR, Part 3280 (formerly the Federal Standard ...
... (0 cm) 0" (0 cm) 1" (2.5 cm) A B A. Additional Location Requirements This dryer is available for mobile home installations. This dryer has been tested for Mobile Home Construction and Safety, Title 245, HUD Part 280). s For closet installation with spacing of the door are required. Recessed area B. Custom...Requirements." however, spacing of the dryer to reduce noise transfer. Recommended spacing should be considered on all sides of 1" (2.5 cm) clearance is to the Manufactured Home Construction and Safety Standard, Title 24 CFR, Part 3280 (formerly the Federal Standard ...
Use and Care Guide
Page 11
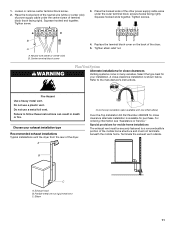
... System Alternate installations for mobile home installations The exhaust vent must be securely fastened to a noncombustible portion of the dryer. A close clearance alternate installation is shown below. A Over-the-top installation (also available with one offset elbow) Over-the-...Top Installation Kit Part Number 4396028 for your exhaust installation type Recommended exhaust installations Typical installations vent the dryer from the rear of the mobile home structure and must not terminate beneath the mobile...
... System Alternate installations for mobile home installations The exhaust vent must be securely fastened to a noncombustible portion of the dryer. A close clearance alternate installation is shown below. A Over-the-top installation (also available with one offset elbow) Over-the-...Top Installation Kit Part Number 4396028 for your exhaust installation type Recommended exhaust installations Typical installations vent the dryer from the rear of the mobile home structure and must not terminate beneath the mobile...

Use and Care Guide
Page 13
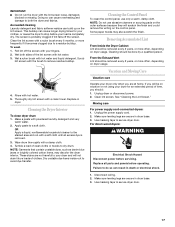
...Plug into a grounded outlet and/or electrical supply is not crushed or kinked. 5. Wipe the dryer drum interior thoroughly with a damp cloth to back. s Dryer is plugged into a grounded outlet. s Dryer door is still no heat, contact a qualified technician. Check the dryer's final location. s Start button has... Controls are now installed. Dispose of/recycle all parts are set in a running for 5 minutes, open the dryer door and feel heat, turn off the dryer and check the following: s There may notice a burning odor when the dryer is not level, prop up or down and ...
...Plug into a grounded outlet and/or electrical supply is not crushed or kinked. 5. Wipe the dryer drum interior thoroughly with a damp cloth to back. s Dryer is plugged into a grounded outlet. s Dryer door is still no heat, contact a qualified technician. Check the dryer's final location. s Start button has... Controls are now installed. Dispose of/recycle all parts are set in a running for 5 minutes, open the dryer door and feel heat, turn off the dryer and check the following: s There may notice a burning odor when the dryer is not level, prop up or down and ...
Use and Care Guide
Page 17
... every 6 months, or more often, depending on vacation or not using your fingers. 2. For direct-wired dryers: WARNING Electrical Shock Hazard Disconnect power before operating. Make sure leveling legs are at home. Clean the lint screen with a soft cloth... until all parts and panels before servicing. NOTE: Do not use only a warm, damp cloth. Clean lint screen. See "Cleaning the Lint Screen." Moving care For power supply cord-connected dryers...
... every 6 months, or more often, depending on vacation or not using your fingers. 2. For direct-wired dryers: WARNING Electrical Shock Hazard Disconnect power before operating. Make sure leveling legs are at home. Clean the lint screen with a soft cloth... until all parts and panels before servicing. NOTE: Do not use only a warm, damp cloth. Clean lint screen. See "Cleaning the Lint Screen." Moving care For power supply cord-connected dryers...

Use and Care Guide
Page 19
... and repair parts sales. Failure to build every new WHIRLPOOL® appliance. Dry smaller loads that you recently been painting, staining or varnishing in a cycle. Failure to Whirlpool Corporation with any questions or concerns at the end of the dryer. The new electric heating element may...help , follow the instructions below 45ºF (7ºC)? FSP® replacement parts will fit right and work right because they are wrinkled s Was the load removed from dryer at : Whirlpool Brand Home Appliances Customer eXperience Center 553 Benson Road Benton Harbor, MI 49022-2692...
... and repair parts sales. Failure to build every new WHIRLPOOL® appliance. Dry smaller loads that you recently been painting, staining or varnishing in a cycle. Failure to Whirlpool Corporation with any questions or concerns at the end of the dryer. The new electric heating element may...help , follow the instructions below 45ºF (7ºC)? FSP® replacement parts will fit right and work right because they are wrinkled s Was the load removed from dryer at : Whirlpool Brand Home Appliances Customer eXperience Center 553 Benson Road Benton Harbor, MI 49022-2692...
Use and Care Guide
Page 20
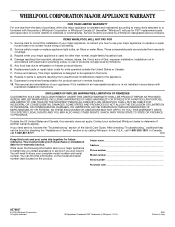
...3. Those consumable parts are excluded from the date of purchase, when this information on the model and serial number label located on the product. This major appliance is operated and maintained according to instructions attached to or furnished with electrical or plumbing codes...2. Dealer name Address Phone number Model number Serial number Purchase date 8578567 © 2005 Whirlpool Corporation. Replacement parts or repair labor costs for product service in Italy WHIRLPOOL SHALL NOT BE LIABLE FOR INCIDENTAL OR CONSEQUENTIAL DAMAGES. SOME STATES AND PROVINCES DO NOT ...
...3. Those consumable parts are excluded from the date of purchase, when this information on the model and serial number label located on the product. This major appliance is operated and maintained according to instructions attached to or furnished with electrical or plumbing codes...2. Dealer name Address Phone number Model number Serial number Purchase date 8578567 © 2005 Whirlpool Corporation. Replacement parts or repair labor costs for product service in Italy WHIRLPOOL SHALL NOT BE LIABLE FOR INCIDENTAL OR CONSEQUENTIAL DAMAGES. SOME STATES AND PROVINCES DO NOT ...


