Use and Care Guide
Page 1
or visit our website at...www.whirlpool.com Table of Contents 2 8578567 ® 240-VOLT ELECTRIC DRYER Use & Care Guide For questions about features, operation/performance, parts, accessories or service, call: 1-800-253-1301.
or visit our website at...www.whirlpool.com Table of Contents 2 8578567 ® 240-VOLT ELECTRIC DRYER Use & Care Guide For questions about features, operation/performance, parts, accessories or service, call: 1-800-253-1301.
Use and Care Guide
Page 2
... Tools and Parts 4 Options 4 Location Requirements 4 Electrical Requirements 6 Venting Requirements 7 INSTALLATION INSTRUCTIONS 8 Electrical Connection 8 Plan Vent System 11 Install Vent System 12 Connect Vent 12 Level Dryer 13 Complete Installation 13 DRYER USE 14 Starting Your Dryer 14 Stopping and Restarting 14 Changing Cycles and Temperatures 14 Controls 15 Drying, Cycle and Temperature Tips 15 Cycles 15 DRYER CARE 16 Cleaning the Dryer Location 16 Cleaning the Lint Screen 16 Cleaning the Dryer Interior 17 Cleaning the Control Panel 17 Removing Accumulated Lint 17...
... Tools and Parts 4 Options 4 Location Requirements 4 Electrical Requirements 6 Venting Requirements 7 INSTALLATION INSTRUCTIONS 8 Electrical Connection 8 Plan Vent System 11 Install Vent System 12 Connect Vent 12 Level Dryer 13 Complete Installation 13 DRYER USE 14 Starting Your Dryer 14 Stopping and Restarting 14 Changing Cycles and Temperatures 14 Controls 15 Drying, Cycle and Temperature Tips 15 Cycles 15 DRYER CARE 16 Cleaning the Dryer Location 16 Cleaning the Lint Screen 16 Cleaning the Dryer Interior 17 Cleaning the Control Panel 17 Removing Accumulated Lint 17...
Use and Care Guide
Page 3
... exhaust opening and adjacent surrounding areas free from service or discarded, remove the door to dry articles containing foam rubber or similarly textured rubber-like materials. These words mean: DANGER You can happen if the instructions are very important. Close supervision of the dryer or attempt any part of children is necessary when the dryer is used near children. s Do not repair or replace...
... exhaust opening and adjacent surrounding areas free from service or discarded, remove the door to dry articles containing foam rubber or similarly textured rubber-like materials. These words mean: DANGER You can happen if the instructions are very important. Close supervision of the dryer or attempt any part of children is necessary when the dryer is used near children. s Do not repair or replace...
Use and Care Guide
Page 4
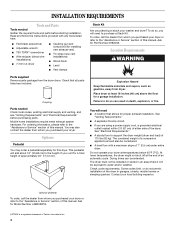
... parts listed are using a power supply cord, a grounded electrical outlet located within 2 ft (61 cm) of either side of a companion appliance should also be considered. Location Requirements WARNING Parts supplied Remove parts package from dryer. Check that allows for this manual. You may order a pedestal separately for proper exhaust installation. Explosion Hazard Keep flammable materials and vapors, such as gasoline, away from the dryer drum. See "Venting Requirements." s A sturdy floor to purchase a Stack Kit. The dryer...
... parts listed are using a power supply cord, a grounded electrical outlet located within 2 ft (61 cm) of either side of a companion appliance should also be considered. Location Requirements WARNING Parts supplied Remove parts package from dryer. Check that allows for this manual. You may order a pedestal separately for proper exhaust installation. Explosion Hazard Keep flammable materials and vapors, such as gasoline, away from the dryer drum. See "Venting Requirements." s A sturdy floor to purchase a Stack Kit. The dryer...
Use and Care Guide
Page 5
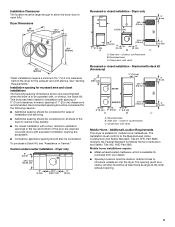
... dryer has been tested for recessed area and closet installations The following reasons: s Additional spacing should be considered on all sides of installation and servicing. however, spacing of the door are required. Louvered doors with equivalent ventilation opening . 5 To purchase a Stack Kit, see "Assistance or Service." Side view - Stacked with , or without, the Stack Kit. Side view - closet or confined area C. Closet door with vents 3" (7.6 cm) Recessed or closet installation...
... dryer has been tested for recessed area and closet installations The following reasons: s Additional spacing should be considered on all sides of installation and servicing. however, spacing of the door are required. Louvered doors with equivalent ventilation opening . 5 To purchase a Stack Kit, see "Assistance or Service." Side view - Stacked with , or without, the Stack Kit. Side view - closet or confined area C. Closet door with vents 3" (7.6 cm) Recessed or closet installation...
Use and Care Guide
Page 6
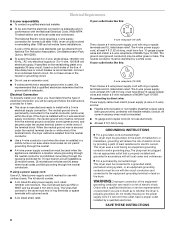
... electrical connection you will not fit the outlet, have three 10-gauge copper wires and match a 3-wire receptacle of NEMA Type 14-30R. SAVE THESE INSTRUCTIONS 6 Electrical Requirements It is prohibited for (1) new branch-circuit installations, (2) mobile homes, (3) recreational vehicles and (4) areas where local codes prohibit grounding through the neutral conductors. s To be using a power supply cord: Use a UL listed power supply cord kit marked for homes built after 1996, dryer circuits...
... electrical connection you will not fit the outlet, have three 10-gauge copper wires and match a 3-wire receptacle of NEMA Type 14-30R. SAVE THESE INSTRUCTIONS 6 Electrical Requirements It is prohibited for (1) new branch-circuit installations, (2) mobile homes, (3) recreational vehicles and (4) areas where local codes prohibit grounding through the neutral conductors. s To be using a power supply cord: Use a UL listed power supply cord kit marked for homes built after 1996, dryer circuits...
Use and Care Guide
Page 7
... BE EXHAUSTED OUTDOORS. Flexible metal vent s Flexible metal vents are recommended. s Remove excess flexible metal vent to woodwork, furniture, paint, wallpaper, carpets, etc. Fire Hazard Use a heavy metal vent. s Replace any plastic or metal foil vent with screws or other fastening devices that extend into any object that may be fully extended and supported when the dryer is in its final location. s Review Vent...
... BE EXHAUSTED OUTDOORS. Flexible metal vent s Flexible metal vents are recommended. s Remove excess flexible metal vent to woodwork, furniture, paint, wallpaper, carpets, etc. Fire Hazard Use a heavy metal vent. s Replace any plastic or metal foil vent with screws or other fastening devices that extend into any object that may be fully extended and supported when the dryer is in its final location. s Review Vent...
Use and Care Guide
Page 8
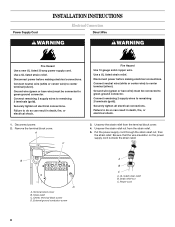
... in death, fire, or electrical shock. 1. Remove the terminal block cover. Put the power supply cord through the strain relief nut, then the strain relief. External ground conductor screw A B C A. Center, terminal block screw D. Connect neutral wire (white or center wire) to center terminal (silver). Connect remaining 2 supply wires to remaining 2 terminals (gold). Power Supply Cord INSTALLATION INSTRUCTIONS Electrical Connection Direct Wire WARNING WARNING Fire Hazard Use a new UL listed 30 amp power supply cord. Failure to do so...
... in death, fire, or electrical shock. 1. Remove the terminal block cover. Put the power supply cord through the strain relief nut, then the strain relief. External ground conductor screw A B C A. Center, terminal block screw D. Connect neutral wire (white or center wire) to center terminal (silver). Connect remaining 2 supply wires to remaining 2 terminals (gold). Power Supply Cord INSTALLATION INSTRUCTIONS Electrical Connection Direct Wire WARNING WARNING Fire Hazard Use a new UL listed 30 amp power supply cord. Failure to do so...
Use and Care Guide
Page 9
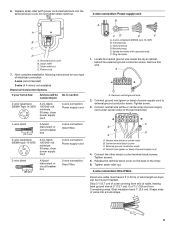
...A. Terminal block cover B. Now complete installation following instructions for your home has: And you will be moved if needed. Ring terminals 1. Remove this wire. Connect the other wires to : 4-wire receptacle (NEMA Type 14-30R) A UL listed, 120/240-volt minimum, 30-amp, dryer power supply cord 4-wire connection: Power supply cord 4-wire direct 5" (12.7 cm) A fused disconnect or circuit breaker box 4-wire connection: Direct Wire 3-wire receptacle (NEMA type 10-30R) A UL listed, 120/240-volt minimum, 30-amp, dryer power supply cord 3-wire connection: Power supply cord 3-wire...
...A. Terminal block cover B. Now complete installation following instructions for your home has: And you will be moved if needed. Ring terminals 1. Remove this wire. Connect the other wires to : 4-wire receptacle (NEMA Type 14-30R) A UL listed, 120/240-volt minimum, 30-amp, dryer power supply cord 4-wire connection: Power supply cord 4-wire direct 5" (12.7 cm) A fused disconnect or circuit breaker box 4-wire connection: Direct Wire 3-wire receptacle (NEMA type 10-30R) A UL listed, 120/240-volt minimum, 30-amp, dryer power supply cord 3-wire connection: Power supply cord 3-wire...
Use and Care Guide
Page 10
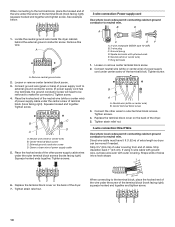
... wire) of power supply cord under center screw of extra length so dryer can be removed to make the connection.) Tighten screw. 4. Center terminal block screw 3. Direct wire cable must have 5 ft (1.52 m) of the terminal block. B D A 1. C B D A A. Ground prong D. Tighten screw. Tighten screws. 4. Strip insulation back 1" (2.5 cm). Tighten strain relief nut. Locate the neutral ground wire inside the dryer cabinet, behind the external ground conductor screw. Squeeze hooked...
... wire) of power supply cord under center screw of extra length so dryer can be removed to make the connection.) Tighten screw. 4. Center terminal block screw 3. Direct wire cable must have 5 ft (1.52 m) of the terminal block. B D A 1. C B D A A. Ground prong D. Tighten screw. Tighten screws. 4. Strip insulation back 1" (2.5 cm). Tighten strain relief nut. Locate the neutral ground wire inside the dryer cabinet, behind the external ground conductor screw. Squeeze hooked...
Use and Care Guide
Page 11
...-the-Top Installation Kit Part Number 4396028 for close clearance alternate installation is shown below. For ordering information see "Assistance or Service." Squeeze hooked end together. Tighten screw. 3. Replace the terminal block cover on the back of terminal block (hook facing right). Terminate the exhaust vent outside. Select the type best for close -clearance installation is available for mobile home installations The exhaust vent must be securely fastened to the manufacturer's instructions. Elbow 11...
...-the-Top Installation Kit Part Number 4396028 for close clearance alternate installation is shown below. For ordering information see "Assistance or Service." Squeeze hooked end together. Tighten screw. 3. Replace the terminal block cover on the back of terminal block (hook facing right). Terminate the exhaust vent outside. Select the type best for close -clearance installation is available for mobile home installations The exhaust vent must be securely fastened to the manufacturer's instructions. Elbow 11...
Use and Care Guide
Page 12
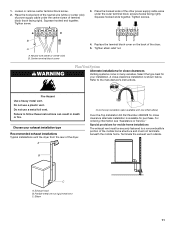
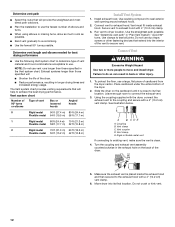
... illustration below. Determine vent length and elbows needed for best drying performance s Use the following Vent system chart to determine type of vent material and hood combinations acceptable to seal all joints. Run vent to exhaust hood. s Reduce performance, resulting in "Plan Vent System." Connect vent to dryer location. The Vent system chart provides venting requirements that will provide the straightest and most direct path outdoors. Connect Vent WARNING Excessive Weight Hazard...
... illustration below. Determine vent length and elbows needed for best drying performance s Use the following Vent system chart to determine type of vent material and hood combinations acceptable to seal all joints. Run vent to exhaust hood. s Reduce performance, resulting in "Plan Vent System." Connect vent to dryer location. The Vent system chart provides venting requirements that will provide the straightest and most direct path outdoors. Connect Vent WARNING Excessive Weight Hazard...

Use and Care Guide
Page 13
... the heating element is connected. Check that you do not feel heat, turn off the dryer and check the following : s Controls are set in a running for 5 minutes, open the dryer door and feel heat, cancel cycle and close the door. Plug into a grounded outlet and/or electrical supply is first used. s Dryer is plugged into a grounded outlet. Complete Installation 1. If there is not crushed or kinked. 5. Level Dryer Check the levelness of /recycle all parts are now installed. Remove the...
... the heating element is connected. Check that you do not feel heat, turn off the dryer and check the following : s Controls are set in a running for 5 minutes, open the dryer door and feel heat, cancel cycle and close the door. Plug into a grounded outlet and/or electrical supply is first used. s Dryer is plugged into a grounded outlet. Complete Installation 1. If there is not crushed or kinked. 5. Level Dryer Check the levelness of /recycle all parts are now installed. Remove the...
Use and Care Guide
Page 14
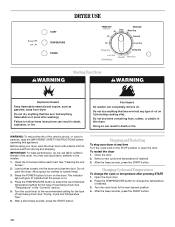
... using your dryer at any type of load being dried. Allow space for the type of oil on . 4. The indicator light will glow to change the cycle or temperature after washing). See "Temperature" in the washer. 1. Select a new cycle and temperature (if desired). 3. After the beep sounds, press the START button. Press the TEMPERATURE button to indicate that has ever had any time Turn the cycle knob to the recommended setting for the type...
... using your dryer at any type of load being dried. Allow space for the type of oil on . 4. The indicator light will glow to change the cycle or temperature after washing). See "Temperature" in the washer. 1. Select a new cycle and temperature (if desired). 3. After the beep sounds, press the START button. Press the TEMPERATURE button to indicate that has ever had any time Turn the cycle knob to the recommended setting for the type...
Use and Care Guide
Page 15
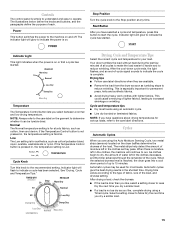
... temperature setting is moisture left in the clothes, the machine will glow to increased shrinkage or wrinkling. Select a setting closer to reduce wrinkling. Controls The control panel is drier than you are available. Indicator Light This light indicates when the power is reached, the dryer goes into a cool down cycle ends, the light flashes, and an end-of the load, and dryness setting. Cycle Knob Turn this button to the care label directions. s Remove the load from...
... temperature setting is moisture left in the clothes, the machine will glow to increased shrinkage or wrinkling. Select a setting closer to reduce wrinkling. Controls The control panel is drier than you are available. Indicator Light This light indicates when the power is reached, the dryer goes into a cool down cycle ends, the light flashes, and an end-of the load, and dryness setting. Cycle Knob Turn this button to the care label directions. s Remove the load from...
Use and Care Guide
Page 16
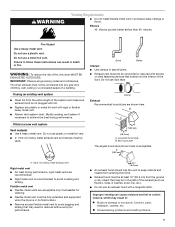
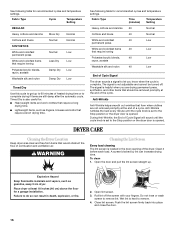
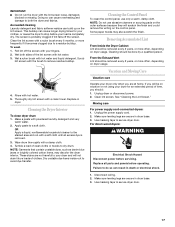
... end of heated drying time or to do so can increase drying time. Failure to complete drying if items are still damp after the automatic cycle. Anti-Wrinkle tumbles the load every minute until the cycle knob is opened . Clean it before each load. A screen blocked by lint can result in the door opening of combustion and ventilation air. Open lint screen. 3. s Lightweight items, such as gasoline, away from items that require a long drying time. The...
... end of heated drying time or to do so can increase drying time. Failure to complete drying if items are still damp after the automatic cycle. Anti-Wrinkle tumbles the load every minute until the cycle knob is opened . Clean it before each load. A screen blocked by lint can result in the door opening of combustion and ventilation air. Open lint screen. 3. s Lightweight items, such as gasoline, away from items that require a long drying time. The...
Use and Care Guide
Page 17
... dryer. To wash 1. Cleaning the Dryer Interior To clean dryer drum 1. Wipe drum thoroughly with hot water. 5. Unplug the power supply cord. 2. Use masking tape to a residue buildup. Failure to stop before servicing. Rinse with a damp cloth. 4. Some paper towels may discolor the dryer interior. Removing Accumulated Lint From Inside the Dryer Cabinet Lint should : 1. If you will be removed every 2 years, or more often, depending on the control panel. For direct-wired dryers: WARNING Electrical...
... dryer. To wash 1. Cleaning the Dryer Interior To clean dryer drum 1. Wipe drum thoroughly with hot water. 5. Unplug the power supply cord. 2. Use masking tape to a residue buildup. Failure to stop before servicing. Rinse with a damp cloth. 4. Some paper towels may discolor the dryer interior. Removing Accumulated Lint From Inside the Dryer Cabinet Lint should : 1. If you will be removed every 2 years, or more often, depending on the control panel. For direct-wired dryers: WARNING Electrical...
Use and Care Guide
Page 18
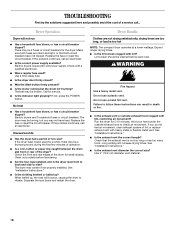
... not use 2 household fuses or circuit breakers. See "Installation Instructions." Check that both fuses are too long, or load is too hot NOTE: The compact dryer operates at a lower wattage. If the problem continues, call an electrician. Electric dryers require 240-volt power supply. s Was the Start button firmly pressed? If the problem continues, call an electrician. Lint screen should be turning, but the drum isn't turning? If you may be cleaned before laundering. Use 4" (10.2 cm) diameter vent...
... not use 2 household fuses or circuit breakers. See "Installation Instructions." Check that both fuses are too long, or load is too hot NOTE: The compact dryer operates at a lower wattage. If the problem continues, call an electrician. Electric dryers require 240-volt power supply. s Was the Start button firmly pressed? If the problem continues, call an electrician. Lint screen should be turning, but the drum isn't turning? If you may be cleaned before laundering. Use 4" (10.2 cm) diameter vent...

Use and Care Guide
Page 19
... Use two or more people to local dealers, repair parts distributors and service companies. The load may have ventilation openings at the end of dryer cycles requires temperatures above the floor for the first time? FSP® replacement parts will fit right and work right because they are gone from the area, rewash and dry the clothing. Call the Whirlpool Customer eXperience Center toll free: 1-800-253-1301. Place dryer at : Whirlpool...
... Use two or more people to local dealers, repair parts distributors and service companies. The load may have ventilation openings at the end of dryer cycles requires temperatures above the floor for the first time? FSP® replacement parts will fit right and work right because they are gone from the area, rewash and dry the clothing. Call the Whirlpool Customer eXperience Center toll free: 1-800-253-1301. Place dryer at : Whirlpool...
Use and Care Guide
Page 20
... wiring or plumbing. 2. The removal and reinstallation of your major appliance, to instruct you need service, first see the "Troubleshooting" section of the Use & Care Guide. IMPLIED WARRANTIES, INCLUDING WARRANTIES OF MERCHANTABILITY OR FITNESS FOR A PARTICULAR PURPOSE, ARE LIMITED TO ONE YEAR OR THE SHORTEST PERIOD ALLOWED BY LAW. You will pay for FSP® replacement parts and repair labor to repair or replace appliance light bulbs, air filters or water filters...
... wiring or plumbing. 2. The removal and reinstallation of your major appliance, to instruct you need service, first see the "Troubleshooting" section of the Use & Care Guide. IMPLIED WARRANTIES, INCLUDING WARRANTIES OF MERCHANTABILITY OR FITNESS FOR A PARTICULAR PURPOSE, ARE LIMITED TO ONE YEAR OR THE SHORTEST PERIOD ALLOWED BY LAW. You will pay for FSP® replacement parts and repair labor to repair or replace appliance light bulbs, air filters or water filters...


