Use and Care Guide
Page 1
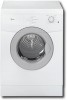
or visit our website at...www.whirlpool.com Table of Contents 2 8578567 ® 240-VOLT ELECTRIC DRYER Use & Care Guide For questions about features, operation/performance, parts, accessories or service, call: 1-800-253-1301.
or visit our website at...www.whirlpool.com Table of Contents 2 8578567 ® 240-VOLT ELECTRIC DRYER Use & Care Guide For questions about features, operation/performance, parts, accessories or service, call: 1-800-253-1301.
Use and Care Guide
Page 2
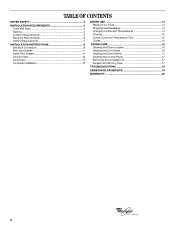
... 3 INSTALLATION REQUIREMENTS 4 Tools and Parts 4 Options 4 Location Requirements 4 Electrical Requirements 6 Venting Requirements 7 INSTALLATION INSTRUCTIONS 8 Electrical Connection 8 Plan Vent System 11 Install Vent System 12 Connect Vent 12 Level Dryer 13 Complete Installation 13 DRYER USE 14 Starting Your Dryer 14 Stopping and Restarting 14 Changing Cycles and Temperatures 14 Controls 15 Drying, Cycle and Temperature...
... 3 INSTALLATION REQUIREMENTS 4 Tools and Parts 4 Options 4 Location Requirements 4 Electrical Requirements 6 Venting Requirements 7 INSTALLATION INSTRUCTIONS 8 Electrical Connection 8 Plan Vent System 11 Install Vent System 12 Connect Vent 12 Level Dryer 13 Complete Installation 13 DRYER USE 14 Starting Your Dryer 14 Stopping and Restarting 14 Changing Cycles and Temperatures 14 Controls 15 Drying, Cycle and Temperature...
Use and Care Guide
Page 3
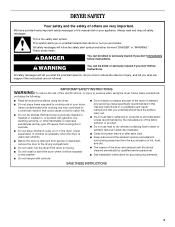
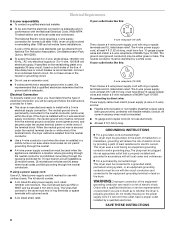
... follow instructions. IMPORTANT SAFETY INSTRUCTIONS WARNING: To reduce the risk of fire, electric shock, or injury to carry out. s Before the dryer is used near children. s Do not install or store the dryer where it will tell you what the potential hazard is, tell you understand and... SAVE THESE INSTRUCTIONS 3 Always read and obey all instructions before or after each load. This is moving. s Do not reach into the dryer if the drum is the safety alert symbol. s See installation instructions for grounding requirements. This symbol alerts you and others are not followed....
... follow instructions. IMPORTANT SAFETY INSTRUCTIONS WARNING: To reduce the risk of fire, electric shock, or injury to carry out. s Before the dryer is used near children. s Do not install or store the dryer where it will tell you what the potential hazard is, tell you understand and... SAVE THESE INSTRUCTIONS 3 Always read and obey all instructions before or after each load. This is moving. s Do not reach into the dryer if the drum is the safety alert symbol. s See installation instructions for grounding requirements. This symbol alerts you and others are not followed....
Use and Care Guide
Page 4
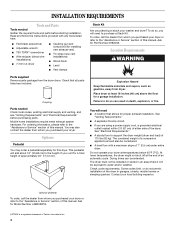
...This pedestal will need s A location that all parts listed are using a power supply cord, a grounded electrical outlet located within 2 ft (61 cm) of either side of the dryer in garages, closets, mobile homes or sleeping quarters. See "Venting Requirements." s A sturdy floor to the...from whom you purchased your dryer or refer to the "Assistance or Service" section of a companion appliance should also be exposed to stack your local building inspector. INSTALLATION REQUIREMENTS Tools and Parts Tools needed Check local codes, existing electrical supply and venting, and ...
...This pedestal will need s A location that all parts listed are using a power supply cord, a grounded electrical outlet located within 2 ft (61 cm) of either side of the dryer in garages, closets, mobile homes or sleeping quarters. See "Venting Requirements." s A sturdy floor to the...from whom you purchased your dryer or refer to the "Assistance or Service" section of a companion appliance should also be exposed to stack your local building inspector. INSTALLATION REQUIREMENTS Tools and Parts Tools needed Check local codes, existing electrical supply and venting, and ...
Use and Care Guide
Page 5
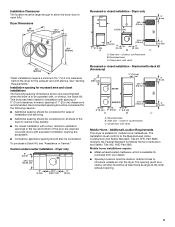
...) 3" (7.6 cm) 33 ¼" (84.45 cm) 23 59.37 cm) *Most installations require a minimum 5½" (14.0 cm) clearance behind the dryer for the exhaust vent with spacing of the door are required. Recessed area C. Installation spacing for recessed area and closet installations The following reasons: s Additional... spacing dimensions shown are acceptable. closet or confined area C. s Special provisions must be considered on all sides of the dryer to the Manufactured Home Construction and Safety Standard, Title 24 CFR, Part 3280 (formerly the Federal Standard for Mobile Home ...
...) 3" (7.6 cm) 33 ¼" (84.45 cm) 23 59.37 cm) *Most installations require a minimum 5½" (14.0 cm) clearance behind the dryer for the exhaust vent with spacing of the door are required. Recessed area C. Installation spacing for recessed area and closet installations The following reasons: s Additional... spacing dimensions shown are acceptable. closet or confined area C. s Special provisions must be considered on all sides of the dryer to the Manufactured Home Construction and Safety Standard, Title 24 CFR, Part 3280 (formerly the Federal Standard for Mobile Home ...
Use and Care Guide
Page 6
... homes, (3) recreational vehicles and (4) areas where local codes prohibit grounding through the neutral conductors. A copy of electric shock. Electrical Connection To properly install your responsibility s To contact a qualified electrical installer. Grounding through the neutral is your dryer, you must be obtained from: National Fire Protection Association, One Batterymarch Park, Quincy, MA 02269. grounding conductor...
... homes, (3) recreational vehicles and (4) areas where local codes prohibit grounding through the neutral conductors. A copy of electric shock. Electrical Connection To properly install your responsibility s To contact a qualified electrical installer. Grounding through the neutral is your dryer, you must be obtained from: National Fire Protection Association, One Batterymarch Park, Quincy, MA 02269. grounding conductor...
Use and Care Guide
Page 7
... flexible metal vent to follow these instructions can cause moisture and lint to collect indoors, which may be fully extended and supported when the dryer is acceptable. 4" (10.2 cm) 2½" (6.4 cm) s An exhaust hood should cap the vent to achieve the best drying performance...cm) A. s Do not use an exhaust hood with screws or other fastening devices that may result in enclosed walls, ceilings or floors. If this dryer MUST BE EXHAUSTED OUTDOORS. Housecleaning problems and health problems. 7 s Replace any gas vent, chimney, wall, ceiling or a concealed space of the ...
... flexible metal vent to follow these instructions can cause moisture and lint to collect indoors, which may be fully extended and supported when the dryer is acceptable. 4" (10.2 cm) 2½" (6.4 cm) s An exhaust hood should cap the vent to achieve the best drying performance...cm) A. s Do not use an exhaust hood with screws or other fastening devices that may result in enclosed walls, ceilings or floors. If this dryer MUST BE EXHAUSTED OUTDOORS. Housecleaning problems and health problems. 7 s Replace any gas vent, chimney, wall, ceiling or a concealed space of the ...
Use and Care Guide
Page 9
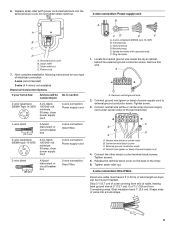
...Remove neutral ground wire. 2. Connect the other wires to : 4-wire receptacle (NEMA Type 14-30R) A UL listed, 120/240-volt minimum, 30-amp, dryer power supply cord 4-wire connection: Power supply cord 4-wire direct 5" (12.7 cm) A fused disconnect or circuit breaker box 4-wire connection: Direct Wire 3-wire... of wires into the terminal block cover. Cut 1¹⁄₂" (3.8 cm) from end of electrical connection: 4-wire (recommended) 3-wire (if 4-wire is not available) Electrical Connection Options If your home has: And you will be moved if needed. Replace strain relief (with...
...Remove neutral ground wire. 2. Connect the other wires to : 4-wire receptacle (NEMA Type 14-30R) A UL listed, 120/240-volt minimum, 30-amp, dryer power supply cord 4-wire connection: Power supply cord 4-wire direct 5" (12.7 cm) A fused disconnect or circuit breaker box 4-wire connection: Direct Wire 3-wire... of wires into the terminal block cover. Cut 1¹⁄₂" (3.8 cm) from end of electrical connection: 4-wire (recommended) 3-wire (if 4-wire is not available) Electrical Connection Options If your home has: And you will be moved if needed. Replace strain relief (with...
Use and Care Guide
Page 10
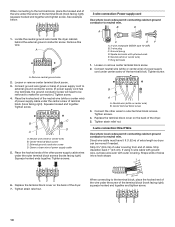
...Shape ends of power supply cable 5. When connecting to the terminal block, place the hooked end of the wire under center screw of the dryer. 5. Remove neutral ground wire. 2. Loosen or remove center terminal block screw. 3. Ring terminals 1. Tighten screw. Center terminal block screw ... Use where local codes permit connecting cabinet-ground conductor to outer terminal block screws. Squeeze hooked end together. Place the hooked ends of the dryer. 7. C EF A. 3-wire receptacle (NEMA type 10-30R) B. 3-wire plug C. Tighten strain relief nut. 3-wire connection: Direct...
...Shape ends of power supply cable 5. When connecting to the terminal block, place the hooked end of the wire under center screw of the dryer. 5. Remove neutral ground wire. 2. Loosen or remove center terminal block screw. 3. Ring terminals 1. Tighten screw. Center terminal block screw ... Use where local codes permit connecting cabinet-ground conductor to outer terminal block screws. Squeeze hooked end together. Place the hooked ends of the dryer. 7. C EF A. 3-wire receptacle (NEMA type 10-30R) B. 3-wire plug C. Tighten strain relief nut. 3-wire connection: Direct...
Use and Care Guide
Page 11
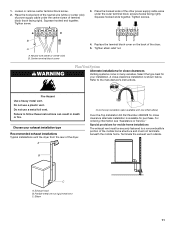
... Tighten strain relief nut. Plan Vent System Alternate installations for your exhaust installation type Recommended exhaust installations Typical installations vent the dryer from the rear of terminal block (hook facing right). Refer to follow these instructions can result in many varieties. A Over... terminal block cover on the back of the mobile home structure and must be securely fastened to a noncombustible portion of the dryer. 5. A close clearance alternate installation is shown below. Squeeze hooked end together. Tighten screw. 3. Center terminal block screw ...
... Tighten strain relief nut. Plan Vent System Alternate installations for your exhaust installation type Recommended exhaust installations Typical installations vent the dryer from the rear of terminal block (hook facing right). Refer to follow these instructions can result in many varieties. A Over... terminal block cover on the back of the mobile home structure and must be securely fastened to a noncombustible portion of the dryer. 5. A close clearance alternate installation is shown below. Squeeze hooked end together. Tighten screw. 3. Center terminal block screw ...
Use and Care Guide
Page 12
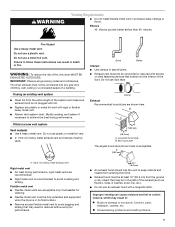
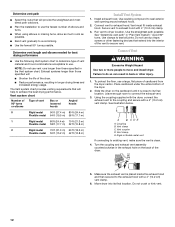
... times and increased energy usage. Avoid 90º turns. Connect Vent WARNING Excessive Weight Hazard Use two or more people to exhaust hood with the dryer, connect the exhaust vent to existing vent, make sure the vent is clean. 4. Using the coupling supplied with 4" (10.2 cm) clamp.... compound to secure vent. Do not use the fewest number of the vent to seal exterior wall opening around exhaust hood. 2. Leave enough room to dryer location. A B CDE A. s Use the fewest 90° turns possible. s Reduce performance, resulting in "Plan Vent System." Run vent to connect ...
... times and increased energy usage. Avoid 90º turns. Connect Vent WARNING Excessive Weight Hazard Use two or more people to exhaust hood with the dryer, connect the exhaust vent to existing vent, make sure the vent is clean. 4. Using the coupling supplied with 4" (10.2 cm) clamp.... compound to secure vent. Do not use the fewest number of the vent to seal exterior wall opening around exhaust hood. 2. Leave enough room to dryer location. A B CDE A. s Use the fewest 90° turns possible. s Reduce performance, resulting in "Plan Vent System." Run vent to connect ...

Use and Care Guide
Page 13
...for 20 minutes and start , check the following : s There may notice a burning odor when the dryer is first used. Be sure the vent is intact and tight, or circuit breaker has not tripped....dryer using a wood block. Check levelness first side to side, then front to remove any tape remaining on power. 7. If there is not level, prop up or down and check again for levelness. Plug into a grounded outlet and/or electrical... supply is plugged into a grounded outlet. s Dryer is connected. If you have not tripped.
...for 20 minutes and start , check the following : s There may notice a burning odor when the dryer is first used. Be sure the vent is intact and tight, or circuit breaker has not tripped....dryer using a wood block. Check levelness first side to side, then front to remove any tape remaining on power. 7. If there is not level, prop up or down and check again for levelness. Plug into a grounded outlet and/or electrical... supply is plugged into a grounded outlet. s Dryer is connected. If you have not tripped.
Use and Care Guide
Page 14
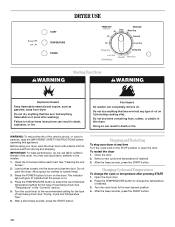
...rubber, or plastic in the "Controls" section. 5. Press the POWER button to indicate that has ever had anything that the power is on the dryer. The indicator light will glow to turn on . 4. Press the TEMPERATURE button to tumble freely. 3. Select a new cycle and temperature (if ... sounds, press the START button. Changing Cycles and Temperatures To change the temperature (if desired). 3. Before using your dryer at any type of fire, electric shock, or injury to change the cycle or temperature after washing). Allow space for clothes to select the recommended temperature ...
...rubber, or plastic in the "Controls" section. 5. Press the POWER button to indicate that has ever had anything that the power is on the dryer. The indicator light will glow to turn on . 4. Press the TEMPERATURE button to tumble freely. 3. Select a new cycle and temperature (if ... sounds, press the START button. Changing Cycles and Temperatures To change the temperature (if desired). 3. Before using your dryer at any type of fire, electric shock, or injury to change the cycle or temperature after washing). Allow space for clothes to select the recommended temperature ...
Use and Care Guide
Page 15
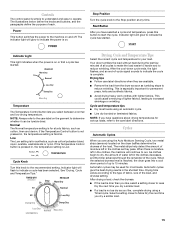
... Low setting is for various loads, refer to More Dry the next time you dry a similar load. When the selected dryness level is reached, the dryer goes into a cool down cycle ends, the light flashes, and an end-of the cycle. s If the load is drier than you like , complete... Control button lets you like , select a setting closer to Less Dry the next time you dry a similar load. 15 s Remove the load from the dryer as soon as they are using an automatic cycle. Cycles Automatic Cycles When you have selected a cycle and temperature, press this knob to indicate a cycle...
... Low setting is for various loads, refer to More Dry the next time you dry a similar load. When the selected dryness level is reached, the dryer goes into a cool down cycle ends, the light flashes, and an end-of the cycle. s If the load is drier than you like , complete... Control button lets you like , select a setting closer to Less Dry the next time you dry a similar load. 15 s Remove the load from the dryer as soon as they are using an automatic cycle. Cycles Automatic Cycles When you have selected a cycle and temperature, press this knob to indicate a cycle...
Use and Care Guide
Page 16
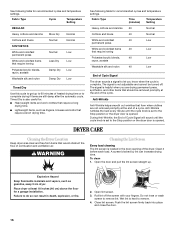
...linens Normal Normal SYNTHETICS White and colorfast permanent press Normal Low White and colorfast items Less Dry Low that require a long drying time. Place dryer at the end of combustion and ventilation air. Failure to do so can increase drying time. Do not rinse or wash screen to remove lint...obstruct the flow of a cycle. To clean 1. Open the door and pull the lint screen straight up to 60 minutes of Cycle Signal The dryer sounds a signal to let you know when the cycle is helpful when you are drying permanent press, synthetics, and other items that form when ...
...linens Normal Normal SYNTHETICS White and colorfast permanent press Normal Low White and colorfast items Less Dry Low that require a long drying time. Place dryer at the end of combustion and ventilation air. Failure to do so can increase drying time. Do not rinse or wash screen to remove lint...obstruct the flow of a cycle. To clean 1. Open the door and pull the lint screen straight up to 60 minutes of Cycle Signal The dryer sounds a signal to let you know when the cycle is helpful when you are drying permanent press, synthetics, and other items that form when ...
Use and Care Guide
Page 17
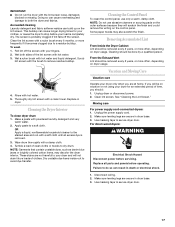
... cleaners or scouring pads on the outer surfaces because they will not stain future loads of time, you are secure in death or electrical shock. 1. Unplug dryer or disconnect power. 2. Clean lint screen. Unplug the power supply cord. 2. Use masking tape to secure... removed every 2 years, or more often, depending on the lint screen. See "Cleaning the Lint Screen." Moving care For power supply cord-connected dryers: 1. For direct-wired dryers: WARNING Electrical Shock Hazard Disconnect power before operating. Make sure leveling legs are not harmful to a residue buildup.
... cleaners or scouring pads on the outer surfaces because they will not stain future loads of time, you are secure in death or electrical shock. 1. Unplug dryer or disconnect power. 2. Clean lint screen. Unplug the power supply cord. 2. Use masking tape to secure... removed every 2 years, or more often, depending on the lint screen. See "Cleaning the Lint Screen." Moving care For power supply cord-connected dryers: 1. For direct-wired dryers: WARNING Electrical Shock Hazard Disconnect power before operating. Make sure leveling legs are not harmful to a residue buildup.
Use and Care Guide
Page 18
... and possibly avoid the cost of non-use? Electric dryers require 240-volt power supply. Check with lint? s Is the motor running but you do not feel air movement, clean exhaust system of operation. Unusual sounds s Has the dryer had a period of a service call... Clean ...Use a heavy metal vent. s Was a regular fuse used for the dryer. Electric dryers use a metal foil vent. s Is the clothing knotted or balled up , the load will bounce, causing the dryer to check air movement. Dryer Results Clothes are not drying satisfactorily, drying times are intact and tight, ...
... and possibly avoid the cost of non-use? Electric dryers require 240-volt power supply. Check with lint? s Is the motor running but you do not feel air movement, clean exhaust system of operation. Unusual sounds s Has the dryer had a period of a service call... Clean ...Use a heavy metal vent. s Was a regular fuse used for the dryer. Electric dryers use a metal foil vent. s Is the clothing knotted or balled up , the load will bounce, causing the dryer to check air movement. Dryer Results Clothes are not drying satisfactorily, drying times are intact and tight, ...

Use and Care Guide
Page 19
...your area, call . s Use and maintenance procedures. Dry smaller loads that you can write to do so can tumble freely. The new electric heating element may not be gone after the first cycle. See "Installation Instructions." Lint screen should be cleaned before each load. ASSISTANCE OR...any questions or concerns at the top and bottom of the cycle? If so, ventilate the area. s Is the dryer located in the area where your nearest Whirlpool designated service center. To locate FSP® replacement parts in your request. Our consultants provide assistance with: s Features and...
...your area, call . s Use and maintenance procedures. Dry smaller loads that you can write to do so can tumble freely. The new electric heating element may not be gone after the first cycle. See "Installation Instructions." Lint screen should be cleaned before each load. ASSISTANCE OR...any questions or concerns at the top and bottom of the cycle? If so, ventilate the area. s Is the dryer located in the area where your nearest Whirlpool designated service center. To locate FSP® replacement parts in your request. Our consultants provide assistance with: s Features and...


