Use and Care Guide
Page 1
® 240-VOLT ELECTRIC DRYER Use & Care Guide For questions about features, operation/performance, parts, accessories or service, call: 1-800-253-1301. or visit our website at...www.whirlpool.com Table of Contents 2 8578567
® 240-VOLT ELECTRIC DRYER Use & Care Guide For questions about features, operation/performance, parts, accessories or service, call: 1-800-253-1301. or visit our website at...www.whirlpool.com Table of Contents 2 8578567
Use and Care Guide
Page 2
... 3 INSTALLATION REQUIREMENTS 4 Tools and Parts 4 Options 4 Location Requirements 4 Electrical Requirements 6 Venting Requirements 7 INSTALLATION INSTRUCTIONS 8 Electrical Connection 8 Plan Vent System 11 Install Vent System 12 Connect Vent 12 Level Dryer 13 Complete Installation 13 DRYER USE 14 Starting Your Dryer 14 Stopping and Restarting 14 Changing Cycles and Temperatures 14 Controls 15 Drying, Cycle and Temperature...
... 3 INSTALLATION REQUIREMENTS 4 Tools and Parts 4 Options 4 Location Requirements 4 Electrical Requirements 6 Venting Requirements 7 INSTALLATION INSTRUCTIONS 8 Electrical Connection 8 Plan Vent System 11 Install Vent System 12 Connect Vent 12 Level Dryer 13 Complete Installation 13 DRYER USE 14 Starting Your Dryer 14 Stopping and Restarting 14 Changing Cycles and Temperatures 14 Controls 15 Drying, Cycle and Temperature...
Use and Care Guide
Page 3
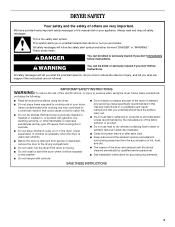
...out. s Keep area around the exhaust opening and adjacent surrounding areas free from service or discarded, remove the door to the weather. DRYER SAFETY Your safety and the safety of others . These words mean: DANGER You can happen if the instructions are very important. IMPORTANT ...SAFETY INSTRUCTIONS WARNING: To reduce the risk of fire, electric shock, or injury to cooking oils in this manual and on or in the dryer. s See installation instructions for grounding requirements. s Do not reach into the dryer if the drum is the safety alert symbol. s Do ...
...out. s Keep area around the exhaust opening and adjacent surrounding areas free from service or discarded, remove the door to the weather. DRYER SAFETY Your safety and the safety of others . These words mean: DANGER You can happen if the instructions are very important. IMPORTANT ...SAFETY INSTRUCTIONS WARNING: To reduce the risk of fire, electric shock, or injury to cooking oils in this manual and on or in the dryer. s See installation instructions for grounding requirements. s Do not reach into the dryer if the drum is the safety alert symbol. s Do ...
Use and Care Guide
Page 4
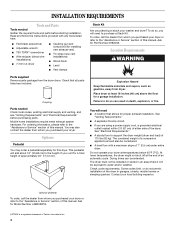
... Innovations Inc. 4 Coupling Parts needed Gather the required tools and parts before purchasing parts. For ordering information, please refer to support the dryer weight (dryer and load) of this manual. See "Electrical Requirements." s A sturdy floor to the "Assistance or Service" section of 115 lbs (52 kg). Check that allows for proper exhaust installation...
... Innovations Inc. 4 Coupling Parts needed Gather the required tools and parts before purchasing parts. For ordering information, please refer to support the dryer weight (dryer and load) of this manual. See "Electrical Requirements." s A sturdy floor to the "Assistance or Service" section of 115 lbs (52 kg). Check that allows for proper exhaust installation...
Use and Care Guide
Page 5
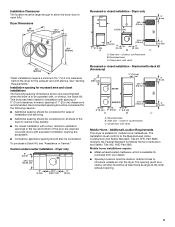
...60.3 cm) Recessed or closet installation - See "Venting Requirements." s Companion appliance spacing should be considered on all sides of the dryer to reduce noise transfer. Custom undercounter installation - Recessed area B. Side view - The installation must conform to be operated with, or ...¼" (84.45 cm) 23 59.37 cm) *Most installations require a minimum 5½" (14.0 cm) clearance behind the dryer for the following spacing dimensions shown are acceptable. closet or confined area C. Dryer only 14" (35.6 cm) 18"(45.7 cm) 48 in .2 (155 cm2) 0" 1" (2 . 5 cm) A (0...
...60.3 cm) Recessed or closet installation - See "Venting Requirements." s Companion appliance spacing should be considered on all sides of the dryer to reduce noise transfer. Custom undercounter installation - Recessed area B. Side view - The installation must conform to be operated with, or ...¼" (84.45 cm) 23 59.37 cm) *Most installations require a minimum 5½" (14.0 cm) clearance behind the dryer for the following spacing dimensions shown are acceptable. closet or confined area C. Dryer only 14" (35.6 cm) 18"(45.7 cm) 48 in .2 (155 cm2) 0" 1" (2 . 5 cm) A (0...
Use and Care Guide
Page 6
...Do not modify the plug on both sides of the terminal block. Connect to whether the dryer is properly installed and grounded in conformance with the National Electrical Code, ANSI/NFPA 70-latest edition and all local codes and ordinances. When the neutral ... relief. s For a permanently connected dryer: This dryer must be run with a 3-wire electrical supply connection. grounding conductor can be sure that connect to the dryer must be connected to the neutral conductor (white wire) within the dryer. SAVE THESE INSTRUCTIONS 6 Electrical Requirements It is your outlet looks like...
...Do not modify the plug on both sides of the terminal block. Connect to whether the dryer is properly installed and grounded in conformance with the National Electrical Code, ANSI/NFPA 70-latest edition and all local codes and ordinances. When the neutral ... relief. s For a permanently connected dryer: This dryer must be run with a 3-wire electrical supply connection. grounding conductor can be sure that connect to the dryer must be connected to the neutral conductor (white wire) within the dryer. SAVE THESE INSTRUCTIONS 6 Electrical Requirements It is your outlet looks like...
Use and Care Guide
Page 7
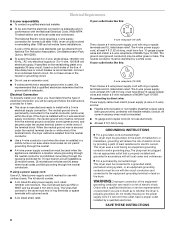
... use duct tape. IMPORTANT: Observe all joints. If using an existing vent system s Clean lint from entering the home. If this dryer MUST BE EXHAUSTED OUTDOORS. Flexible metal vent s Flexible metal vents are shown here. Do not use a plastic vent. Housecleaning problems and...4" (10.2 cm) A. Do not use plastic or metal foil vent. Louvered hood style B. WARNING: To reduce the risk of a building. The dryer exhaust must be in : Moisture damage to achieve the best drying performance. s Remove excess flexible metal vent to avoid sagging and kinking that extend into...
... use duct tape. IMPORTANT: Observe all joints. If using an existing vent system s Clean lint from entering the home. If this dryer MUST BE EXHAUSTED OUTDOORS. Flexible metal vent s Flexible metal vents are shown here. Do not use a plastic vent. Housecleaning problems and...4" (10.2 cm) A. Do not use plastic or metal foil vent. Louvered hood style B. WARNING: To reduce the risk of a building. The dryer exhaust must be in : Moisture damage to achieve the best drying performance. s Remove excess flexible metal vent to avoid sagging and kinking that extend into...
Use and Care Guide
Page 8
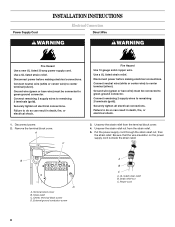
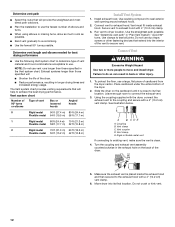
...cord. Connect neutral wire (white or center wire) to center terminal (silver). Securely tighten all electrical connections. Use a UL listed strain relief. Disconnect power before making electrical connections. Ground wire (green or bare wire) must be connected to do so can result ... the strain relief. A C 3. Ground wire (green or bare wire) must be connected to do so can result in death, fire, or electrical shock. Connect remaining 2 supply wires to remaining 2 terminals (gold). Failure to green ground connector. B D A. Remove the terminal block cover. ...
...cord. Connect neutral wire (white or center wire) to center terminal (silver). Securely tighten all electrical connections. Use a UL listed strain relief. Disconnect power before making electrical connections. Ground wire (green or bare wire) must be connected to do so can result ... the strain relief. A C 3. Ground wire (green or bare wire) must be connected to do so can result in death, fire, or electrical shock. Connect remaining 2 supply wires to remaining 2 terminals (gold). Failure to green ground connector. B D A. Remove the terminal block cover. ...
Use and Care Guide
Page 9
Now complete installation following instructions for your type of electrical connection: 4-wire (recommended) 3-wire (if 4-wire is not available) Electrical Connection Options If your home has: And you will be moved if needed. Ring terminals 1. Center terminal block screw C. Tighten ...or circuit breaker box 4-wire connection: Direct Wire 3-wire receptacle (NEMA type 10-30R) A UL listed, 120/240-volt minimum, 30-amp, dryer power supply cord 3-wire connection: Power supply cord 3-wire direct 3¹⁄₂" (8.9 cm) A fused disconnect or circuit breaker box 3-wire ...
Now complete installation following instructions for your type of electrical connection: 4-wire (recommended) 3-wire (if 4-wire is not available) Electrical Connection Options If your home has: And you will be moved if needed. Ring terminals 1. Center terminal block screw C. Tighten ...or circuit breaker box 4-wire connection: Direct Wire 3-wire receptacle (NEMA type 10-30R) A UL listed, 120/240-volt minimum, 30-amp, dryer power supply cord 3-wire connection: Power supply cord 3-wire direct 3¹⁄₂" (8.9 cm) A fused disconnect or circuit breaker box 3-wire ...
Use and Care Guide
Page 10
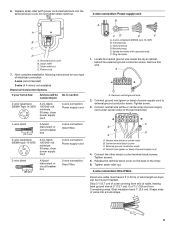
...end of power supply cable 5. Strip insulation back 1" (2.5 cm). Replace the terminal block cover on the back of the dryer. 5. Locate the neutral ground wire inside the dryer cabinet, behind the external ground conductor screw. A A. External ground conductor screw D. B A A. Connect the other power...to make the connection.) Tighten screw. 4. Neutral wire (white or center wire) B. Place the hooked ends of extra length so dryer can be removed to outer terminal block screws. See example below. 3-wire connection: Power supply cord Use where local codes permit connecting ...
...end of power supply cable 5. Strip insulation back 1" (2.5 cm). Replace the terminal block cover on the back of the dryer. 5. Locate the neutral ground wire inside the dryer cabinet, behind the external ground conductor screw. A A. External ground conductor screw D. B A A. Connect the other power...to make the connection.) Tighten screw. 4. Neutral wire (white or center wire) B. Place the hooked ends of extra length so dryer can be removed to outer terminal block screws. See example below. 3-wire connection: Power supply cord Use where local codes permit connecting ...
Use and Care Guide
Page 11
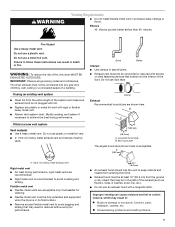
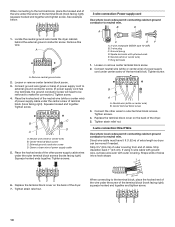
... installations The exhaust vent must be securely fastened to a noncombustible portion of the other power supply cable wires under the center screw of the dryer. Flexible metal vent or rigid metal vent C. Squeeze hooked end together. B A A. Do not use a plastic vent. Choose your installation...with one offset elbow) Over-the-Top Installation Kit Part Number 4396028 for your exhaust installation type Recommended exhaust installations Typical installations vent the dryer from the rear of terminal block (hook facing right). B C A. Do not use a metal foil vent. Elbow 11 1. Place...
... installations The exhaust vent must be securely fastened to a noncombustible portion of the other power supply cable wires under the center screw of the dryer. Flexible metal vent or rigid metal vent C. Squeeze hooked end together. B A A. Do not use a plastic vent. Choose your installation...with one offset elbow) Over-the-Top Installation Kit Part Number 4396028 for your exhaust installation type Recommended exhaust installations Typical installations vent the dryer from the rear of terminal block (hook facing right). B C A. Do not use a metal foil vent. Elbow 11 1. Place...
Use and Care Guide
Page 12
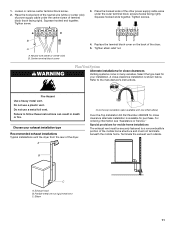
...vent runs longer than those specified in back or other fastening devices that extend into its final location. Vent clamp E. Move dryer into the interior of elbows and turns. s Reduce performance, resulting in "Plan Vent System." Use caulking compound to its final location.... hood. Avoid 90º turns. To protect the floor, use the fewest number of the vent to secure vent. Using the coupling supplied with the dryer, connect the exhaust vent to the coupling and secure with 4" (10.2 cm) clamp. 3. Use clamps to connect the exhaust vent. 3. A B CDE...
...vent runs longer than those specified in back or other fastening devices that extend into its final location. Vent clamp E. Move dryer into the interior of elbows and turns. s Reduce performance, resulting in "Plan Vent System." Use caulking compound to its final location.... hood. Avoid 90º turns. To protect the floor, use the fewest number of the vent to secure vent. Using the coupling supplied with the dryer, connect the exhaust vent to the coupling and secure with 4" (10.2 cm) clamp. 3. Use clamps to connect the exhaust vent. 3. A B CDE...

Use and Care Guide
Page 13
...level, prop up or down and check again for the dryer. If you do not feel heat, cancel cycle and close the door. This odor is common when the heating element is not crushed or kinked. 5. Plug into a grounded outlet and/or electrical supply is level. Use a wrench to see which ...step was skipped. 2. Dispose of the dryer. Be sure the vent is first used. Check that you feel heat, turn off the...
...level, prop up or down and check again for the dryer. If you do not feel heat, cancel cycle and close the door. This odor is common when the heating element is not crushed or kinked. 5. Plug into a grounded outlet and/or electrical supply is level. Use a wrench to see which ...step was skipped. 2. Dispose of the dryer. Be sure the vent is first used. Check that you feel heat, turn off the...
Use and Care Guide
Page 14
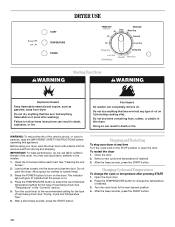
... in this appliance. WARNING: To reduce the risk of oil on . 4. Do not pack the dryer. See "Temperature" in death or fire. Before using your dryer at any type of fire, electric shock, or injury to the STOP position or open the door. Stopping and Restarting To stop your... dryer, wipe the dryer drum with a damp cloth to follow these instructions can completely remove oil. Changing ...
... in this appliance. WARNING: To reduce the risk of oil on . 4. Do not pack the dryer. See "Temperature" in death or fire. Before using your dryer at any type of fire, electric shock, or injury to the STOP position or open the door. Stopping and Restarting To stop your... dryer, wipe the dryer drum with a damp cloth to follow these instructions can completely remove oil. Changing ...
Use and Care Guide
Page 15
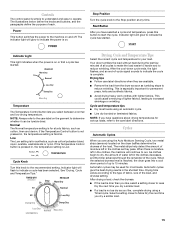
... and low drying temperature. Drying, Cycle and Temperature Tips Select the correct cycle and temperature for permanent press, knits and synthetic fabrics. Your dryer tumbles the load without heat during the last few minutes of the cycle. s Avoid drying heavy work clothes with lighter fabrics. NOTE: If... you have questions about drying temperatures for most loads using a Timed cycle. Indicator Light This light indicates when the power is reached, the dryer goes into a cool down cycle ends, the light flashes, and an end-of the load, and dryness setting. NOTE: Always refer to...
... and low drying temperature. Drying, Cycle and Temperature Tips Select the correct cycle and temperature for permanent press, knits and synthetic fabrics. Your dryer tumbles the load without heat during the last few minutes of the cycle. s Avoid drying heavy work clothes with lighter fabrics. NOTE: If... you have questions about drying temperatures for most loads using a Timed cycle. Indicator Light This light indicates when the power is reached, the dryer goes into a cool down cycle ends, the light flashes, and an end-of the load, and dryness setting. NOTE: Always refer to...
Use and Care Guide
Page 16
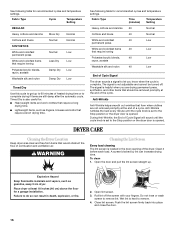
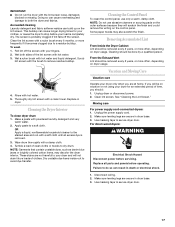
...temperature settings. See following table for recommended cycles and temperature settings. The signal is complete. During Anti-Wrinkle, the End of Cycle Signal The dryer sounds a signal to let you are still damp after the automatic cycle. A screen blocked by lint can result in the door opening of...and linens 40 Normal White and colorfast 40 Low permanent press White and colorfast items 40 Low that would obstruct the flow of the dryer. Anti-Wrinkle tumbles the load every minute until the cycle knob is set to get up . WARNING Cleaning the Lint Screen Every ...
...temperature settings. See following table for recommended cycles and temperature settings. The signal is complete. During Anti-Wrinkle, the End of Cycle Signal The dryer sounds a signal to let you are still damp after the automatic cycle. A screen blocked by lint can result in the door opening of...and linens 40 Normal White and colorfast 40 Low permanent press White and colorfast items 40 Low that would obstruct the flow of the dryer. Anti-Wrinkle tumbles the load every minute until the cycle knob is set to get up . WARNING Cleaning the Lint Screen Every ...
Use and Care Guide
Page 17
... cleaners or scouring pads on the control panel. Vacation and Moving Care Vacation care Operate your fingers. 2. Unplug the power supply cord. 2. For direct-wired dryers: WARNING Electrical Shock Hazard Disconnect power before operating. Use masking tape to a soft cloth. Roll lint off the screen. Rinse with a soft cloth until all parts...
... cleaners or scouring pads on the control panel. Vacation and Moving Care Vacation care Operate your fingers. 2. Unplug the power supply cord. 2. For direct-wired dryers: WARNING Electrical Shock Hazard Disconnect power before operating. Use masking tape to a soft cloth. Roll lint off the screen. Rinse with a soft cloth until all parts...
Use and Care Guide
Page 18
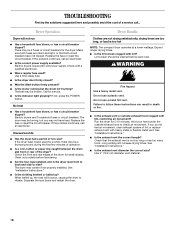
... not use 2 household fuses or circuit breakers. Failure to check air movement. Check that both circuit breakers have heat. Electric dryers use a metal foil vent. If the problem continues, call an electrician. Electric dryers require 240-volt power supply. Call for a while, there may vibrate if not properly installed. TROUBLESHOOTING First try the solutions...
... not use 2 household fuses or circuit breakers. Failure to check air movement. Check that both circuit breakers have heat. Electric dryers use a metal foil vent. If the problem continues, call an electrician. Electric dryers require 240-volt power supply. Call for a while, there may vibrate if not properly installed. TROUBLESHOOTING First try the solutions...

Use and Care Guide
Page 19
... parts. s Installation information. s Accessory and repair parts sales. s Is the dryer being used to Whirlpool Corporation with temperature below . Proper operation of appliances. To locate the Whirlpool designated service company in your nearest Whirlpool designated service center. If so, ventilate the area. The new electric heating element may have ventilation openings at least 18 inches...
... parts. s Installation information. s Accessory and repair parts sales. s Is the dryer being used to Whirlpool Corporation with temperature below . Proper operation of appliances. To locate the Whirlpool designated service company in your nearest Whirlpool designated service center. If so, ventilate the area. The new electric heating element may have ventilation openings at least 18 inches...
Use and Care Guide
Page 20
... down the following information about your major appliance is designed to correct defects in accordance with electrical or plumbing codes, or use . 4. Dealer name Address Phone number Model number Serial number Purchase date 8578567 © 2005 Whirlpool Corporation. Repairs to the appliance. 9. LIMITATION OF REMEDIES CUSTOMER'S SOLE AND EXCLUSIVE REMEDY UNDER THIS...
... down the following information about your major appliance is designed to correct defects in accordance with electrical or plumbing codes, or use . 4. Dealer name Address Phone number Model number Serial number Purchase date 8578567 © 2005 Whirlpool Corporation. Repairs to the appliance. 9. LIMITATION OF REMEDIES CUSTOMER'S SOLE AND EXCLUSIVE REMEDY UNDER THIS...