Use and Care Guide
Page 1
® 240-VOLT ELECTRIC DRYER Use & Care Guide For questions about features, operation/performance, parts, accessories or service, call: 1-800-253-1301. or visit our website at...www.whirlpool.com Table of Contents 2 8578567
® 240-VOLT ELECTRIC DRYER Use & Care Guide For questions about features, operation/performance, parts, accessories or service, call: 1-800-253-1301. or visit our website at...www.whirlpool.com Table of Contents 2 8578567
Use and Care Guide
Page 2
... 3 INSTALLATION REQUIREMENTS 4 Tools and Parts 4 Options 4 Location Requirements 4 Electrical Requirements 6 Venting Requirements 7 INSTALLATION INSTRUCTIONS 8 Electrical Connection 8 Plan Vent System 11 Install Vent System 12 Connect Vent 12 Level Dryer 13 Complete Installation 13 DRYER USE 14 Starting Your Dryer 14 Stopping and Restarting 14 Changing Cycles and Temperatures 14 Controls 15 Drying, Cycle and Temperature...
... 3 INSTALLATION REQUIREMENTS 4 Tools and Parts 4 Options 4 Location Requirements 4 Electrical Requirements 6 Venting Requirements 7 INSTALLATION INSTRUCTIONS 8 Electrical Connection 8 Plan Vent System 11 Install Vent System 12 Connect Vent 12 Level Dryer 13 Complete Installation 13 DRYER USE 14 Starting Your Dryer 14 Stopping and Restarting 14 Changing Cycles and Temperatures 14 Controls 15 Drying, Cycle and Temperature...
Use and Care Guide
Page 3
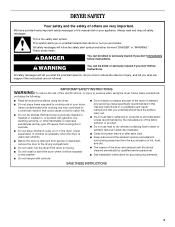
...drying compartment. s Clean lint screen before using the dryer, follow the safety alert symbol and either the word "DANGER" or "WARNING." Close supervision of children is necessary when the dryer is removed from the accumulation of fire, electric shock, or injury to catch fire. s Do ...not install or store the dryer where it will follow basic precautions, including the following: s Read all safety ...
...drying compartment. s Clean lint screen before using the dryer, follow the safety alert symbol and either the word "DANGER" or "WARNING." Close supervision of children is necessary when the dryer is removed from the accumulation of fire, electric shock, or injury to catch fire. s Do ...not install or store the dryer where it will follow basic precautions, including the following: s Read all safety ...
Use and Care Guide
Page 4
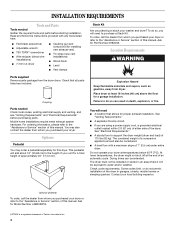
..."Assistance or Service" section of 1" (2.5 cm) under entire dryer. INSTALLATION REQUIREMENTS Tools and Parts Tools needed Check local codes, existing electrical supply and venting, and see "Venting Requirements" and "Electrical Requirements" before starting installation. Options Pedestal You may also contact ... kg). Coupling Parts needed Gather the required tools and parts before purchasing parts. See "Electrical Requirements." s A level floor with any tools listed here. Place dryer at temperatures below 45ºF (7ºC). For ordering information, please refer to water and...
..."Assistance or Service" section of 1" (2.5 cm) under entire dryer. INSTALLATION REQUIREMENTS Tools and Parts Tools needed Check local codes, existing electrical supply and venting, and see "Venting Requirements" and "Electrical Requirements" before starting installation. Options Pedestal You may also contact ... kg). Coupling Parts needed Gather the required tools and parts before purchasing parts. See "Electrical Requirements." s A level floor with any tools listed here. Place dryer at temperatures below 45ºF (7ºC). For ordering information, please refer to water and...
Use and Care Guide
Page 6
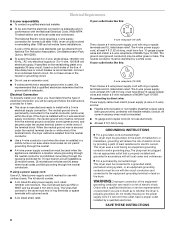
... to the equipment-grounding terminal or lead on both sides of the equipment- Do not have a proper outlet installed by providing a path of electric shock. This dryer uses a cord having an equipment-grounding conductor and a grounding plug. The 4-wire power supply cord, at least 4 ft (1.22 m) long...The plug must end in a mobile home or an area where local codes do not use an extension cord. Check with clothes dryers. The National Electric Code requires a 4-wire supply connection for it here. The kit should be type SRD or SRDT and be plugged into an ...
... to the equipment-grounding terminal or lead on both sides of the equipment- Do not have a proper outlet installed by providing a path of electric shock. This dryer uses a cord having an equipment-grounding conductor and a grounding plug. The 4-wire power supply cord, at least 4 ft (1.22 m) long...The plug must end in a mobile home or an area where local codes do not use an extension cord. Check with clothes dryers. The National Electric Code requires a 4-wire supply connection for it here. The kit should be type SRD or SRDT and be plugged into an ...
Use and Care Guide
Page 9
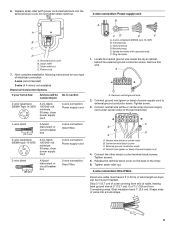
...wire (recommended) 3-wire (if 4-wire is not available) Electrical Connection Options If your type of power supply cord to : 4-wire receptacle (NEMA Type 14-30R) A UL listed, 120/240-volt minimum, 30-amp, dryer power supply cord 4-wire connection: Power supply cord 4-wire direct... conductor screw. Replace strain relief (with upturned ends F. Terminal block cover B. Ring terminals 1. Locate the neutral ground wire inside the dryer cabinet, behind the external ground conductor screw. Tighten screw. 3. Strip insulation back 1" (2.5 cm). Ground prong D. A A. Connect the...
...wire (recommended) 3-wire (if 4-wire is not available) Electrical Connection Options If your type of power supply cord to : 4-wire receptacle (NEMA Type 14-30R) A UL listed, 120/240-volt minimum, 30-amp, dryer power supply cord 4-wire connection: Power supply cord 4-wire direct... conductor screw. Replace strain relief (with upturned ends F. Terminal block cover B. Ring terminals 1. Locate the neutral ground wire inside the dryer cabinet, behind the external ground conductor screw. Tighten screw. 3. Strip insulation back 1" (2.5 cm). Ground prong D. A A. Connect the...

Use and Care Guide
Page 13
... been running or "On" position. If the dryer is an extra part, go away. 13 If there is not level, prop up or down and check again for levelness. Be sure the vent is first used. Plug into a grounded outlet and/or electrical supply is intact and tight, or circuit breaker has... not tripped. Read "Dryer Use." 9. If you have not tripped. This odor is common when the heating element is not crushed or kinked...
... been running or "On" position. If the dryer is an extra part, go away. 13 If there is not level, prop up or down and check again for levelness. Be sure the vent is first used. Plug into a grounded outlet and/or electrical supply is intact and tight, or circuit breaker has... not tripped. Read "Dryer Use." 9. If you have not tripped. This odor is common when the heating element is not crushed or kinked...
Use and Care Guide
Page 14
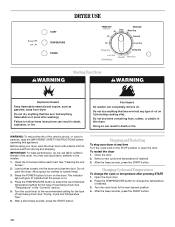
...softener in this appliance. The indicator light will glow to follow these instructions can result in death, explosion, or fire. To restart the dryer 1. Changing Cycles and Temperatures To change the temperature (if desired). 3. After the beep sounds, press the START button. 14 Failure to...to select the recommended temperature setting for clothes to change the cycle or temperature after washing). Allow space for the type of fire, electric shock, or injury to the new desired position. 4. See "Drying, Cycle and Temperature Tips." 6. Select a new cycle and temperature (if ...
...softener in this appliance. The indicator light will glow to follow these instructions can result in death, explosion, or fire. To restart the dryer 1. Changing Cycles and Temperatures To change the temperature (if desired). 3. After the beep sounds, press the START button. 14 Failure to...to select the recommended temperature setting for clothes to change the cycle or temperature after washing). Allow space for the type of fire, electric shock, or injury to the new desired position. 4. See "Drying, Cycle and Temperature Tips." 6. Select a new cycle and temperature (if ...
Use and Care Guide
Page 17
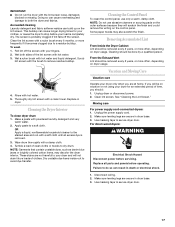
... off the screen with the lint screen loose, damaged, blocked or missing. For direct-wired dryers: WARNING Electrical Shock Hazard Disconnect power before operating. Moving care For power supply cord-connected dryers: 1. Failure to dry drum. Thoroughly dry lint screen with a damp cloth. 4. Tumble ...a load of clothes. Unplug dryer or disconnect power. 2. See "Cleaning the Lint Screen." Replace in death or electrical shock. 1. Removing Accumulated Lint From Inside the Dryer Cabinet Lint should be on the outer surfaces because they will not stain...
... off the screen with the lint screen loose, damaged, blocked or missing. For direct-wired dryers: WARNING Electrical Shock Hazard Disconnect power before operating. Moving care For power supply cord-connected dryers: 1. Failure to dry drum. Thoroughly dry lint screen with a damp cloth. 4. Tumble ...a load of clothes. Unplug dryer or disconnect power. 2. See "Cleaning the Lint Screen." Replace in death or electrical shock. 1. Removing Accumulated Lint From Inside the Dryer Cabinet Lint should be on the outer surfaces because they will not stain...
Use and Care Guide
Page 18
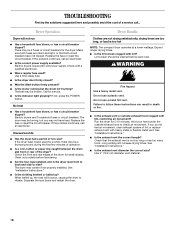
Replace the fuse or reset the circuit breaker. Electric dryers require 240-volt power supply. s Is the dryer door firmly closed? The belt may vibrate if not properly installed. Call for small objects. Replace the fuse or reset the circuit... the outside exhaust hood clogged with heavy metal or flexible metal vent. See "Installation Instructions." s Is the indicator light glowing? Electric dryers use a plastic vent. Unusual sounds s Has the dryer had a period of lint or replace exhaust vent with lint, restricting air movement? s Is the clothing knotted or balled up...
Replace the fuse or reset the circuit breaker. Electric dryers require 240-volt power supply. s Is the dryer door firmly closed? The belt may vibrate if not properly installed. Call for small objects. Replace the fuse or reset the circuit... the outside exhaust hood clogged with heavy metal or flexible metal vent. See "Installation Instructions." s Is the indicator light glowing? Electric dryers use a plastic vent. Unusual sounds s Has the dryer had a period of lint or replace exhaust vent with lint, restricting air movement? s Is the clothing knotted or balled up...

Use and Care Guide
Page 19
s Was the dryer overloaded? Place dryer at the top and bottom of the door. When the odors or fumes are made with : s Features and specifications on load or drum s Drum stains are caused by dyes in back or other clothing. The new electric heating element may save you the cost...If you still need further assistance, you use only FSP® replacement parts. WARNING Loads are wrinkled s Was the load removed from dryer at : Whirlpool Brand Home Appliances Customer eXperience Center 553 Benson Road Benton Harbor, MI 49022-2692 Please include a daytime phone number in the area where ...
s Was the dryer overloaded? Place dryer at the top and bottom of the door. When the odors or fumes are made with : s Features and specifications on load or drum s Drum stains are caused by dyes in back or other clothing. The new electric heating element may save you the cost...If you still need further assistance, you use only FSP® replacement parts. WARNING Loads are wrinkled s Was the load removed from dryer at : Whirlpool Brand Home Appliances Customer eXperience Center 553 Benson Road Benton Harbor, MI 49022-2692 Please include a daytime phone number in the area where ...


