User Manual
Page 2
APPENDIX TROUBLESHOOTING 18 CLEANING THE 1080P MONITOR 20 SPECIFICATIONS 20 i OSD FUNCTION OSD FUNCTION 12 PICTURE 13 PC PARAMETERS 14 AUDIO 15 PICTURE-IN-PICTURE 17 GENERAL SETTINGS 17 4. PRODUCT SAFETY SAFETY GUIDELINES 2 PRODUCT SAFETY INSTRUCTIONS 3 2. INSTALLATION PACKAGE CONTENTS 4 FRONT VIEW OF THE 1080PMONITOR 5 REAR VIEW OF THE 1080P MONITOR 5 SIDE VIEW OF THE 1080P MONITOR 6 REMOTE CONTROL 8 INSTALLATION 9 3. English CONTENTS 1.
APPENDIX TROUBLESHOOTING 18 CLEANING THE 1080P MONITOR 20 SPECIFICATIONS 20 i OSD FUNCTION OSD FUNCTION 12 PICTURE 13 PC PARAMETERS 14 AUDIO 15 PICTURE-IN-PICTURE 17 GENERAL SETTINGS 17 4. PRODUCT SAFETY SAFETY GUIDELINES 2 PRODUCT SAFETY INSTRUCTIONS 3 2. INSTALLATION PACKAGE CONTENTS 4 FRONT VIEW OF THE 1080PMONITOR 5 REAR VIEW OF THE 1080P MONITOR 5 SIDE VIEW OF THE 1080P MONITOR 6 REMOTE CONTROL 8 INSTALLATION 9 3. English CONTENTS 1.
User Manual
Page 4
... If a BNC cable used . If this device. 2 For 1080p monitors placed directly on a desk or table, only SJT type cord sets may cause harmful interference to radio communications if not installed and used in accordance with bonded ferrite cores. These limits are listed below for the... Figure A2 For the United States and Canada In the United States and Canada the male plug is connected. • Consult the Westinghouse Service Center or an experienced technician for assistance. Some examples are designed to operate this equipment does cause harmful interference to radio or ...
... If a BNC cable used . If this device. 2 For 1080p monitors placed directly on a desk or table, only SJT type cord sets may cause harmful interference to radio communications if not installed and used in accordance with bonded ferrite cores. These limits are listed below for the... Figure A2 For the United States and Canada In the United States and Canada the male plug is connected. • Consult the Westinghouse Service Center or an experienced technician for assistance. Some examples are designed to operate this equipment does cause harmful interference to radio or ...
User Manual
Page 10
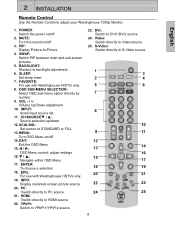
... timer 7. English 1. BACKLIGHT: Shortcut to STANDARD or FILL 13. FAVORITE: For use with Westinghouse HDTVs only. 8. CH/SOURCET / S: Source selection up/down 12. SCALING: Set screen to backlight adjustment 6. ENTER: To choose a selection 18. INFO: Display main/sub-screen picture source 20. PC: Switch directly to DVI1/DVI2 source 24. DVI: Switch to...
... timer 7. English 1. BACKLIGHT: Shortcut to STANDARD or FILL 13. FAVORITE: For use with Westinghouse HDTVs only. 8. CH/SOURCET / S: Source selection up/down 12. SCALING: Set screen to backlight adjustment 6. ENTER: To choose a selection 18. INFO: Display main/sub-screen picture source 20. PC: Switch directly to DVI1/DVI2 source 24. DVI: Switch to...
User Manual
Page 13
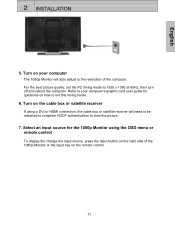
... key on how to 1920 x 1080 at 60Hz, then turn off and reboot the computer. English 2 INSTALLATION 5. For the best picture quality, set the PC timing mode to set this timing mode. 6. Select an input source for questions on the remote control. 11 Turn on the cable box or satellite receiver If... using the OSD menu or remote control To display the change the input source, press the Input button on the right side of the...
... key on how to 1920 x 1080 at 60Hz, then turn off and reboot the computer. English 2 INSTALLATION 5. For the best picture quality, set the PC timing mode to set this timing mode. 6. Select an input source for questions on the remote control. 11 Turn on the cable box or satellite receiver If... using the OSD menu or remote control To display the change the input source, press the Input button on the right side of the...
User Manual
Page 14
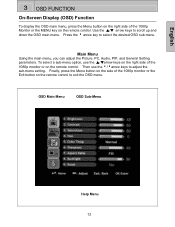
...the main menu, you can adjust the Picture, PC, Audio, PIP, and General Setting parameters. Finally, press the Menu button on the side of the 1080p monitor or ...the 1080p monitor or the Exit button on the remote control. English 3 OSD FUNCTION On-Screen Display (OSD) Function To display the OSD main menu, press the Menu button on the right side of the 1080p Monitor or... the MENU key on the remote control to select the desired OSD sub-menu. Use the ▲/▼ arrow keys to adjust the sub-menu setting...
...the main menu, you can adjust the Picture, PC, Audio, PIP, and General Setting parameters. Finally, press the Menu button on the side of the 1080p monitor or ...the 1080p monitor or the Exit button on the remote control. English 3 OSD FUNCTION On-Screen Display (OSD) Function To display the OSD main menu, press the Menu button on the right side of the 1080p Monitor or... the MENU key on the remote control to select the desired OSD sub-menu. Use the ▲/▼ arrow keys to adjust the sub-menu setting...
User Manual
Page 15
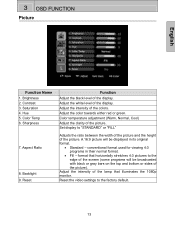
... format that illuminates the 1080p monitor. Saturation 4. Color Temp 6. Adjust the intensity of the display. A 16:9 picture will be displayed in their normal format. • Fill - Reset the video settings to the edge of the screen (some programs will be broadcasted with black or gray bars on... the top and bottom or sides of the picture). Sharpness 7. Set display to "STANDARD" or "FILL" Adjusts the ratio between the width of the picture and the height of the display. Adjust the intensity of the picture. Backlight 9. Reset Function Adjust the black ...
... format that illuminates the 1080p monitor. Saturation 4. Color Temp 6. Adjust the intensity of the display. A 16:9 picture will be displayed in their normal format. • Fill - Reset the video settings to the edge of the screen (some programs will be broadcasted with black or gray bars on... the top and bottom or sides of the picture). Sharpness 7. Set display to "STANDARD" or "FILL" Adjusts the ratio between the width of the picture and the height of the display. Adjust the intensity of the picture. Backlight 9. Reset Function Adjust the black ...

User Manual
Page 17
Treble Treble adjustment 4. Reset Reset audio settings 15 Balance Balance adjustment 5. English 3 OSD FUNCTION Audio Function Name Function 1. Speaker Select internal or external speakers 7. Bass Bass adjustment 3. Mute Turn audio On or Off 6. Volume Volume adjustment 2.
Treble Treble adjustment 4. Reset Reset audio settings 15 Balance Balance adjustment 5. English 3 OSD FUNCTION Audio Function Name Function 1. Speaker Select internal or external speakers 7. Bass Bass adjustment 3. Mute Turn audio On or Off 6. Volume Volume adjustment 2.
User Manual
Page 19
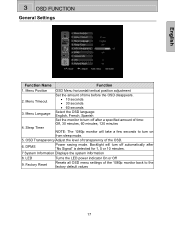
...OSD Menu horizontal/vertical position adjustment Set the amount of time: Off, 30 minutes, 60 minutes, 120 minutes NOTE: The 1080p monitor will take a few seconds to turn off automatically after "No Signal" is detected for 1, 5 or 10 minutes. 7 System Information Displays the system information 8. LED ...9. Factory Reset Turns the LED power indicator On or Off Resets all OSD menu settings of the OSD. 6. OSD Transparency Adjust the level of transparency of the 1080p monitor...
...OSD Menu horizontal/vertical position adjustment Set the amount of time: Off, 30 minutes, 60 minutes, 120 minutes NOTE: The 1080p monitor will take a few seconds to turn off automatically after "No Signal" is detected for 1, 5 or 10 minutes. 7 System Information Displays the system information 8. LED ...9. Factory Reset Turns the LED power indicator On or Off Resets all OSD menu settings of the OSD. 6. OSD Transparency Adjust the level of transparency of the 1080p monitor...
User Manual
Page 20
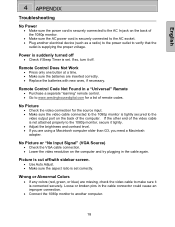
... "learning" remote control. • Go to www.westinghousedigital.com for the source input. • Make sure the video cable connected to the 1080p monitor is set . Wrong or Abnormal Colors • If any colors (red, green, or blue) are missing, check the video cable to make sure it is... set correctly. No Picture or "No Input Signal" (VGA Source) • Check the VGA cable connection. • Lower the video resolution on the back of the ...
... "learning" remote control. • Go to www.westinghousedigital.com for the source input. • Make sure the video cable connected to the 1080p monitor is set . Wrong or Abnormal Colors • If any colors (red, green, or blue) are missing, check the video cable to make sure it is... set correctly. No Picture or "No Input Signal" (VGA Source) • Check the VGA cable connection. • Lower the video resolution on the back of the ...
User Manual
Page 23
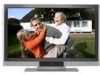
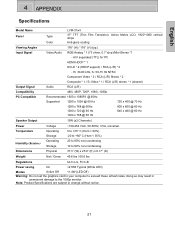
...(Hum < 90%) -20 to +60o C (Hum < 35%) Humidity (Relative) Operating Storage 20 to 90% non-condensing 10 to 90% non-condensing. Dimensions Physical 37.3" (W) x 25.9" (H) x 8.17" (D) Weight Net / Gross 49.6 lbs / 60.6 lbs Regulations UL/C-UL, FCC-B Power saving On H/V separated (TTL) for...(x2 Channels) Power Voltage ~100-264 VAC, 50-60Hz, 3.5A, universal. English 4 APPENDIX Specifications Model Name Panel Type Color LVM-37w3 37" TFT (Thin Film Transistor), Active Matrix LCD, 1920*1080 vertical stripe Anti-glare coating Viewing Angles 176° (H) / 176° (V) (typ.) Input...
...(Hum < 90%) -20 to +60o C (Hum < 35%) Humidity (Relative) Operating Storage 20 to 90% non-condensing 10 to 90% non-condensing. Dimensions Physical 37.3" (W) x 25.9" (H) x 8.17" (D) Weight Net / Gross 49.6 lbs / 60.6 lbs Regulations UL/C-UL, FCC-B Power saving On H/V separated (TTL) for...(x2 Channels) Power Voltage ~100-264 VAC, 50-60Hz, 3.5A, universal. English 4 APPENDIX Specifications Model Name Panel Type Color LVM-37w3 37" TFT (Thin Film Transistor), Active Matrix LCD, 1920*1080 vertical stripe Anti-glare coating Viewing Angles 176° (H) / 176° (V) (typ.) Input...


