
User Manual
Page 2
... / Reset 15 PC PARAMETERS: Auto Adjust / Clock / Phase / Position 16 AUDIO SETTINGS: Volume / Bass / Treble / Balance / MTS / Mute / Speaker / Reset 17 PICTURE-IN-PICTURE: Display Mode / Main Source / PIP Source / Swap / PIP Position / PIP Size / Audio From 18 CHANNEL SETTINGS: TV / CATV / Auto Scan / Channel EDIT / Close Caption 19 PARENTAL CONTROLS: Lock Menu / MPAA Rating / TV PG Rating / Password EDIT 19 GENERAL SETTINGS: Menu Position / Menu Timeout / Language / Sleep Timer / Transparency / DPMS / System Info / Factory Reset 21 Specifications 22 Troubleshooting 24
... / Reset 15 PC PARAMETERS: Auto Adjust / Clock / Phase / Position 16 AUDIO SETTINGS: Volume / Bass / Treble / Balance / MTS / Mute / Speaker / Reset 17 PICTURE-IN-PICTURE: Display Mode / Main Source / PIP Source / Swap / PIP Position / PIP Size / Audio From 18 CHANNEL SETTINGS: TV / CATV / Auto Scan / Channel EDIT / Close Caption 19 PARENTAL CONTROLS: Lock Menu / MPAA Rating / TV PG Rating / Password EDIT 19 GENERAL SETTINGS: Menu Position / Menu Timeout / Language / Sleep Timer / Transparency / DPMS / System Info / Factory Reset 21 Specifications 22 Troubleshooting 24
User Manual
Page 4
... remove the rear cover. The LCD TV shall be installed near a wall socket outlet and the plug on the LCD TV, audio/video cables, or power cord. • If the LCD TV emits smoke, abnormal noise, or a strange odor, immediately turn it off and contact the Westinghouse Service Center. • WARNING - Precautions • Avoid touching the screen. Skin oils are provided for a long period of the LCD TV and to . Orient your LCD TV...
... remove the rear cover. The LCD TV shall be installed near a wall socket outlet and the plug on the LCD TV, audio/video cables, or power cord. • If the LCD TV emits smoke, abnormal noise, or a strange odor, immediately turn it off and contact the Westinghouse Service Center. • WARNING - Precautions • Avoid touching the screen. Skin oils are provided for a long period of the LCD TV and to . Orient your LCD TV...
User Manual
Page 5
..., stand, tripod, bracket, or table specified by the manufacturer, or sold with the manufacturer's instructions. 8) Do not install near water. 6) Clean only with one wider than the other electric light or power circuits. When a cart is used for the grounding electrode. lightning may strike while you are holding the cable cord, causing serious injury. Install in any ventilation openings. Antenna Installation Safety Outdoor Antenna...
..., stand, tripod, bracket, or table specified by the manufacturer, or sold with the manufacturer's instructions. 8) Do not install near water. 6) Clean only with one wider than the other electric light or power circuits. When a cart is used for the grounding electrode. lightning may strike while you are holding the cable cord, causing serious injury. Install in any ventilation openings. Antenna Installation Safety Outdoor Antenna...
User Manual
Page 6
... Canada the male plug is connected. • Consult the Westinghouse Service Center or an experienced radio/TV technician for a Class B digital device, pursuant to part 15 of the cord set is encouraged to try to radio communications if not installed and used . Use the following measures: • Reorient or relocate the receiving antenna. • Increase the separation between the LCD TV and receiver. • Connect the equipment into...
... Canada the male plug is connected. • Consult the Westinghouse Service Center or an experienced radio/TV technician for a Class B digital device, pursuant to part 15 of the cord set is encouraged to try to radio communications if not installed and used . Use the following measures: • Reorient or relocate the receiving antenna. • Increase the separation between the LCD TV and receiver. • Connect the equipment into...

User Manual
Page 7
... to damage the screen and/or LCD TV case. This removes dust and other particles. 2. Cleaning the LCD TV • MAKE SURE THE LCD TV IS TURNED OFF • NEVER SPRAY OR POUR ANY LIQUID DIRECTLY ONTO THE SCREEN OR CASE To clean the screen: 1. Use a soft, dry cloth. 2. abrasive detergent onto a clean, soft, lint-free cloth, then wipe the surface. Westinghouse Digital will not...
... to damage the screen and/or LCD TV case. This removes dust and other particles. 2. Cleaning the LCD TV • MAKE SURE THE LCD TV IS TURNED OFF • NEVER SPRAY OR POUR ANY LIQUID DIRECTLY ONTO THE SCREEN OR CASE To clean the screen: 1. Use a soft, dry cloth. 2. abrasive detergent onto a clean, soft, lint-free cloth, then wipe the surface. Westinghouse Digital will not...
User Manual
Page 8
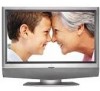
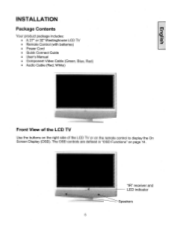
"IR" receiver and LED indicator Speakers 6 INSTALLATION Package Contents Your product package includes: • A 27" or 32" Westinghouse LCD TV • Remote Control (with batteries) • Power Cord • Quick Connect Guide • User's Manual • Component Video Cable (Green, Blue, Red) • Audio Cable (Red, White) Front View of the LCD TV Use the buttons on the right side of the LCD TV or on page 14. The OSD controls are defined in "OSD Functions" on the remote control to display the On Screen Display (OSD).
"IR" receiver and LED indicator Speakers 6 INSTALLATION Package Contents Your product package includes: • A 27" or 32" Westinghouse LCD TV • Remote Control (with batteries) • Power Cord • Quick Connect Guide • User's Manual • Component Video Cable (Green, Blue, Red) • Audio Cable (Red, White) Front View of the LCD TV Use the buttons on the right side of the LCD TV or on page 14. The OSD controls are defined in "OSD Functions" on the remote control to display the On Screen Display (OSD).
User Manual
Page 9
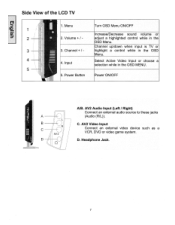
Power Button Power ON/OFF A- B R, C- C. Volume + / - Headphone Jack, 7 AV2 Video Input Connect an external video device such as a VCR, DVD or video game system. adjust a highlighted control while in the OSD Menu. 4 4. highlight a control while in the OSD Menu. AV 2 A/B. Menu Turn OSD Menu ON/OFF 1 Increase/Decrease sound volume or 2 2. Channel + / - Side View of the LCD TV 1. D. Channel up/down when input is TV or 3 3. Input Select Active Video Input or choose a selection while in the OSD MENU. 5 5. AV2 Audio Input (Left / Right) Connect an...
Power Button Power ON/OFF A- B R, C- C. Volume + / - Headphone Jack, 7 AV2 Video Input Connect an external video device such as a VCR, DVD or video game system. adjust a highlighted control while in the OSD Menu. 4 4. highlight a control while in the OSD Menu. AV 2 A/B. Menu Turn OSD Menu ON/OFF 1 Increase/Decrease sound volume or 2 2. Channel + / - Side View of the LCD TV 1. D. Channel up/down when input is TV or 3 3. Input Select Active Video Input or choose a selection while in the OSD MENU. 5 5. AV2 Audio Input (Left / Right) Connect an...

User Manual
Page 10
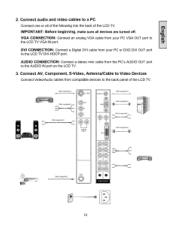
... 2. 1. AV1 Video Input Connect the Composite Video to this jack; (Audio (R/L). Audio Output (Right / Left) Connect this jack. 13 - - 11 12. AUDIO MO 7. YPbPr1 Audio 1 Input (Left / Right) Connect an external audio source to this output to an external video device such as VCR, DVD and video game system. 3. AC IN (Power) Connect the power cord from a computer. ANT (RF-input) Connect the LCD TV to this jack. 12-- -- 9 10 9. DVI Audio Input (Right / Left) Connect an external audio to an antenna or cable service 6. S-Video Input Connect to an external audio receiver...
... 2. 1. AV1 Video Input Connect the Composite Video to this jack; (Audio (R/L). Audio Output (Right / Left) Connect this jack. 13 - - 11 12. AUDIO MO 7. YPbPr1 Audio 1 Input (Left / Right) Connect an external audio source to this output to an external video device such as VCR, DVD and video game system. 3. AC IN (Power) Connect the power cord from a computer. ANT (RF-input) Connect the LCD TV to this jack. 12-- -- 9 10 9. DVI Audio Input (Right / Left) Connect an external audio to an antenna or cable service 6. S-Video Input Connect to an external audio receiver...

User Manual
Page 12
... Select AV1 / AV2 source input 10 POWER: Switch the power On/Off 2. SCALING Select Video Display format "STANDARD" or "FILL" or "ZOOM" 7. CHANNEL NUMBER KEYS Select specific channels 4. Display the source and channel information 11.PIP Display Sub picture On/Off 9 12.FREEZE 11 12 Freeze main screen 13.VOL -/ + 13 14 Volume Up/Down adjustment 14.CH V / A TV Channel Up/Down adjustment 15 17 15.YPbPr 16 Select YPbPr1 / YPbPr2 source input 16.PC 18...
... Select AV1 / AV2 source input 10 POWER: Switch the power On/Off 2. SCALING Select Video Display format "STANDARD" or "FILL" or "ZOOM" 7. CHANNEL NUMBER KEYS Select specific channels 4. Display the source and channel information 11.PIP Display Sub picture On/Off 9 12.FREEZE 11 12 Freeze main screen 13.VOL -/ + 13 14 Volume Up/Down adjustment 14.CH V / A TV Channel Up/Down adjustment 15 17 15.YPbPr 16 Select YPbPr1 / YPbPr2 source input 16.PC 18...
User Manual
Page 14
... CONNECTION: Connect a Digital DVI cable from the PC's AUDIO OUT port to the back panel of the LCD TV IMPORTANT: Before beginning, make sure all devices are turned off. OAVI e AUDIO IN ( Not supplied ) ( Not suppled MIS O Not supplied ) AUDIO OUT Not supplied ) DV ( Not supplied ANT O (1) O O 0 P NEN S 12 Connect audio and video cables to the LCD TV DVI-HDCP port. AUDIO CONNECTION: Connect a stereo mini cable from your PC VGA OUT port to the LCD TV VGA IN port. Connect AV, Component, S-Video, Antenna/Cable...
... CONNECTION: Connect a Digital DVI cable from the PC's AUDIO OUT port to the back panel of the LCD TV IMPORTANT: Before beginning, make sure all devices are turned off. OAVI e AUDIO IN ( Not supplied ) ( Not suppled MIS O Not supplied ) AUDIO OUT Not supplied ) DV ( Not supplied ANT O (1) O O 0 P NEN S 12 Connect audio and video cables to the LCD TV DVI-HDCP port. AUDIO CONNECTION: Connect a stereo mini cable from your PC VGA OUT port to the LCD TV VGA IN port. Connect AV, Component, S-Video, Antenna/Cable...

User Manual
Page 15
...'s user guide of the LCD TV, or press the Power ON (Red) button on the remote control. \ 000 0 O0 0 60 Power Button 6. 4. Connect power cables Connect the power cord to the LCD TV then to a PC (VGA/DVI): For the best picture quality, set this timing mode. 13 Turn Power On Press the Power ON button on TV Inputs: See page 19 to 1280 x 720 at 75Hz (for 27 inch LCD TV) or 1360 x 768 at 60Hz (for the LCD TV using the OSD menu or remote control 7. If connecting...
...'s user guide of the LCD TV, or press the Power ON (Red) button on the remote control. \ 000 0 O0 0 60 Power Button 6. 4. Connect power cables Connect the power cord to the LCD TV then to a PC (VGA/DVI): For the best picture quality, set this timing mode. 13 Turn Power On Press the Power ON button on TV Inputs: See page 19 to 1280 x 720 at 75Hz (for 27 inch LCD TV) or 1360 x 768 at 60Hz (for the LCD TV using the OSD menu or remote control 7. If connecting...
User Manual
Page 16
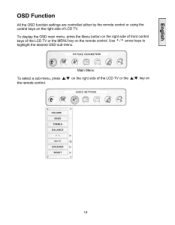
Use 4 / ► arrow keys to highlight the desired OSD sub-menu. AUDIO SETTINGS VOLUME BASS TREBLE BALANCE MUTE SPEAKER RESET 14 To display the OSD main menu, press the Menu button on the right side of front control keys of the LCD TV or the MENU key on the remote control. PICTURE PARAMETERS Main Menu To select a sub-menu, press A/V on the right side of LCD W. OSD Function All the OSD function settings are controlled either by the remote control or using the control keys on the right side of the LCD TV or the A/V key on the remote control.
Use 4 / ► arrow keys to highlight the desired OSD sub-menu. AUDIO SETTINGS VOLUME BASS TREBLE BALANCE MUTE SPEAKER RESET 14 To display the OSD main menu, press the Menu button on the right side of front control keys of the LCD TV or the MENU key on the remote control. PICTURE PARAMETERS Main Menu To select a sub-menu, press A/V on the right side of LCD W. OSD Function All the OSD function settings are controlled either by the remote control or using the control keys on the right side of the LCD TV or the A/V key on the remote control.
User Manual
Page 21
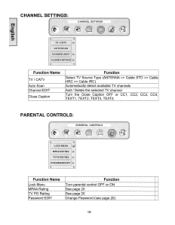
CHANNEL SETTINGS: CHANNEL SETTINGS TV/CATV AUTO SCAN CHANNEL EDIT % CLOSE CAPTION Function Name TV / CATV Auto Scan Channel EDIT Close Caption Function Select TV Source Type (ANTENNA => Cable STD => Cable HRC => Cable IRC) Automatically detect available TV channels Add / Delete the selected TV channel Turn the Close Caption OFF or CC1, CC2, CC3, CC4, TEXT1, TEXT2, TEXT3, TEXT4 PARENTAL CONTROLS: PARENTAL CONTROLS LOCK MENU MPAA RATING 3s i TV PG RATING PASSWORD EDIT Function Name Lock Menu MPAA Rating TV PG Rating Password EDIT Function Turn parental control OFF or ON See page 20 See ...
CHANNEL SETTINGS: CHANNEL SETTINGS TV/CATV AUTO SCAN CHANNEL EDIT % CLOSE CAPTION Function Name TV / CATV Auto Scan Channel EDIT Close Caption Function Select TV Source Type (ANTENNA => Cable STD => Cable HRC => Cable IRC) Automatically detect available TV channels Add / Delete the selected TV channel Turn the Close Caption OFF or CC1, CC2, CC3, CC4, TEXT1, TEXT2, TEXT3, TEXT4 PARENTAL CONTROLS: PARENTAL CONTROLS LOCK MENU MPAA RATING 3s i TV PG RATING PASSWORD EDIT Function Name Lock Menu MPAA Rating TV PG Rating Password EDIT Function Turn parental control OFF or ON See page 20 See ...
User Manual
Page 23
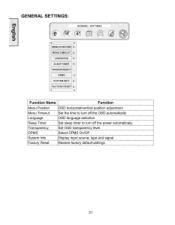
OPMS SYSTEM INFO FACTORY RESET. Function Name Function Menu Position OSD horizontal/vertical position adjustment Menu Timeout Set the time to turn off the OSD automatically Language OSD language selection Sleep Timer Set sleep timer to turn off the power automatically Transparency Set OSD transparency level DPMS Select DPMS On/Off System Info Display Input source, type and signal Factory Reset Restore factory default settings 21 GENERAL SETTINGS: GENERAL SETTINGS MENU POSITION MENU TIMEOUT LANGUAGE SLEEP TIMER TRANSPARENCY.
OPMS SYSTEM INFO FACTORY RESET. Function Name Function Menu Position OSD horizontal/vertical position adjustment Menu Timeout Set the time to turn off the OSD automatically Language OSD language selection Sleep Timer Set sleep timer to turn off the power automatically Transparency Set OSD transparency level DPMS Select DPMS On/Off System Info Display Input source, type and signal Factory Reset Restore factory default settings 21 GENERAL SETTINGS: GENERAL SETTINGS MENU POSITION MENU TIMEOUT LANGUAGE SLEEP TIMER TRANSPARENCY.
User Manual
Page 24
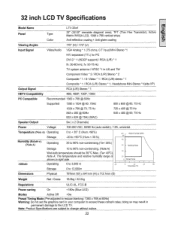
... Hz Speaker Output Power Voltage 9w ( x 2 Channels) 100-240 VAC, 50/60 Hz (auto switch), 1.8A, universal. 32 inch LCD TV Specifications Model Name Panel Type Color LTV-32w1 32" (32.02" viewable diagonal area), TFT (Thin Film Transistor), Active Matrix WXGA LCD, 1366 x 768 vertical stripe Anti-reflective coating + Anti-glare coating Viewing Angles Input Signal Video/Audio 170° (H) / 170° (V) VGA Analog * 1 (75 ohms, 0.7 Vp-p)/Mini-Stereo *1 HN separated (TTL) for PC DVI-D * 1 (HDCP support...
... Hz Speaker Output Power Voltage 9w ( x 2 Channels) 100-240 VAC, 50/60 Hz (auto switch), 1.8A, universal. 32 inch LCD TV Specifications Model Name Panel Type Color LTV-32w1 32" (32.02" viewable diagonal area), TFT (Thin Film Transistor), Active Matrix WXGA LCD, 1366 x 768 vertical stripe Anti-reflective coating + Anti-glare coating Viewing Angles Input Signal Video/Audio 170° (H) / 170° (V) VGA Analog * 1 (75 ohms, 0.7 Vp-p)/Mini-Stereo *1 HN separated (TTL) for PC DVI-D * 1 (HDCP support...
User Manual
Page 25
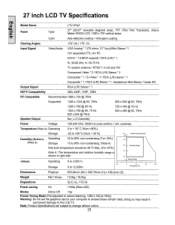
..., 50/60 Hz (auto switch), 1.6A, universal. 27 inch LCD TV Specifications Model Name LTV-27w2 Panel Type 27" (26.97" viewable diagonal area), TFT (Thin Film Transistor), Active Matrix WXGA LCD, 1280 x 720 vertical stripe Color Anti-reflective coating + Anti-glare coating Viewing Angles 170° (H) / 170° (V) Input Signal Video/Audio VGA Analog * 1 (75 ohms, 0.7 Vp-p)/Mini-Stereo *1 HN separated (TTL) for PC DVI-D * 1 (HDCP support) / RCA (L/R) * 1 fh...
..., 50/60 Hz (auto switch), 1.6A, universal. 27 inch LCD TV Specifications Model Name LTV-27w2 Panel Type 27" (26.97" viewable diagonal area), TFT (Thin Film Transistor), Active Matrix WXGA LCD, 1280 x 720 vertical stripe Color Anti-reflective coating + Anti-glare coating Viewing Angles 170° (H) / 170° (V) Input Signal Video/Audio VGA Analog * 1 (75 ohms, 0.7 Vp-p)/Mini-Stereo *1 HN separated (TTL) for PC DVI-D * 1 (HDCP support) / RCA (L/R) * 1 fh...

User Manual
Page 26
... Colors • If any colors (red, green, or blue) are missing, check the video cable to make sure it tightly. • Adjust brightness and contrast. • If you are not connected to the Headphone Jack on the remote control, so that headphones are using a Macintosh computer older than G3, you need a Macintosh adapter. • Check Source settings. Remote Control Buttons Do Not Work • Press only one button at a time. The LCD TV audio...
... Colors • If any colors (red, green, or blue) are missing, check the video cable to make sure it tightly. • Adjust brightness and contrast. • If you are not connected to the Headphone Jack on the remote control, so that headphones are using a Macintosh computer older than G3, you need a Macintosh adapter. • Check Source settings. Remote Control Buttons Do Not Work • Press only one button at a time. The LCD TV audio...
User Manual
Page 29
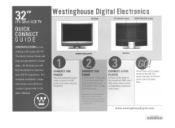
...complete installation, usage instructions, and safety precautions please refer to maximize your LCD TV experience. CONNECT THE CONNECT A LAID TUNER ; Press Power on the keypad to turn on the corresponding component connection panel. Refer to the table on purchasing a HD-ready LCD TV! 32" LTV-32w1 LCD TV QUICK CONNECT GUIDE CONGRATULATIONS on the back for connection to satellite set top box or digital cable. Westinghouse Digi al El•c r KEYPAD S-Video/AV Inputs VGA/YPbPr/DVI Inputs POWER INDICATOR Antenna CONNECT THE POWER Use the enclosed A/C power cable to connect...
...complete installation, usage instructions, and safety precautions please refer to maximize your LCD TV experience. CONNECT THE CONNECT A LAID TUNER ; Press Power on the keypad to turn on the corresponding component connection panel. Refer to the table on purchasing a HD-ready LCD TV! 32" LTV-32w1 LCD TV QUICK CONNECT GUIDE CONGRATULATIONS on the back for connection to satellite set top box or digital cable. Westinghouse Digi al El•c r KEYPAD S-Video/AV Inputs VGA/YPbPr/DVI Inputs POWER INDICATOR Antenna CONNECT THE POWER Use the enclosed A/C power cable to connect...
User Manual
Page 30
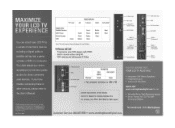
...Set computer resolution to 1366 x 768 Use the input button on the remote control or keypad to a variety of Westinghouse Electric Corporation and are trademarks of electronic devices including a digital cable or satellite set top box, a game console, a VCR, or a computer. Specifications subject to the User's Manual. © 2005 Westinghouse Digital Electronics, LLC. The chart shows our recommendations for the best quality picture for LCD TVs with S-Video 0 - 0 S-Video Input AV 1 Input S-Videe/AV 1 Audio I/O Input Audio Output YPbPr 2 (Component) YPbPr 2 Audio Input - (Component...
...Set computer resolution to 1366 x 768 Use the input button on the remote control or keypad to a variety of Westinghouse Electric Corporation and are trademarks of electronic devices including a digital cable or satellite set top box, a game console, a VCR, or a computer. Specifications subject to the User's Manual. © 2005 Westinghouse Digital Electronics, LLC. The chart shows our recommendations for the best quality picture for LCD TVs with S-Video 0 - 0 S-Video Input AV 1 Input S-Videe/AV 1 Audio I/O Input Audio Output YPbPr 2 (Component) YPbPr 2 Audio Input - (Component...

User Manual
Page 33
... service center. Damage to the Product resulting from date of installation, whichever occurs last. u HD Tuner with incompatible components or accessories; Replacement parts will supply new or rebuilt replacement parts in the United States of America or Canada. This warranty does not cover damage due to: (i) improper installation, set-up adjustments, operation, or maintenance; (ii) power surges, connection to the following terms and conditions: LABOR AND PARTS - Westinghouse Digital Electronics LCD TV...
... service center. Damage to the Product resulting from date of installation, whichever occurs last. u HD Tuner with incompatible components or accessories; Replacement parts will supply new or rebuilt replacement parts in the United States of America or Canada. This warranty does not cover damage due to: (i) improper installation, set-up adjustments, operation, or maintenance; (ii) power surges, connection to the following terms and conditions: LABOR AND PARTS - Westinghouse Digital Electronics LCD TV...


