
User Manual
Page 2
Contents Product Safety Instructions 2 Antenna Installation Safety 3 Safety Guidelines 4 Cleaning the LCD TV 5 INSTALLATION Package Contents 6 Front View of the LCD TV 6 Side View of the LCD TV 7 Rear View of the LCD TV 9 Remote Controls 10 Installation 11 OSD Functions PICTURE PARAMETERS: Brightness / Contrast / Saturation / Hue / Color Temp / Sharpness / Aspect Ratio / Backlight / Reset 15 PC PARAMETERS: Auto Adjust / Clock...
Contents Product Safety Instructions 2 Antenna Installation Safety 3 Safety Guidelines 4 Cleaning the LCD TV 5 INSTALLATION Package Contents 6 Front View of the LCD TV 6 Side View of the LCD TV 7 Rear View of the LCD TV 9 Remote Controls 10 Installation 11 OSD Functions PICTURE PARAMETERS: Brightness / Contrast / Saturation / Hue / Color Temp / Sharpness / Aspect Ratio / Backlight / Reset 15 PC PARAMETERS: Auto Adjust / Clock...

User Manual
Page 12
...LCD TV up to previous channel 5. LAST CH Switch to 23 feet away. 1. MENU/EXIT Turn OSD Menu On/Off or quit the TV 3 channel scanning 6. AV Select AV1 / AV2 source input 10 V / A / 1 /► 4 OSD MENU control 8. Display the source and channel information 11.PIP Display Sub picture... On/Off 9 12.FREEZE 11 12 Freeze main screen 13.VOL -/ + 13 14 Volume Up/Down adjustment 14.CH V / A TV Channel Up/Down adjustment 15 17 15.YPbPr 16 Select YPbPr1 / YPbPr2 source input...
...LCD TV up to previous channel 5. LAST CH Switch to 23 feet away. 1. MENU/EXIT Turn OSD Menu On/Off or quit the TV 3 channel scanning 6. AV Select AV1 / AV2 source input 10 V / A / 1 /► 4 OSD MENU control 8. Display the source and channel information 11.PIP Display Sub picture... On/Off 9 12.FREEZE 11 12 Freeze main screen 13.VOL -/ + 13 14 Volume Up/Down adjustment 14.CH V / A TV Channel Up/Down adjustment 15 17 15.YPbPr 16 Select YPbPr1 / YPbPr2 source input...

User Manual
Page 15
...Power Button 6. 4. Select input source for 32 inch LCD TV). Refer to the graphic card's user guide of your computer to set the timing mode of the LCD TV, or press the Power ON (Red) button on TV Inputs: See page 19 to a PC (VGA/DVI): For the best picture quality, set this timing mode. 13 Connect... power cables Connect the power cord to the LCD TV then to 1280 x 720 at 75Hz (for 27 inch LCD TV) or 1360 x 768 at 60Hz (for the LCD TV using the OSD menu or remote control 7. If connecting to...
...Power Button 6. 4. Select input source for 32 inch LCD TV). Refer to the graphic card's user guide of your computer to set the timing mode of the LCD TV, or press the Power ON (Red) button on TV Inputs: See page 19 to a PC (VGA/DVI): For the best picture quality, set this timing mode. 13 Connect... power cables Connect the power cord to the LCD TV then to 1280 x 720 at 75Hz (for 27 inch LCD TV) or 1360 x 768 at 60Hz (for the LCD TV using the OSD menu or remote control 7. If connecting to...
User Manual
Page 16
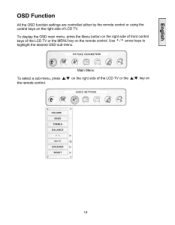
To display the OSD main menu, press the Menu button on the right side of front control keys of the LCD TV or the MENU key on the right side of the LCD TV or the A/V key on the remote control. OSD Function All the OSD function settings are controlled either by the remote control or using the control keys on the remote control. PICTURE PARAMETERS Main Menu To select a sub-menu, press A/V on the right side of LCD W. AUDIO SETTINGS VOLUME BASS TREBLE BALANCE MUTE SPEAKER RESET 14 Use 4 / ► arrow keys to highlight the desired OSD sub-menu.
To display the OSD main menu, press the Menu button on the right side of front control keys of the LCD TV or the MENU key on the right side of the LCD TV or the A/V key on the remote control. OSD Function All the OSD function settings are controlled either by the remote control or using the control keys on the remote control. PICTURE PARAMETERS Main Menu To select a sub-menu, press A/V on the right side of LCD W. AUDIO SETTINGS VOLUME BASS TREBLE BALANCE MUTE SPEAKER RESET 14 Use 4 / ► arrow keys to highlight the desired OSD sub-menu.
User Manual
Page 17
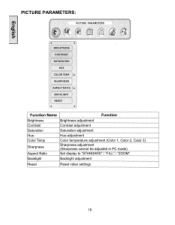
PICTURE PARAMETERS: PICTURE PARAMETERS BRIGHTNESS CONTRAST SATURATION HUE COLOR TEMP SHARPNESS ASPECT RATIO BACKLIGHT RESET Function Name Function Brightness Brightness adjustment Contrast Contrast adjustment Saturation Saturation adjustment Hue Color Temp Sharpness Aspect Ratio Hue adjustment Color temperature adjustment (Color 1, Color 2, Color 3) Sharpness adjustment (Sharpness cannot be adjusted in PC mode) Set display to "STANDARD" / "FILL" / "ZOOM" Backlight Backlight adjustment Reset Reset video settings 15
PICTURE PARAMETERS: PICTURE PARAMETERS BRIGHTNESS CONTRAST SATURATION HUE COLOR TEMP SHARPNESS ASPECT RATIO BACKLIGHT RESET Function Name Function Brightness Brightness adjustment Contrast Contrast adjustment Saturation Saturation adjustment Hue Color Temp Sharpness Aspect Ratio Hue adjustment Color temperature adjustment (Color 1, Color 2, Color 3) Sharpness adjustment (Sharpness cannot be adjusted in PC mode) Set display to "STANDARD" / "FILL" / "ZOOM" Backlight Backlight adjustment Reset Reset video settings 15
User Manual
Page 30
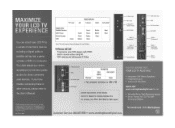
.... The chart shows our recommendations for the best quality picture for LCD TVs with S-Video 0 - 0 S-Video Input AV 1 Input S-Videe/AV 1 Audio I/O Input Audio Output YPbPr 2 (Component) YPbPr 2 Audio Input - (Component) - Westinghouse and You can he sure... Antenna/Cable VGA Audio ...: 866.287.5555 • www.westinghousedigital.com You can be sure...if Westinghouse MAXIMIZE YOUR LCD TV EXPERIENCE You can attach your LCD TV to the User's Manual. © 2005 Westinghouse Digital Electronics, LLC. YOUR LCD TV ALSO HAS: • Integrated 9 W Stereo Speakers • Progressive Scan ...
.... The chart shows our recommendations for the best quality picture for LCD TVs with S-Video 0 - 0 S-Video Input AV 1 Input S-Videe/AV 1 Audio I/O Input Audio Output YPbPr 2 (Component) YPbPr 2 Audio Input - (Component) - Westinghouse and You can he sure... Antenna/Cable VGA Audio ...: 866.287.5555 • www.westinghousedigital.com You can be sure...if Westinghouse MAXIMIZE YOUR LCD TV EXPERIENCE You can attach your LCD TV to the User's Manual. © 2005 Westinghouse Digital Electronics, LLC. YOUR LCD TV ALSO HAS: • Integrated 9 W Stereo Speakers • Progressive Scan ...


