User Manual
Page 4
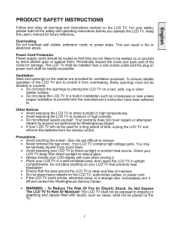
... LCD TV on the LCD TV, audio/video cables, or power cord. • If the LCD TV emits smoke, abnormal noise, or a strange odor, immediately turn it . • Place your LCD TV will not be placed on the cabinet are provided for future reference. The LCD TV shall be installed near a wall socket outlet and the plug on or pinched by Westinghouse...
... LCD TV on the LCD TV, audio/video cables, or power cord. • If the LCD TV emits smoke, abnormal noise, or a strange odor, immediately turn it . • Place your LCD TV will not be placed on the cabinet are provided for future reference. The LCD TV shall be installed near a wall socket outlet and the plug on or pinched by Westinghouse...
User Manual
Page 5
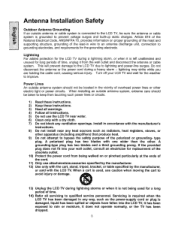
... apparatus (including amplifiers) that produce heat. 9) Do not attempt to rain or moisture, it does not operate normally, or the TV has been dropped. 3 Turn off your wall outlet, consult an electrician for long periods of time. 14) Refer all instructions. 5) Do not use attachments/accessories...walked on proper grounding of the mast and supporting structure, grounding of overhead power lines or other . Lightning For added protection for the LCD TV during a heavy storm - Power Lines An outside antenna system should be taken to keep from being used , use caution when moving...
... apparatus (including amplifiers) that produce heat. 9) Do not attempt to rain or moisture, it does not operate normally, or the TV has been dropped. 3 Turn off your wall outlet, consult an electrician for long periods of time. 14) Refer all instructions. 5) Do not use attachments/accessories...walked on proper grounding of the mast and supporting structure, grounding of overhead power lines or other . Lightning For added protection for the LCD TV during a heavy storm - Power Lines An outside antenna system should be taken to keep from being used , use caution when moving...
User Manual
Page 6
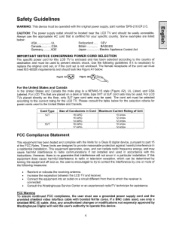
... turning the equipment off and on, the user is connected. • Consult the Westinghouse Service Center or an experienced radio/TV technician for assistance. Safety Guidelines WARNING: This device must be operated with bonded ferrite cores. Use the following measures: • Reorient or relocate the receiving antenna. • Increase the separation between the LCD TV...
... turning the equipment off and on, the user is connected. • Consult the Westinghouse Service Center or an experienced radio/TV technician for assistance. Safety Guidelines WARNING: This device must be operated with bonded ferrite cores. Use the following measures: • Reorient or relocate the receiving antenna. • Increase the separation between the LCD TV...

User Manual
Page 7
Cleaning the LCD TV • MAKE SURE THE LCD TV IS TURNED OFF • NEVER SPRAY OR POUR ANY LIQUID DIRECTLY ONTO THE SCREEN OR CASE To clean the screen: 1. Disclaimer Westinghouse Digital does not recommend the use of non-ammonia, non-alcohol based, mild non- To clean the case: 1. Some chemical cleaners have been reported to...
Cleaning the LCD TV • MAKE SURE THE LCD TV IS TURNED OFF • NEVER SPRAY OR POUR ANY LIQUID DIRECTLY ONTO THE SCREEN OR CASE To clean the screen: 1. Disclaimer Westinghouse Digital does not recommend the use of non-ammonia, non-alcohol based, mild non- To clean the case: 1. Some chemical cleaners have been reported to...
User Manual
Page 9
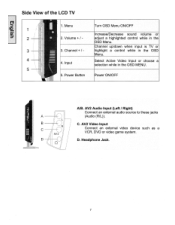
.... Channel up/down when input is TV or 3 3. AV2 Audio Input (Left / Right) Connect an external audio source to these jacks (Audio (R/L)). Input Select Active Video Input or choose a selection while in the OSD MENU. 5 5. AV 2 A/B. Power Button Power ON/OFF A- Side View of the LCD TV 1. Menu Turn OSD Menu ON/OFF 1 Increase...
.... Channel up/down when input is TV or 3 3. AV2 Audio Input (Left / Right) Connect an external audio source to these jacks (Audio (R/L)). Input Select Active Video Input or choose a selection while in the OSD MENU. 5 5. AV 2 A/B. Power Button Power ON/OFF A- Side View of the LCD TV 1. Menu Turn OSD Menu ON/OFF 1 Increase...

User Manual
Page 12
...LCD TV up to previous channel 5. LAST CH Switch to 23 feet away. 1. SCALING Select Video Display format "STANDARD" or "FILL" or "ZOOM" 7. AV Select AV1 / AV2 source input 10 MUTE Turn the Sound On/Off 7 8 10.INFO. INPUT Select input source 3. MENU/EXIT Turn... OSD Menu On/Off or quit the TV 3 channel scanning 6. CHANNEL NUMBER KEYS Select specific channels 4. Enter 5 6 Execute a command...
...LCD TV up to previous channel 5. LAST CH Switch to 23 feet away. 1. SCALING Select Video Display format "STANDARD" or "FILL" or "ZOOM" 7. AV Select AV1 / AV2 source input 10 MUTE Turn the Sound On/Off 7 8 10.INFO. INPUT Select input source 3. MENU/EXIT Turn... OSD Menu On/Off or quit the TV 3 channel scanning 6. CHANNEL NUMBER KEYS Select specific channels 4. Enter 5 6 Execute a command...
User Manual
Page 14
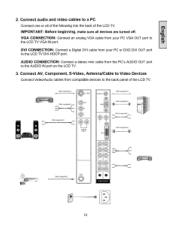
...Connect audio and video cables to a PC Connect one or all devices are turned off. Connect AV, Component, S-Video, Antenna/Cable to Video Devices Connect Video/Audio cables from your PC VGA OUT port to the LCD TV DVI-HDCP port. DVI CONNECTION: Connect a Digital DVI cable from compatible devices ... CONNECTION: Connect an analog VGA cable from the PC's AUDIO OUT port to the back panel of the LCD TV IMPORTANT: Before beginning, make sure all of the following into the back of the LCD TV. ( Nol supplied ) ( Not supplied ) s- AUDIO CONNECTION: Connect a stereo mini cable from your PC ...
...Connect audio and video cables to a PC Connect one or all devices are turned off. Connect AV, Component, S-Video, Antenna/Cable to Video Devices Connect Video/Audio cables from your PC VGA OUT port to the LCD TV DVI-HDCP port. DVI CONNECTION: Connect a Digital DVI cable from compatible devices ... CONNECTION: Connect an analog VGA cable from the PC's AUDIO OUT port to the back panel of the LCD TV IMPORTANT: Before beginning, make sure all of the following into the back of the LCD TV. ( Nol supplied ) ( Not supplied ) s- AUDIO CONNECTION: Connect a stereo mini cable from your PC ...

User Manual
Page 15
... the timing mode of the LCD TV, or press the Power ON (Red) button on TV Inputs: See page 19 to a properly grounded AC outlet. 27 inch LCD TV 32 inch LCD TV 5. If connecting to Antenna, Cable or other RF source on the remote control. \ 000 0 O0 0 60 Power Button 6. Turn Power On Press the Power ...ON button on the right side of you computer to a PC (VGA/DVI): For the best picture quality, set this timing mode. 13 If connecting to 1280 x 720 at 75Hz (for 27 inch LCD TV) or 1360 x 768 at 60Hz (for the LCD TV using the ...
... the timing mode of the LCD TV, or press the Power ON (Red) button on TV Inputs: See page 19 to a properly grounded AC outlet. 27 inch LCD TV 32 inch LCD TV 5. If connecting to Antenna, Cable or other RF source on the remote control. \ 000 0 O0 0 60 Power Button 6. Turn Power On Press the Power ...ON button on the right side of you computer to a PC (VGA/DVI): For the best picture quality, set this timing mode. 13 If connecting to 1280 x 720 at 75Hz (for 27 inch LCD TV) or 1360 x 768 at 60Hz (for the LCD TV using the ...
User Manual
Page 21
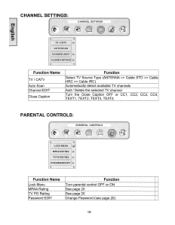
... AUTO SCAN CHANNEL EDIT % CLOSE CAPTION Function Name TV / CATV Auto Scan Channel EDIT Close Caption Function Select TV Source Type (ANTENNA => Cable STD => Cable HRC => Cable IRC) Automatically detect available TV channels Add / Delete the selected TV channel Turn the Close Caption OFF or CC1, CC2, CC3, CC4, ...TEXT1, TEXT2, TEXT3, TEXT4 PARENTAL CONTROLS: PARENTAL CONTROLS LOCK MENU MPAA RATING 3s i TV PG RATING PASSWORD EDIT Function Name Lock Menu MPAA Rating TV PG Rating Password EDIT Function Turn parental control OFF or ON See page 20 See page 20 Change Password (see page 20) ...
... AUTO SCAN CHANNEL EDIT % CLOSE CAPTION Function Name TV / CATV Auto Scan Channel EDIT Close Caption Function Select TV Source Type (ANTENNA => Cable STD => Cable HRC => Cable IRC) Automatically detect available TV channels Add / Delete the selected TV channel Turn the Close Caption OFF or CC1, CC2, CC3, CC4, ...TEXT1, TEXT2, TEXT3, TEXT4 PARENTAL CONTROLS: PARENTAL CONTROLS LOCK MENU MPAA RATING 3s i TV PG RATING PASSWORD EDIT Function Name Lock Menu MPAA Rating TV PG Rating Password EDIT Function Turn parental control OFF or ON See page 20 See page 20 Change Password (see page 20) ...
User Manual
Page 23
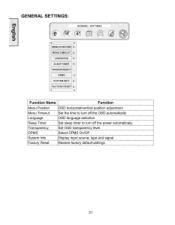
GENERAL SETTINGS: GENERAL SETTINGS MENU POSITION MENU TIMEOUT LANGUAGE SLEEP TIMER TRANSPARENCY. Function Name Function Menu Position OSD horizontal/vertical position adjustment Menu Timeout Set the time to turn off the OSD automatically Language OSD language selection Sleep Timer Set sleep timer to turn off the power automatically Transparency Set OSD transparency level DPMS Select DPMS On/Off System Info Display Input source, type and signal Factory Reset Restore factory default settings 21 OPMS SYSTEM INFO FACTORY RESET.
GENERAL SETTINGS: GENERAL SETTINGS MENU POSITION MENU TIMEOUT LANGUAGE SLEEP TIMER TRANSPARENCY. Function Name Function Menu Position OSD horizontal/vertical position adjustment Menu Timeout Set the time to turn off the OSD automatically Language OSD language selection Sleep Timer Set sleep timer to turn off the power automatically Transparency Set OSD transparency level DPMS Select DPMS On/Off System Info Display Input source, type and signal Factory Reset Restore factory default settings 21 OPMS SYSTEM INFO FACTORY RESET.
User Manual
Page 29
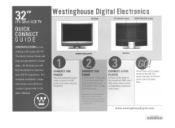
32" LTV-32w1 LCD TV QUICK CONNECT GUIDE CONGRATULATIONS on the LCD TV. audio inputs. This Quick Connect Guide will find information to the power input on purchasing a HD-ready LCD TV! Westinghouse Digi al El•c r KEYPAD S-Video/AV Inputs VGA/YPbPr/DVI Inputs POWER INDICATOR Antenna CONNECT THE POWER Use the...the input labeled "ANT" on the front panel of the LCD glows blue. CONNECT THE CONNECT A LAID TUNER ; On the back you will help you do not use these options. Press Power on the keypad to turn on the back for connection to the User's Manual. For ...
32" LTV-32w1 LCD TV QUICK CONNECT GUIDE CONGRATULATIONS on the LCD TV. audio inputs. This Quick Connect Guide will find information to the power input on purchasing a HD-ready LCD TV! Westinghouse Digi al El•c r KEYPAD S-Video/AV Inputs VGA/YPbPr/DVI Inputs POWER INDICATOR Antenna CONNECT THE POWER Use the...the input labeled "ANT" on the front panel of the LCD glows blue. CONNECT THE CONNECT A LAID TUNER ; On the back you will help you do not use these options. Press Power on the keypad to turn on the back for connection to the User's Manual. For ...


