
User Manual
Page 2
... Product Safety Instructions 2 Antenna Installation Safety 3 Safety Guidelines 4 Cleaning the LCD TV 5 INSTALLATION Package Contents 6 Front View of the LCD TV 6 Side View of the LCD TV 7 Rear View of the LCD TV 9 Remote Controls 10 Installation 11 OSD Functions PICTURE PARAMETERS: Brightness / Contrast / Saturation.../ Swap / PIP Position / PIP Size / Audio From 18 CHANNEL SETTINGS: TV / CATV / Auto Scan / Channel EDIT / Close Caption 19 PARENTAL CONTROLS: Lock Menu / MPAA Rating / TV PG Rating / Password EDIT 19 GENERAL SETTINGS: Menu Position / Menu Timeout /...
... Product Safety Instructions 2 Antenna Installation Safety 3 Safety Guidelines 4 Cleaning the LCD TV 5 INSTALLATION Package Contents 6 Front View of the LCD TV 6 Side View of the LCD TV 7 Rear View of the LCD TV 9 Remote Controls 10 Installation 11 OSD Functions PICTURE PARAMETERS: Brightness / Contrast / Saturation.../ Swap / PIP Position / PIP Size / Audio From 18 CHANNEL SETTINGS: TV / CATV / Auto Scan / Channel EDIT / Close Caption 19 PARENTAL CONTROLS: Lock Menu / MPAA Rating / TV PG Rating / Password EDIT 19 GENERAL SETTINGS: Menu Position / Menu Timeout /...
User Manual
Page 4
...cover repairs or attempted repairs by anyone not authorized by Westinghouse Digital. • If your safety, please read all warnings and instructions marked on the LCD TV, audio/video cables, or power cord. • If the LCD TV emits smoke, abnormal noise, or a strange odor,... immediately turn it off and contact the Westinghouse Service Center. • WARNING - This can result in airtight compartments. Skin oils are provided for future reference. Orient your LCD TV away from the remote control. The LCD TV shall not be readily accessible. Keep m this user's ...
...cover repairs or attempted repairs by anyone not authorized by Westinghouse Digital. • If your safety, please read all warnings and instructions marked on the LCD TV, audio/video cables, or power cord. • If the LCD TV emits smoke, abnormal noise, or a strange odor,... immediately turn it off and contact the Westinghouse Service Center. • WARNING - This can result in airtight compartments. Skin oils are provided for future reference. Orient your LCD TV away from the remote control. The LCD TV shall not be readily accessible. Keep m this user's ...
User Manual
Page 8
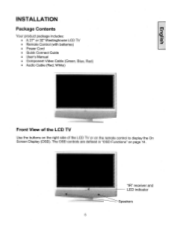
The OSD controls are defined in "OSD Functions" on the remote control to display the On Screen Display (OSD). "IR" receiver and LED indicator Speakers 6 INSTALLATION Package Contents Your product package includes: • A 27" or 32" Westinghouse LCD TV • Remote Control (with batteries) • Power Cord • Quick Connect Guide • User's Manual • Component Video Cable (Green, Blue, Red) • Audio Cable (Red, White) Front View of the LCD TV Use the buttons on the right side of the LCD TV or on page 14.
The OSD controls are defined in "OSD Functions" on the remote control to display the On Screen Display (OSD). "IR" receiver and LED indicator Speakers 6 INSTALLATION Package Contents Your product package includes: • A 27" or 32" Westinghouse LCD TV • Remote Control (with batteries) • Power Cord • Quick Connect Guide • User's Manual • Component Video Cable (Green, Blue, Red) • Audio Cable (Red, White) Front View of the LCD TV Use the buttons on the right side of the LCD TV or on page 14.

User Manual
Page 12
... input 10 CHANNEL NUMBER KEYS Select specific channels 4. SCALING Select Video Display format "STANDARD" or "FILL" or "ZOOM" 7. Enter 5 6 Execute a command 9. Remote Control The Remote Control will transmit to the LCD TV up to previous channel 5. Display the source and channel information 11.PIP Display Sub picture On/Off 9 12.FREEZE 11 12 Freeze...
... input 10 CHANNEL NUMBER KEYS Select specific channels 4. SCALING Select Video Display format "STANDARD" or "FILL" or "ZOOM" 7. Enter 5 6 Execute a command 9. Remote Control The Remote Control will transmit to the LCD TV up to previous channel 5. Display the source and channel information 11.PIP Display Sub picture On/Off 9 12.FREEZE 11 12 Freeze...
User Manual
Page 13
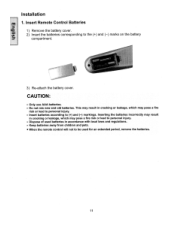
... (+) and (-) marks on the battery compartment. 3) Re-attach the battery cover. Keep batteries away from children and pets. • When the remote control will not to personal injury. . Insert Remote Control Batteries 1) Remove the battery cover. 2) Insert the batteries corresponding to (+) and (-) markings. Inserting the batteries incorrectly may result in accordance with...
... (+) and (-) marks on the battery compartment. 3) Re-attach the battery cover. Keep batteries away from children and pets. • When the remote control will not to personal injury. . Insert Remote Control Batteries 1) Remove the battery cover. 2) Insert the batteries corresponding to (+) and (-) markings. Inserting the batteries incorrectly may result in accordance with...

User Manual
Page 15
... set the timing mode of the LCD TV, or press the Power ON (Red) button on the remote control. \ 000 0 O0 0 60 Power Button 6. Select input source for 32 inch LCD TV). If connecting to a properly grounded AC outlet. 27 inch LCD TV 32 inch LCD TV 5. Connect power cables Connect the power cord to the LCD TV then to a PC (VGA/DVI...
... set the timing mode of the LCD TV, or press the Power ON (Red) button on the remote control. \ 000 0 O0 0 60 Power Button 6. Select input source for 32 inch LCD TV). If connecting to a properly grounded AC outlet. 27 inch LCD TV 32 inch LCD TV 5. Connect power cables Connect the power cord to the LCD TV then to a PC (VGA/DVI...
User Manual
Page 16
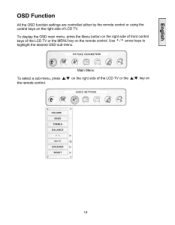
OSD Function All the OSD function settings are controlled either by the remote control or using the control keys on the right side of the LCD TV or the MENU key on the remote control. To display the OSD main menu, press the Menu button on the remote control. AUDIO SETTINGS VOLUME BASS TREBLE BALANCE MUTE SPEAKER RESET 14 PICTURE PARAMETERS Main Menu To select a sub-menu, press A/V on the right side of the LCD TV or the A/V key on the right side of front control keys of LCD W. Use 4 / ► arrow keys to highlight the desired OSD sub-menu.
OSD Function All the OSD function settings are controlled either by the remote control or using the control keys on the right side of the LCD TV or the MENU key on the remote control. To display the OSD main menu, press the Menu button on the remote control. AUDIO SETTINGS VOLUME BASS TREBLE BALANCE MUTE SPEAKER RESET 14 PICTURE PARAMETERS Main Menu To select a sub-menu, press A/V on the right side of the LCD TV or the A/V key on the right side of front control keys of LCD W. Use 4 / ► arrow keys to highlight the desired OSD sub-menu.

User Manual
Page 26
... Issues • Remember that headphones are not connected to the Headphone Jack on the back of the video cable is not attached properly to the LCD TV, secure it tightly. • Adjust brightness and contrast. • If you are missing, check the video cable to make sure it is "LOST" •... LED). • Make sure AC power cord is securely connected to the AC socket. • Plug another computer. The LCD TV audio may be set to SAP or minimum. • Press the Volume + (Up) key on the remote control. • Make sure that S-Video and Composite (AV1) share the same audio source.
... Issues • Remember that headphones are not connected to the Headphone Jack on the back of the video cable is not attached properly to the LCD TV, secure it tightly. • Adjust brightness and contrast. • If you are missing, check the video cable to make sure it is "LOST" •... LED). • Make sure AC power cord is securely connected to the AC socket. • Plug another computer. The LCD TV audio may be set to SAP or minimum. • Press the Volume + (Up) key on the remote control. • Make sure that S-Video and Composite (AV1) share the same audio source.
User Manual
Page 27
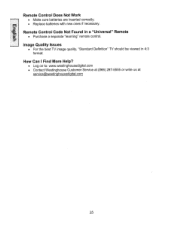
Remote Control Does Not Work • Make sure batteries are inserted correctly. • Replace batteries with new ones if necessary. Image Quality Issues • For the best TV image quality, "Standard Definition" TV should be viewed in a "Universal" Remote • Purchase a separate "learning" remote control. How Can I Find More Help? • Log on to: www.westinghousedigital.com • Contact Westinghouse Customer Service at (866) 287-5555 or write us at servicewestinghousediqital.com 25 Remote Control Code Not Found in 4:3 format.
Remote Control Does Not Work • Make sure batteries are inserted correctly. • Replace batteries with new ones if necessary. Image Quality Issues • For the best TV image quality, "Standard Definition" TV should be viewed in a "Universal" Remote • Purchase a separate "learning" remote control. How Can I Find More Help? • Log on to: www.westinghousedigital.com • Contact Westinghouse Customer Service at (866) 287-5555 or write us at servicewestinghousediqital.com 25 Remote Control Code Not Found in 4:3 format.
User Manual
Page 30
... action using AV VCR viewing and editing with Acoustical Mattes Customer Service: 866.287.5555 • www.westinghousedigital.com You can be sure...if Westinghouse Westinghouse and You can attach your LCD TV to the User's Manual. © 2005 Westinghouse Digital Electronics, LLC. Specifications subject to navigate between AV and S-Video. MA-PS-0112-0501... Input DVI-HDCP Monitor PC INPUTS VGA (RGB) DVI-HDCP Good Best • Set computer resolution to 1366 x 768 Use the input button on the remote control or keypad to change without notice.
... action using AV VCR viewing and editing with Acoustical Mattes Customer Service: 866.287.5555 • www.westinghousedigital.com You can be sure...if Westinghouse Westinghouse and You can attach your LCD TV to the User's Manual. © 2005 Westinghouse Digital Electronics, LLC. Specifications subject to navigate between AV and S-Video. MA-PS-0112-0501... Input DVI-HDCP Monitor PC INPUTS VGA (RGB) DVI-HDCP Good Best • Set computer resolution to 1366 x 768 Use the input button on the remote control or keypad to change without notice.


