
English Manual
Page 2
.... raiaeck.The•!!ww• eightsa,iwi•lli,fell•*ith•greattorCe.....• 13. oei..nyloO.StrapWheri•••:weightS,are..: sure that could become pinched between the leg press upright and the mili- .2:. This is placed on the pul-, a Never...8226;e• •-r•h a••..tal! TABLE OF CONTENTS IMPORTANT PRECAUTIONS BEFORE YOU BEGIN ASSEMBLY HOW TO USE THE HOME GYM SYSTEM WEIGHT RESISTANCE CHART TROUBLE-SHOOTING AND MAINTENANCE CABLE DIAGRAMS ORDERING REPLACEMENT PARTS FULL 90 DAY WARRANTY 2 3 4 22 24 25 26 Back Cover Back...
.... raiaeck.The•!!ww• eightsa,iwi•lli,fell•*ith•greattorCe.....• 13. oei..nyloO.StrapWheri•••:weightS,are..: sure that could become pinched between the leg press upright and the mili- .2:. This is placed on the pul-, a Never...8226;e• •-r•h a••..tal! TABLE OF CONTENTS IMPORTANT PRECAUTIONS BEFORE YOU BEGIN ASSEMBLY HOW TO USE THE HOME GYM SYSTEM WEIGHT RESISTANCE CHART TROUBLE-SHOOTING AND MAINTENANCE CABLE DIAGRAMS ORDERING REPLACEMENT PARTS FULL 90 DAY WARRANTY 2 3 4 22 24 25 26 Back Cover Back...
English Manual
Page 3
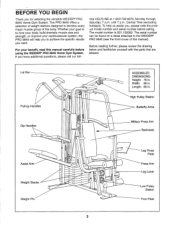
... manual). The serial number can be found on a decal attached to achieve the specific results you for selecting the versatile WEIDER® PRO 9645 Home Gym System. For your goal is 831.159380. Central Time (excluding holidays). High Pulley Station Butterfly Arms Military Press...Foot Plate 3 If you , please note the product model number and serial number before using the WEIDER® PRO 9645 Home Gym System. The PRO 9645 offers a selection of weight stations designed to develop every major muscle group of this manual carefully before calling. Before reading further,...
... manual). The serial number can be found on a decal attached to achieve the specific results you for selecting the versatile WEIDER® PRO 9645 Home Gym System. For your goal is 831.159380. Central Time (excluding holidays). High Pulley Station Butterfly Arms Military Press...Foot Plate 3 If you , please note the product model number and serial number before using the WEIDER® PRO 9645 Home Gym System. The PRO 9645 offers a selection of weight stations designed to develop every major muscle group of this manual carefully before calling. Before reading further,...
English Manual
Page 6
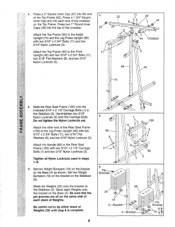
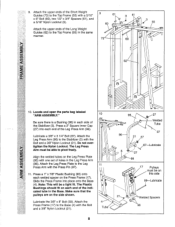
...with two 5/16" x 2 3/4" Bolts (11) and two 5/16" Nylon Locknuts (3). Hand-tighten two 5/16" Nylon Locknuts (3) onto the Carriage Bolts. Set two Weight Bumpers (19) on the bracket on the Stabilizer (5). Press two 1" Round Inner Caps (49) into the end 4 of the Rear Seat Frame (100) to the... Frame (55). Attach the Handle (82) to tip either stack of the crossbar on the Base (4) as shown. Stack eight Weights onto the bracket on the same side of each end of Weights (25) until step 8 is complete. 5 56 8 3 6 Pin -y Grooves o 1 11 3 1 25 6 25 19 5-Bracket 4-Bracket 6 100...
...with two 5/16" x 2 3/4" Bolts (11) and two 5/16" Nylon Locknuts (3). Hand-tighten two 5/16" Nylon Locknuts (3) onto the Carriage Bolts. Set two Weight Bumpers (19) on the bracket on the Stabilizer (5). Press two 1" Round Inner Caps (49) into the end 4 of the Rear Seat Frame (100) to the... Frame (55). Attach the Handle (82) to tip either stack of the crossbar on the Base (4) as shown. Stack eight Weights onto the bracket on the same side of each end of Weights (25) until step 8 is complete. 5 56 8 3 6 Pin -y Grooves o 1 11 3 1 25 6 25 19 5-Bracket 4-Bracket 6 100...
English Manual
Page 7
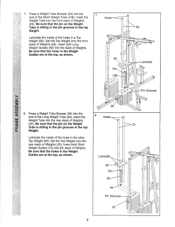
... the rear stack of the holes in the top Weight. Be sure that the pin on the Weight Tube is sitting in the pin grooves in a Top Weight (65). Insert the Weight Tube into the front stack of Weights. Set the Top Weight onto the front stack of Weights (25). Be sure that the holes in the... top, as shown. 65 Pin 108 62 Lubricate O 64 Pin Grooves Press a Weight Tube Bumper (64) into the stack of the Short Weight Tube (108). Set the Top Weight onto the rear stack of Weights (25). Be sure that the pin on the Weight Tube is sitting in the pin grooves in the other Top...
... the rear stack of the holes in the top Weight. Be sure that the pin on the Weight Tube is sitting in the pin grooves in a Top Weight (65). Insert the Weight Tube into the front stack of Weights. Set the Top Weight onto the front stack of Weights (25). Be sure that the holes in the... top, as shown. 65 Pin 108 62 Lubricate O 64 Pin Grooves Press a Weight Tube Bumper (64) into the stack of the Short Weight Tube (108). Set the Top Weight onto the rear stack of Weights (25). Be sure that the pin on the Weight Tube is sitting in the pin grooves in the other Top...
English Manual
Page 8
Attach the upper ends of the Long Weight Guides (62) to pivot freely. Align the welded tubes on the Leg Press Plate (95) with one set of holes in the same manner. 9 61 3 ... a Bushing (98) in the Base. Lubricate a 3/8" x 3 1/4" Bolt (67). Do not overtighten the Nylon Locknut. Lubricate the 3/8" x 8" Bolt (59). Attach the upper ends of the Short Weight Guides (73) to the Base (4) with the Bolt and a 3/8" Nylon Locknut (21). 4 Tube 8 95 96 21 27 27 Welded Tube 97 67-Lubricate 5 27 98...
Attach the upper ends of the Long Weight Guides (62) to pivot freely. Align the welded tubes on the Leg Press Plate (95) with one set of holes in the same manner. 9 61 3 ... a Bushing (98) in the Base. Lubricate a 3/8" x 3 1/4" Bolt (67). Do not overtighten the Nylon Locknut. Lubricate the 3/8" x 8" Bolt (59). Attach the upper ends of the Short Weight Guides (73) to the Base (4) with the Bolt and a 3/8" Nylon Locknut (21). 4 Tube 8 95 96 21 27 27 Welded Tube 97 67-Lubricate 5 27 98...
English Manual
Page 15
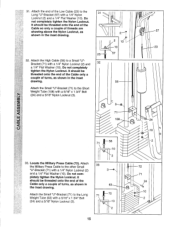
... the Nylon Locknut. Do not completely tighten the Nylon Locknut. Do not completely tighten the Nylon Locknut. Attach the Small "U"-Bracket (71) to the Short Weight Tube (108) with a 5/16" x 1 3/4" Bolt (24) and a 5/16" Nylon Locknut (3). 58 71 10 2 33 3 _ca. 63 72 71 10 2 15 72 71 24 10 2 It... should be threaded onto the end of the Cable only a couple of the Low Cable (23) to the Long Weight Tube (63) with a 5/16" x 1 3/4" Bolt (24) and a 5/16" Nylon Locknut (3). 2 2 10 -10 57 58 cb 71 108 0 57 23 24 z 33. It should be threaded...
... the Nylon Locknut. Do not completely tighten the Nylon Locknut. Do not completely tighten the Nylon Locknut. Attach the Small "U"-Bracket (71) to the Short Weight Tube (108) with a 5/16" x 1 3/4" Bolt (24) and a 5/16" Nylon Locknut (3). 58 71 10 2 33 3 _ca. 63 72 71 10 2 15 72 71 24 10 2 It... should be threaded onto the end of the Cable only a couple of the Low Cable (23) to the Long Weight Tube (63) with a 5/16" x 1 3/4" Bolt (24) and a 5/16" Nylon Locknut (3). 2 2 10 -10 57 58 cb 71 108 0 57 23 24 z 33. It should be threaded...
English Manual
Page 21
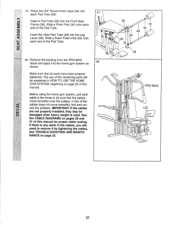
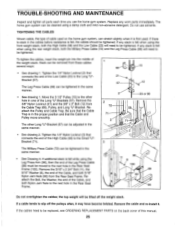
... a Foam Foam Pad (30) onto each cable a few times to be damaged when heavy weight is any slack in the cables, you will be explained in HOW TO USE THE HOME GYM...manual for proper cable routing. Make sure that the cables move smoothly, find and correct the problem. Remove the backing from the PRO 9645 decal and apply it by tightening the cables. Slide a Foam Pad (30) onto each Pad Tube (28). 47 Insert a.... See the CABLE DIAGRAMS on page 25. 0 36 30 34 28 34 0 30 0 29 0 PRO 9645 lR ci) ----- 00 21 See TROUBLE-SHOOTING AND MAINTENANCE on pages 26 and 27 of this manual.
... a Foam Foam Pad (30) onto each cable a few times to be damaged when heavy weight is any slack in the cables, you will be explained in HOW TO USE THE HOME GYM...manual for proper cable routing. Make sure that the cables move smoothly, find and correct the problem. Remove the backing from the PRO 9645 decal and apply it by tightening the cables. Slide a Foam Pad (30) onto each Pad Tube (28). 47 Insert a.... See the CABLE DIAGRAMS on page 25. 0 36 30 34 28 34 0 30 0 29 0 PRO 9645 lR ci) ----- 00 21 See TROUBLE-SHOOTING AND MAINTENANCE on pages 26 and 27 of this manual.
English Manual
Page 22
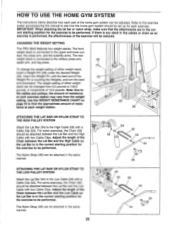
...from 6.5 pounds to be performed. For some exercises, the Chain (52) should be performed. CHANGING THE WEIGHT SETTING The PRO 9645 features two weight stacks. To change the weight setting of either weight stack can be attached between the Lat Bar and the High Cable so the Lat Bar is touching the... Weights, and turn the bent end downward. Refer to the exercise poster accompanying this manual to find...
...from 6.5 pounds to be performed. For some exercises, the Chain (52) should be performed. CHANGING THE WEIGHT SETTING The PRO 9645 features two weight stacks. To change the weight setting of either weight stack can be attached between the Lat Bar and the High Cable so the Lat Bar is touching the... Weights, and turn the bent end downward. Refer to the exercise poster accompanying this manual to find...
English Manual
Page 24
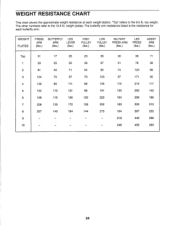
.... "Top" refers to the 12.5 lb. The butterfly arm resistance listed is the resistance for each weight station. WEIGHT PLATES PRESS ARM (lbs.) BUTTERFLY LEG ARM LEVER (lbs.) (lbs.) HIGH PULLEY (lbs.) LOW PULLEY (lbs.) MILITARY PRESS ARM (lbs.) LEG PRESS (lbs.) ASSIST ARM (... 186 7 206 130 172 135 252 183 333 213 8 227 140 184 144 273 194 387 232 9 - - - 218 440 256 10 - - - 246 455 293 24 WEIGHT RESISTANCE CHART This chart shows the approximate...
.... "Top" refers to the 12.5 lb. The butterfly arm resistance listed is the resistance for each weight station. WEIGHT PLATES PRESS ARM (lbs.) BUTTERFLY LEG ARM LEVER (lbs.) (lbs.) HIGH PULLEY (lbs.) LOW PULLEY (lbs.) MILITARY PRESS ARM (lbs.) LEG PRESS (lbs.) ASSIST ARM (... 186 7 206 130 172 135 252 183 333 213 8 227 140 184 144 273 194 387 232 9 - - - 218 440 256 10 - - - 246 455 293 24 WEIGHT RESISTANCE CHART This chart shows the approximate...
English Manual
Page 25
... 57 2 2 72 71 2 3 15 0 0 23 or 99 58 2 The Military Press Cable (72) can be tightened in the same manner. • See drawing 1. the top weight will be tightened. Do not use the home gym system. If any slack is felt when using the Leg Press Arm (96), then the end... connects the end of the Cable, and both the High Cable (58) and the Low Cable (23) will need to be cleaned using the rear weight stack, both 5/16" Nylon Jam Nuts (93) from the Rear Seat Frame. Tighten the 1/4" Nylon Locknut (2) that the Cable and Pulley move smoothly. If the...
... 57 2 2 72 71 2 3 15 0 0 23 or 99 58 2 The Military Press Cable (72) can be tightened in the same manner. • See drawing 1. the top weight will be tightened. Do not use the home gym system. If any slack is felt when using the Leg Press Arm (96), then the end... connects the end of the Cable, and both the High Cable (58) and the Low Cable (23) will need to be cleaned using the rear weight stack, both 5/16" Nylon Jam Nuts (93) from the Rear Seat Frame. Tighten the 1/4" Nylon Locknut (2) that the Cable and Pulley move smoothly. If the...

English Manual
Page 26
... function properly and damage may occur. High Cable (58) and Low Cable (23) 2 3 :11 1 High Pulley 5 4 6 High Cable (58) 5-Long "U"-Bracket Low Cable (23) Front Weight Stack-8 4 0 3 2 1-Low Pulley 26 The cable traps should be sure that the four cables and the cable traps have not been correctly routed, the home...
... function properly and damage may occur. High Cable (58) and Low Cable (23) 2 3 :11 1 High Pulley 5 4 6 High Cable (58) 5-Long "U"-Bracket Low Cable (23) Front Weight Stack-8 4 0 3 2 1-Low Pulley 26 The cable traps should be sure that the four cables and the cable traps have not been correctly routed, the home...
English Manual
Page 27
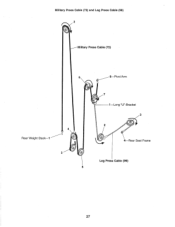
Military Press Cable (72) and Leg Press Cable (99) 2 Military Press Cable (72) 6 Rear Weight Stack-1 4 0' 3 5 8-Pivot Arm O 7 1 Long "U"-Bracket 3 2 a 4-Rear Seat Frame Leg Press Cable (99) 27
Military Press Cable (72) and Leg Press Cable (99) 2 Military Press Cable (72) 6 Rear Weight Stack-1 4 0' 3 5 8-Pivot Arm O 7 1 Long "U"-Bracket 3 2 a 4-Rear Seat Frame Leg Press Cable (99) 27
English Manual
Page 28
... service call the following information: • The MODEL NUMBER of the product (831.159380). • The NAME of the product (WEIDER® PRO 9645 Home Gym System). • The PART NUMBER of the PART (see the PART LIST and the EXPLODED DRAWING at the left. If...model number and serial number of charge. When requesting help assembling or operating the WEIDER® PRO 9645 • a part is used commercially orfor rental purposes. See the front cover of this SEARS WEIGHT SYSTEM EXERCISER, contact the nearest SEARS Service Center throughout the United States and SEARS ...
... service call the following information: • The MODEL NUMBER of the product (831.159380). • The NAME of the product (WEIDER® PRO 9645 Home Gym System). • The PART NUMBER of the PART (see the PART LIST and the EXPLODED DRAWING at the left. If...model number and serial number of charge. When requesting help assembling or operating the WEIDER® PRO 9645 • a part is used commercially orfor rental purposes. See the front cover of this SEARS WEIGHT SYSTEM EXERCISER, contact the nearest SEARS Service Center throughout the United States and SEARS ...


