
English Manual
Page 3
...exercising, stop immediately and begin cooling down. 9. Do not use the lat bar. 16. If the cables bind as described in this or any worn parts immediately. 11. Keep children under 12 and pets away...Replace any exercise program, consult your physician. The weights will fall with pre-existing health problems. Read all cables at any other type of weight to mount, dismount, and use only. Use the weight system only as.... Never release the arms, leg lever, lat bar, leg press, ab strap, or handle while weights are on the weight system before using the weight system. 1.
...exercising, stop immediately and begin cooling down. 9. Do not use the lat bar. 16. If the cables bind as described in this or any worn parts immediately. 11. Keep children under 12 and pets away...Replace any exercise program, consult your physician. The weights will fall with pre-existing health problems. Read all cables at any other type of weight to mount, dismount, and use only. Use the weight system only as.... Never release the arms, leg lever, lat bar, leg press, ab strap, or handle while weights are on the weight system before using the weight system. 1.
English Manual
Page 12
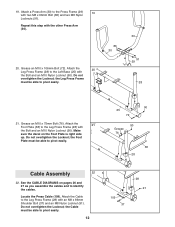
... (28) to pivot easily. 90 25 72 90 Grease 76 38 28 Cable Assembly 22 22. Repeat this step with the Bolt and an M10 Nylon Locknut (90). Locate the Press Cable (109). Grease an M10 x 106mm Bolt (72). 19. Make sure the decal on pages 26 and 27 as you assemble the... cables and to the Press Frame (29) 19 with the Bolt and an M10 Nylon Locknut (90).
... (28) to pivot easily. 90 25 72 90 Grease 76 38 28 Cable Assembly 22 22. Repeat this step with the Bolt and an M10 Nylon Locknut (90). Locate the Press Cable (109). Grease an M10 x 106mm Bolt (72). 19. Make sure the decal on pages 26 and 27 as you assemble the... cables and to the Press Frame (29) 19 with the Bolt and an M10 Nylon Locknut (90).
English Manual
Page 13
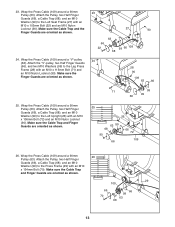
... M10 Washer (99) to the Leg Press Frame (28) with an M10 x 103mm Bolt (22) and an M10 Nylon Locknut (90). Wrap the Press Cable (109) around a 90mm Pulley (63). Make sure the Cable Trap and the Finger Guards are oriented as shown. 24. Wrap the Press Cable (109) around a 90mm 26 Pulley... (63). Make sure the Cable Trap and Finger Guards are oriented as shown. 29 ...
... M10 Washer (99) to the Leg Press Frame (28) with an M10 x 103mm Bolt (22) and an M10 Nylon Locknut (90). Wrap the Press Cable (109) around a 90mm Pulley (63). Make sure the Cable Trap and the Finger Guards are oriented as shown. 24. Wrap the Press Cable (109) around a 90mm 26 Pulley... (63). Make sure the Cable Trap and Finger Guards are oriented as shown. 29 ...
English Manual
Page 14
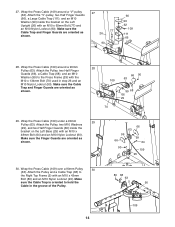
... sure the Finger Guards are oriented as shown. 27 77 26 90 66 99 62 109 111 66 28. Wrap the Press Cable (109) around a "V"-pulley (62). Attach the Pulley and a Cable Trap (68) to the Right Top Frame (5) with an M10 x 48mm Bolt (64) and an M10 Nylon Locknut (90). 27. Wrap... the Press Cable (109) around a 90mm Pulley (63). Attach the "V"-pulley, two Half Finger Guards (66), a Large Cable Trap (111), and an M10 Washer (99) inside the bracket on the Left Upright (26) with the M10...
... sure the Finger Guards are oriented as shown. 27 77 26 90 66 99 62 109 111 66 28. Wrap the Press Cable (109) around a "V"-pulley (62). Attach the Pulley and a Cable Trap (68) to the Right Top Frame (5) with an M10 x 48mm Bolt (64) and an M10 Nylon Locknut (90). 27. Wrap... the Press Cable (109) around a 90mm Pulley (63). Attach the "V"-pulley, two Half Finger Guards (66), a Large Cable Trap (111), and an M10 Washer (99) inside the bracket on the Left Upright (26) with the M10...
English Manual
Page 15
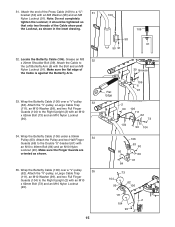
it should be tightened so that only two threads of the Press Cable (109) to a "U"- 31 bracket (50) with an M8 Washer (98) and an M8 Nylon Locknut (91). Locate the Butterfly Cable (106). Wrap the Butterfly Cable (106) over a "V"-pulley 35 (62). Attach the Pulley and two Half Finger Guards (66) to ...the Right Upright (2) with an M10 x 46mm Bolt (84) and an M10 Nylon Locknut (90). Attach the "V"-pulley, a Large Cable Trap (111), an M10 Washer (99), and two Full Finger Guards (104) to the Double "U"-bracket (61) with an M10 x 62mm Bolt (73) and ...
it should be tightened so that only two threads of the Press Cable (109) to a "U"- 31 bracket (50) with an M8 Washer (98) and an M8 Nylon Locknut (91). Locate the Butterfly Cable (106). Wrap the Butterfly Cable (106) over a "V"-pulley 35 (62). Attach the Pulley and two Half Finger Guards (66) to ...the Right Upright (2) with an M10 x 46mm Bolt (84) and an M10 Nylon Locknut (90). Attach the "V"-pulley, a Large Cable Trap (111), an M10 Washer (99), and two Full Finger Guards (104) to the Double "U"-bracket (61) with an M10 x 62mm Bolt (73) and ...
English Manual
Page 20
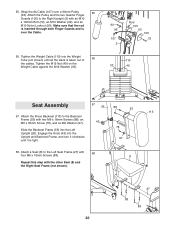
... Tube (not shown) until it clockwise until all the slack is taken out of 56 the cables. Make sure that the rod is inserted through both Finger Guards and is tight. 78 97 58. Attach the Press Backrest (113) to the Left Seat Frame (27) with 58 four M6 x 16mm Screws (88...). 8 Repeat this step with an M10 x 106mm Bolt (72), an M10 Washer (99), and an M10 Nylon Locknut (90). Tighten the Weight Cable (110) into the Upright and Backrest...
... Tube (not shown) until it clockwise until all the slack is taken out of 56 the cables. Make sure that the rod is inserted through both Finger Guards and is tight. 78 97 58. Attach the Press Backrest (113) to the Left Seat Frame (27) with 58 four M6 x 16mm Screws (88...). 8 Repeat this step with an M10 x 106mm Bolt (72), an M10 Washer (99), and an M10 Nylon Locknut (90). Tighten the Weight Cable (110) into the Upright and Backrest...
English Manual
Page 22
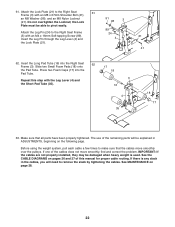
...parts have been properly tightened. Insert the Long Pad Tube (16) into the Pad Tube. 17 18 Repeat this manual for proper cable routing. Make sure that the cables move smoothly, find and correct the problem. If one of the remaining parts will be damaged when heavy weight is any slack ...in ADJUSTMENTS, beginning on the following page. Press two Foam Caps (17) into the Right Seat 62 Frame (3). The use of the cables does not move smoothly over the pulleys. Attach the Lock Plate (21) to remove the slack by ...
...parts have been properly tightened. Insert the Long Pad Tube (16) into the Pad Tube. 17 18 Repeat this manual for proper cable routing. Make sure that the cables move smoothly, find and correct the problem. If one of the remaining parts will be damaged when heavy weight is any slack ...in ADJUSTMENTS, beginning on the following page. Press two Foam Caps (17) into the Right Seat 62 Frame (3). The use of the cables does not move smoothly over the pulleys. Attach the Lock Plate (21) to remove the slack by ...

English Manual
Page 25
... PULLEY (lbs.) 10 25 38 54 67 84 97 105 122 BUTTERFLY ARM (lbs.) 16 30 45 51 60 73 88 93 106 PRESS ARM (lbs.) 31 48 81 97 120 138 150 176 214 LEG LEVER (lbs.) 11 22 39 49 66 85 94 106 126 ...LOW PULLEY (lbs.) 27 35 43 61 71 87 107 120 143 LEG PRESS (lbs.) 45 59 84 118 146 162 193 223 248 AB STATION (lbs.) 19 27 41 60 73 90 100... the approximate weight resistance at each station may vary due to differences in individual weight plates as well as friction between the cables, pulleys, and weight guides. The other numbers refer to the 6 lb. "Top" refers to the 12.5 lb....
... PULLEY (lbs.) 10 25 38 54 67 84 97 105 122 BUTTERFLY ARM (lbs.) 16 30 45 51 60 73 88 93 106 PRESS ARM (lbs.) 31 48 81 97 120 138 150 176 214 LEG LEVER (lbs.) 11 22 39 49 66 85 94 106 126 ...LOW PULLEY (lbs.) 27 35 43 61 71 87 107 120 143 LEG PRESS (lbs.) 45 59 84 118 146 162 193 223 248 AB STATION (lbs.) 19 27 41 60 73 90 100... the approximate weight resistance at each station may vary due to differences in individual weight plates as well as friction between the cables, pulleys, and weight guides. The other numbers refer to the 6 lb. "Top" refers to the 12.5 lb....
English Manual
Page 26
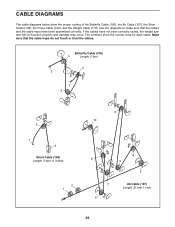
... routing of the Butterfly Cable (106), the Ab Cable (107), the Short Cable (108), the Press Cable (109), and the Weight Cable (110). Butterfly Cable (106) 4 Length: 5 feet 2 5 1 3 2 1 3 Short Cable (108) Length: 3 feet 11 inches 2 1 6 10 4 8 5 3 7 9 Ab Cable (107) Length: 21 feet 1 inch 26 CABLE DIAGRAMS The cable diagrams below show the correct route for each cable. If the cables have been assembled...
... routing of the Butterfly Cable (106), the Ab Cable (107), the Short Cable (108), the Press Cable (109), and the Weight Cable (110). Butterfly Cable (106) 4 Length: 5 feet 2 5 1 3 2 1 3 Short Cable (108) Length: 3 feet 11 inches 2 1 6 10 4 8 5 3 7 9 Ab Cable (107) Length: 21 feet 1 inch 26 CABLE DIAGRAMS The cable diagrams below show the correct route for each cable. If the cables have been assembled...
English Manual
Page 27
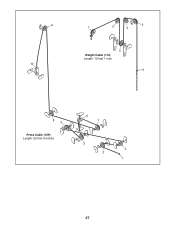
9 10 1 2 4 5 3 Weight Cable (110) Length: 12 feet 1 inch 6 84 Press Cable (109) Length: 22 feet 6 inches 6 7 5 3 2 1 27
9 10 1 2 4 5 3 Weight Cable (110) Length: 12 feet 1 inch 6 84 Press Cable (109) Length: 22 feet 6 inches 6 7 5 3 2 1 27

English Manual
Page 34
...Leg Pin 25 1 Left Base 26 1 Left Upright 27 1 Left Seat Frame 28 1 Leg Press Frame 29 1 Press Frame 30 2 Press Arm 31 2 Support Plate 32 2 Press Handle 33 2 M12 Washer 34 2 Press Arm Cap 35 1 Short Pad Tube 36 1 Left Top Frame 37 1 M8 x 86mm ... x 12mm Spacer M10 x 19mm Spacer M8 x 13mm Spacer Full Finger Guard Quarter Finger Guard Butterfly Cable Ab Cable Short Cable Press Cable Weight Cable Large Cable Trap 20mm x 40mm Inner Cap Press Backrest User's Manual Exercise Guide Grease Packet Allen Wrench Note: "#" indicates a non-illustrated part. Description...
...Leg Pin 25 1 Left Base 26 1 Left Upright 27 1 Left Seat Frame 28 1 Leg Press Frame 29 1 Press Frame 30 2 Press Arm 31 2 Support Plate 32 2 Press Handle 33 2 M12 Washer 34 2 Press Arm Cap 35 1 Short Pad Tube 36 1 Left Top Frame 37 1 M8 x 86mm ... x 12mm Spacer M10 x 19mm Spacer M8 x 13mm Spacer Full Finger Guard Quarter Finger Guard Butterfly Cable Ab Cable Short Cable Press Cable Weight Cable Large Cable Trap 20mm x 40mm Inner Cap Press Backrest User's Manual Exercise Guide Grease Packet Allen Wrench Note: "#" indicates a non-illustrated part. Description...


