
English Manual
Page 1
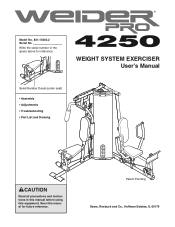
Save this equipment. Patent Pending Sears, Roebuck and Co., Hoffman Estates, IL 60179 WEIGHT SYSTEM EXERCISER User's Manual Serial Number Decal (under seat) • Assembly • Adjustments • Troubleshooting • Part List and Drawing CAUTION Read all precautions and instructions in the space above for future reference. Model No. 831.15402.2 Serial No. Write the serial number in this manual before using this manual for reference.
Save this equipment. Patent Pending Sears, Roebuck and Co., Hoffman Estates, IL 60179 WEIGHT SYSTEM EXERCISER User's Manual Serial Number Decal (under seat) • Assembly • Adjustments • Troubleshooting • Part List and Drawing CAUTION Read all precautions and instructions in the space above for future reference. Model No. 831.15402.2 Serial No. Write the serial number in this manual before using this manual for reference.
English Manual
Page 2
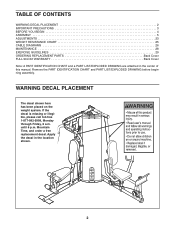
...missing or illegible, please call toll-free 1-877-992-5999, Monday through Friday, 6 a.m. TABLE OF CONTENTS WARNING DECAL PLACEMENT 2 IMPORTANT PRECAUTIONS 3 BEFORE YOU BEGIN 4 ASSEMBLY 5 ADJUSTMENTS 23 WEIGHT RESISTANCE CHART 25 CABLE DIAGRAMS 26 MAINTENANCE 28 EXERCISE GUIDELINES 29 ORDERING REPLACEMENT PARTS Back Cover FULL 90-DAY WARRANTY Back Cover... The decal shown here has been placed on the weight system. Remove the PART IDENTIFICATION CHART and PART LIST/EXPLODED DRAWING before beginning assembly. Mountain Time, and order a free replacement decal. until 6 p.m.
...missing or illegible, please call toll-free 1-877-992-5999, Monday through Friday, 6 a.m. TABLE OF CONTENTS WARNING DECAL PLACEMENT 2 IMPORTANT PRECAUTIONS 3 BEFORE YOU BEGIN 4 ASSEMBLY 5 ADJUSTMENTS 23 WEIGHT RESISTANCE CHART 25 CABLE DIAGRAMS 26 MAINTENANCE 28 EXERCISE GUIDELINES 29 ORDERING REPLACEMENT PARTS Back Cover FULL 90-DAY WARRANTY Back Cover... The decal shown here has been placed on the weight system. Remove the PART IDENTIFICATION CHART and PART LIST/EXPLODED DRAWING before beginning assembly. Mountain Time, and order a free replacement decal. until 6 p.m.
English Manual
Page 4
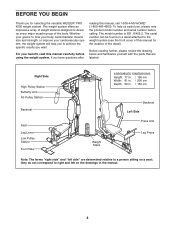
... strength, or improve your cardiovascular system, the weight system will help us assist you have questions after reading this manual for selecting the versatile WEIDER® PRO 4250 weight system. The serial number can be found on a decal attached to right and left on a seat; they do not correspond to... number before using the weight system. Right Side High Pulley Station Butterfly Arm Ab Pulley Station Backrest Seat Leg Lever Low Pulley Station Foot Plate ASSEMBLED DIMENSIONS: Height: 77 in. / 196 cm Width: 81 in. / 206 cm Depth: 59 in the manual. 4 To help you to achieve ...
... strength, or improve your cardiovascular system, the weight system will help us assist you have questions after reading this manual for selecting the versatile WEIDER® PRO 4250 weight system. The serial number can be found on a decal attached to right and left on a seat; they do not correspond to... number before using the weight system. Right Side High Pulley Station Butterfly Arm Ab Pulley Station Backrest Seat Leg Lever Low Pulley Station Foot Plate ASSEMBLED DIMENSIONS: Height: 77 in. / 196 cm Width: 81 in. / 206 cm Depth: 59 in the manual. 4 To help you to achieve ...
English Manual
Page 5
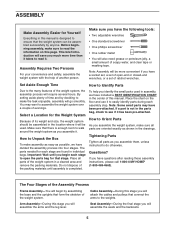
...rubber mallet • You will also need grease or petroleum jelly, a small amount of the packing materials until you assemble the weight system, make the task enjoyable, assembly will be assembled successfully by anyone. Do not dispose of soapy water, and clear tape or masking tape. Note: Some small parts... 1-800-4-MY-HOME® (1-800-469-4663). Select a Location for the Weight System Because of this stage you have divided the assembly process into four stages. Place the chart on this manual is enough room to ensure that stage. How to Unpack the Box To ...
...rubber mallet • You will also need grease or petroleum jelly, a small amount of the packing materials until you assemble the weight system, make the task enjoyable, assembly will be assembled successfully by anyone. Do not dispose of soapy water, and clear tape or masking tape. Note: Some small parts... 1-800-4-MY-HOME® (1-800-469-4663). Select a Location for the Weight System Because of this stage you have divided the assembly process into four stages. Place the chart on this manual is enough room to ensure that stage. How to Unpack the Box To ...
English Manual
Page 6
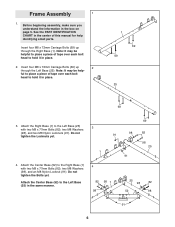
... Carriage Bolts (69) up through the Left Base (25). Attach the Center Base (52) to the Left Base (25) in the box on page 5. Frame Assembly 1 1. Attach the Center Base (52) to the Right Base (1) with two M8 x 77mm Bolts (82), two M8 Washers (98), and two M8 Nylon Locknuts (91... (25) 3 with two M8 x 77mm Bolts (82), two M8 Washers (98), and an M8 Nylon Locknut (91). Do not tighten the Bolts yet. Before beginning assembly, make sure you understand the information in the same manner. 4 82 98 1 98 69 98 91 82 98 25 25 98 82 52 98 91 6
... Carriage Bolts (69) up through the Left Base (25). Attach the Center Base (52) to the Left Base (25) in the box on page 5. Frame Assembly 1 1. Attach the Center Base (52) to the Right Base (1) with two M8 x 77mm Bolts (82), two M8 Washers (98), and two M8 Nylon Locknuts (91... (25) 3 with two M8 x 77mm Bolts (82), two M8 Washers (98), and an M8 Nylon Locknut (91). Do not tighten the Bolts yet. Before beginning assembly, make sure you understand the information in the same manner. 4 82 98 1 98 69 98 91 82 98 25 25 98 82 52 98 91 6
English Manual
Page 10
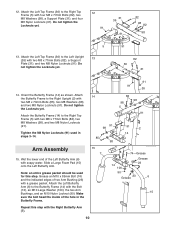
... x 85mm Bolt (74) and the indicated edges of the hole in steps 3-14. 14 82 98 98 5 91 91 98 85 98 91 2 14 Arm Assembly 15. Attach the Left Butterfly Arm (6) to the Butterfly Frame (14) with a grease packet.
... x 85mm Bolt (74) and the indicated edges of the hole in steps 3-14. 14 82 98 98 5 91 91 98 85 98 91 2 14 Arm Assembly 15. Attach the Left Butterfly Arm (6) to the Butterfly Frame (14) with a grease packet.
English Manual
Page 12
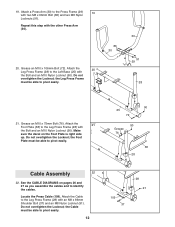
the Leg Press Frame must be able to pivot easily. 90 25 72 90 Grease 76 38 28 Cable Assembly 22 22. Make sure the decal on pages 26 and 27 as you assemble the cables and to the Left Base (25) with the Bolt and an M10 Nylon Locknut (90). the Cable...
the Leg Press Frame must be able to pivot easily. 90 25 72 90 Grease 76 38 28 Cable Assembly 22 22. Make sure the decal on pages 26 and 27 as you assemble the cables and to the Left Base (25) with the Bolt and an M10 Nylon Locknut (90). the Cable...
English Manual
Page 20
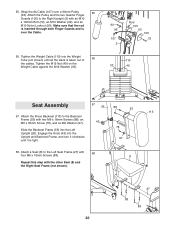
... the M12 Nut (49) on the Weight Cable against the M12 Washer (33). 90 99 107 2 Rod 105 63 105 72 110 33 49 Seat Assembly 57 26 88 53 113 57. Attach a Seat (8) to the Backrest Frame (53) with an M10 x 106mm Bolt (72), an M10 Washer (99), and an...
... the M12 Nut (49) on the Weight Cable against the M12 Washer (33). 90 99 107 2 Rod 105 63 105 72 110 33 49 Seat Assembly 57 26 88 53 113 57. Attach a Seat (8) to the Backrest Frame (53) with an M10 x 106mm Bolt (72), an M10 Washer (99), and an...
English Manual
Page 26
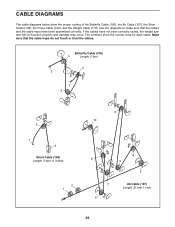
If the cables have been assembled correctly. Make sure that the cables and the cable traps have not been correctly routed, the weight system will not function properly and damage may ...
If the cables have been assembled correctly. Make sure that the cables and the cable traps have not been correctly routed, the weight system will not function properly and damage may ...

English Manual
Page 32
... been pre-attached. If a part is the key number of the part, from the PART LIST in the center of this manual. The number in assembly. If a part is not in the parts bag, check to identify small parts used in parentheses by each drawing is missing, call toll-free 1-877...
... been pre-attached. If a part is the key number of the part, from the PART LIST in the center of this manual. The number in assembly. If a part is not in the parts bag, check to identify small parts used in parentheses by each drawing is missing, call toll-free 1-877...


