
Weider Pro 8900 Support Question
Weider Pro 8900 Support Question
Find answers below for this question about Weider Pro 8900.Need a Weider Pro 8900 manual? We have 1 online manual for this item!
Question posted by carmen011374 on August 12th, 2013
How Do U Assemble The Pulleys On The Weider Pro 8900 Instructions Not Clear
the diagram in the manual looks nothing like the actual machine is there a better way to see this diagram of the assembly? thanks in advance
Current Answers
Related Weider Pro 8900 Manual Pages
English Manual - Page 1

Hoffman Estates, IL 60179
CAUTION
Read all precautions and instructions in the space above for future reference. Keep this equipment. Write the serial number in this manual before using this manual for reference. Serial Number Decal
WEIGHT SYSTEM EXERCISER Userʼs Manual
• Assembly • Operation • Maintenance • Part List and Drawing
Sears, Roebuck and Co...
English Manual - Page 2
...(s) may not be shown at actual size.
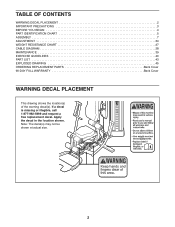
2 If a decal is missing or illegible, call 1-877-992-5999 and request a free replacement decal. TABLE OF CONTENTS
WARNING DECAL PLACEMENT 2 IMPORTANT PRECAUTIONS 3 BEFORE YOU BEGIN 4 PART IDENTIFICATION CHART 5 ASSEMBLY 7 ADJUSTMENT 34 WEIGHT RESISTANCE CHART 37 CABLE DIAGRAM 38 MAINTENANCE 39 EXERCISE GUIDELINES 40 PART LIST 43...
English Manual - Page 3

... faint or if you are adequately informed of serious injury, read all important precautions and
instructions in this manual.
4. Do not use only. Place the weight system on the pulleys.
14. Replace any exercise program, consult your weight sys- Over exercising may result in a commercial, rental, or institutional setting.
5. do not wear loose clothes that...
English Manual - Page 4
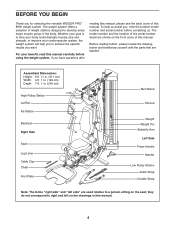
...Pulley Station
Ankle Strap Double Strap
Note: The terms "right side" and "left side" are labeled. Assembled Dimensions: Height: 6 ft. 11 in. (211 cm) Width: 4 ft. 1 in. (124 cm) Depth: 7 ft. 1 in this manual...BEFORE YOU BEGIN
Thank you have questions after
reading this manual, please see the back cover of this manual. If you for selecting the versatile WEIDER PRO™ 8900 weight system. ...
English Manual - Page 5
...)
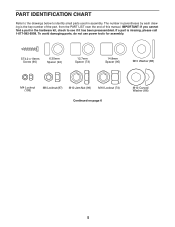
M6 Locknut (87) M10 Jam Nut (99) M10 Locknut (74)
Continued on page 6
M10 Curved Washer (86)
5 The number in assembly. To avoid damaging parts, do not use power tools for assembly. PART IDENTIFICATION CHART
Refer to the drawings below to see if it has been preassembled. If a part is the key...
English Manual - Page 7
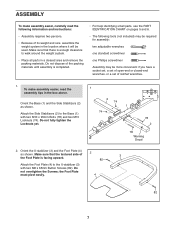
...(1) with two M8 x 65mm Button Screws (82). To make assembly easier, carefully read the assembly tips in a cleared area and remove the packing materials. Do
not overtighten the Screws... until assembly is completed.
• For help identifying small parts, use the PART IDENTIFICATION CHART on pages 5 and 6.
• The following information and instructions:
• Assembly requires ...
English Manual - Page 10
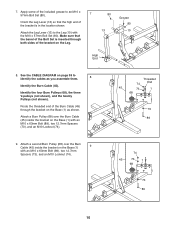
... Pulley (68) over the Burn Cable (45) inside the bracket on the Base (1) as you assemble them.
8
Identify the Burn Cable (45). Make sure that the high end of the bracket on the Leg.
80 13
Grease 80 10
High End
8. Threaded
74
End
45
73
1
68
73 89
9.
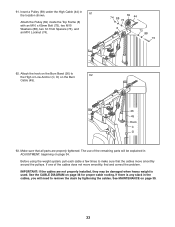
See the CABLE DIAGRAM...
English Manual - Page 14
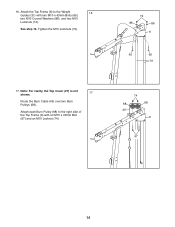
See step 15. Note: For clarity, the Top Cover (27) is not shown.
17
Route the Burn Cable (45) over two Burn Pulleys (68).
Attach each Burn Pulley (68) to the Weight
16
Guides (31) with an M10 x 40mm Bolt (97) and an M10 Locknut (74).
74
86
86
6
65
65
31
74...
English Manual - Page 15
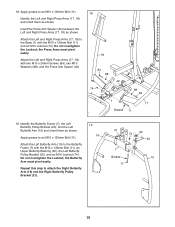
Apply grease to attach the Right Butterfly Arm (16) and the Right Butterfly Pulley Bracket (21).
19 16
21
74
52
20
7
Grease
15
11
15 the Butterfly Arm...74
88
84
1 17
Grease 11
19. the Press Arms must pivot easily. Identify the Butterfly Frame (7), the Left Butterfly Pulley Bracket (20), and the Left Butterfly Arm (15) and orient them as shown. Insert the Press Arm Spacer (42) ...
English Manual - Page 16
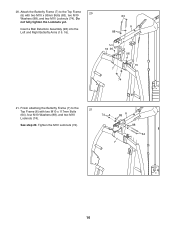
Insert a Ball Detention Assembly (96) into the Left and Right Butterfly Arms (15, 16).
63
6 88
16 96 96
15 7
74
21.
Tighten the M10 Locknuts (74).
21 74
6 ...
English Manual - Page 17
... Bolt (75), two M10 Washers (88), two 12.7mm Spacers (73), and an M10 Locknut (74).
24. Attach a Pulley (69) inside the Leg (10) with an M10 x 45mm Bolt (98) and an M10 Jam Nut (99).
10
74...
17
69 43 99
1 98 See drawing 24a.
Attach a Pulley (69) to the bracket on the Leg Lever
22
(13). 22. Route the Low Cable (43) over a Pulley (69) and through the bracket on the Base (1) over the...
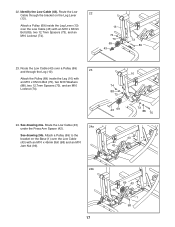
English Manual - Page 18
... and an M10 Washer (88). Route the Low Cable (43) around a Pulley (69) and then route it through the left side of the Pulley.
43 69
74
1
71 91
27.
Make sure that the Cable Trap ...through the bracket in the
26
Base (1) as shown. 25. Route the Low Cable (43) over a Pulley (69).
27
Attach the Pulley (69) and a Cable Trap (71) inside the Left and Right Press Arms (17, 18) with an...
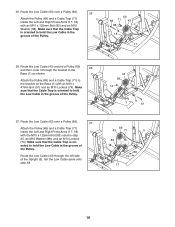
English Manual - Page 19
...), an M10 Washer (88), and an M10 Locknut (74). Route the High Cable (44) under a
30
V-pulley (67). Attach the V-pulley (67) and a Cable Trap (71) to hold the High Cable in the groove of the Top Frame (6) with...High Cable through the bracket on the Top Frame (6)
28
and over a Pulley (69).
29
Attach the Pulley (69) and a Cable Trap (71) to hold the High Cable in the groove of the...
English Manual - Page 20
...x 47mm Bolt (91) and an M10 Locknut (74). Route the High Cable (44) around a Pulley (69).
32
Attach the Pulley (69) to the Right Butterfly Pulley Bracket (21) with an M10 x 47mm Bolt (91) and an M10 Locknut (74). Make sure... that the Cable Trap is oriented to hold the High Cable in the groove of the Pulley.
74 71 69 21
44
91
74 5
69
65
44
74 71
20 44
69 91
20 Make ...
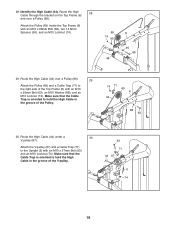
English Manual - Page 21
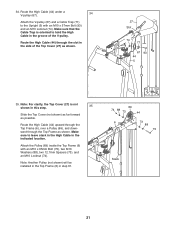
...: For clarity, the Top Cover (27) is oriented to hold the High Cable in the side of the V-pulley.
Make sure that the Cable Trap is not shown in this step.
35
Slide the Top Cover (not shown)... in the Top Frame (6) in the indicated location. Route the High Cable (44) under a V-pulley (67).
34
Attach the V-pulley (67) and a Cable Trap (71) to leave slack in the High Cable in step 61....
English Manual - Page 22
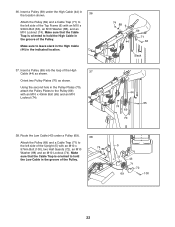
...
100
22 Make sure that the Cable Trap is oriented to hold the Low Cable in the location shown.
36
Attach the Pulley (69) and a Cable Trap (71) to the Pulley (69) with an M10 x 43mm Bolt (65) and an M10 Locknut (74).
74 88 6 44
69
71 63
Slack
44
65...
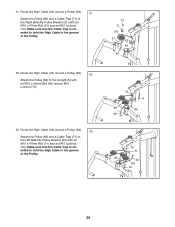
English Manual - Page 23
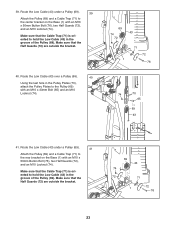
...the Half Guards (72) are outside the bracket.
40.
Route the Low Cable (43) under a Pulley (69).
39
Attach the Pulley (69) and a Cable Trap (71) to the rear bracket on the Base (1) with an M10...bracket.
69 43
74
72
71
1
72
76
23 Route the Low Cable (43) under a Pulley (69).
41
Attach the Pulley (69) and a Cable Trap (71) to the center bracket on the Base (1) with an ...
English Manual - Page 24
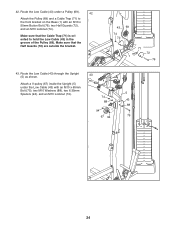
... (72) are outside the bracket.
43 69
74 72
71 72
1 76
43. Route the Low Cable (43) through the Upright (5) as shown.
43
Attach a V-pulley (67) inside the Upright (5) under a Pulley (69).
42
Attach the Pulley (69) and a Cable Trap (71) to hold the Low Cable (43) in the groove of the...
English Manual - Page 33
...routing. If there is any slack in the location shown.
61
Attach the Pulley (69) inside the Top Frame (6) with an M10 x 65mm Bolt (...D
63. The use of the cables does not move smoothly around the pulleys. IMPORTANT: If the cables are properly tightened. Attach the hook on the...the High or Low Anchor (C, D) on page 39.
33 Insert a Pulley (69) under the High Cable (44) in the cables, you will...
English Manual - Page 34
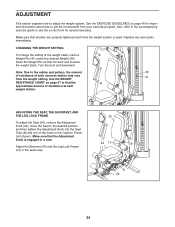
... of resistance at each time the weight system is engaged in the same way.
25
24 12
29
8 29
34 Replace any worn parts immediately. Use the WEIGHT
41
RESISTANCE CHART on page 40 for several exercises.
See the EXERCISE GUIDELINES on page 37 to find the
approximate amount of the weight stack...
Similar Questions

Weider Pro 4100
what is the weight for shipment of a Weider pro 4100
what is the weight for shipment of a Weider pro 4100
(Posted by Byroncemail 1 year ago)

I Need A Replacement Cable For My Welder Pro 8900 Do You Guys Carry One?
(Posted by mjdunkin21 3 years ago)

Weider Pro 8900
Hello,Do universal weights fit Weider pro 8900?Thank you
Hello,Do universal weights fit Weider pro 8900?Thank you
(Posted by patoro969 4 years ago)

Weider Pro 4950
Where can I get another exercise manual for this machine?
Where can I get another exercise manual for this machine?
(Posted by mvfmetz 9 years ago)
Weider Pro 8900 Pulley Position/tension.
Pulley's 3-6 do not seem to be set up correctly. I have them exactly as they are in the book, howeve...
Pulley's 3-6 do not seem to be set up correctly. I have them exactly as they are in the book, howeve...
(Posted by djbillbraun 11 years ago)