
Weider Pro 8900 Support Question
Weider Pro 8900 Support Question
Find answers below for this question about Weider Pro 8900.Need a Weider Pro 8900 manual? We have 1 online manual for this item!
Question posted by djbillbraun on April 18th, 2013
Weider Pro 8900 Pulley Position/tension.
Pulley's 3-6 do not seem to be set up correctly. I have them exactly as they are in the book, however there is a lot of tension and a "rubbing" sound when using the low cable. From pulley 3 to pulley 4 the cable has to go pretty far to the left and then back to the right for pulley 5. Pulley 5-6 is okay and 6-7 is good. To be more specific, pulleys 3 and 5 are in line and 4 and 6 being side by side seem to be too far offset. Are the cable stays supposed to be on the OUTSIDE of each of those pulleys like shown?
Current Answers
Related Weider Pro 8900 Manual Pages
English Manual - Page 3

... to tip.
15. Do not use the weight system.
7. Keep the weight system indoors, away from moving parts.
3. Place the weight system on the pulleys at all users of the weight system... performing an exercise that could become caught on your weight system before using your physician. The weight system should not be used by or
through the use only. Make sure that the cables remain on ...
English Manual - Page 4
... note the product model number and serial number before using the weight system.
Before reading further, please review ...
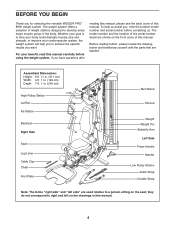
High Pulley Station Lat Bar Ab Station
Backrest Right Side
Seat
Leg Lever Cable Clip Chain Foot Plate
Burn Band
Shroud
Weight Weight Pin Butterfly Arm
Left Side Press Handle
Handle Low Pulley Station
...you for selecting the versatile WEIDER PRO™ 8900 weight system.
English Manual - Page 10
... Locknut (74).
74
45
73
1
68
73 89
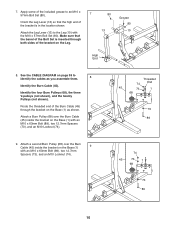
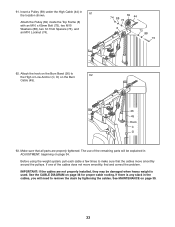
10 Route the threaded end of the Burn Cable (45) through both sides of the Bolt Set is in the location shown. Attach a second Burn Pulley (68) over the Burn Cable (45) inside the bracket on page 38 to the Leg (10) with an M10 x 63mm...
English Manual - Page 14
... (74). Tighten the M10 Locknuts (74).
17. Note: For clarity, the Top Cover (27) is not shown.
17
Route the Burn Cable (45) over two Burn Pulleys (68). Attach each Burn Pulley (68) to the Weight
16
Guides (31) with an M10 x 40mm Bolt (97) and an M10 Locknut (74).
74
86
86...
English Manual - Page 15
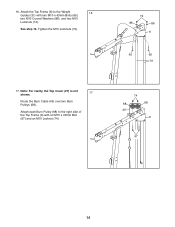
...17, 18) with the M10 x 130mm Bolt (11), an Upper Butterfly Bushing (52), the Left Butterfly Pulley Bracket (20), and an M10 Locknut (74).
the Butterfly Arm must pivot easily. Do not overtighten the...and Right Press Arms (17, 18) to attach the Right Butterfly Arm (16) and the Right Butterfly Pulley Bracket (21).
19 16
21
74
52
20
7
Grease
15
11
15 Attach the Left Butterfly Arm ...
English Manual - Page 17
... 75
43 42
24b
17
69 43 99
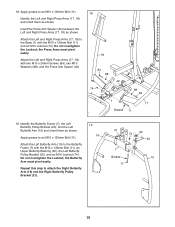
1 98 Route the Low Cable (43) under the Press Arm Spacer (42).
24a
See drawing 24b. Route the Low Cable through the Leg (10).
23
Attach the Pulley (69) inside the Leg Lever (13) over the Low Cable (43) with an M10 x 65mm Bolt (75), two M10 Washers (88...
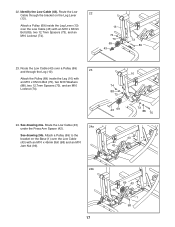
English Manual - Page 18
...(83) used in step 25, an M10 Washer (88), and an M10 Locknut (74). Route the Low Cable (43) over a Pulley (69).
27
Attach the Pulley (69) and a Cable Trap (...Cable Trap is oriented to the bracket on the Base (1) with an M10 x 125mm Bolt (83) and an M10 Washer (88). Route the Low Cable (43) around a Pulley (69) and then route it through the left side of the Pulley. 25.
Set the Low Cable...
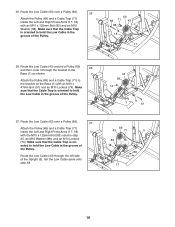
English Manual - Page 19
... (63), an M10 Washer (88), and an M10 Locknut (74). Route the High Cable (44) under a
30
V-pulley (67). 28. Route the High Cable through the bracket on the Top Frame (6)
28
and over a Pulley (69).
29
Attach the Pulley (69) and a Cable Trap (71) to the Upright (5) with an M10 x 68mm Bolt (66), two 14...
English Manual - Page 20
... 71 69 21
44
91
74 5
69
65
44
74 71
20 44
69 91
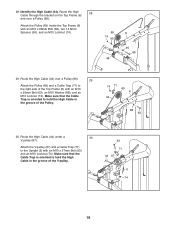
20 Route the High Cable (44) around a Pulley (69).
33
Attach the Pulley (69) and a Cable Trap (71) to the Right Butterfly Pulley Bracket (21) with an M10 x 43mm Bolt (65) and an M10 Locknut (74).
33. Route the High...
English Manual - Page 21
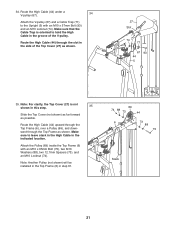
...21 34. Route the High Cable (44) under a V-pulley (67).
34
Attach the V-pulley (67) and a Cable Trap (71) to hold the High Cable in the side of the V-pulley.
Note: Another Pulley (not shown) will be ... 12.7mm Spacers (73), and an M10 Locknut (74). Route the High Cable (44) upward through the Top Frame (6), over a Pulley (69), and downward through the slot in the groove of the Top Cover ...
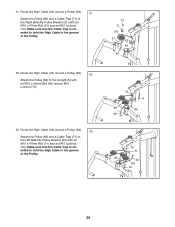
English Manual - Page 22
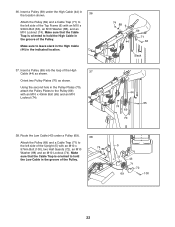
... (71) to the left side of the High Cable (44) as shown.
37
Orient two Pulley Plates (70) as shown. Using the second hole in the Pulley Plates (70), attach the Pulley Plates to hold the Low Cable in the indicated location.
37.
Route the Low Cable (43) under the High Cable (44) in the groove of the Upright (5) with...
English Manual - Page 23
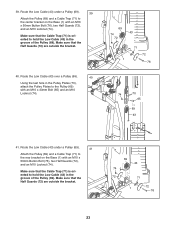
... Low Cable (43) over a Pulley (69).
40
Using the last hole in the Pulley Plates (70), attach the Pulley Plates to the Pulley (69) with an M10 x 50mm Button Bolt (76), two Half Guards (72), and an M10 Locknut (74). Make sure that the Cable Trap (71) is oriented to hold the Low Cable (43) in the groove of the Pulley...
English Manual - Page 24
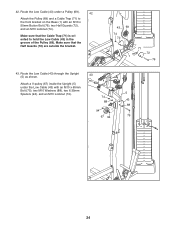
... 43
88 88
94
67 94
75
24 Route the Low Cable (43) through the Upright (5) as shown.
43
Attach a V-pulley (67) inside the Upright (5) under a Pulley (69).
42
Attach the Pulley (69) and a Cable Trap (71) to hold the Low Cable (43) in the groove of the Pulley (69). 42. Make sure that the Half Guards (72) are...
English Manual - Page 33
Make sure that the cables move smoothly, find and correct the problem. If there is used. See MAINTENANCE on page 38 for proper cable routing. The use of the cables does not move smoothly around the pulleys. Before using the weight system, pull each cable a few times to make sure that all parts are not properly installed, they may be...
English Manual - Page 34
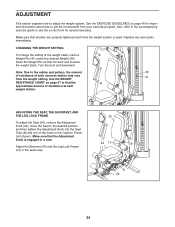
... how to the cables and pulleys, the amount
30
of the weight stack, insert a Weight Pin (41) under the desired Weight (30).
Use the WEIGHT
41
RESISTANCE CHART on page 40 for several exercises. Also, refer to the accompanying exercise guide to see the correct form for important information about how to the desired position, and then...
English Manual - Page 35
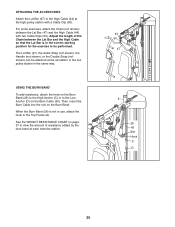
... use, attach the hook to the Low Anchor (D) on the Burn Band. When the Burn Band (26) is in the correct starting position for the exercise to be attached at each exercise station.
44 50
47
6
26 45 Slot Hook C D
35
ATTACHING THE ACCESSORIES
Attach the Lat Bar (47) to the High Cable (44) at the high pulley...
English Manual - Page 36
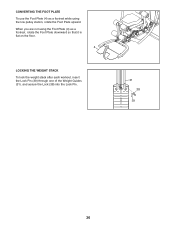
When you are not using the Foot Plate (4) as a footrest while using the low pulley station, rotate the Foot Plate upward. CONVERTING THE FOOT PLATE To use the Foot Plate (4) as a footrest, rotate the Foot Plate downward so that it is flat on the floor.
4
LOCKING THE WEIGHT STACK To lock the ...
English Manual - Page 37
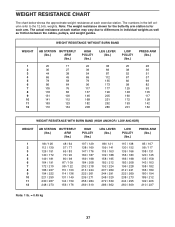
The actual resistance at each exercise station.
Note: The weight resistance shown for the butterfly arm station is for each arm... 163 139 / 188 158 / 195 182 / 212 192 / 224 207 / 269 244 / 291 248 / 320 272 / 339 286 / 362
LOW PULLEY
(lbs.)
115 / 138 130 / 152 139 / 166 156 / 180 166 / 198 183 / 208 196 / 228 212 / 241 222 /... well as friction between the cables, pulleys, and weight guides.
English Manual - Page 39
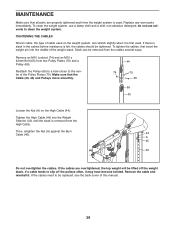
... into the Weight Selector (32) until the slack is first used on the High Cable (44). Tighten the High Cable (44) into the middle of this manual.
39 If a cable tends to clean the weight system. MAINTENANCE
Make sure that the Cable (43, 44) and Pulleys move smoothly.
44
74
70
65
69 43
Loosen the...
English Manual - Page 43
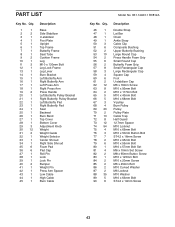
... Left Butterfly Pulley Bracket Right Butterfly Pulley Bracket Left Butterfly Pad Right Butterfly Pad Seat Backrest Burn Band Top Cover Bottom Cover Adjustment Knob Weight Weight Guide Weight Selector Center Shroud Right Side Shroud Foam Pad Pad Cap Roll Pin Lock Lock Pin Bumper Weight Pin Press Arm Spacer Low Cable High Cable Burn Cable
Model...
Similar Questions

I'm Looking To Order Complete Cables To The Weider Pro 9940
(Posted by Hef2324 1 year ago)

I Need A Replacement Cable For My Welder Pro 8900 Do You Guys Carry One?
(Posted by mjdunkin21 3 years ago)

Weider Pro 8900
Hello,Do universal weights fit Weider pro 8900?Thank you
Hello,Do universal weights fit Weider pro 8900?Thank you
(Posted by patoro969 4 years ago)
How To Install Cable And Pulley On Weider Pro 4850
can you help me install new weider pro 4850 cable and pulley?
can you help me install new weider pro 4850 cable and pulley?
(Posted by verrolburnett 8 years ago)

How Do U Assemble The Pulleys On The Weider Pro 8900 Instructions Not Clear
the diagram in the manual looks nothing like the actual machine is there a better way to see this di...
the diagram in the manual looks nothing like the actual machine is there a better way to see this di...
(Posted by carmen011374 10 years ago)