
English Manual
Page 3
...: Before beginning this manual before using the weight bench. 2. Use the weight bench only on each side.pfyoUr. Cover the floor beneath the weight bench for foot rotection while exercising. 9. weight bench at all instructions before using the weight bench. of weight on the leg 0.0 tt. This Is .... Replace any 4ple. Always wear athletic;shoes for protection. ICON assumes no responsibility for hPrkle:0 only 000 weight :bench ,in this product oAkm,a,,ottit.. IMPORTANT PRECAUTIONS WARNING: To reduce the risk of serlouS injury, read the following Important...
...: Before beginning this manual before using the weight bench. 2. Use the weight bench only on each side.pfyoUr. Cover the floor beneath the weight bench for foot rotection while exercising. 9. weight bench at all instructions before using the weight bench. of weight on the leg 0.0 tt. This Is .... Replace any 4ple. Always wear athletic;shoes for protection. ICON assumes no responsibility for hPrkle:0 only 000 weight :bench ,in this product oAkm,a,,ottit.. IMPORTANT PRECAUTIONS WARNING: To reduce the risk of serlouS injury, read the following Important...
English Manual
Page 4
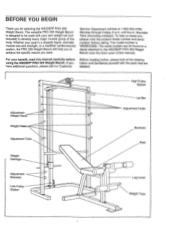
...-free at the drawing below and familiarize yourself with your own weight set- (not included) to the WEIDER' PRO 355 Weight Bench (see the front cover of the body. The model number is a shapely figure, dramatic muscle size and strength, or a healthier cardiovascular system, the PRO 355 Weight Bench will help us assist you want. until 6 p.m. For your goal is...
...-free at the drawing below and familiarize yourself with your own weight set- (not included) to the WEIDER' PRO 355 Weight Bench (see the front cover of the body. The model number is a shapely figure, dramatic muscle size and strength, or a healthier cardiovascular system, the PRO 355 Weight Bench will help us assist you want. until 6 p.m. For your goal is...
English Manual
Page 10
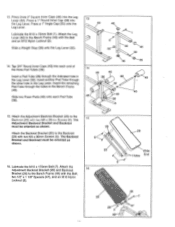
... must be oriented as shown. 26 Attach the Backrest Bracket (25) to the Backrest (29) with the Bolt and an M10 Nylon Locknut (2). 2 Slide a Weight Stop (35) onto the Leg Lever (32). 55 32 46 39 14. Slide two Foam Pads (48) onto each end of the three Pad Tubes... (38). The 15 Adjustment Backrest Bracket and Backrest must be oriented as shown. 25 6 16. Attach the Leg Lever (32) to the Bench Frame (49) with two M6 x 36mm Screws (6). Attach the Adjustment Backrest Bracket (26) to the Backrest (29) with the Bolt, two 1/2" x 1 1/8" Spacers (47), and...
... must be oriented as shown. 26 Attach the Backrest Bracket (25) to the Backrest (29) with the Bolt and an M10 Nylon Locknut (2). 2 Slide a Weight Stop (35) onto the Leg Lever (32). 55 32 46 39 14. Slide two Foam Pads (48) onto each end of the three Pad Tubes... (38). The 15 Adjustment Backrest Bracket and Backrest must be oriented as shown. 25 6 16. Attach the Leg Lever (32) to the Bench Frame (49) with two M6 x 36mm Screws (6). Attach the Adjustment Backrest Bracket (26) to the Backrest (29) with the Bolt, two 1/2" x 1 1/8" Spacers (47), and...
English Manual
Page 11
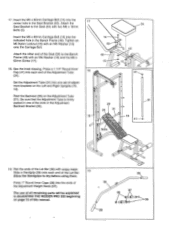
... In ADJUSTING THE WEIDER PRO 355 beginning on the Adjustment Tube (31). Wet the ends of the Adjustment Weight.Rests (37). Insert the M6 x 60mm Carriage Bolt (14) into the ends of the Lat Bar (36) with an M6 Washer (16) onto the Carriage Bolt. Attach the Seat Bracket to the Bench Frame (49) with... two M6 x 16mm Bolts (5). Be sure that the Adjustment Tube is firmly seated in the Bench...
... In ADJUSTING THE WEIDER PRO 355 beginning on the Adjustment Tube (31). Wet the ends of the Adjustment Weight.Rests (37). Insert the M6 x 60mm Carriage Bolt (14) into the ends of the Lat Bar (36) with an M6 Washer (16) onto the Carriage Bolt. Attach the Seat Bracket to the Bench Frame (49) with... two M6 x 16mm Bolts (5). Be sure that the Adjustment Tube is firmly seated in the Bench...
English Manual
Page 12
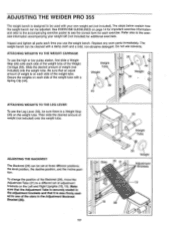
... cloth and a mild, non-abrasive detergent. ATTACHING WEIGHTS TO THE WEIGHT CARRIAGE To use the high or low pulley station, first slide a Weight Stop (35) onto each time you use solvents. ADJUSTING THE WEIDER PRO 355 The weight bench is designed to be adjusted. The steps below explain how the weight bench can be set (not included) for each side...
... cloth and a mild, non-abrasive detergent. ATTACHING WEIGHTS TO THE WEIGHT CARRIAGE To use the high or low pulley station, first slide a Weight Stop (35) onto each time you use solvents. ADJUSTING THE WEIDER PRO 355 The weight bench is designed to be adjusted. The steps below explain how the weight bench can be set (not included) for each side...
English Manual
Page 18
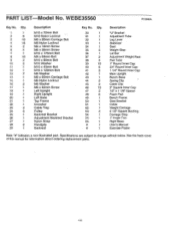
... Pad Tube 1" Round Inner Cap 3/4" Round Inner Cap 1 1/4" Round Inner Cap Main Upright Bench Base Spring Clip Cable Clip 2" Square Inner Cap 1/2" x 1 1/8" Spacer Foam Pad Bench Frame Seat Bracket Cable Weight Carriage 2 1/2" Square Bushing Carriage Stop 1" Anola Cap Right Base User's Manual Exercise Poster Note: "#" indicates a non-illustrated part. Specifications are subject to...
... Pad Tube 1" Round Inner Cap 3/4" Round Inner Cap 1 1/4" Round Inner Cap Main Upright Bench Base Spring Clip Cable Clip 2" Square Inner Cap 1/2" x 1 1/8" Spacer Foam Pad Bench Frame Seat Bracket Cable Weight Carriage 2 1/2" Square Bushing Carriage Stop 1" Anola Cap Right Base User's Manual Exercise Poster Note: "#" indicates a non-illustrated part. Specifications are subject to...
English Manual
Page 20
To help us assist you, please be prepared to give the following information when calling: 1. The MODEL NUMBER of the product (WEIDER° PRO 355 Weight Bench). 3. The SERIAL NUMBER of the product (see page 18 of this manual). until 6 p.m. The NAME of the product (WEBE35560). 2. Part No. 131133 R1096A Printed in ...
To help us assist you, please be prepared to give the following information when calling: 1. The MODEL NUMBER of the product (WEIDER° PRO 355 Weight Bench). 3. The SERIAL NUMBER of the product (see page 18 of this manual). until 6 p.m. The NAME of the product (WEBE35560). 2. Part No. 131133 R1096A Printed in ...


