
English Manual
Page 1
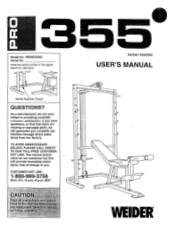
... are missing or damaged parts, we will provide immediate assistance, free of charge to providing complete custiAner satisfaction. if you have questions, or find that there are committed to you complete satisfaction through direct assistance from our factory. Model No. WEBE35560 Serial No. PATENT PENDING USER'S MANUAL Serial Number Decal QUESTIONS? Write the serial number in the space above for future •...
... are missing or damaged parts, we will provide immediate assistance, free of charge to providing complete custiAner satisfaction. if you have questions, or find that there are committed to you complete satisfaction through direct assistance from our factory. Model No. WEBE35560 Serial No. PATENT PENDING USER'S MANUAL Serial Number Decal QUESTIONS? Write the serial number in the space above for future •...
English Manual
Page 2
... may not apply to you . TABLE OF CONTENTS LIMITED WARRANTY IMPORTANT PRECAUTIONS BEFORE YOU BEGIN PART IDENTIFICATION CHART ASSEMBLY ADJUSTING THE WEIDER PRO 355 EXERCISE GUIDELINES PART LIST EXPLODED DRAWING ORDERING REPLACEMENT PARTS 2 3 4 5 6 12 14 18 19 Back Cover LIMITED WARRANTY ICON Health & Fitness, Inc. (ICON), warrants this product to be free from defects in workmanship and material, under this warranty is limited to replacing or repairing, at ICON's option, the product at one of its authorized...
... may not apply to you . TABLE OF CONTENTS LIMITED WARRANTY IMPORTANT PRECAUTIONS BEFORE YOU BEGIN PART IDENTIFICATION CHART ASSEMBLY ADJUSTING THE WEIDER PRO 355 EXERCISE GUIDELINES PART LIST EXPLODED DRAWING ORDERING REPLACEMENT PARTS 2 3 4 5 6 12 14 18 19 Back Cover LIMITED WARRANTY ICON Health & Fitness, Inc. (ICON), warrants this product to be free from defects in workmanship and material, under this warranty is limited to replacing or repairing, at ICON's option, the product at one of its authorized...
English Manual
Page 3
... the weight bench for foot rotection while exercising. 9. Replace any 4ple. Included). The weight bench does not include weights The weight bench is anequal.ernount of weight on a level surface. the 14. Inspect and tighten all parts each time you are a quately informed of all times. 6 Always be sure there is the responsibili of the owner to support a maximum of 510 pounds, including the user, a weight bar and weights...
... the weight bench for foot rotection while exercising. 9. Replace any 4ple. Included). The weight bench does not include weights The weight bench is anequal.ernount of weight on a level surface. the 14. Inspect and tighten all parts each time you are a quately informed of all times. 6 Always be sure there is the responsibili of the owner to support a maximum of 510 pounds, including the user, a weight bar and weights...
English Manual
Page 4
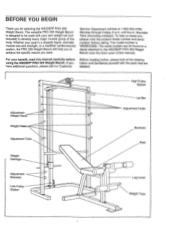
... through Friday, 6 a.m. Service Department toll-free at the drawing below and familiarize yourself with your own weight set- (not included) to achieve the specific results you to develop every major muscle group of this manual carefully before calling. until 6 p.m. PRO 355 Weight Bench. To help you want. The serial number can be found on a decal attached to be used with the parts that are labeled...
... through Friday, 6 a.m. Service Department toll-free at the drawing below and familiarize yourself with your own weight set- (not included) to achieve the specific results you to develop every major muscle group of this manual carefully before calling. until 6 p.m. PRO 355 Weight Bench. To help you want. The serial number can be found on a decal attached to be used with the parts that are labeled...
English Manual
Page 5
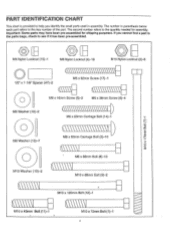
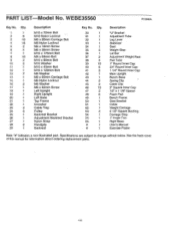
... M8 Washer (13)-7 M6 x 16mm Screw (5)-2 M6 x 36mm Screw (6)-4 M6 x 60mm Carriage Bolt (14)-1 M8 x 60mm Carriage Bolt (3)-10 0 M10 Washer (10)-2 \\\\\\\\ M8 x 68mm Bolt (8)-10 \\\\\\\\ M10 x 89mm Bolt (9)-2 M10 x 120mm Bolt (12)-1 M10 x 43mm Bolt (11)-1 M10 x 72mm Bolt (1)-1 The second number refers to the key number of the part. The number in parenthesis below each part refers to the quantity needed for shipping purposes.
... M8 Washer (13)-7 M6 x 16mm Screw (5)-2 M6 x 36mm Screw (6)-4 M6 x 60mm Carriage Bolt (14)-1 M8 x 60mm Carriage Bolt (3)-10 0 M10 Washer (10)-2 \\\\\\\\ M8 x 68mm Bolt (8)-10 \\\\\\\\ M10 x 89mm Bolt (9)-2 M10 x 120mm Bolt (12)-1 M10 x 43mm Bolt (11)-1 M10 x 72mm Bolt (1)-1 The second number refers to the key number of the part. The number in parenthesis below each part refers to the quantity needed for shipping purposes.
English Manual
Page 6
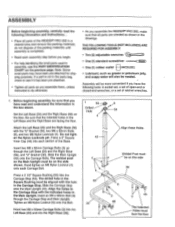
... begin. • For help identifying the small parts used in assembly, use the PART IDENTIFICATION CHART on this side 56 8 3 46 46 The Indented Holes must be on the previous page. Tighten an M8 Nylon Locknut (4) onto the Bolt. Set the Left Base (20) and the Right Base... has been pre-attached. • Tighten all parts are facing the floor. Assembly will be needed. Be sure that all parts as you assemble them, unless instructed to do otherwise. • As you have the following information and instructions:_ _ • Place all parts of the WEIDER® PRO 355 in the Left Base...
... begin. • For help identifying the small parts used in assembly, use the PART IDENTIFICATION CHART on this side 56 8 3 46 46 The Indented Holes must be on the previous page. Tighten an M8 Nylon Locknut (4) onto the Bolt. Set the Left Base (20) and the Right Base... has been pre-attached. • Tighten all parts are facing the floor. Assembly will be needed. Be sure that all parts as you assemble them, unless instructed to do otherwise. • As you have the following information and instructions:_ _ • Place all parts of the WEIDER® PRO 355 in the Left Base...
English Manual
Page 7
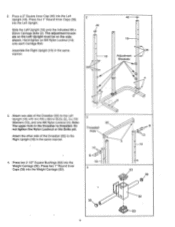
... 46 'Q 0 19 0 39 Adjustment Brackets 4 4 3 3. Press four 1" Round Inner Caps (39) into the Weight Carriage (52). Assemble the Right Upright (19) in the same manner. 4. me Washers (13), and one side of the Crossbar (22) to the Left Upright (1A) ja,ith F.A. Slide the Left Upright (18) onto the indicated M8 x 60mm Carriage Bolts (3). Hand-tighten an M8 Nylon...
... 46 'Q 0 19 0 39 Adjustment Brackets 4 4 3 3. Press four 1" Round Inner Caps (39) into the Weight Carriage (52). Assemble the Right Upright (19) in the same manner. 4. me Washers (13), and one side of the Crossbar (22) to the Left Upright (1A) ja,ith F.A. Slide the Left Upright (18) onto the indicated M8 x 60mm Carriage Bolts (3). Hand-tighten an M8 Nylon...
English Manual
Page 8
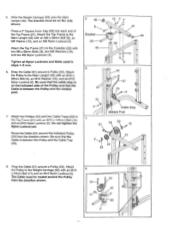
...10 2 Cable Stop Welded Post 7 51 24 23 12 .G° 2 - Route the Cable (51) around the Pulley from the direction shown. Be sure that the Cable is between the Pulley and the welded post. 7. Attach the Pulley to the Main Upright (42) with ari MIG x 120(nryt Bolt (12) and an M10 Nylon Locknut (2). Do not tighten the ... side of the Top Frame (21). Top Frame to the Top Fiairie (21) with an M10 x 89mm Bolt (9), an M10 Washer (10), and an M10 Nylon Locknut (2). Wrap the Cable (51) around a Pulley (24). Tighten all Nylon Locknuts and Bolts used in steps 1-5 now. 6. 5.
...10 2 Cable Stop Welded Post 7 51 24 23 12 .G° 2 - Route the Cable (51) around the Pulley from the direction shown. Be sure that the Cable is between the Pulley and the welded post. 7. Attach the Pulley to the Main Upright (42) with ari MIG x 120(nryt Bolt (12) and an M10 Nylon Locknut (2). Do not tighten the ... side of the Top Frame (21). Top Frame to the Top Fiairie (21) with an M10 x 89mm Bolt (9), an M10 Washer (10), and an M10 Nylon Locknut (2). Wrap the Cable (51) around a Pulley (24). Tighten all Nylon Locknuts and Bolts used in steps 1-5 now. 6. 5.

English Manual
Page 9
... (33). Slide the end of the Bench Base (43). Tighten an M8 Nylon Locknut (4) onto each end of the Pulley and that the Cable and Pulleys move smoothly. 10. Press a 2" Square Inner Cap (46) into each Carriage Bolt. Press a 2" Square Inner Cap (46) into the Bench Frame (49). 9 23 4 2 O 51 0 . 0 0 0 10 51 21 0 2 0 0 9 24 0 Cable Stop 0 Welded 0 Post 11 .• 43 33...
... (33). Slide the end of the Bench Base (43). Tighten an M8 Nylon Locknut (4) onto each end of the Pulley and that the Cable and Pulleys move smoothly. 10. Press a 2" Square Inner Cap (46) into each Carriage Bolt. Press a 2" Square Inner Cap (46) into the Bench Frame (49). 9 23 4 2 O 51 0 . 0 0 0 10 51 21 0 2 0 0 9 24 0 Cable Stop 0 Welded 0 Post 11 .• 43 33...
English Manual
Page 10
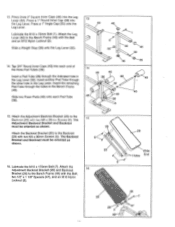
...Attach the Backrest Bracket (25) to the Bench Frame (49) with two MG x 36r-cirri Screws (6). Attach the Adjustment Backrest Bracket (26) and Backrest 16 Bracket (25) to the Backrest (29) with the Bolt and an M10 Nylon Locknut (2). 2 Slide a Weight Stop (35) onto the Leg Lever (32). 55 32 46 39 14. Press...in the Leg Lever. Attach the Adjustment Backrest Bracket (26) to the Bench Frame (49) with two M6 x 36mm Screws (6). Lubricate the M10 x 175mm Bolt (7). Press a 1" Angle Cap' (55) onto the 49 46 Leg Lever. Insert another Pad Tube through the other hole in the Leg Lever (32...
...Attach the Backrest Bracket (25) to the Bench Frame (49) with two MG x 36r-cirri Screws (6). Attach the Adjustment Backrest Bracket (26) and Backrest 16 Bracket (25) to the Backrest (29) with the Bolt and an M10 Nylon Locknut (2). 2 Slide a Weight Stop (35) onto the Leg Lever (32). 55 32 46 39 14. Press...in the Leg Lever. Attach the Adjustment Backrest Bracket (26) to the Bench Frame (49) with two M6 x 36mm Screws (6). Lubricate the M10 x 175mm Bolt (7). Press a 1" Angle Cap' (55) onto the 49 46 Leg Lever. Insert another Pad Tube through the other hole in the Leg Lever (32...
English Manual
Page 11
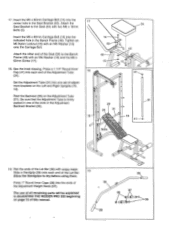
Attach the other end of the Seat (34) to dry before using them. Set the Adjustment Tube (31) into one of the slots in one set of the Adjustment Tube (31). Press 1" Round Inner Caps (39) into each end of the Lat Bar (36) with an M6 Washer (16) and the M6 x 62mm Screw (17). 14 50 49 15 34 5 16 17...
Attach the other end of the Seat (34) to dry before using them. Set the Adjustment Tube (31) into one of the slots in one set of the Adjustment Tube (31). Press 1" Round Inner Caps (39) into each end of the Lat Bar (36) with an M6 Washer (16) and the M6 x 62mm Screw (17). 14 50 49 15 34 5 16 17...
English Manual
Page 12
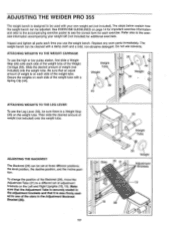
... THE LEG LEVER To use solvents. Inspect and tighten all parts each side of the weight tube of the Weight Carriage (52). ATTACHING WEIGHTS TO THE WEIGHT CARRIAGE To use the high or low pulley station, first slide a Weight Stop (35) onto each time you use the weight bench. Slots z. 26 31 35 -Weight Adjustment Brackets 19 18 29 12 ADJUSTING THE WEIDER PRO 355 The weight bench is designed to be used with your weight set...
... THE LEG LEVER To use solvents. Inspect and tighten all parts each side of the weight tube of the Weight Carriage (52). ATTACHING WEIGHTS TO THE WEIGHT CARRIAGE To use the high or low pulley station, first slide a Weight Stop (35) onto each time you use the weight bench. Slots z. 26 31 35 -Weight Adjustment Brackets 19 18 29 12 ADJUSTING THE WEIDER PRO 355 The weight bench is designed to be used with your weight set...
English Manual
Page 13
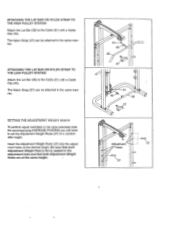
...; 36 27 0 Adjustment 37 Holes 37 SETTING THE itaiLiSTiviENT WEiGHT HL STS To perform squat exercises or toe raise exercises (see the accompanying EXERCISE POSTER) you will need to set the Adjustment Weight Rests (37) to a comfortable height. ATTACHING THE LAT BAR OR NYLON STRAP TO THE HIGH PULLEY STATION Attach the Lat Bar (36) to the Cable (51) with a Cable Clip (45). The Nylon Strap (27) can be attached in the...
...; 36 27 0 Adjustment 37 Holes 37 SETTING THE itaiLiSTiviENT WEiGHT HL STS To perform squat exercises or toe raise exercises (see the accompanying EXERCISE POSTER) you will need to set the Adjustment Weight Rests (37) to a comfortable height. ATTACHING THE LAT BAR OR NYLON STRAP TO THE HIGH PULLEY STATION Attach the Lat Bar (36) to the Cable (51) with a Cable Clip (45). The Nylon Strap (27) can be attached in the...
English Manual
Page 14
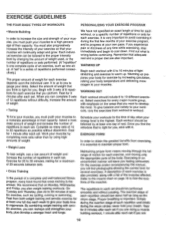
... correct form for each exercise depends upon the individual user. Proper breathing is wrong before continuing. When you feeling exhausted. WARMING UP Begin each set " is one complete cycle of motion for several exercises. Exercise for 20 to 30 minutes, resting for a maximum of 30 seconds between sets. • Cross Training In the pursuit of a complete and well-balanced fitness program, many sets...
... correct form for each exercise depends upon the individual user. Proper breathing is wrong before continuing. When you feeling exhausted. WARMING UP Begin each set " is one complete cycle of motion for several exercises. Exercise for 20 to 30 minutes, resting for a maximum of 30 seconds between sets. • Cross Training In the pursuit of a complete and well-balanced fitness program, many sets...
English Manual
Page 15
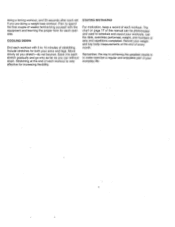
... of each set if you are doing a toning workout, and 30 seconds after each workout. List the date, exercises performed, weight, and numbers of every month. Record your arms and legs. STAYING MOTIVATED For motivation, keep a record of weeks familiarizing yourself with 5 to schedule and record your everyday life. Move slowly as you stretch-do not bounce. The chart on page...
... of each set if you are doing a toning workout, and 30 seconds after each workout. List the date, exercises performed, weight, and numbers of every month. Record your arms and legs. STAYING MOTIVATED For motivation, keep a record of weeks familiarizing yourself with 5 to schedule and record your everyday life. Move slowly as you stretch-do not bounce. The chart on page...
English Manual
Page 16
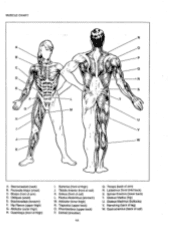
... Dorsi (mid back) S. Obliques (waist) E. Deltoid (shoulder) in Q. Spinae Erectors (lower back) T. Gastrocnemius (back of calf) K. Quadriceps (front of thigh) J. Abductor (outer thigh) H. Rectus Abdominus (stomach) M. Rhomboideus (upper back) P. Gluteus Maximus (buttocks) V. MUSCLE CHART R S L LI Jll J A. Pectoralis Major (chest) C. Sartorius (front of thigh) I. Soleus (front of leg) W. Trapezius (upper back) 0. Hamstring (back of calf) L.
... Dorsi (mid back) S. Obliques (waist) E. Deltoid (shoulder) in Q. Spinae Erectors (lower back) T. Gastrocnemius (back of calf) K. Quadriceps (front of thigh) J. Abductor (outer thigh) H. Rectus Abdominus (stomach) M. Rhomboideus (upper back) P. Gluteus Maximus (buttocks) V. MUSCLE CHART R S L LI Jll J A. Pectoralis Major (chest) C. Sartorius (front of thigh) I. Soleus (front of leg) W. Trapezius (upper back) 0. Hamstring (back of calf) L.
English Manual
Page 17
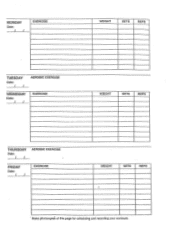
MONDAY Date: / / EXERCISE WEIGHT SETS REPS TUESDAY Date: / / AEROBIC EXERCISE WEDNESDAY Date: / / EXERCISE WEIGHT SETS REPS THURSDAY Date: / / AEROBIC EXERCISE FRIDAY Date: / / EXERCISE WEIGHT SETS REPS Make photocopies of this page for scheduling and recording your workouts.
MONDAY Date: / / EXERCISE WEIGHT SETS REPS TUESDAY Date: / / AEROBIC EXERCISE WEDNESDAY Date: / / EXERCISE WEIGHT SETS REPS THURSDAY Date: / / AEROBIC EXERCISE FRIDAY Date: / / EXERCISE WEIGHT SETS REPS Make photocopies of this page for scheduling and recording your workouts.
English Manual
Page 18
... 3 54 1 55 1 56 1 1 1 Description "U" Bracket Adjustment Tube Leg Lever Stabilizer Seat Weight Stop Lat Bar Adjustment Weight Rest Pad Tube 1" Round Inner Cap 3/4" Round Inner Cap 1 1/4" Round Inner Cap Main Upright Bench Base Spring Clip Cable Clip 2" Square Inner Cap 1/2" x 1 1/8" Spacer Foam Pad Bench Frame Seat Bracket Cable Weight Carriage 2 1/2" Square Bushing Carriage Stop 1" Anola Cap Right Base User's Manual Exercise Poster Note: "#" indicates a non-illustrated part. Qty. 1 1 2 6 3 10 4 18 5 2 6 4 7 1 8 10...
... 3 54 1 55 1 56 1 1 1 Description "U" Bracket Adjustment Tube Leg Lever Stabilizer Seat Weight Stop Lat Bar Adjustment Weight Rest Pad Tube 1" Round Inner Cap 3/4" Round Inner Cap 1 1/4" Round Inner Cap Main Upright Bench Base Spring Clip Cable Clip 2" Square Inner Cap 1/2" x 1 1/8" Spacer Foam Pad Bench Frame Seat Bracket Cable Weight Carriage 2 1/2" Square Bushing Carriage Stop 1" Anola Cap Right Base User's Manual Exercise Poster Note: "#" indicates a non-illustrated part. Qty. 1 1 2 6 3 10 4 18 5 2 6 4 7 1 8 10...
English Manual
Page 20
... MODEL NUMBER of the product (WEIDER° PRO 355 Weight Bench). 3. The KEY NUMBER and DESCRIPTION of the desired part(s) (see the front cover of this manual). 4. until 6 p.m. To help us assist you, please be prepared to give the following information when calling: 1. The NAME of the product (WEBE35560). 2. Part No. 131133 R1096A Printed in China © 1996 ICON Health & Fitness, Inc. Mountain Time (excluding holidays). The SERIAL NUMBER...
... MODEL NUMBER of the product (WEIDER° PRO 355 Weight Bench). 3. The KEY NUMBER and DESCRIPTION of the desired part(s) (see the front cover of this manual). 4. until 6 p.m. To help us assist you, please be prepared to give the following information when calling: 1. The NAME of the product (WEBE35560). 2. Part No. 131133 R1096A Printed in China © 1996 ICON Health & Fitness, Inc. Mountain Time (excluding holidays). The SERIAL NUMBER...


