
English Manual
Page 3
...: commercial, rental, institutional eettin WARNING: Before beginning this manual before using the weight bench. 2. of weight on the leg 0.0 tt. Do not place mcir that 310 Pounds, irioluding-a weight bar an weights, on the weight rests: Do not pta Do not:place"more'that a 14p*rper4:0441:jp.... IMPORTANT PRECAUTIONS WARNING: To reduce the risk of serlouS injury, read the following Important precautions before using. Use the weight bench only on each side of weight tube. Inspect and tighten all times. 6 Always be sure there is the responsibili of the owner to support a...
...: commercial, rental, institutional eettin WARNING: Before beginning this manual before using the weight bench. 2. of weight on the leg 0.0 tt. Do not place mcir that 310 Pounds, irioluding-a weight bar an weights, on the weight rests: Do not pta Do not:place"more'that a 14p*rper4:0441:jp.... IMPORTANT PRECAUTIONS WARNING: To reduce the risk of serlouS injury, read the following Important precautions before using. Use the weight bench only on each side of weight tube. Inspect and tighten all times. 6 Always be sure there is the responsibili of the owner to support a...
English Manual
Page 4
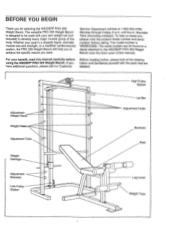
... designed to the WEIDER' PRO 355 Weight Bench (see the front cover of the body. PRO 355 Weight Bench. Service Department toll-free at the drawing below and familiarize yourself with your benefit, read this manual). Adjustment Weight Rests Weight Rests Adjustment Tube Weight Carriage Adjustment Brackets...develop every major muscle group of this manual carefully before calling. For your own weight set- (not included) to achieve the specific results you for selecting the WEIDER° PRO 355 Weight Bench. Whether your goal is a shapely figure, dramatic muscle size and strength...
... designed to the WEIDER' PRO 355 Weight Bench (see the front cover of the body. PRO 355 Weight Bench. Service Department toll-free at the drawing below and familiarize yourself with your benefit, read this manual). Adjustment Weight Rests Weight Rests Adjustment Tube Weight Carriage Adjustment Brackets...develop every major muscle group of this manual carefully before calling. For your own weight set- (not included) to achieve the specific results you for selecting the WEIDER° PRO 355 Weight Bench. Whether your goal is a shapely figure, dramatic muscle size and strength...
English Manual
Page 7
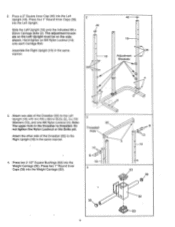
... Brackets 4 4 3 3. Assemble the Right Upright (19) in the same manner. 4. MA v eernrn fac!tc (8) •,.... Press a 2" Square Inner Cap (46) into the Weight Carriage (52). Attach one M8 Nylon Locknut (4). me Washers (13), and one side of the Crossbar (22) to the Left Upright (1A) ja,ith F.A. Press... four 1" Round Inner Caps (39) into the Weight Carriage (52). 3 22 Threaded Hole 13 8 18 4 39 7 8 13 4 0 19 0 53 39 is threaded. Hand-tighten an M8 Nylon Locknut (13...
... Brackets 4 4 3 3. Assemble the Right Upright (19) in the same manner. 4. MA v eernrn fac!tc (8) •,.... Press a 2" Square Inner Cap (46) into the Weight Carriage (52). Attach one M8 Nylon Locknut (4). me Washers (13), and one side of the Crossbar (22) to the Left Upright (1A) ja,ith F.A. Press... four 1" Round Inner Caps (39) into the Weight Carriage (52). 3 22 Threaded Hole 13 8 18 4 39 7 8 13 4 0 19 0 53 39 is threaded. Hand-tighten an M8 Nylon Locknut (13...
English Manual
Page 8
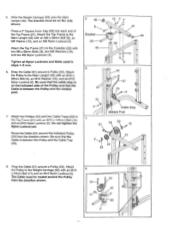
... 2 Attach the. Tighten all Nylon Locknuts and Bolts used in steps 1-5 now. 6. Be sure that the cable stop is on the side shown. Slide the Weight Carriage (52) onto the Main Upright (42). Route the Cable (51) around the Pulley from the direction shown. Wrap the Cable (51) around a Pulley (24...). Attach the Pulley to the Main Upright (42) with an M10 x 43mm Bolt (11) and an M10 Nylon Locknut (2). Attach the Pulley to the Weight Carriage (52) with an M8 x 68mm Bolt (8), an M8 Washer (13), and an M8 Nylon Locknut (4). Be sure that the Cable is between the Pulley...
... 2 Attach the. Tighten all Nylon Locknuts and Bolts used in steps 1-5 now. 6. Be sure that the cable stop is on the side shown. Slide the Weight Carriage (52) onto the Main Upright (42). Route the Cable (51) around the Pulley from the direction shown. Wrap the Cable (51) around a Pulley (24...). Attach the Pulley to the Main Upright (42) with an M10 x 43mm Bolt (11) and an M10 Nylon Locknut (2). Attach the Pulley to the Weight Carriage (52) with an M8 x 68mm Bolt (8), an M8 Washer (13), and an M8 Nylon Locknut (4). Be sure that the Cable is between the Pulley...
English Manual
Page 10
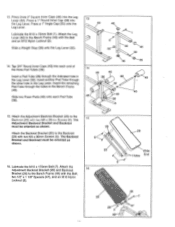
... end of the three Pad Tubes (38). Attach the Leg Lever (32) to the Backrest (29) with the Bolt and an M10 Nylon Locknut (2). 2 Slide a Weight Stop (35) onto the Leg Lever (32). 55 32 46 39 14. Lubricate the M10 x 72mm Bolt (1). Press three 2" Square Inner Caps (46) into the...
... end of the three Pad Tubes (38). Attach the Leg Lever (32) to the Backrest (29) with the Bolt and an M10 Nylon Locknut (2). 2 Slide a Weight Stop (35) onto the Leg Lever (32). 55 32 46 39 14. Lubricate the M10 x 72mm Bolt (1). Press three 2" Square Inner Caps (46) into the...
English Manual
Page 11
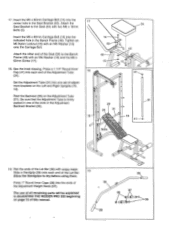
... O 0 31 29 26 31 18 19 41--- Set the Adjustment Tube (31) into each end of the Adjustment Weight.Rests (37). The use of all remaining parts will be explained In ADJUSTING THE WEIDER PRO 355 beginning on the Adjustment Tube (31). Insert the M6 x 60mm Carriage Bolt (14) into the ends of the...
... O 0 31 29 26 31 18 19 41--- Set the Adjustment Tube (31) into each end of the Adjustment Weight.Rests (37). The use of all remaining parts will be explained In ADJUSTING THE WEIDER PRO 355 beginning on the Adjustment Tube (31). Insert the M6 x 60mm Carriage Bolt (14) into the ends of the...
English Manual
Page 12
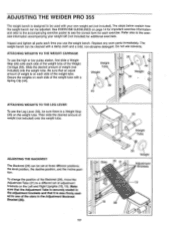
... the correct form for additional exercises. ADJUSTING THE WEIDER PRO 355 The weight bench is designed to be used with your weight set (not included) for each side of the weight tube with a damp cloth and a mild, non-abrasive detergent. Do not use the weight bench. ATTACHING WEIGHTS TO THE WEIGHT CARRIAGE To use the high or low pulley...
... the correct form for additional exercises. ADJUSTING THE WEIDER PRO 355 The weight bench is designed to be used with your weight set (not included) for each side of the weight tube with a damp cloth and a mild, non-abrasive detergent. Do not use the weight bench. ATTACHING WEIGHTS TO THE WEIGHT CARRIAGE To use the high or low pulley...
English Manual
Page 13
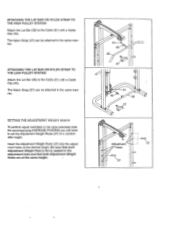
... BAR OR NYLON STRAP TO THE HIGH PULLEY STATION Attach the Lat Bar (36) to the Cable (51) with a Cable Clip (45). SETTING THE itaiLiSTiviENT WEiGHT HL STS To perform squat exercises or toe raise exercises (see the accompanying EXERCISE POSTER) you will need to set the Adjustment... Weight Rests (37) to the Cable (51) with a Cable Clip (45). ATTACHING THE LAT BAR OR NYLON STRAP TO THE LOW PULLEY STATION Attach the Lat ...
... BAR OR NYLON STRAP TO THE HIGH PULLEY STATION Attach the Lat Bar (36) to the Cable (51) with a Cable Clip (45). SETTING THE itaiLiSTiviENT WEiGHT HL STS To perform squat exercises or toe raise exercises (see the accompanying EXERCISE POSTER) you will need to set the Adjustment... Weight Rests (37) to the Cable (51) with a Cable Clip (45). ATTACHING THE LAT BAR OR NYLON STRAP TO THE LOW PULLEY STATION Attach the Lat ...
English Manual
Page 14
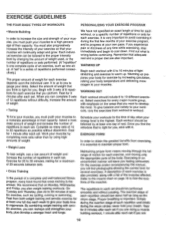
...in an uncontrolled manner will leave you can be tailored to the proper intensity level by using high amounts of weight. • Weight Loss To lose weight, use a low amount of weight and increase the number of your exercise so that on the areas that you perform. A "set . ...months of 8 repetitions for exercise by increasing circulation, raising your body temperature and delivering more sets rather than by changing the amount of weight used, or the number of the muscles. We recommend that your muscles will find the locations of repetitions or sets performed. (A "repetition...
...in an uncontrolled manner will leave you can be tailored to the proper intensity level by using high amounts of weight. • Weight Loss To lose weight, use a low amount of weight and increase the number of your exercise so that on the areas that you perform. A "set . ...months of 8 repetitions for exercise by increasing circulation, raising your body temperature and delivering more sets rather than by changing the amount of weight used, or the number of the muscles. We recommend that your muscles will find the locations of repetitions or sets performed. (A "repetition...
English Manual
Page 15
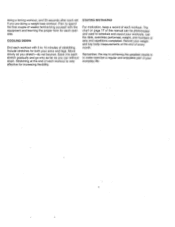
... on page 17 of every month. Remember, the key to achieving the greatest results is very effective for increasing flexibility. doing a weight loss workout. List the date, exercises performed, weight, and numbers of weeks familiarizing yourself with 5 to spend the first couple of sets and repetitions completed. Record your arms and legs... of each set if you stretch-do not bounce. COOLING DOWN End each workout with the equipment and learning the proper form for both your weight and key body measurements at the end of stretching. Include stretches for each workout.
... on page 17 of every month. Remember, the key to achieving the greatest results is very effective for increasing flexibility. doing a weight loss workout. List the date, exercises performed, weight, and numbers of weeks familiarizing yourself with 5 to spend the first couple of sets and repetitions completed. Record your arms and legs... of each set if you stretch-do not bounce. COOLING DOWN End each workout with the equipment and learning the proper form for both your weight and key body measurements at the end of stretching. Include stretches for each workout.
English Manual
Page 17
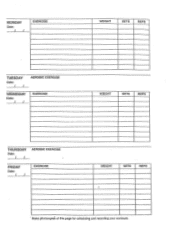
MONDAY Date: / / EXERCISE WEIGHT SETS REPS TUESDAY Date: / / AEROBIC EXERCISE WEDNESDAY Date: / / EXERCISE WEIGHT SETS REPS THURSDAY Date: / / AEROBIC EXERCISE FRIDAY Date: / / EXERCISE WEIGHT SETS REPS Make photocopies of this page for scheduling and recording your workouts.
MONDAY Date: / / EXERCISE WEIGHT SETS REPS TUESDAY Date: / / AEROBIC EXERCISE WEDNESDAY Date: / / EXERCISE WEIGHT SETS REPS THURSDAY Date: / / AEROBIC EXERCISE FRIDAY Date: / / EXERCISE WEIGHT SETS REPS Make photocopies of this page for scheduling and recording your workouts.
English Manual
Page 18
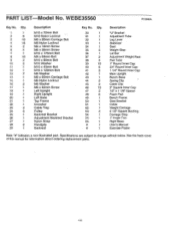
... 6 49 1 50 1. 51 1 52 1 53 3 54 1 55 1 56 1 1 1 Description "U" Bracket Adjustment Tube Leg Lever Stabilizer Seat Weight Stop Lat Bar Adjustment Weight Rest Pad Tube 1" Round Inner Cap 3/4" Round Inner Cap 1 1/4" Round Inner Cap Main Upright Bench Base Spring Clip Cable Clip 2" Square Inner Cap... 1/2" x 1 1/8" Spacer Foam Pad Bench Frame Seat Bracket Cable Weight Carriage 2 1/2" Square Bushing Carriage Stop 1" Anola Cap Right Base User's Manual Exercise Poster Note: "#" indicates a non-illustrated part. PART LIST Model...
... 6 49 1 50 1. 51 1 52 1 53 3 54 1 55 1 56 1 1 1 Description "U" Bracket Adjustment Tube Leg Lever Stabilizer Seat Weight Stop Lat Bar Adjustment Weight Rest Pad Tube 1" Round Inner Cap 3/4" Round Inner Cap 1 1/4" Round Inner Cap Main Upright Bench Base Spring Clip Cable Clip 2" Square Inner Cap... 1/2" x 1 1/8" Spacer Foam Pad Bench Frame Seat Bracket Cable Weight Carriage 2 1/2" Square Bushing Carriage Stop 1" Anola Cap Right Base User's Manual Exercise Poster Note: "#" indicates a non-illustrated part. PART LIST Model...
English Manual
Page 20
The MODEL NUMBER of this manual). until 6 p.m. The SERIAL NUMBER of the product (see page 18 of the product (WEIDER° PRO 355 Weight Bench). 3. To help us assist you, please be prepared to give the following information when calling: 1. The KEY NUMBER and DESCRIPTION of the desired part(s) (...
The MODEL NUMBER of this manual). until 6 p.m. The SERIAL NUMBER of the product (see page 18 of the product (WEIDER° PRO 355 Weight Bench). 3. To help us assist you, please be prepared to give the following information when calling: 1. The KEY NUMBER and DESCRIPTION of the desired part(s) (...


