
English Manual
Page 3
...in ariy: commercial, rental, institutional eettin WARNING: Before beginning this manual before using the weight bench. Keep small children and pets away om t e. The weight bench does not include weights The weight bench is the responsibili of the owner to support a maximum of serlouS injury, read the following ... age of weight tube. Keep hands and feet away from moving parts 10. The Weight benctile:ip.teille0 for hPrkle:0 only 000 weight :bench ,in this or any exercise program, consult your physician. Wnen.;usmg:the 400190st:11144e spre: that a 14p*rper4:0441:jp:::gryily;:00...
...in ariy: commercial, rental, institutional eettin WARNING: Before beginning this manual before using the weight bench. Keep small children and pets away om t e. The weight bench does not include weights The weight bench is the responsibili of the owner to support a maximum of serlouS injury, read the following ... age of weight tube. Keep hands and feet away from moving parts 10. The Weight benctile:ip.teille0 for hPrkle:0 only 000 weight :bench ,in this or any exercise program, consult your physician. Wnen.;usmg:the 400190st:11144e spre: that a 14p*rper4:0441:jp:::gryily;:00...
English Manual
Page 4
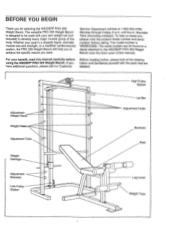
...own weight set- (not included) to be found on a decal attached to achieve the specific results you for selecting the WEIDER° PRO 355 Weight Bench. The model number is designed to develop every major muscle group of this manual carefully before calling. If you have additional questions...). For your goal is a shapely figure, dramatic muscle size and strength, or a healthier cardiovascular system, the PRO 355 Weight Bench will help us assist you to the WEIDER' PRO 355 Weight Bench (see the front cover of the body. The serial number can be used with the parts that are labeled....
...own weight set- (not included) to be found on a decal attached to achieve the specific results you for selecting the WEIDER° PRO 355 Weight Bench. The model number is designed to develop every major muscle group of this manual carefully before calling. If you have additional questions...). For your goal is a shapely figure, dramatic muscle size and strength, or a healthier cardiovascular system, the PRO 355 Weight Bench will help us assist you to the WEIDER' PRO 355 Weight Bench (see the front cover of the body. The serial number can be used with the parts that are labeled....

English Manual
Page 9
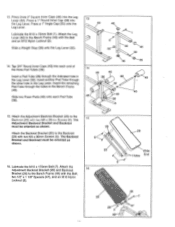
Press a 2" Square Inner Cap (46) into the Bench Frame (49). 9 23 4 2 O 51 0 . 0 0 0 10 51 21 0 2 0 0 9 24 0 Cable Stop 0 Welded 0 Post 11 .• 43 33 46 12 4 ...(23) are turned as shown and that the Cable is on the indicated side of the Bench Base (43). Slide the Bench Frame (49) onto the M8 x 60mm Carriage Bolts (3). Tighten the M10 Nylon Locknut ...M10 Washer (10), and an M10 Nylon Locknut (2). Tighten an M8 Nylon Locknut (4) onto each end of the Bench Base (43) onto the Carriage Bolts. Press a 2" Square Inner Cap (46) into each Carriage Bolt. Do...
Press a 2" Square Inner Cap (46) into the Bench Frame (49). 9 23 4 2 O 51 0 . 0 0 0 10 51 21 0 2 0 0 9 24 0 Cable Stop 0 Welded 0 Post 11 .• 43 33 46 12 4 ...(23) are turned as shown and that the Cable is on the indicated side of the Bench Base (43). Slide the Bench Frame (49) onto the M8 x 60mm Carriage Bolts (3). Tighten the M10 Nylon Locknut ...M10 Washer (10), and an M10 Nylon Locknut (2). Tighten an M8 Nylon Locknut (4) onto each end of the Bench Base (43) onto the Carriage Bolts. Press a 2" Square Inner Cap (46) into each Carriage Bolt. Do...
English Manual
Page 10
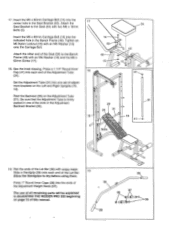
... must be oriented as shown. 25 6 16. The Backrest 6 Bracket and Backrest must be oriented as shown. 26 Attach the Backrest Bracket (25) to the Bench Frame (49) with the Bolt, two 1/2" x 1 1/8" Spacers (47), and an M10 Nylon Locknut (2). 29 Wide Holes End 29 25 , 2 49 26 . 47 ...Lubricate the M10 x 175mm Bolt (7). Insert a Pad Tube (38) through the holes in the Bench Frame (49). 13. Press a 1" Angle Cap' (55) onto the 49 46 Leg Lever. Lubricate the M10 x 72mm Bolt (1). Slide two Foam Pads (48) onto...
... must be oriented as shown. 25 6 16. The Backrest 6 Bracket and Backrest must be oriented as shown. 26 Attach the Backrest Bracket (25) to the Bench Frame (49) with the Bolt, two 1/2" x 1 1/8" Spacers (47), and an M10 Nylon Locknut (2). 29 Wide Holes End 29 25 , 2 49 26 . 47 ...Lubricate the M10 x 175mm Bolt (7). Insert a Pad Tube (38) through the holes in the Bench Frame (49). 13. Press a 1" Angle Cap' (55) onto the 49 46 Leg Lever. Lubricate the M10 x 72mm Bolt (1). Slide two Foam Pads (48) onto...
English Manual
Page 11
...). The use of the Seat (34) to dry before using them. Attach the other end of all remaining parts will be explained In ADJUSTING THE WEIDER PRO 355 beginning on the Adjustment Tube (31). Wet the ends of adjustment brackets on the Left and Right Uprights (18, 19). Be sure that the Adjustment...). 18 O 0 31 29 26 31 18 19 41--- Set the Adjustment Tube (31) into one of the Lat Bar. 19 Allow the Handgrips to the Bench Frame (49) with two M6 x 16mm Bolts (5). 17. Insert the M6 x 60mm Carriage Bolt (14) into each end of the slots in the...
...). The use of the Seat (34) to dry before using them. Attach the other end of all remaining parts will be explained In ADJUSTING THE WEIDER PRO 355 beginning on the Adjustment Tube (31). Wet the ends of adjustment brackets on the Left and Right Uprights (18, 19). Be sure that the Adjustment...). 18 O 0 31 29 26 31 18 19 41--- Set the Adjustment Tube (31) into one of the Lat Bar. 19 Allow the Handgrips to the Bench Frame (49) with two M6 x 16mm Bolts (5). 17. Insert the M6 x 60mm Carriage Bolt (14) into each end of the slots in the...
English Manual
Page 12
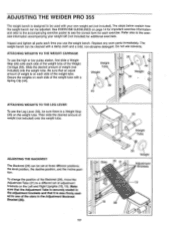
... be set at three different positions: the level position, the decline position, and the incline position. The steps below explain how the weight bench can be adjusted. See EXERCISE GUIDELINES on the Left and Right Uprights (18, 19). Inspect and tighten all parts each side of the... to a different set of the Weight Carriage (52). Slots z. 26 31 35 -Weight Adjustment Brackets 19 18 29 12 ADJUSTING THE WEIDER PRO 355 The weight bench is designed to the exercise information accompanying your own weight set (not included). Weight Tube Weight \-* 35 44 35 44 Weight 52 _...
... be set at three different positions: the level position, the decline position, and the incline position. The steps below explain how the weight bench can be adjusted. See EXERCISE GUIDELINES on the Left and Right Uprights (18, 19). Inspect and tighten all parts each side of the... to a different set of the Weight Carriage (52). Slots z. 26 31 35 -Weight Adjustment Brackets 19 18 29 12 ADJUSTING THE WEIDER PRO 355 The weight bench is designed to the exercise information accompanying your own weight set (not included). Weight Tube Weight \-* 35 44 35 44 Weight 52 _...
English Manual
Page 18
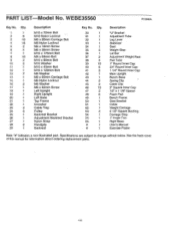
... Weight Stop Lat Bar Adjustment Weight Rest Pad Tube 1" Round Inner Cap 3/4" Round Inner Cap 1 1/4" Round Inner Cap Main Upright Bench Base Spring Clip Cable Clip 2" Square Inner Cap 1/2" x 1 1/8" Spacer Foam Pad Bench Frame Seat Bracket Cable Weight Carriage 2 1/2" Square Bushing Carriage Stop 1" Anola Cap Right Base User's Manual Exercise Poster Note...
... Weight Stop Lat Bar Adjustment Weight Rest Pad Tube 1" Round Inner Cap 3/4" Round Inner Cap 1 1/4" Round Inner Cap Main Upright Bench Base Spring Clip Cable Clip 2" Square Inner Cap 1/2" x 1 1/8" Spacer Foam Pad Bench Frame Seat Bracket Cable Weight Carriage 2 1/2" Square Bushing Carriage Stop 1" Anola Cap Right Base User's Manual Exercise Poster Note...
English Manual
Page 20
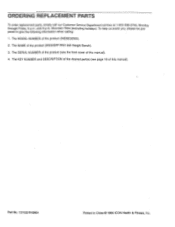
... order replacement parts, simply call our Customer Service Department toll-free at 1-800-999-3756, Monday through Friday, 6 a.m. The MODEL NUMBER of the product (WEIDER° PRO 355 Weight Bench). 3. Mountain Time (excluding holidays). The SERIAL NUMBER of the product (see page 18 of this manual). Part No. 131133 R1096A Printed in China ©...
... order replacement parts, simply call our Customer Service Department toll-free at 1-800-999-3756, Monday through Friday, 6 a.m. The MODEL NUMBER of the product (WEIDER° PRO 355 Weight Bench). 3. Mountain Time (excluding holidays). The SERIAL NUMBER of the product (see page 18 of this manual). Part No. 131133 R1096A Printed in China ©...


