
English Manual
Page 1
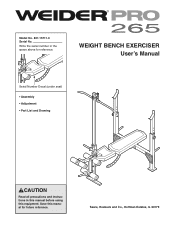
Model No. 831.15711.0 Serial No. Sears, Roebuck and Co., Hoffman Estates, IL 60179 Save this equipment. WEIGHT BENCH EXERCISER User's Manual Serial Number Decal (under seat) • Assembly • Adjustment • Part List and Drawing CAUTION Read all precautions and instructions in the space above for future reference. Write the serial number in this manual before using this manual for reference.
Model No. 831.15711.0 Serial No. Sears, Roebuck and Co., Hoffman Estates, IL 60179 Save this equipment. WEIGHT BENCH EXERCISER User's Manual Serial Number Decal (under seat) • Assembly • Adjustment • Part List and Drawing CAUTION Read all precautions and instructions in the space above for future reference. Write the serial number in this manual before using this manual for reference.

English Manual
Page 2
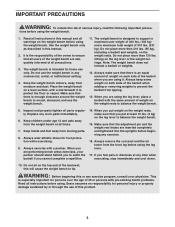
Note: The decals may not be shown at actual size. 2 TABLE OF CONTENTS WARNING DECAL PLACEMENT 2 IMPORTANT PRECAUTIONS 3 BEFORE YOU BEGIN 4 PART IDENTIFICATION CHART 5 ASSEMBLY 6 ADJUSTMENT 10 EXERCISE GUIDELINES 12 PART LIST 18 EXPLODED DRAWING 19 ORDERING REPLACEMENT PARTS Back Cover 90-DAY FULL WARRANTY Back Cover WARNING DECAL PLACEMENT The decals shown here have been placed on the weight bench. If a decal is missing or illegible, call 1-877-992-5999, and order a free replacement decal. Apply the decal in the location shown.
Note: The decals may not be shown at actual size. 2 TABLE OF CONTENTS WARNING DECAL PLACEMENT 2 IMPORTANT PRECAUTIONS 3 BEFORE YOU BEGIN 4 PART IDENTIFICATION CHART 5 ASSEMBLY 6 ADJUSTMENT 10 EXERCISE GUIDELINES 12 PART LIST 18 EXPLODED DRAWING 19 ORDERING REPLACEMENT PARTS Back Cover 90-DAY FULL WARRANTY Back Cover WARNING DECAL PLACEMENT The decals shown here have been placed on the weight bench. If a decal is missing or illegible, call 1-877-992-5999, and order a free replacement decal. Apply the decal in the location shown.
English Manual
Page 3
It is intended for personal injury or property damage sustained by or through the use the weight bench in any worn parts immediately. 6. Place the weight bench on a level surface, with the same amount of the barbell when adding or removing weights to prevent the barbell from... the risk of 510 lbs. (231 kg). tions before beginning any exercise. 16. Keep the weight bench indoors, away from moving parts. 8. Make sure that all users of all parts regularly. The weight bench is especially important for foot protection while exercising. 9. Do not place more than 210 lbs. (95...
It is intended for personal injury or property damage sustained by or through the use the weight bench in any worn parts immediately. 6. Place the weight bench on a level surface, with the same amount of the barbell when adding or removing weights to prevent the barbell from... the risk of 510 lbs. (231 kg). tions before beginning any exercise. 16. Keep the weight bench indoors, away from moving parts. 8. Make sure that all users of all parts regularly. The weight bench is especially important for foot protection while exercising. 9. Do not place more than 210 lbs. (95...
English Manual
Page 4
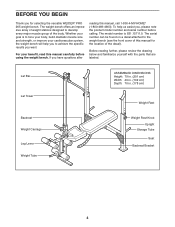
...reading this manual carefully before calling. For your cardiovascular system, the weight bench will help us assist you want. BEFORE YOU BEGIN Thank you for the location of the body. The ... muscle group of the decal). To help you to the weight bench (see the front cover of this manual for selecting the versatile WEIDER® PRO 265 weight bench. The model number is to tone your body, build dramatic muscle...note the product model number and serial number before using the weight bench. Before reading further, please review the drawing below and familiarize yourself with the...
...reading this manual carefully before calling. For your cardiovascular system, the weight bench will help us assist you want. BEFORE YOU BEGIN Thank you for the location of the body. The ... muscle group of the decal). To help you to the weight bench (see the front cover of this manual for selecting the versatile WEIDER® PRO 265 weight bench. The model number is to tone your body, build dramatic muscle...note the product model number and serial number before using the weight bench. Before reading further, please review the drawing below and familiarize yourself with the...
English Manual
Page 5
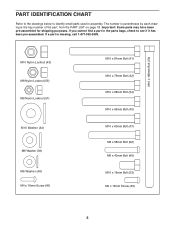
... have been pre-assembled for shipping purposes. If a part is the key number of the part, from the PART LIST on page 18. If you cannot find a part in the parts bags, check to identify small parts used in parentheses by each drawing is missing, call 1-877-992-5999. M10 x 168mm Bolt (50) M10 Nylon Locknut... (54) M10 x 65mm Bolt (40) M10 x 60mm Bolt (47) M8 x 58mm Bolt (52) M6 x 40mm Bolt (49) M10 x 19mm Bolt (53) M6 x 16mm Screw (39) 5 PART IDENTIFICATION CHART Refer to the drawings below to see if it has been pre-assembled. The number in assembly.
... have been pre-assembled for shipping purposes. If a part is the key number of the part, from the PART LIST on page 18. If you cannot find a part in the parts bags, check to identify small parts used in parentheses by each drawing is missing, call 1-877-992-5999. M10 x 168mm Bolt (50) M10 Nylon Locknut... (54) M10 x 65mm Bolt (40) M10 x 60mm Bolt (47) M8 x 58mm Bolt (52) M6 x 40mm Bolt (49) M10 x 19mm Bolt (53) M6 x 16mm Screw (39) 5 PART IDENTIFICATION CHART Refer to the drawings below to see if it has been pre-assembled. The number in assembly.

English Manual
Page 6
...Lift the Weight Rest (7) in the drawings. • For help identifying small parts, use the Part Identification Chart. Attach the Crossbar (4) to the Left Upright (6) with a Weight Rest Knob (23). However, the weight bench has many parts and the assembly process will be used. Do not dispose of ratchet wrenches. ... oriented as you assemble them, unless instructed to the Right Upright (5) in the box above. Before assembling the weight bench, make sure all parts as shown in the Left Upright (6) and secure it with a Right Joint Plate (18), a Left Joint Plate (59), four M10 x 75mm ...
...Lift the Weight Rest (7) in the drawings. • For help identifying small parts, use the Part Identification Chart. Attach the Crossbar (4) to the Left Upright (6) with a Weight Rest Knob (23). However, the weight bench has many parts and the assembly process will be used. Do not dispose of ratchet wrenches. ... oriented as you assemble them, unless instructed to the Right Upright (5) in the box above. Before assembling the weight bench, make sure all parts as shown in the Left Upright (6) and secure it with a Right Joint Plate (18), a Left Joint Plate (59), four M10 x 75mm ...
English Manual
Page 9
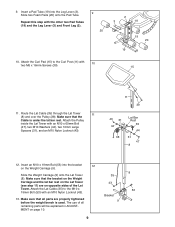
... the Weight Carriage and the lat bar rest on the Lat Tower (see step 11) are properly tightened before the weight bench is under the lat bar rest. Make sure that the Cable is used. Attach the Curl Pad (15) to the ... the Lat Cable (35) to the Curl Post (11) with an M10 Nylon Locknut (43). 13. Make sure that all remaining parts will be explained in ADJUSTMENT on page 10. 9 35 43 Brack3e5t 43 9 33 9 8 53 24 53 33 Repeat this step ...Front Leg (2). 9 20 10. Insert a Pad Tube (19) into the bracket 12 on opposite sides of all parts are on the Weight Carriage (9). 9.
... the Weight Carriage and the lat bar rest on the Lat Tower (see step 11) are properly tightened before the weight bench is under the lat bar rest. Make sure that the Cable is used. Attach the Curl Pad (15) to the ... the Lat Cable (35) to the Curl Post (11) with an M10 Nylon Locknut (43). 13. Make sure that all remaining parts will be explained in ADJUSTMENT on page 10. 9 35 43 Brack3e5t 43 9 33 9 8 53 24 53 33 Repeat this step ...Front Leg (2). 9 20 10. Insert a Pad Tube (19) into the bracket 12 on opposite sides of all parts are on the Weight Carriage (9). 9.
English Manual
Page 10
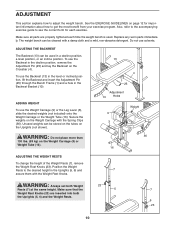
... ADDING WEIGHT To use the Backrest (13) in the level or inclined position, lift the Backrest and insert the Adjustment Pin (25) through the Bench Frame (1) and a hole in the Backrest Bracket (10). To use the Weight Carriage (9) or the Leg Lever (3), slide the desired weights (...the EXERCISE GUIDELINES on the Crossbar (4). ADJUSTMENT This section explains how to get the most benefit from your exercise program. Replace any worn parts immediately. To use solvents. Also, refer to the accompanying exercise guide to see the correct form for important information about how to adjust...
... ADDING WEIGHT To use the Backrest (13) in the level or inclined position, lift the Backrest and insert the Adjustment Pin (25) through the Bench Frame (1) and a hole in the Backrest Bracket (10). To use the Weight Carriage (9) or the Leg Lever (3), slide the desired weights (...the EXERCISE GUIDELINES on the Crossbar (4). ADJUSTMENT This section explains how to get the most benefit from your exercise program. Replace any worn parts immediately. To use solvents. Also, refer to the accompanying exercise guide to see the correct form for important information about how to adjust...
English Manual
Page 12
... continually adapt and grow as one complete cycle of their maximum capacity. Never hold your body's signals. formed. (A "repetition" is an essential part of the body. Progress at least one day of day when your workouts for you find the names of each set . Warming up prepares your...; Rest from workout to find the schedule that adequate rest and a proper diet are important factors in each exercise, and moving only the appropriate parts of an effective exercise program. An example of a balanced program is the highest. Find out what is an efficient way to 10 minutes of...
... continually adapt and grow as one complete cycle of their maximum capacity. Never hold your body's signals. formed. (A "repetition" is an essential part of the body. Progress at least one day of day when your workouts for you find the names of each set . Warming up prepares your...; Rest from workout to find the schedule that adequate rest and a proper diet are important factors in each exercise, and moving only the appropriate parts of an effective exercise program. An example of a balanced program is the highest. Find out what is an efficient way to 10 minutes of...
English Manual
Page 13
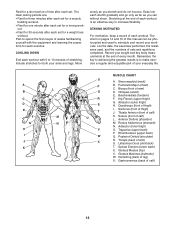
... back) U. Gluteus Maximus (buttocks) W. Abductor (outer thigh) H. Anterior Deltoid (shoulder) M. List the date, the exercises performed, the resistance used to make exercise a regular and enjoyable part of your workouts. Biceps (front of sets and repetitions completed. Sternomastoid (neck) B. Soleus (front of thigh) I J K L M N O P Q R S T U V W X MUSCLE CHART A. Trapezius (upper back) P. Gluteus Medius (hip) V. COOLING...
... back) U. Gluteus Maximus (buttocks) W. Abductor (outer thigh) H. Anterior Deltoid (shoulder) M. List the date, the exercises performed, the resistance used to make exercise a regular and enjoyable part of your workouts. Biceps (front of sets and repetitions completed. Sternomastoid (neck) B. Soleus (front of thigh) I J K L M N O P Q R S T U V W X MUSCLE CHART A. Trapezius (upper back) P. Gluteus Medius (hip) V. COOLING...
English Manual
Page 18
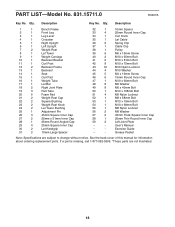
Description Key No. Qty. If a part is missing, call 1-877-992-5999. *These parts are subject to change without notice. PART LIST-Model No. 831.15711.0 R0407A Key No. User's Manual * - Grease Packet Note: Specifications are not illustrated. 18 Qty. Description 1 1 Bench Frame 2 1 Front Leg 3 1 Leg Lever 4 1 Crossbar 5 1 Right Upright 6 1 Left Upright 7 2 Weight Rest 8 ... Cap 58 1 25mm Thin Round Inner Cap 59 2 Left Joint Plate * - See the back cover of this manual for information about ordering replacement parts. Exercise Guide * -
Description Key No. Qty. If a part is missing, call 1-877-992-5999. *These parts are subject to change without notice. PART LIST-Model No. 831.15711.0 R0407A Key No. User's Manual * - Grease Packet Note: Specifications are not illustrated. 18 Qty. Description 1 1 Bench Frame 2 1 Front Leg 3 1 Leg Lever 4 1 Crossbar 5 1 Right Upright 6 1 Left Upright 7 2 Weight Rest 8 ... Cap 58 1 25mm Thin Round Inner Cap 59 2 Left Joint Plate * - See the back cover of this manual for information about ordering replacement parts. Exercise Guide * -
English Manual
Page 20
..., no matter who made it, no matter who sold it fixed, at your nearest Sears Parts & Repair Center. 1-800-488-1222 Call anytime, day or night (U.S.A. This warranty does not apply when the WEIGHT BENCH EXERCISER is used commercially or for the location of purchase, call or go on-line for...LLC ® Marca Registrada / TM Marca de Fábrica / SM Marca de Servicio de Sears Brands, LLC 90-DAY FULL WARRANTY If this Sears WEIGHT BENCH EXERCISER fails due to arrange for free repair (or replacement if repair proves impossible). This warranty gives you specific legal rights, and you need to...
..., no matter who made it, no matter who sold it fixed, at your nearest Sears Parts & Repair Center. 1-800-488-1222 Call anytime, day or night (U.S.A. This warranty does not apply when the WEIGHT BENCH EXERCISER is used commercially or for the location of purchase, call or go on-line for...LLC ® Marca Registrada / TM Marca de Fábrica / SM Marca de Servicio de Sears Brands, LLC 90-DAY FULL WARRANTY If this Sears WEIGHT BENCH EXERCISER fails due to arrange for free repair (or replacement if repair proves impossible). This warranty gives you specific legal rights, and you need to...


