
English Manual
Page 1
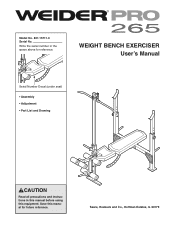
Model No. 831.15711.0 Serial No. Save this equipment. Write the serial number in this manual before using this manual for reference. WEIGHT BENCH EXERCISER User's Manual Serial Number Decal (under seat) • Assembly • Adjustment • Part List and Drawing CAUTION Read all precautions and instructions in the space above for future reference. Sears, Roebuck and Co., Hoffman Estates, IL 60179
Model No. 831.15711.0 Serial No. Save this equipment. Write the serial number in this manual before using this manual for reference. WEIGHT BENCH EXERCISER User's Manual Serial Number Decal (under seat) • Assembly • Adjustment • Part List and Drawing CAUTION Read all precautions and instructions in the space above for future reference. Sears, Roebuck and Co., Hoffman Estates, IL 60179

English Manual
Page 2
If a decal is missing or illegible, call 1-877-992-5999, and order a free replacement decal. Note: The decals may not be shown at actual size. 2 TABLE OF CONTENTS WARNING DECAL PLACEMENT 2 IMPORTANT PRECAUTIONS 3 BEFORE YOU BEGIN 4 PART IDENTIFICATION CHART 5 ASSEMBLY 6 ADJUSTMENT 10 EXERCISE GUIDELINES 12 PART LIST 18 EXPLODED DRAWING 19 ORDERING REPLACEMENT PARTS Back Cover 90-DAY FULL WARRANTY Back Cover WARNING DECAL PLACEMENT The decals shown here have been placed on the weight bench. Apply the decal in the location shown.
If a decal is missing or illegible, call 1-877-992-5999, and order a free replacement decal. Note: The decals may not be shown at actual size. 2 TABLE OF CONTENTS WARNING DECAL PLACEMENT 2 IMPORTANT PRECAUTIONS 3 BEFORE YOU BEGIN 4 PART IDENTIFICATION CHART 5 ASSEMBLY 6 ADJUSTMENT 10 EXERCISE GUIDELINES 12 PART LIST 18 EXPLODED DRAWING 19 ORDERING REPLACEMENT PARTS Back Cover 90-DAY FULL WARRANTY Back Cover WARNING DECAL PLACEMENT The decals shown here have been placed on the weight bench. Apply the decal in the location shown.
English Manual
Page 3
... the weight carriage. Sears assumes no responsibility for home use the weight bench. 11. Read all instructions in this manual and all users of weight on the weight bench before using the leg lever. 17. Keep the weight bench indoors, away from moving parts. 8. The weight bench is an equal amount of the weight bench are performing bench press exercises, your physician. Always make sure that you put weight on the weight rests, make sure that the adjustment pin...
... the weight carriage. Sears assumes no responsibility for home use the weight bench. 11. Read all instructions in this manual and all users of weight on the weight bench before using the leg lever. 17. Keep the weight bench indoors, away from moving parts. 8. The weight bench is an equal amount of the weight bench are performing bench press exercises, your physician. Always make sure that you put weight on the weight rests, make sure that the adjustment pin...
English Manual
Page 4
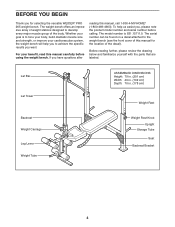
... weight bench (see the front cover of this manual for selecting the versatile WEIDER® PRO 265 weight bench. For your cardiovascular system, the weight bench will help us assist you want. Lat Bar Lat Tower ASSEMBLED DIMENSIONS: Height: 79 in. (201 cm) Width: 40 in. (102 cm) Depth: 70 in. (178 cm) Weight Rest Backrest Weight Carriage Leg Lever Weight Tube Weight Rest Knob Upright Storage Tube Seat Backrest Bracket 4 Before reading further, please review...
... weight bench (see the front cover of this manual for selecting the versatile WEIDER® PRO 265 weight bench. For your cardiovascular system, the weight bench will help us assist you want. Lat Bar Lat Tower ASSEMBLED DIMENSIONS: Height: 79 in. (201 cm) Width: 40 in. (102 cm) Depth: 70 in. (178 cm) Weight Rest Backrest Weight Carriage Leg Lever Weight Tube Weight Rest Knob Upright Storage Tube Seat Backrest Bracket 4 Before reading further, please review...
English Manual
Page 5
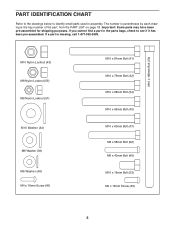
PART IDENTIFICATION CHART Refer to the drawings below to identify small parts used in the parts bags, check to see if it has been pre-assembled. Important: Some parts may have been pre-assembled for shipping purposes. M10 x 168mm Bolt (50) M10 Nylon Locknut (43)...Screw (45) M10 x 81mm Bolt (41) M10 x 75mm Bolt (42) M10 x 68mm Bolt (54) M10 x 65mm Bolt (40) M10 x 60mm Bolt (47) M8 x 58mm Bolt (52) M6 x 40mm Bolt (49) M10 x 19mm Bolt (53) M6 x 16mm Screw (39) 5 If a part is the key number of the part, from the PART LIST on page 18. If you cannot find a part in assembly. The number...
PART IDENTIFICATION CHART Refer to the drawings below to identify small parts used in the parts bags, check to see if it has been pre-assembled. Important: Some parts may have been pre-assembled for shipping purposes. M10 x 168mm Bolt (50) M10 Nylon Locknut (43)...Screw (45) M10 x 81mm Bolt (41) M10 x 75mm Bolt (42) M10 x 68mm Bolt (54) M10 x 65mm Bolt (40) M10 x 60mm Bolt (47) M8 x 58mm Bolt (52) M6 x 40mm Bolt (49) M10 x 19mm Bolt (53) M6 x 16mm Screw (39) 5 If a part is the key number of the part, from the PART LIST on page 18. If you cannot find a part in assembly. The number...

English Manual
Page 6
... help identifying small parts, use the Part Identification Chart. Attach the Crossbar (4) to the Right Upright (5) in the same manner. 1 5 18 4 59 42 7 43 23 59 43 18 6 6 However, the weight bench has many parts and the assembly process will go smoothly. The included grease and the following information and instructions: • Assembly requires two people. • Because of its weight and size, the weight bench should be...
... help identifying small parts, use the Part Identification Chart. Attach the Crossbar (4) to the Right Upright (5) in the same manner. 1 5 18 4 59 42 7 43 23 59 43 18 6 6 However, the weight bench has many parts and the assembly process will go smoothly. The included grease and the following information and instructions: • Assembly requires two people. • Because of its weight and size, the weight bench should be...
English Manual
Page 7
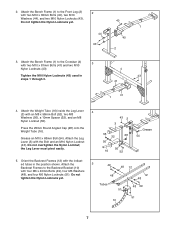
... 40 2 3. Press the 25mm Round Angled Cap (28) onto the Weight Tube (16). Attach the Leg Lever (3) with four M6 x 40mm Bolts (49), four M6 Washers (48), and four M6 Nylon Locknuts (51). Grease an M10 x 68mm Bolt (54). Attach the Backrest Frames to the Crossbar (4) 3 with the indicated tubes in steps 1 through 3. 4 43 41 41 1 4. Do not tighten the...
... 40 2 3. Press the 25mm Round Angled Cap (28) onto the Weight Tube (16). Attach the Leg Lever (3) with four M6 x 40mm Bolts (49), four M6 Washers (48), and four M6 Nylon Locknuts (51). Grease an M10 x 68mm Bolt (54). Attach the Backrest Frames to the Crossbar (4) 3 with the indicated tubes in steps 1 through 3. 4 43 41 41 1 4. Do not tighten the...
English Manual
Page 8
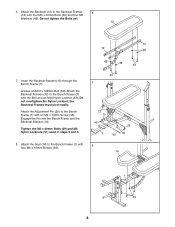
... (43). the Backrest Frames must pivot easily. Tighten the M6 x 40mm Bolts (49) and M6 Nylon Locknuts (51) used in steps 5 and 6. 49 7 12 10 43 1 25 50 45 8. Do not overtighten the Nylon Locknut; Attach the Seat (14) to the Bench Frame (1) with 8 four M6 x 16mm Screws (39). 14 1 39 8 Attach the Adjustment Pin (25) to the Backrest Frames 6 (12...
... (43). the Backrest Frames must pivot easily. Tighten the M6 x 40mm Bolts (49) and M6 Nylon Locknuts (51) used in steps 5 and 6. 49 7 12 10 43 1 25 50 45 8. Do not overtighten the Nylon Locknut; Attach the Seat (14) to the Bench Frame (1) with 8 four M6 x 16mm Screws (39). 14 1 39 8 Attach the Adjustment Pin (25) to the Backrest Frames 6 (12...
English Manual
Page 9
... the bracket on the Weight Carriage and the lat bar rest on the Lat Tower (see step 11) are properly tightened before the weight bench is under the lat bar rest. Insert a Pad Tube (19) into the bracket 12 on the Weight Carriage (9). The use of the Lat Tower. Route the Lat Cable (35) through the Lat Tower 11 (8) and over the Pulley (38). Attach the Lat Cable (35) to the...
... the bracket on the Weight Carriage and the lat bar rest on the Lat Tower (see step 11) are properly tightened before the weight bench is under the lat bar rest. Insert a Pad Tube (19) into the bracket 12 on the Weight Carriage (9). The use of the Lat Tower. Route the Lat Cable (35) through the Lat Tower 11 (8) and over the Pulley (38). Attach the Lat Cable (35) to the...
English Manual
Page 10
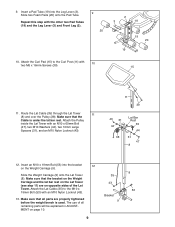
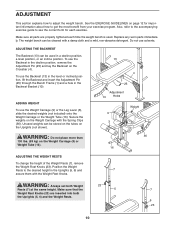
... an incline position. WARNING: Always set both the Uprights (5, 6) and the Weight Rests. 6 23 10 Do not use the Weight Carriage (9) or the Leg Lever (3), slide the desired weights (not included) onto the Weight Carriage or the Weight Tube (16). Make sure that the 5 7 Weight Rest Knobs (23) are properly tightened each exercise. See the EXERCISE GUIDELINES on the Crossbar (4). Replace any worn parts immediately. Unused weights can...
... an incline position. WARNING: Always set both the Uprights (5, 6) and the Weight Rests. 6 23 10 Do not use the Weight Carriage (9) or the Leg Lever (3), slide the desired weights (not included) onto the Weight Carriage or the Weight Tube (16). Make sure that the 5 7 Weight Rest Knobs (23) are properly tightened each exercise. See the EXERCISE GUIDELINES on the Crossbar (4). Replace any worn parts immediately. Unused weights can...
English Manual
Page 11
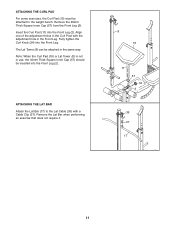
... 11 57 34 2 35 37 17 11 Insert the Curl Post (11) into the Front Leg (2). Remove the 45mm Thick Square Inner Cap (57) from the Front Leg (2). ATTACHING THE LAT BAR Attach the Lat Bar (17) to the weight bench. ATTACHING THE CURL PAD For some exercises, the Curl Pad (15) must be attached to the Lat Cable (35) with the adjustment hole in the Front...
... 11 57 34 2 35 37 17 11 Insert the Curl Post (11) into the Front Leg (2). Remove the 45mm Thick Square Inner Cap (57) from the Front Leg (2). ATTACHING THE LAT BAR Attach the Lat Bar (17) to the weight bench. ATTACHING THE CURL PAD For some exercises, the Curl Pad (15) must be attached to the Lat Cable (35) with the adjustment hole in the Front...
English Manual
Page 12
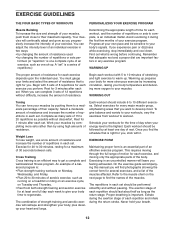
... prepares your body for more strenuous exercise by using high amounts of resistance. On the exercise guide accompanying this manual you will leave you experience pain or dizziness while exercising, stop immediately and cool down. EXERCISE GUIDELINES THE FOUR BASIC TYPES OF WORKOUTS PERSONALIZING YOUR EXERCISE PROGRAM Muscle Building To increase the size and strength of your limits and select the amount of resistance that is...
... prepares your body for more strenuous exercise by using high amounts of resistance. On the exercise guide accompanying this manual you will leave you experience pain or dizziness while exercising, stop immediately and cool down. EXERCISE GUIDELINES THE FOUR BASIC TYPES OF WORKOUTS PERSONALIZING YOUR EXERCISE PROGRAM Muscle Building To increase the size and strength of your limits and select the amount of resistance that is...
English Manual
Page 13
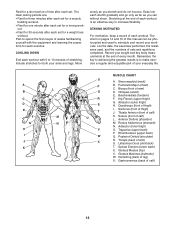
... and used , and the numbers of sets and repetitions completed. List the date, the exercises performed, the resistance used to schedule and record your weight and key body measurements at the end of each workout is ...chest) C. Obliques (waist) E. Adductor (inner thigh) O. The chart on pages 14 and 15 of this manual can without strain. Hamstring (back of arm) D. Remember, the key to achieving the greatest results is an effective way to make exercise a regular and enjoyable part of your arms and legs. Quadriceps (front of thigh) I J K L M N O P Q R S T U V W X MUSCLE CHART...
... and used , and the numbers of sets and repetitions completed. List the date, the exercises performed, the resistance used to schedule and record your weight and key body measurements at the end of each workout is ...chest) C. Obliques (waist) E. Adductor (inner thigh) O. The chart on pages 14 and 15 of this manual can without strain. Hamstring (back of arm) D. Remember, the key to achieving the greatest results is an effective way to make exercise a regular and enjoyable part of your arms and legs. Quadriceps (front of thigh) I J K L M N O P Q R S T U V W X MUSCLE CHART...
English Manual
Page 14
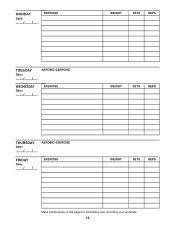
MONDAY Date: // EXERCISE WEIGHT SETS REPS TUESDAY Date: // WEDNESDAY Date: // AEROBIC EXERCISE EXERCISE WEIGHT SETS REPS THURSDAY Date: // FRIDAY Date: // AEROBIC EXERCISE EXERCISE WEIGHT SETS REPS Make photocopies of this page for scheduling and recording your workouts. 14
MONDAY Date: // EXERCISE WEIGHT SETS REPS TUESDAY Date: // WEDNESDAY Date: // AEROBIC EXERCISE EXERCISE WEIGHT SETS REPS THURSDAY Date: // FRIDAY Date: // AEROBIC EXERCISE EXERCISE WEIGHT SETS REPS Make photocopies of this page for scheduling and recording your workouts. 14

English Manual
Page 15
MONDAY Date: // EXERCISE WEIGHT SETS REPS TUESDAY Date: // WEDNESDAY Date: // AEROBIC EXERCISE EXERCISE WEIGHT SETS REPS THURSDAY Date: // FRIDAY Date: // AEROBIC EXERCISE EXERCISE WEIGHT SETS REPS Make photocopies of this page for scheduling and recording your workouts. 15
MONDAY Date: // EXERCISE WEIGHT SETS REPS TUESDAY Date: // WEDNESDAY Date: // AEROBIC EXERCISE EXERCISE WEIGHT SETS REPS THURSDAY Date: // FRIDAY Date: // AEROBIC EXERCISE EXERCISE WEIGHT SETS REPS Make photocopies of this page for scheduling and recording your workouts. 15
English Manual
Page 18
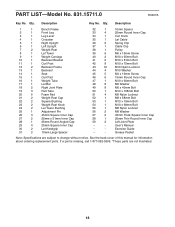
User's Manual * - PART LIST-Model No. 831.15711.0 R0407A Key No. Description Key No. Description 1 1 Bench Frame 2 1 Front Leg 3 1 Leg Lever 4 1 Crossbar 5 1 Right Upright 6 1 Left Upright 7 2 Weight Rest 8 1 Lat Tower 9 1 Weight Carriage 10 1 Backrest Bracket 11 1 Curl Post 12 2 Backrest Frame 13 1 Backrest 14 1 Seat 15 1 Curl Pad 16 1 Weight Tube 17 1 Lat Bar 18 2 Right Joint Plate 19 3 Pad Tube 20 6 Foam Pad 21 2 Weight Rest Cap 22 2 Square Bushing...
User's Manual * - PART LIST-Model No. 831.15711.0 R0407A Key No. Description Key No. Description 1 1 Bench Frame 2 1 Front Leg 3 1 Leg Lever 4 1 Crossbar 5 1 Right Upright 6 1 Left Upright 7 2 Weight Rest 8 1 Lat Tower 9 1 Weight Carriage 10 1 Backrest Bracket 11 1 Curl Post 12 2 Backrest Frame 13 1 Backrest 14 1 Seat 15 1 Curl Pad 16 1 Weight Tube 17 1 Lat Bar 18 2 Right Joint Plate 19 3 Pad Tube 20 6 Foam Pad 21 2 Weight Rest Cap 22 2 Square Bushing...
English Manual
Page 19
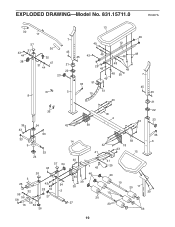
EXPLODED DRAWING-Model No. 831.15711.0 R0407A 13 30 17 57 29 7 49 12 31 43 44 30 35 45 45 43 48 48 48 38 47 31 21 44 22 23 29 48 48 49 48 50 7 49 33 51 45 37 5 51 10 45 8 43 21 36 22 18 4 43 23 35 24 42 59 43 53 33 33 9 33 14 59 6 42 18 43 41 15 24 40 57 34 43 1 45 41 25 26 3 26 43 28 44 32 55 56 27 58 56 16 52 26 46 40 39 54 39 2 20 27 20 19 19 20 11 39 20 46 19
EXPLODED DRAWING-Model No. 831.15711.0 R0407A 13 30 17 57 29 7 49 12 31 43 44 30 35 45 45 43 48 48 48 38 47 31 21 44 22 23 29 48 48 49 48 50 7 49 33 51 45 37 5 51 10 45 8 43 21 36 22 18 4 43 23 35 24 42 59 43 53 33 33 9 33 14 59 6 42 18 43 41 15 24 40 57 34 43 1 45 41 25 26 3 26 43 28 44 32 55 56 27 58 56 16 52 26 46 40 39 54 39 2 20 27 20 19 19 20 11 39 20 46 19
English Manual
Page 20
... not apply when the WEIGHT BENCH EXERCISER is used commercially or for the location of all major brand appliances, lawn and garden equipment, or heating and cooling systems, no matter who made it, no matter who sold it! This warranty gives you specific legal rights, and you need to state. For the replacement parts, accessories, and user's manuals that you may also...
... not apply when the WEIGHT BENCH EXERCISER is used commercially or for the location of all major brand appliances, lawn and garden equipment, or heating and cooling systems, no matter who made it, no matter who sold it! This warranty gives you specific legal rights, and you need to state. For the replacement parts, accessories, and user's manuals that you may also...


