
English Manual
Page 3
... Always remove the lat tower or curl post from moving parts. 8. This is especially important for adjustment tube is designed to the weight bench when performing squat exercises (see page 15). It is folded. 2. Always lower the weight carriage in any time while exercising, stop immediately... is the responsibility of the owner to ensure that you can safely return the barbell to the weight rests when you are performing bench press exercises, squat exercises or toe raise exercises, your back to support a maximum of the way when performing squat exercises (see page...
... Always remove the lat tower or curl post from moving parts. 8. This is especially important for adjustment tube is designed to the weight bench when performing squat exercises (see page 15). It is folded. 2. Always lower the weight carriage in any time while exercising, stop immediately... is the responsibility of the owner to ensure that you can safely return the barbell to the weight rests when you are performing bench press exercises, squat exercises or toe raise exercises, your back to support a maximum of the way when performing squat exercises (see page...
English Manual
Page 6
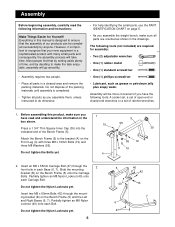
... Before beginning assembly, carefully read and understand the information in the 5 box above. 19 55 Press a 1 3/4" Thin Square Inner Cap (39) into the 39 indicated end of the Bench Frame (5). The following information and instructions: Make Things Easier for assembly: • Two (2) adjustable...8226; One (1) standard screwdriver • One (1) phillips screwdriver • Lubricant, such as shown in the drawings. Attach the Bench Frame (5) to ensure that by setting aside plenty of ratchet wrenches. 1. Assembly will take time. Slide the mounting bracket (B) on the...
... Before beginning assembly, carefully read and understand the information in the 5 box above. 19 55 Press a 1 3/4" Thin Square Inner Cap (39) into the 39 indicated end of the Bench Frame (5). The following information and instructions: Make Things Easier for assembly: • Two (2) adjustable...8226; One (1) standard screwdriver • One (1) phillips screwdriver • Lubricant, such as shown in the drawings. Attach the Bench Frame (5) to ensure that by setting aside plenty of ratchet wrenches. 1. Assembly will take time. Slide the mounting bracket (B) on the...

English Manual
Page 9
... Brackets and the holes in the Leg Lever (3). Make sure the narrow end of the Weight Tube (20). Press a 1" Round Inner Cap (30) into the indicated hole in the bracket (E) on the Front Leg (4) with... Nylon Locknut. Attach the Leg Lever Lock (66) to the bracket (E) on the Front Leg (4). 10. Press the 1" Round Angle Cap (57) onto the indicated end of the Seat (22) is pointing towards the ... 29 29 57 55 56 42 12. Insert the Long Pad Tube (59) through the holes in the Bench Frame (5). Attach the Seat (22) to freely pivot the Leg Lever (3) and the Leg Lever Lock (66...
... Brackets and the holes in the Leg Lever (3). Make sure the narrow end of the Weight Tube (20). Press a 1" Round Inner Cap (30) into the indicated hole in the bracket (E) on the Front Leg (4) with... Nylon Locknut. Attach the Leg Lever Lock (66) to the bracket (E) on the Front Leg (4). 10. Press the 1" Round Angle Cap (57) onto the indicated end of the Seat (22) is pointing towards the ... 29 29 57 55 56 42 12. Insert the Long Pad Tube (59) through the holes in the Bench Frame (5). Attach the Seat (22) to freely pivot the Leg Lever (3) and the Leg Lever Lock (66...


