
English Manual
Page 1
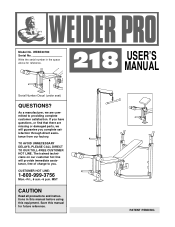
... Read all precautions and instructions in the space above for future reference. WEBE20780 Serial No. Write the serial number in this manual before using this manual for reference. If you . The trained technicians on our customer hot line will guarantee you complete satisfaction through direct assistance from our factory. Save this equipment. USER'S MANUAL PATENT PENDING Model No. Serial Number Decal (under seat) QUESTIONS? CUSTOMER HOT...
... Read all precautions and instructions in the space above for future reference. WEBE20780 Serial No. Write the serial number in this manual before using this manual for reference. If you . The trained technicians on our customer hot line will guarantee you complete satisfaction through direct assistance from our factory. Save this equipment. USER'S MANUAL PATENT PENDING Model No. Serial Number Decal (under seat) QUESTIONS? CUSTOMER HOT...
English Manual
Page 2
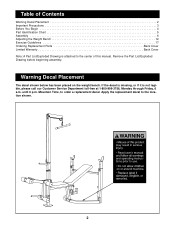
Remove the Part List/Exploded Drawing before beginning assembly. Mountain Time, to the center of this manual. Table of Contents Warning Decal Placement 2 Important Precautions 3 Before You Begin 4 Part Identification Chart 5 Assembly 6 Adjusting the Weight Bench 12 Exercise Guidelines 17 Ordering Replacement Parts Back Cover Limited Warranty Back Cover Note: A Part List/Exploded Drawing is not legible, please call our Customer Service Department toll-free at 1-800-999-3756, Monday through Friday, 6 a.m. until...
Remove the Part List/Exploded Drawing before beginning assembly. Mountain Time, to the center of this manual. Table of Contents Warning Decal Placement 2 Important Precautions 3 Before You Begin 4 Part Identification Chart 5 Assembly 6 Adjusting the Weight Bench 12 Exercise Guidelines 17 Ordering Replacement Parts Back Cover Limited Warranty Back Cover Note: A Part List/Exploded Drawing is not legible, please call our Customer Service Department toll-free at 1-800-999-3756, Monday through Friday, 6 a.m. until...
English Manual
Page 3
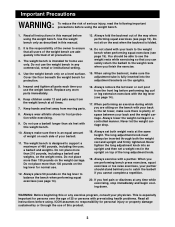
... the leg lever for foot protection while exercising. 9. adjustment brackets on a level surface. 15. Read all parts each side of 460 pounds, including the user, a barbell and weights. Use the weight bench only on the uprights. 5. WARNING: Before beginning this manual. 13. Inspect and tighten all instructions in a controlled manner. Always remove the lat tower or curl post from moving parts. 8. Always wear athletic shoes for normal use the weight bench.
... the leg lever for foot protection while exercising. 9. adjustment brackets on a level surface. 15. Read all parts each side of 460 pounds, including the user, a barbell and weights. Use the weight bench only on the uprights. 5. WARNING: Before beginning this manual. 13. Inspect and tighten all instructions in a controlled manner. Always remove the lat tower or curl post from moving parts. 8. Always wear athletic shoes for normal use the weight bench.
English Manual
Page 4
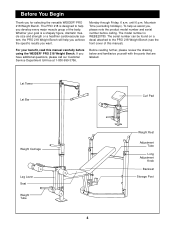
... the versatile WEIDER® PRO 218 Weight Bench. Monday through Friday, 6 a.m. Lat Tower Lat Bar Curl Pad Weight Carriage Leg Lever Seat Weight Tube 4 Weight Rest Adjustment Tube Long Adjustment Knob Backrest Storage Post To help you achieve the specific results you have additional questions, please call our Customer Service Department toll-free at 1-800-999-3756, Before reading further, please review the drawing below and familiarize yourself with the parts that...
... the versatile WEIDER® PRO 218 Weight Bench. Monday through Friday, 6 a.m. Lat Tower Lat Bar Curl Pad Weight Carriage Leg Lever Seat Weight Tube 4 Weight Rest Adjustment Tube Long Adjustment Knob Backrest Storage Post To help you achieve the specific results you have additional questions, please call our Customer Service Department toll-free at 1-800-999-3756, Before reading further, please review the drawing below and familiarize yourself with the parts that...
English Manual
Page 6
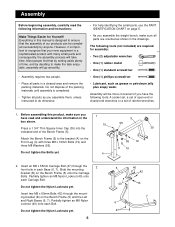
... or a set of ratchet wrenches. 1. Do not tighten the Nylon Locknuts yet. Everything in this product, make sure you assemble the weight bench, make the task enjoyable, assembly will take time. The following information and instructions: Make Things Easier for assembly: • Two (2) adjustable wrenches • One (1) rubber mallet • One (1) standard screwdriver • One (1) phillips screwdriver • Lubricant, such as...
... or a set of ratchet wrenches. 1. Do not tighten the Nylon Locknuts yet. Everything in this product, make sure you assemble the weight bench, make the task enjoyable, assembly will take time. The following information and instructions: Make Things Easier for assembly: • Two (2) adjustable wrenches • One (1) rubber mallet • One (1) standard screwdriver • One (1) phillips screwdriver • Lubricant, such as...
English Manual
Page 7
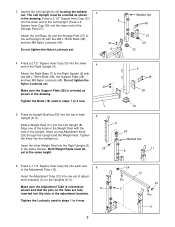
... the lower end of the Storage Post (27). Press a 2 1/2" Square Inner Cap (33) into the Left Upright (8). Tighten the Bolts (19) used in steps 1 to the Left Upright (8) with the hole in the Weight Rest with two M8 x 75mm Bolts (48) and two M8 Nylon Locknuts (40). Slide a Weight Rest (11) into the lower end of the Adjustment Tube (12). Tighten the Knob into each Upright (8, 9). Press a 1 1/4" Square...
... the lower end of the Storage Post (27). Press a 2 1/2" Square Inner Cap (33) into the Left Upright (8). Tighten the Bolts (19) used in steps 1 to the Left Upright (8) with the hole in the Weight Rest with two M8 x 75mm Bolts (48) and two M8 Nylon Locknuts (40). Slide a Weight Rest (11) into the lower end of the Adjustment Tube (12). Tighten the Knob into each Upright (8, 9). Press a 1 1/4" Square...

English Manual
Page 8
...Bolt (43). Push the Bolt through the indicated hole in the drawing. Attach the Backrest (23) to the inset drawing below for this step. ing. 62 Protrusion 8. Push the Bolt through the indicated hole in the drawing. 8 Lubricate...must be pointed towards the 61 center of the bench as shown in the Right Seat Bracket (65). Refer to the Left Backrest ...open end 7 of 32 the welded tubes on the Right Backrest Tube (61). Do not overtighten the Nylon Locknut. Insert the M10 x 177mm Bolt (43) through the welded tube on one Welded Tubes side. Lubricate an M10 x 177mm Bolt...
...Bolt (43). Push the Bolt through the indicated hole in the drawing. Attach the Backrest (23) to the inset drawing below for this step. ing. 62 Protrusion 8. Push the Bolt through the indicated hole in the drawing. 8 Lubricate...must be pointed towards the 61 center of the bench as shown in the Right Seat Bracket (65). Refer to the Left Backrest ...open end 7 of 32 the welded tubes on the Right Backrest Tube (61). Do not overtighten the Nylon Locknut. Insert the M10 x 177mm Bolt (43) through the welded tube on one Welded Tubes side. Lubricate an M10 x 177mm Bolt...

English Manual
Page 9
...). Lubricate the M10 x 70mm Bolt (41). 12 49 Attach the Leg Lever (3) to freely pivot the Leg Lever (3) and the Leg Lever Lock (66). 4 E 40 68 41 Lubricate 55 67 66 13. Attach the Seat (22) to the Front Leg (4) with four M6 x 16mm Screws (45). Insert the Long Pad Tube (59) through one set of holes in the center of the Weight...
...). Lubricate the M10 x 70mm Bolt (41). 12 49 Attach the Leg Lever (3) to freely pivot the Leg Lever (3) and the Leg Lever Lock (66). 4 E 40 68 41 Lubricate 55 67 66 13. Attach the Seat (22) to the Front Leg (4) with four M6 x 16mm Screws (45). Insert the Long Pad Tube (59) through one set of holes in the center of the Weight...

English Manual
Page 10
... Bushing (58) is oriented as shown. Attach the Carriage Stop to the Curl Post (10) with 14 two M6 x 16mm Screws (45). Slide the Carriage Stop (37) onto the Lat Tower (1). Slide the Curl Post (10) into the end of the weight tube (F) on the Weight Carriage (2). F Slide a Weight Stop (21) onto the weight tube (F). Press a 2 1/4" Square Bushing (58) into the...
... Bushing (58) is oriented as shown. Attach the Carriage Stop to the Curl Post (10) with 14 two M6 x 16mm Screws (45). Slide the Carriage Stop (37) onto the Lat Tower (1). Slide the Curl Post (10) into the end of the weight tube (F) on the Weight Carriage (2). F Slide a Weight Stop (21) onto the weight tube (F). Press a 2 1/4" Square Bushing (58) into the...

English Manual
Page 11
...Pulleys (35). Rest the Cable (36) in the groove of the second Pulley (35). The 18 Lat Tower must be turned as shown. Rest the Cable in the groove of a Pulley (35). Attach the Cable (36) to the Lat Tower (1) with the Short Adjustment Knob (26). 1 26 4 11 17. Attach the Pulley to the welded bracket (G) on the Weight... (49). Secure the Lat Tower with an M10 x 75mm Bolt (50), two M10 Washers (51), two 15mm Spacers (52) and an M10 Nylon Locknut (49). Feed the Cable (36) through the indicated slot in the Lat Tower (1). Insert the Lat Tower (1) into the Front Leg (4).
...Pulleys (35). Rest the Cable (36) in the groove of the second Pulley (35). The 18 Lat Tower must be turned as shown. Rest the Cable in the groove of a Pulley (35). Attach the Cable (36) to the Lat Tower (1) with the Short Adjustment Knob (26). 1 26 4 11 17. Attach the Pulley to the welded bracket (G) on the Weight... (49). Secure the Lat Tower with an M10 x 75mm Bolt (50), two M10 Washers (51), two 15mm Spacers (52) and an M10 Nylon Locknut (49). Feed the Cable (36) through the indicated slot in the Lat Tower (1). Insert the Lat Tower (1) into the Front Leg (4).
English Manual
Page 12
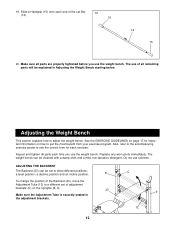
...), move the Adjustment Tube (12) to a different set of the Lat Bar 19 (14). 15 14 15 20. Do not use the weight bench. 19. The use of all parts are properly tightened before you use the weight bench. Also, refer to the accompanying exercise poster to see the correct form for important information on the Uprights (8, 9). 23 9 Make sure the Adjustment Tube is securely seated in Adjusting the Weight Bench starting below. Adjusting the Weight Bench...
...), move the Adjustment Tube (12) to a different set of the Lat Bar 19 (14). 15 14 15 20. Do not use the weight bench. 19. The use of all parts are properly tightened before you use the weight bench. Also, refer to the accompanying exercise poster to see the correct form for important information on the Uprights (8, 9). 23 9 Make sure the Adjustment Tube is securely seated in Adjusting the Weight Bench starting below. Adjusting the Weight Bench...

English Manual
Page 13
... Weight Rests must always be set at the same height. 21 11 11 WARNING: Always set a weight rest in one Upright. Never tighten the long adjustment knob into an upright and then set both the weight rest and upright and firmly tightened. ATTACHING WEIGHTS TO THE WEIGHT CARRIAGE To use the Leg Lever (3), first make sure the Weight Stop (21) is on the Weight Tube (20). Secure the weights with the Long Adjustment Knob...
... Weight Rests must always be set at the same height. 21 11 11 WARNING: Always set a weight rest in one Upright. Never tighten the long adjustment knob into an upright and then set both the weight rest and upright and firmly tightened. ATTACHING WEIGHTS TO THE WEIGHT CARRIAGE To use the Leg Lever (3), first make sure the Weight Stop (21) is on the Weight Tube (20). Secure the weights with the Long Adjustment Knob...
English Manual
Page 14
... position, depending on your particular weight bench. To give the Seat an incline, pull out the Seat Pin (63). Then lower the Seat again. Make sure that you fully tighten the Short Adjustment Knob. To adjust the Long Pad Tube (59), remove one is not in use , it through another set of the Seat and insert the Seat Pin through the holes in the Seat Brackets (64, 65), but...
... position, depending on your particular weight bench. To give the Seat an incline, pull out the Seat Pin (63). Then lower the Seat again. Make sure that you fully tighten the Short Adjustment Knob. To adjust the Long Pad Tube (59), remove one is not in use , it through another set of the Seat and insert the Seat Pin through the holes in the Seat Brackets (64, 65), but...
English Manual
Page 15
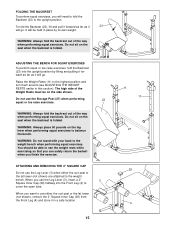
... the seat when the backrest is folded. Do not sit on the leg lever when performing squat exercises to the weight bench. ATTACHING AND REMOVING THE 2" SQUARE CAP Do not use either the curl post or the lat tower (not shown) are attached to balance the bench. It will need to fold the Backrest (23) to the weight bench when performing squat exercises. Do not use the Leg Lever...
... the seat when the backrest is folded. Do not sit on the leg lever when performing squat exercises to the weight bench. ATTACHING AND REMOVING THE 2" SQUARE CAP Do not use either the curl post or the lat tower (not shown) are attached to balance the bench. It will need to fold the Backrest (23) to the weight bench when performing squat exercises. Do not use the Leg Lever...

English Manual
Page 16
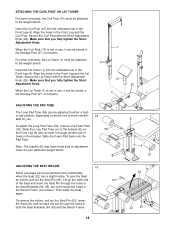
To lock the Leg Lever (3), turn the Leg Lever Lock (66) until it engages the Short Pad Tube (17). 14 3 66 17 16 ATTACHING THE LAT BAR TO THE LAT TOWER To use the Lat Tower (1), attach the Lat Bar (14) to the 1 Cable (36) with a Cable Clip (16). 36 16 LOCKING THE LEG LEVER Some exercises, such as sit-ups, can be performed more comfortably with the Leg Lever (3) locked.
To lock the Leg Lever (3), turn the Leg Lever Lock (66) until it engages the Short Pad Tube (17). 14 3 66 17 16 ATTACHING THE LAT BAR TO THE LAT TOWER To use the Lat Tower (1), attach the Lat Bar (14) to the 1 Cable (36) with a Cable Clip (16). 36 16 LOCKING THE LEG LEVER Some exercises, such as sit-ups, can be performed more comfortably with the Leg Lever (3) locked.
English Manual
Page 17
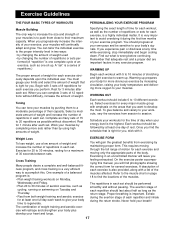
... percentage of their maximum capacity. formed (A "repetition" is important. When you will gain the greatest benefits from both weight training and aerobic exercise for you Cross Training Many people desire a complete and well-balanced fitness program, and cross training is a very efficient way to 10 different exercises. Find out what is a series of repetitions.) The proper amount of your exercise program. Exercising in each repetition should...
... percentage of their maximum capacity. formed (A "repetition" is important. When you will gain the greatest benefits from both weight training and aerobic exercise for you Cross Training Many people desire a complete and well-balanced fitness program, and cross training is a very efficient way to 10 different exercises. Find out what is a series of repetitions.) The proper amount of your exercise program. Exercising in each repetition should...
English Manual
Page 18
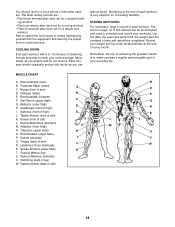
... and go only as far as you can be photocopied and used to make exercise a regular and enjoyable part of your everyday life. List the date, the exercises performed, the weight plus the numbers of thigh) E J. Quadriceps (front of thigh) I Q. Triceps (back of leg) W. Hamstring (back of arm) J R. The chart on page 19 of calf) F L L. Obliques (waist) B E. Soleus (front of...
... and go only as far as you can be photocopied and used to make exercise a regular and enjoyable part of your everyday life. List the date, the exercises performed, the weight plus the numbers of thigh) E J. Quadriceps (front of thigh) I Q. Triceps (back of leg) W. Hamstring (back of arm) J R. The chart on page 19 of calf) F L L. Obliques (waist) B E. Soleus (front of...
English Manual
Page 19
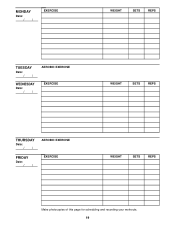
MONDAY Date: / / EXERCISE WEIGHT SETS REPS TUESDAY Date: / / WEDNESDAY Date: / / AEROBIC EXERCISE EXERCISE WEIGHT SETS REPS THURSDAY Date: / / FRIDAY Date: / / AEROBIC EXERCISE EXERCISE WEIGHT SETS REPS Make photocopies of this page for scheduling and recording your workouts. 19
MONDAY Date: / / EXERCISE WEIGHT SETS REPS TUESDAY Date: / / WEDNESDAY Date: / / AEROBIC EXERCISE EXERCISE WEIGHT SETS REPS THURSDAY Date: / / FRIDAY Date: / / AEROBIC EXERCISE EXERCISE WEIGHT SETS REPS Make photocopies of this page for scheduling and recording your workouts. 19
English Manual
Page 20
... (WEIDER® PRO 218 Weight Bench) • The SERIAL NUMBER of the product (see the front cover of this manual) • The KEY NUMBER and DESCRIPTION of the desired part(s) (see the PART LIST and the EXPLODED DRAWING at 1-800-999-3756, Monday through Friday, 6 a.m. This warranty extends only to be pre-authorized by ICON. ICON HEALTH & FITNESS, INC., 1500 S. 1000 W., LOGAN, UT 84321-9813 WEIDER is limited to replacing or repairing, at ICON...
... (WEIDER® PRO 218 Weight Bench) • The SERIAL NUMBER of the product (see the front cover of this manual) • The KEY NUMBER and DESCRIPTION of the desired part(s) (see the PART LIST and the EXPLODED DRAWING at 1-800-999-3756, Monday through Friday, 6 a.m. This warranty extends only to be pre-authorized by ICON. ICON HEALTH & FITNESS, INC., 1500 S. 1000 W., LOGAN, UT 84321-9813 WEIDER is limited to replacing or repairing, at ICON...

English Manual
Page 22
... Tube Lat Bar Handgrip Cable Clip Short Pad Tube Foam Pad M8 x 16mm Bolt Weight Tube Weight Stop Seat Backrest Curl Pad Long Adjustment Knob Short Adjustment Knob Storage Post Support Plate 2" Square Inner Cap 1" Round Inner Cap 3/4" Round Inner Cap 1" Square Inner Cap 2 1/2" Square Inner Cap 1 1/4" Square Inner Cap Pulley Key No. Specifications are subject to change without notice. See the back cover of the user's manual for information about ordering replacement parts...
... Tube Lat Bar Handgrip Cable Clip Short Pad Tube Foam Pad M8 x 16mm Bolt Weight Tube Weight Stop Seat Backrest Curl Pad Long Adjustment Knob Short Adjustment Knob Storage Post Support Plate 2" Square Inner Cap 1" Round Inner Cap 3/4" Round Inner Cap 1" Square Inner Cap 2 1/2" Square Inner Cap 1 1/4" Square Inner Cap Pulley Key No. Specifications are subject to change without notice. See the back cover of the user's manual for information about ordering replacement parts...


