
English Manual
Page 3
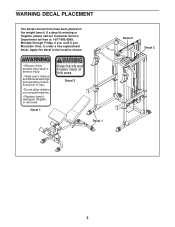
..., illegible, or removed. until 6 p.m. Decal 1 Keep hands and fingers clear of this area. Mountain Time, to use. • Do not allow children on the weight bench. If a decal is missing or illegible, please call our Customer Service Department toll-free at 1-877-992-5999, Monday through Friday, 6 a.m. Decal 2 Decal 1 Decal 2 Decal...
..., illegible, or removed. until 6 p.m. Decal 1 Keep hands and fingers clear of this area. Mountain Time, to use. • Do not allow children on the weight bench. If a decal is missing or illegible, please call our Customer Service Department toll-free at 1-877-992-5999, Monday through Friday, 6 a.m. Decal 2 Decal 1 Decal 2 Decal...
English Manual
Page 4
...product. 4 Do not place more than 150 pounds on a level surface. WARNING: Before beginning this manual before using the weight bench. 1. The weight bench is used. Your partner should be ready to ensure that the cables are mounted on the pulleys at the same height. 11... important for home use of this manual. 2. ICON assumes no responsibility for foot protection while exercising. 9. Do not use the weight bench in any worn parts immediately. 6. Always wear athletic shoes for personal injury or property damage sustained by or through the use only. ...
...product. 4 Do not place more than 150 pounds on a level surface. WARNING: Before beginning this manual before using the weight bench. 1. The weight bench is used. Your partner should be ready to ensure that the cables are mounted on the pulleys at the same height. 11... important for home use of this manual. 2. ICON assumes no responsibility for foot protection while exercising. 9. Do not use the weight bench in any worn parts immediately. 6. Always wear athletic shoes for personal injury or property damage sustained by or through the use only. ...
English Manual
Page 5
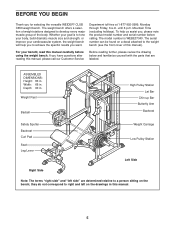
... muscle size and strength, or improve your benefit, read this manual. 5 For your cardiovascular system, the weight bench will help us assist you have questions after reading this manual). If you , please note the product model number... and serial number before using the weight bench. Depth: 90 in this manual carefully before calling. they do not correspond to develop every major muscle group ... relative to achieve the specific results you for selecting the versatile WEIDER® CLUB C650 weight bench.
... muscle size and strength, or improve your benefit, read this manual. 5 For your cardiovascular system, the weight bench will help us assist you have questions after reading this manual). If you , please note the product model number... and serial number before using the weight bench. Depth: 90 in this manual carefully before calling. they do not correspond to develop every major muscle group ... relative to achieve the specific results you for selecting the versatile WEIDER® CLUB C650 weight bench.

English Manual
Page 6
...packing materials until assembly is completed. • Tighten all parts as you assemble them, unless instructed to do otherwise. • As you assemble the weight bench, make sure you have a socket set, a set of open-end or closed-end wrenches, or a set of ratchet wrenches. 1. The included Allen ...of the Left Base in the same manner. 39 34 Attach the Left Base (40) to realize that the versatile weight bench has many parts and that the weight bench can be more convenient if you 1 understand the information in a cleared area and remove the packing materials. Assembly will ...
...packing materials until assembly is completed. • Tighten all parts as you assemble them, unless instructed to do otherwise. • As you assemble the weight bench, make sure you have a socket set, a set of open-end or closed-end wrenches, or a set of ratchet wrenches. 1. The included Allen ...of the Left Base in the same manner. 39 34 Attach the Left Base (40) to realize that the versatile weight bench has many parts and that the weight bench can be more convenient if you 1 understand the information in a cleared area and remove the packing materials. Assembly will ...

English Manual
Page 18
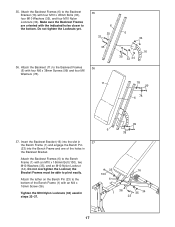
... (4) 34 with two M10 x 58mm Carriage Bolts (77) and two M10 Nylon Locknuts (34). Attach anoth- Attach the Bench Frame (1) to the Bench Base (3) with two M4 x 16mm Screws (36). Attach the Bench Leg (4) to the Stabilizer (2) with four M10 x 68mm Bolts (98), two Notched Plates (24), and four M10 Nylon Locknuts (34...). 32. Do not tighten the Locknuts yet. 4 34 3 20 25 98 25 98 20 33. Attach a Small Base Cap (20) to the Bench Base (3) with two M4 x 16mm Screws (36). Do not tighten the Locknuts yet. 34 77 36 1 24 4 24 98 16 Make sure the decal is...
... (4) 34 with two M10 x 58mm Carriage Bolts (77) and two M10 Nylon Locknuts (34). Attach anoth- Attach the Bench Frame (1) to the Bench Base (3) with two M4 x 16mm Screws (36). Attach the Bench Leg (4) to the Stabilizer (2) with four M10 x 68mm Bolts (98), two Notched Plates (24), and four M10 Nylon Locknuts (34...). 32. Do not tighten the Locknuts yet. 4 34 3 20 25 98 25 98 20 33. Attach a Small Base Cap (20) to the Bench Base (3) with two M4 x 16mm Screws (36). Do not tighten the Locknuts yet. 34 77 36 1 24 4 24 98 16 Make sure the decal is...
English Manual
Page 19
... 99 78 6 99 6 78 37. Do not overtighten the Locknut; Tighten the M10 Nylon Locknuts (34) used in the Bench Frame (1) and engage the Bench Pin (23) into the Bench Frame and one of the Bench Frame (1) with four M10 x 45mm Bolts (33), four M10 Washers (35), and four M10 Nylon Locknuts (34). Attach... 32-37. 37 35 16 100 6 36 1 35 34 23 17 the Bracket Frames must be able to the bottom. Attach the tether on the Bench Pin (23) to the Backrest Bracket (16) with an M4 x 16mm Screw (36). Make sure the Backrest Frames are oriented with the indicated holes closer...
... 99 78 6 99 6 78 37. Do not overtighten the Locknut; Tighten the M10 Nylon Locknuts (34) used in the Bench Frame (1) and engage the Bench Pin (23) into the Bench Frame and one of the Bench Frame (1) with four M10 x 45mm Bolts (33), four M10 Washers (35), and four M10 Nylon Locknuts (34). Attach... 32-37. 37 35 16 100 6 36 1 35 34 23 17 the Bracket Frames must be able to the bottom. Attach the tether on the Bench Pin (23) to the Backrest Bracket (16) with an M4 x 16mm Screw (36). Make sure the Backrest Frames are oriented with the indicated holes closer...

English Manual
Page 20
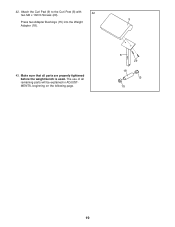
... (76). 1 29 29 5 60 61 75 21 17 76 60 40. Slide a Pad Tube (27) into the Bench Leg (4). Lubricate an M10 x 68mm Bolt (98) with grease. 40 Attach the Leg Lever (5) to the Bench Leg (4) with four M6 x 16mm Screws (29). 38 10 39. the Leg Lever must be able to... M8 x 58mm Bolt (75), two M8 Washers (60), the 10mm Spacer (21), and an M8 Nylon Locknut (17). Attach the Weight Tube (76) to the Bench Frame (1) as shown with the Bolt and an M10 Nylon Locknut (34).
... (76). 1 29 29 5 60 61 75 21 17 76 60 40. Slide a Pad Tube (27) into the Bench Leg (4). Lubricate an M10 x 68mm Bolt (98) with grease. 40 Attach the Leg Lever (5) to the Bench Leg (4) with four M6 x 16mm Screws (29). 38 10 39. the Leg Lever must be able to... M8 x 58mm Bolt (75), two M8 Washers (60), the 10mm Spacer (21), and an M8 Nylon Locknut (17). Attach the Weight Tube (76) to the Bench Frame (1) as shown with the Bolt and an M10 Nylon Locknut (34).
English Manual
Page 21
The use of all parts are properly tightened before the weight bench is used. Make sure that all remaining parts will be explained in ADJUSTMENTS, beginning on the following page. 8 29 18 15 15 19 42. Attach the Curl Pad (9) to the Curl Post (8) with 42 two M6 x 16mm Screws (29). 9 Press two Adapter Bushings (15) into the Weight Adapter (18). 43.
The use of all parts are properly tightened before the weight bench is used. Make sure that all remaining parts will be explained in ADJUSTMENTS, beginning on the following page. 8 29 18 15 15 19 42. Attach the Curl Pad (9) to the Curl Post (8) with 42 two M6 x 16mm Screws (29). 9 Press two Adapter Bushings (15) into the Weight Adapter (18). 43.

English Manual
Page 22
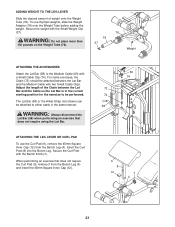
...: Do not place more than 150 pounds on page 24 for important information about how to see the correct form for each time the weight bench is used. ADJUSTMENTS This section explains how to the Barbell (not shown) in the Backrest Bracket (16). 11 23 ADDING WEIGHT TO THE WEIGHT ...CARRIAGE OR BARBELL To add weight to the Weight Carriage (62), slide the desired amount of the Bench Frame (1). Also, refer to the accompanying exercise guide to get the most benefit from your exercise program. ADJUSTING THE BACKREST To adjust the position of...
...: Do not place more than 150 pounds on page 24 for important information about how to see the correct form for each time the weight bench is used. ADJUSTMENTS This section explains how to the Barbell (not shown) in the Backrest Bracket (16). 11 23 ADDING WEIGHT TO THE WEIGHT ...CARRIAGE OR BARBELL To add weight to the Weight Carriage (62), slide the desired amount of the Bench Frame (1). Also, refer to the accompanying exercise guide to get the most benefit from your exercise program. ADJUSTING THE BACKREST To adjust the position of...
English Manual
Page 23
... the Lat Bar (58) to either cable in the correct starting position for the exercise to be attached to the Medium Cable (69) with the Bench Knob (7). WARNING: Always disconnect the Lat Bar (58) when performing an exercise that does not require the Curl Pad (9), remove it from the... Cable Clip (74). Adjust the length of weight onto the Weight Tube (76). Insert the Curl Post (8) into the Bench Leg. To use the Curl Pad (9), remove the 45mm Square Inner Cap (12) from the Bench Leg (4) and insert the 45mm Square Inner Cap (12). 69 74 73 74 58 9 8 12 7 4 21...
... the Lat Bar (58) to either cable in the correct starting position for the exercise to be attached to the Medium Cable (69) with the Bench Knob (7). WARNING: Always disconnect the Lat Bar (58) when performing an exercise that does not require the Curl Pad (9), remove it from the... Cable Clip (74). Adjust the length of weight onto the Weight Tube (76). Insert the Curl Post (8) into the Bench Leg. To use the Curl Pad (9), remove the 45mm Square Inner Cap (12) from the Bench Leg (4) and insert the 45mm Square Inner Cap (12). 69 74 73 74 58 9 8 12 7 4 21...
English Manual
Page 30
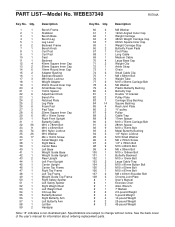
.... Specifications are subject to change without notice. Qty. PART LIST-Model No. Description Key No. Description 1 1 Bench Frame 2 1 Stabilizer 3 1 Bench Base 4 1 Bench Leg 5 1 Leg Lever 6 2 Backrest Frame 7 1 Bench Knob 8 1 Curl Post 9 1 Curl Pad 10 1 Seat 11 1 Backrest 12 4 45mm Square Inner Cap... Locknut 18 1 Weight Adapter 19 1 25mm Round Inner Cap 20 4 Small Base Cap 21 1 10mm Spacer 22 6 Adjustment Knob 23 1 Bench Pin 24 2 Notched Plate 25 2 Leg Plate 26 6 Foam Pad 27 3 Pad Tube 28 6 25mm Square Inner Cap 29 6 M6...
.... Specifications are subject to change without notice. Qty. PART LIST-Model No. Description Key No. Description 1 1 Bench Frame 2 1 Stabilizer 3 1 Bench Base 4 1 Bench Leg 5 1 Leg Lever 6 2 Backrest Frame 7 1 Bench Knob 8 1 Curl Post 9 1 Curl Pad 10 1 Seat 11 1 Backrest 12 4 45mm Square Inner Cap... Locknut 18 1 Weight Adapter 19 1 25mm Round Inner Cap 20 4 Small Base Cap 21 1 10mm Spacer 22 6 Adjustment Knob 23 1 Bench Pin 24 2 Notched Plate 25 2 Leg Plate 26 6 Foam Pad 27 3 Pad Tube 28 6 25mm Square Inner Cap 29 6 M6...
English Manual
Page 33
... ninety (90) days from state to any implied warranties of purchase. This warranty does not extend to state. The MODEL NUMBER of the product (WEIDER® CLUB C650 weight bench) 3. No other warranty beyond that specifically set forth herein. Some states do not allow the exclusion or limitation of incidental or consequential damages. You...
... ninety (90) days from state to any implied warranties of purchase. This warranty does not extend to state. The MODEL NUMBER of the product (WEIDER® CLUB C650 weight bench) 3. No other warranty beyond that specifically set forth herein. Some states do not allow the exclusion or limitation of incidental or consequential damages. You...


