
English Manual
Page 1
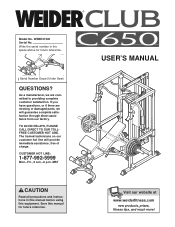
... and instructions in the space above for future reference. Model No. Serial Number Decal (Under Seat) QUESTIONS? Write the serial number in this manual before using this manual for future reference. The trained technicians on our customer hot line will guarantee complete satisfaction through direct assistance from our factory. As a manufacturer, we are missing or damaged parts, we will provide immediate assistance, free of charge. USER'S MANUAL...
... and instructions in the space above for future reference. Model No. Serial Number Decal (Under Seat) QUESTIONS? Write the serial number in this manual before using this manual for future reference. The trained technicians on our customer hot line will guarantee complete satisfaction through direct assistance from our factory. As a manufacturer, we are missing or damaged parts, we will provide immediate assistance, free of charge. USER'S MANUAL...
English Manual
Page 2
WEIDER is attached in the center of ICON IP, Inc. 2 TABLE OF CONTENTS WARNING DECAL PLACEMENT 3 IMPORTANT PRECAUTIONS 4 BEFORE YOU BEGIN 5 ASSEMBLY 6 ADJUSTMENTS 20 CABLE DIAGRAMS 23 EXERCISE GUIDELINES 24 ORDERING REPLACEMENT PARTS Back Cover LIMITED WARRANTY Back Cover Note: A PART IDENTIFICATION CHART and a PART LIST/EXPLODED DRAWING is a registered trademark of this manual. Remove the PART IDENTIFICATION CHART and PART LIST/EXPLODED DRAWING before beginning assembly.
WEIDER is attached in the center of ICON IP, Inc. 2 TABLE OF CONTENTS WARNING DECAL PLACEMENT 3 IMPORTANT PRECAUTIONS 4 BEFORE YOU BEGIN 5 ASSEMBLY 6 ADJUSTMENTS 20 CABLE DIAGRAMS 23 EXERCISE GUIDELINES 24 ORDERING REPLACEMENT PARTS Back Cover LIMITED WARRANTY Back Cover Note: A PART IDENTIFICATION CHART and a PART LIST/EXPLODED DRAWING is a registered trademark of this manual. Remove the PART IDENTIFICATION CHART and PART LIST/EXPLODED DRAWING before beginning assembly.
English Manual
Page 3
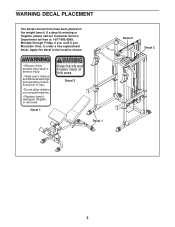
... operating instructions prior to order a free replacement decal. Decal 2 Decal 1 Decal 2 Decal 2 3 WARNING • Misuse of this product may result in the location shown. ! WARNING DECAL PLACEMENT The decals shown here have been placed on or around machine. • Replace label if damaged, illegible, or removed. until 6 p.m. Mountain Time, to use. • Do not allow children on the weight bench...
... operating instructions prior to order a free replacement decal. Decal 2 Decal 1 Decal 2 Decal 2 3 WARNING • Misuse of this product may result in the location shown. ! WARNING DECAL PLACEMENT The decals shown here have been placed on or around machine. • Replace label if damaged, illegible, or removed. until 6 p.m. Mountain Time, to use. • Do not allow children on the weight bench...
English Manual
Page 4
... manual before using the weight bench. 1. Use the weight bench only as you feel pain or dizziness while exercising, stop immediately and make sure that the cables remain on the pulleys at the same height. 11. Make sure all users of the weight bench are on the weight rests. Do not place more than 310 pounds, including the barbell, on the pulleys. Always disconnect the lat bar from moving parts...
... manual before using the weight bench. 1. Use the weight bench only as you feel pain or dizziness while exercising, stop immediately and make sure that the cables remain on the pulleys at the same height. 11. Make sure all users of the weight bench are on the weight rests. Do not place more than 310 pounds, including the barbell, on the pulleys. Always disconnect the lat bar from moving parts...
English Manual
Page 5
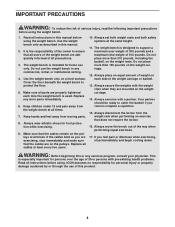
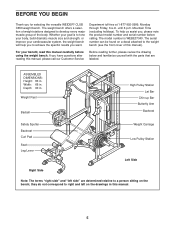
... versatile WEIDER® CLUB C650 weight bench. Depth: 90 in . Weight Rest Barbell High Pulley Station Lat Bar Chin-up Bar Butterfly Arm Backrest Safety Spotter Backrest Curl Pad Seat Leg Lever Weight Carriage Low Pulley Station Left Side Right Side Note: The terms "right side" and "left on the drawings in . ASSEMBLED DIMENSIONS: Height: 83 in this manual, please call our Customer Service Before reading further, please review the...
... versatile WEIDER® CLUB C650 weight bench. Depth: 90 in . Weight Rest Barbell High Pulley Station Lat Bar Chin-up Bar Butterfly Arm Backrest Safety Spotter Backrest Curl Pad Seat Leg Lever Weight Carriage Low Pulley Station Left Side Right Side Note: The terms "right side" and "left on the drawings in . ASSEMBLED DIMENSIONS: Height: 83 in this manual, please call our Customer Service Before reading further, please review the...

English Manual
Page 6
... sure all parts as grease or petroleum jelly, and soapy water. Do not tighten the Locknuts yet. 32 70 Repeat this manual is designed to realize that the versatile weight bench has many parts and that the assembly process will be assembled successfully by setting aside plenty of time, assembly will go smoothly. For help identifying small parts, use the PART IDENTIFICATION CHART. Insert two...
... sure all parts as grease or petroleum jelly, and soapy water. Do not tighten the Locknuts yet. 32 70 Repeat this manual is designed to realize that the versatile weight bench has many parts and that the assembly process will be assembled successfully by setting aside plenty of time, assembly will go smoothly. For help identifying small parts, use the PART IDENTIFICATION CHART. Insert two...
English Manual
Page 8
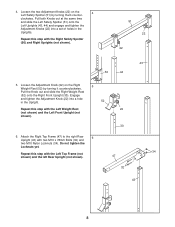
... (47) to the right Rear 6 Upright (43) with the Left Weight Rest 22 (not shown) and the Left Front Upright (not shown). 30 6. 4. Loosen the two Adjustment Knobs (22) on the Right 5 Weight Rest (52) by turning them counter- Engage and tighten the Adjustment Knob (22) into a set of holes in the Upright. 52 Repeat this step with two M10 x 78mm Bolts (32) and two...
... (47) to the right Rear 6 Upright (43) with the Left Weight Rest 22 (not shown) and the Left Front Upright (not shown). 30 6. 4. Loosen the two Adjustment Knobs (22) on the Right 5 Weight Rest (52) by turning them counter- Engage and tighten the Adjustment Knob (22) into a set of holes in the Upright. 52 Repeat this step with two M10 x 78mm Bolts (32) and two...
English Manual
Page 12
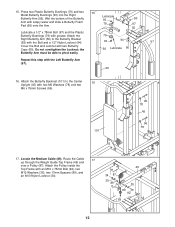
15. Do not overtighten the Locknut; Route the Cable 17 up through the Weight Guide Top Frame (49) and over a Pulley (87). Attach the 79 Right Butterfly Arm (56) to pivot easily. Repeat this step with an M10 x 75mm Bolt (92), two M10 Washers (35), two 17mm Spacers (89), and an... Arm. 79 97 55 Lubricate a 1/2" x 78mm Bolt (97) and the Plastic Butterfly Bushings (79) with two M6 Washers (78) and two M6 x 75mm Screws (96). 101 96 78 45 96 78 17. Locate the Medium Cable (69). Attach the Butterfly Backrest (101) to the Center 16 Upright (45) with grease. Press ...
15. Do not overtighten the Locknut; Route the Cable 17 up through the Weight Guide Top Frame (49) and over a Pulley (87). Attach the 79 Right Butterfly Arm (56) to pivot easily. Repeat this step with an M10 x 75mm Bolt (92), two M10 Washers (35), two 17mm Spacers (89), and an... Arm. 79 97 55 Lubricate a 1/2" x 78mm Bolt (97) and the Plastic Butterfly Bushings (79) with two M6 Washers (78) and two M6 x 75mm Screws (96). 101 96 78 45 96 78 17. Locate the Medium Cable (69). Attach the Butterfly Backrest (101) to the Center 16 Upright (45) with grease. Press ...
English Manual
Page 14
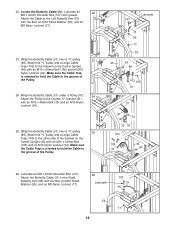
... Butterfly Cable (31) over a "V"-pulley 25 (86). Attach the "V"-pulley and a Large Cable Trap (103) to hold the Cable in the groove of the Pulley. 24. Lubricate 107 31 95 17 57 45 34 86 103 105 31 31 87 34 33 81 103 86 105 31 45 34 26. Lubricate an M8 x 43mm Shoulder Bolt (107). Locate the Butterfly Cable (31). Lubricate...
... Butterfly Cable (31) over a "V"-pulley 25 (86). Attach the "V"-pulley and a Large Cable Trap (103) to hold the Cable in the groove of the Pulley. 24. Lubricate 107 31 95 17 57 45 34 86 103 105 31 31 87 34 33 81 103 86 105 31 45 34 26. Lubricate an M8 x 43mm Shoulder Bolt (107). Locate the Butterfly Cable (31). Lubricate...
English Manual
Page 15
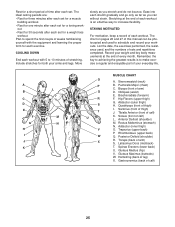
... make exercise a regular and enjoyable part of your arms and legs. Quadriceps (front of thigh) I J K L M N O P Q R S T U V W X MUSCLE CHART A. Rest for a short period of time after each set for each exercise. Adductor (inner thigh) O. List the date, the exercises performed, the resistance used to increase flexibility. Brachioradials (forearm) F. Hip Flexors (upper thigh) G. Rectus Abdominus (stomach) N. Triceps (back of arm) S. Latissimus Dorsi (mid back) T. Move slowly...
... make exercise a regular and enjoyable part of your arms and legs. Quadriceps (front of thigh) I J K L M N O P Q R S T U V W X MUSCLE CHART A. Rest for a short period of time after each set for each exercise. Adductor (inner thigh) O. List the date, the exercises performed, the resistance used to increase flexibility. Brachioradials (forearm) F. Hip Flexors (upper thigh) G. Rectus Abdominus (stomach) N. Triceps (back of arm) S. Latissimus Dorsi (mid back) T. Move slowly...
English Manual
Page 16
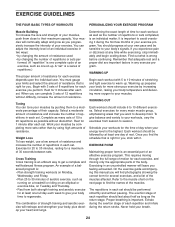
... workout should progress at any exercise program. Select exercises for several exercises, and a list of your exercise. On the exercise guide accompanying this manual you will continually adapt and grow as the number of resistance. Select a moderate amount of resistance and increase the number of resistance that adequate rest and a proper diet are important factors in each repetition and inhale during the exertion stage of each set...
... workout should progress at any exercise program. Select exercises for several exercises, and a list of your exercise. On the exercise guide accompanying this manual you will continually adapt and grow as the number of resistance. Select a moderate amount of resistance and increase the number of resistance that adequate rest and a proper diet are important factors in each repetition and inhale during the exertion stage of each set...
English Manual
Page 17
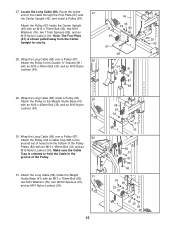
... (34). 30. Wrap the Long Cable (68) under a Pulley (87). Wrap the Long Cable (68) over a Pulley (87). 30 Attach the Pulley and a Cable Trap (88) to the Weight Guide Base (41) with an M10 x 45mm Bolt (33) and an M10 Nylon Locknut (34). Attach the Long Cable (68) inside the Center Upright (45) with an M10 x 75mm Bolt (92), two M10 Washers (35...
... (34). 30. Wrap the Long Cable (68) under a Pulley (87). Wrap the Long Cable (68) over a Pulley (87). 30 Attach the Pulley and a Cable Trap (88) to the Weight Guide Base (41) with an M10 x 45mm Bolt (33) and an M10 Nylon Locknut (34). Attach the Long Cable (68) inside the Center Upright (45) with an M10 x 75mm Bolt (92), two M10 Washers (35...
English Manual
Page 19
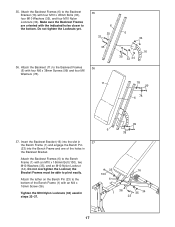
... Nylon Locknuts (34). Attach the tether on the Bench Pin (23) to the Bench Frame (1) with an M4 x 16mm Screw (36). Attach the Backrest Frames (6) to the bottom of the holes in steps 32-37. 37 35 16 100 6 36 1 35 34 23 17 Tighten the M10 Nylon Locknuts (34) used in the Backrest Bracket. Attach the Backrest (11) to...
... Nylon Locknuts (34). Attach the tether on the Bench Pin (23) to the Bench Frame (1) with an M4 x 16mm Screw (36). Attach the Backrest Frames (6) to the bottom of the holes in steps 32-37. 37 35 16 100 6 36 1 35 34 23 17 Tighten the M10 Nylon Locknuts (34) used in the Backrest Bracket. Attach the Backrest (11) to...

English Manual
Page 20
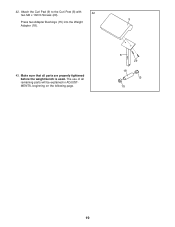
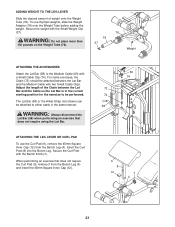
... the Bench Frame (1) as shown with the Bolt and an M10 Nylon Locknut (34). Press the 19mm Angled Outer Cap (61) onto the indicated end of the Pad Tube. Lubricate an M10 x 68mm Bolt (98) with grease. 40 Attach the Leg Lever (5) to pivot easily. 98 41. Slide two Foam Pads (26) onto the ends of the Weight Tube...
... the Bench Frame (1) as shown with the Bolt and an M10 Nylon Locknut (34). Press the 19mm Angled Outer Cap (61) onto the indicated end of the Pad Tube. Lubricate an M10 x 68mm Bolt (98) with grease. 40 Attach the Leg Lever (5) to pivot easily. 98 41. Slide two Foam Pads (26) onto the ends of the Weight Tube...
English Manual
Page 21
The use of all parts are properly tightened before the weight bench is used. Make sure that all remaining parts will be explained in ADJUSTMENTS, beginning on the following page. 8 29 18 15 15 19 42. Attach the Curl Pad (9) to the Curl Post (8) with 42 two M6 x 16mm Screws (29). 9 Press two Adapter Bushings (15) into the Weight Adapter (18). 43.
The use of all parts are properly tightened before the weight bench is used. Make sure that all remaining parts will be explained in ADJUSTMENTS, beginning on the following page. 8 29 18 15 15 19 42. Attach the Curl Pad (9) to the Curl Post (8) with 42 two M6 x 16mm Screws (29). 9 Press two Adapter Bushings (15) into the Weight Adapter (18). 43.

English Manual
Page 22
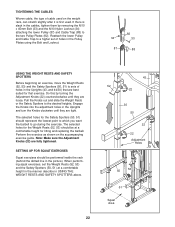
... weight bench is used. The weight bench can be cleaned with a Weight Clip (71). Also, refer to the accompanying exercise guide to see the correct form for important information about how to the Weight Carriage (62), slide the desired amount of weight onto the weight tube. Make sure all parts are properly tightened each exercise. See the EXERCISE GUIDELINES on the Weight Carriage (62). 1 16 62 Weight 71 20 ADJUSTMENTS...
... weight bench is used. The weight bench can be cleaned with a Weight Clip (71). Also, refer to the accompanying exercise guide to see the correct form for important information about how to the Weight Carriage (62), slide the desired amount of weight onto the weight tube. Make sure all parts are properly tightened each exercise. See the EXERCISE GUIDELINES on the Weight Carriage (62). 1 16 62 Weight 71 20 ADJUSTMENTS...
English Manual
Page 23
... attached to either cable in the correct starting position for the exercise to the Medium Cable (69) with two Small Cable Clips. When performing an exercise that does not require using the Lat Bar. Secure the weight with the Bench Knob (7). For some exercises, the Chain (73) should be performed. Secure the Curl Post with the Small Weight Clip (37). Adjust the length of weight onto the Weight...
... attached to either cable in the correct starting position for the exercise to the Medium Cable (69) with two Small Cable Clips. When performing an exercise that does not require using the Lat Bar. Secure the weight with the Bench Knob (7). For some exercises, the Chain (73) should be performed. Secure the Curl Post with the Small Weight Clip (37). Adjust the length of weight onto the Weight...
English Manual
Page 24
... used on the accompanying exercise guide. SETTING UP FOR SQUAT EXERCISES Squat exercises should be at a comfortable height in the manner describe in the Uprights and turn the Knobs clockwise until they are tight. When performing squat exercises, set of holes in the Pulley Plates using the Bolt and Locknut. 34 87 82 33 88 USING THE WEIGHT RESTS AND SAFETY SPOTTERS Before beginning an exercise, move the Weight...
... used on the accompanying exercise guide. SETTING UP FOR SQUAT EXERCISES Squat exercises should be at a comfortable height in the manner describe in the Uprights and turn the Knobs clockwise until they are tight. When performing squat exercises, set of holes in the Pulley Plates using the Bolt and Locknut. 34 87 82 33 88 USING THE WEIGHT RESTS AND SAFETY SPOTTERS Before beginning an exercise, move the Weight...
English Manual
Page 30
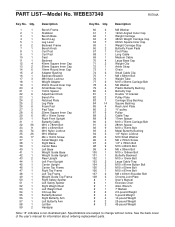
... x 19mm Bolt Large Cable Trap M10 x 81mm Button Bolt M10 x 60mm Bolt M10 x 87mm Bolt M8 x 43mm Shoulder Bolt Chrome Joint Plate User's Manual Exercise Chart Allen Wrench 7' Barbell 2.5-pound Weight 5-pound Weight 10-pound Weight 25-pound Weight 45-pound Weight Note: "#" indicates a non-illustrated part. Specifications are subject to change without notice. See the back cover of the user's manual for information about ordering replacement parts. Description Key No. Qty. WEBE37340 R0704A Key No. PART LIST-Model No.
... x 19mm Bolt Large Cable Trap M10 x 81mm Button Bolt M10 x 60mm Bolt M10 x 87mm Bolt M8 x 43mm Shoulder Bolt Chrome Joint Plate User's Manual Exercise Chart Allen Wrench 7' Barbell 2.5-pound Weight 5-pound Weight 10-pound Weight 25-pound Weight 45-pound Weight Note: "#" indicates a non-illustrated part. Specifications are subject to change without notice. See the back cover of the user's manual for information about ordering replacement parts. Description Key No. Qty. WEBE37340 R0704A Key No. PART LIST-Model No.
English Manual
Page 33
The SERIAL NUMBER of the product (see the PART LIST and EXPLODED DRAWING in the center of this manual) LIMITED WARRANTY ICON Health & Fitness, Inc. (ICON), warrants this product to be prepared to give the following information: 1. All repairs for commercial or rental purposes; or products used for which vary from defects in its authorized service centers. This warranty extends only to the terms set forth above is...
The SERIAL NUMBER of the product (see the PART LIST and EXPLODED DRAWING in the center of this manual) LIMITED WARRANTY ICON Health & Fitness, Inc. (ICON), warrants this product to be prepared to give the following information: 1. All repairs for commercial or rental purposes; or products used for which vary from defects in its authorized service centers. This warranty extends only to the terms set forth above is...


