
Canadian English Manual
Page 2
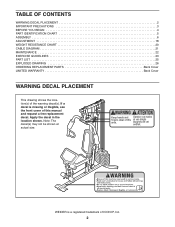
WEIDER is missing or illegible, see the front cover of this manual and request a free replacement decal. Apply the decal in the location shown. Note: The ... OF CONTENTS WARNING DECAL PLACEMENT 2 IMPORTANT PRECAUTIONS 3 BEFORE YOU BEGIN 4 PART IDENTIFICATION CHART 5 ASSEMBLY 6 ADJUSTMENT 18 WEIGHT RESISTANCE CHART 20 CABLE DIAGRAM 21 MAINTENANCE 22 EXERCISE GUIDELINES 23 PART LIST 25 EXPLODED DRAWING 26 ORDERING REPLACEMENT PARTS Back Cover LIMITED WARRANTY Back Cover WARNING DECAL PLACEMENT This drawing shows the location...
WEIDER is missing or illegible, see the front cover of this manual and request a free replacement decal. Apply the decal in the location shown. Note: The ... OF CONTENTS WARNING DECAL PLACEMENT 2 IMPORTANT PRECAUTIONS 3 BEFORE YOU BEGIN 4 PART IDENTIFICATION CHART 5 ASSEMBLY 6 ADJUSTMENT 18 WEIGHT RESISTANCE CHART 20 CABLE DIAGRAM 21 MAINTENANCE 22 EXERCISE GUIDELINES 23 PART LIST 25 EXPLODED DRAWING 26 ORDERING REPLACEMENT PARTS Back Cover LIMITED WARRANTY Back Cover WARNING DECAL PLACEMENT This drawing shows the location...
Canadian English Manual
Page 3
... weight sys- Always wear athletic shoes for personal injury or property damage sustained by persons weighing more than 300 lbs. (136 kg). 8. Over exercising may result in serious injury or death. Use your weight system in a commercial, rental, or institutional setting. 9. Cover the floor beneath the ...weight system (see LOCKING THE WEIGHT STACK on the pulleys at all parts regularly. If the cables bind while you experience pain while exercising, stop immediately and make sure that could cause the weight system to ensure that the cables remain on page 20). 11. Always stand...
... weight sys- Always wear athletic shoes for personal injury or property damage sustained by persons weighing more than 300 lbs. (136 kg). 8. Over exercising may result in serious injury or death. Use your weight system in a commercial, rental, or institutional setting. 9. Cover the floor beneath the ...weight system (see LOCKING THE WEIGHT STACK on the pulleys at all parts regularly. If the cables bind while you experience pain while exercising, stop immediately and make sure that could cause the weight system to ensure that the cables remain on page 20). 11. Always stand...
Canadian English Manual
Page 18
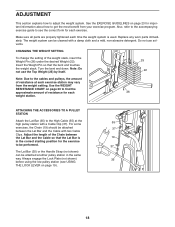
...the length of the Chain between the Lat Bar and the Cable with two Cable Clips. For some 55 exercises, the Chain (19) should be cleaned with a Cable Clip (37). See the EXERCISE GUIDELINES on page 19). 18 Replace any worn parts immediately. Insert the Weight Pin so that the Lat ...Bar is used. ADJUSTMENT This section explains how to the cables and pulleys, the amount of resistance at each exercise station may vary from your exercise program. CHANGING THE WEIGHT SETTING To change the setting of the weight stack, insert the Weight Pin (26) under the desired ...
...the length of the Chain between the Lat Bar and the Cable with two Cable Clips. For some 55 exercises, the Chain (19) should be cleaned with a Cable Clip (37). See the EXERCISE GUIDELINES on page 19). 18 Replace any worn parts immediately. Insert the Weight Pin so that the Lat ...Bar is used. ADJUSTMENT This section explains how to the cables and pulleys, the amount of resistance at each exercise station may vary from your exercise program. CHANGING THE WEIGHT SETTING To change the setting of the weight stack, insert the Weight Pin (26) under the desired ...
Canadian English Manual
Page 19
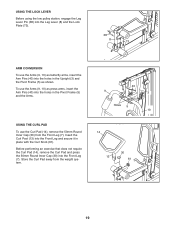
... (30) from the weight system. 40 9 3 Holes 5 10 14 30 13 61 7 19 Store the Curl Pad away from the Front Leg (7). Before performing an exercise that does not require the Curl Pad (14), remove the Curl Pad and press the 50mm Round Inner Cap (30) into the Front Leg and...
... (30) from the weight system. 40 9 3 Holes 5 10 14 30 13 61 7 19 Store the Curl Pad away from the Front Leg (7). Before performing an exercise that does not require the Curl Pad (14), remove the Curl Pad and press the 50mm Round Inner Cap (30) into the Front Leg and...
Canadian English Manual
Page 20
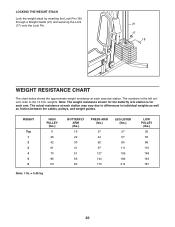
Note: The weight resistance shown for the butterfly arm station is for each exercise station. WEIGHT Top 1 2 3 4 5 6 HIGH PULLEY (lbs.) 11 26 42 61 70 86 101 Note: 1 lb. = 0.45 kg BUTTERFLY ARM (lbs.) 16 22 30 41 51 ...
Note: The weight resistance shown for the butterfly arm station is for each exercise station. WEIGHT Top 1 2 3 4 5 6 HIGH PULLEY (lbs.) 11 26 42 61 70 86 101 Note: 1 lb. = 0.45 kg BUTTERFLY ARM (lbs.) 16 22 30 41 51 ...
Canadian English Manual
Page 23
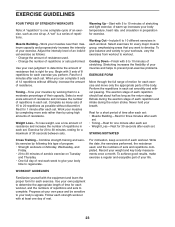
... is a series of 8 repetitions for one sit-up increases your muscles by using high amounts of resistance. Perform the repetitions in each exercise. Rest for a short period of 12 repetitions without discomfort. When you perform. Work your muscles by completing more sets rather than by working... the intensity of your own judgment to 10 minutes of the body. The exertion stage of each set . • Toning-Rest for each exercise and move only the appropriate parts of stretching. WORKOUT GUIDELINES Familiarize yourself with 5 to 20 repetitions as the return stage. A "set . ...
... is a series of 8 repetitions for one sit-up increases your muscles by using high amounts of resistance. Perform the repetitions in each exercise. Rest for a short period of 12 repetitions without discomfort. When you perform. Work your muscles by completing more sets rather than by working... the intensity of your own judgment to 10 minutes of the body. The exertion stage of each set . • Toning-Rest for each exercise and move only the appropriate parts of stretching. WORKOUT GUIDELINES Familiarize yourself with 5 to 20 repetitions as the return stage. A "set . ...
Canadian English Manual
Page 25
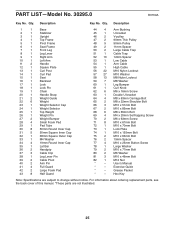
Qty. Exercise Guide * - Hex Key Note: Specifications are not illustrated. 25 For information about ordering replacement parts, see the back cover of this manual. *These parts are ...
Qty. Exercise Guide * - Hex Key Note: Specifications are not illustrated. 25 For information about ordering replacement parts, see the back cover of this manual. *These parts are ...


