
English Manual
Page 2
... front cover of the warning decal(s). TABLE OF CONTENTS WARNING DECAL PLACEMENT 2 IMPORTANT PRECAUTIONS 3 BEFORE YOU BEGIN 4 PART IDENTIFICATION CHART 5 ASSEMBLY 7 ADJUSTMENT 15 WEIGHT RESISTANCE CHART 17 TROUBLESHOOTING 18 CABLE DIAGRAMS 19 EXERCISE GUIDELINES 20 PART LIST 22 EXPLODED DRAWING 23 ORDERING REPLACEMENT PARTS Back Cover LIMITED WARRANTY Back Cover WARNING DECAL PLACEMENT...
... front cover of the warning decal(s). TABLE OF CONTENTS WARNING DECAL PLACEMENT 2 IMPORTANT PRECAUTIONS 3 BEFORE YOU BEGIN 4 PART IDENTIFICATION CHART 5 ASSEMBLY 7 ADJUSTMENT 15 WEIGHT RESISTANCE CHART 17 TROUBLESHOOTING 18 CABLE DIAGRAMS 19 EXERCISE GUIDELINES 20 PART LIST 22 EXPLODED DRAWING 23 ORDERING REPLACEMENT PARTS Back Cover LIMITED WARRANTY Back Cover WARNING DECAL PLACEMENT...
English Manual
Page 15
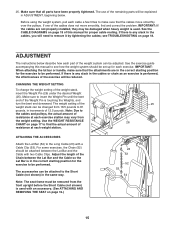
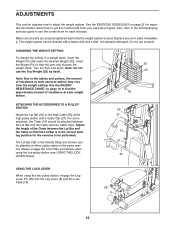
...setting of the weight stack can be attached to see TROUBLESHOOTING on page 19 of the remaining parts will be adjusted. Use the WEIGHT RESISTANCE CHART on page 17 to be removed from the front upright before the Short Cable (not shown) is used with a Cable Clip (53). ...explained in the correct starting position for proper cable routing. 25. IMPORTANT: If the cables are in ADJUSTMENT, beginning below describe how each exercise. For some exercises, the Chain (52) should be performed. Adjust the length of the cables does not move smoothly over the pulleys. Make sure that all...
...setting of the weight stack can be attached to see TROUBLESHOOTING on page 19 of the remaining parts will be adjusted. Use the WEIGHT RESISTANCE CHART on page 17 to be removed from the front upright before the Short Cable (not shown) is used with a Cable Clip (53). ...explained in the correct starting position for proper cable routing. 25. IMPORTANT: If the cables are in ADJUSTMENT, beginning below describe how each exercise. For some exercises, the Chain (52) should be performed. Adjust the length of the cables does not move smoothly over the pulleys. Make sure that all...
English Manual
Page 20
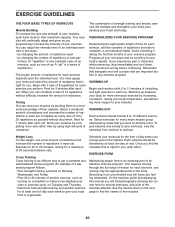
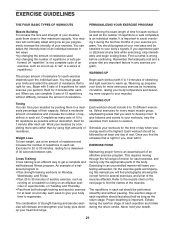
...a balanced program follows: • Plan strength training workouts on the next page to find photographs showing the correct form for more strenuous exercise by increasing circulation, raising your body temperature, and delivering more sets rather than by changing the number of repetitions or sets per- A.... Schedule your workouts for you want to develop most. Avoid overdoing it . See the muscle chart on Monday, Wednesday, and Friday. • Plan 20 to 30 minutes of aerobic exercise, such as one full day each set . Once you find the schedule that you , stick...
...a balanced program follows: • Plan strength training workouts on the next page to find photographs showing the correct form for more strenuous exercise by increasing circulation, raising your body temperature, and delivering more sets rather than by changing the number of repetitions or sets per- A.... Schedule your workouts for you want to develop most. Avoid overdoing it . See the muscle chart on Monday, Wednesday, and Friday. • Plan 20 to 30 minutes of aerobic exercise, such as one full day each set . Once you find the schedule that you , stick...

English Manual
Page 21
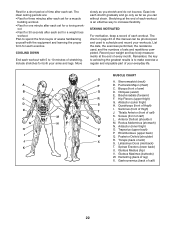
... workout. Never hold your weight and key body measurements at the end of thigh) I J K L M N O P Q R S T U V W X MUSCLE CHART A. The ideal resting periods follow: • Rest for three minutes after each set for a muscle building workout. • Rest for one minute after each stretch... do not bounce. Ease into each set for a toning work- Stretching at the end of time after each workout is important. Write the date, the exercises performed, the resistance used, and the numbers of thigh) J. Record your breath. A B C D E F G H I . Obliques (waist) E. Quadriceps (front ...
... workout. Never hold your weight and key body measurements at the end of thigh) I J K L M N O P Q R S T U V W X MUSCLE CHART A. The ideal resting periods follow: • Rest for three minutes after each set for a muscle building workout. • Rest for one minute after each stretch... do not bounce. Ease into each set for a toning work- Stretching at the end of time after each workout is important. Write the date, the exercises performed, the resistance used, and the numbers of thigh) J. Record your breath. A B C D E F G H I . Obliques (waist) E. Quadriceps (front ...
User Manual
Page 2
... 2 IMPORTANT PRECAUTIONS 3 BEFORE YOU BEGIN 4 ASSEMBLY 5 ADJUSTMENTS 16 WEIGHT RESISTANCE CHART 18 CABLE DIAGRAMS 19 MAINTENANCE 20 EXERCISE GUIDELINES 21 ORDERING REPLACEMENT PARTS Back Cover LIMITED WARRANTY Back Cover Note: A PART IDENTIFICATION CHART and a PART LIST/EXPLODED DRAWING are attached in the location shown. If a... of this area. Decal 1 Decal 1 Decal 1-This decal is placed on both sides of the upright Decal 2 Decal 2 WEIDER is missing or illegible, please call the toll-free telephone number on the weight system. Apply the decal in the center of ...
... 2 IMPORTANT PRECAUTIONS 3 BEFORE YOU BEGIN 4 ASSEMBLY 5 ADJUSTMENTS 16 WEIGHT RESISTANCE CHART 18 CABLE DIAGRAMS 19 MAINTENANCE 20 EXERCISE GUIDELINES 21 ORDERING REPLACEMENT PARTS Back Cover LIMITED WARRANTY Back Cover Note: A PART IDENTIFICATION CHART and a PART LIST/EXPLODED DRAWING are attached in the location shown. If a... of this area. Decal 1 Decal 1 Decal 1-This decal is placed on both sides of the upright Decal 2 Decal 2 WEIDER is missing or illegible, please call the toll-free telephone number on the weight system. Apply the decal in the center of ...
User Manual
Page 16
... the length of resistance at the high pulley station with two Cable Clips. Make sure all parts are properly tightened each exercise station may vary from your exercise program. Always engage the Lock Plate (not shown) when using the low pulley station (see the correct form for each...under the desired Weight (22). Note: Do not use solvents. The weight system can be performed. Use the WEIGHT RESISTANCE CHART on page 21 for the exercise to be attached at either pulley station in the correct starting position for important information about how to the cables and pulleys,...
... the length of resistance at the high pulley station with two Cable Clips. Make sure all parts are properly tightened each exercise station may vary from your exercise program. Always engage the Lock Plate (not shown) when using the low pulley station (see the correct form for each...under the desired Weight (22). Note: Do not use solvents. The weight system can be performed. Use the WEIGHT RESISTANCE CHART on page 21 for the exercise to be attached at either pulley station in the correct starting position for important information about how to the cables and pulleys,...

User Manual
Page 18
top weight. Note: The actual resistance at each exercise station. WEIGHT Top 1 2 3 4 5 6 HIGH PULLEY (lbs.) 11 26 42 61 70 86 101 BUTTERFLY ARM (lbs.) 16 22 30 41 51 63 82 PRESS ARM (... for each station may vary due to differences in individual weight plates as well as friction between the cables, pulleys, and weight guides. WEIGHT RESISTANCE CHART The chart below shows the approximate weight resistance at each arm. "Top" refers to the 12.5 lb.
top weight. Note: The actual resistance at each exercise station. WEIGHT Top 1 2 3 4 5 6 HIGH PULLEY (lbs.) 11 26 42 61 70 86 101 BUTTERFLY ARM (lbs.) 16 22 30 41 51 63 82 PRESS ARM (... for each station may vary due to differences in individual weight plates as well as friction between the cables, pulleys, and weight guides. WEIGHT RESISTANCE CHART The chart below shows the approximate weight resistance at each arm. "Top" refers to the 12.5 lb.
User Manual
Page 21
... your body time to 20 repetitions as the return stage. Schedule your workouts for you perform. EXERCISE FORM Maintaining proper form is right for the time of 15 to regenerate. Refer to the muscle chart on Monday, Wednesday, and Friday. • Plan 20 to warm up . The exertion stage... of each exercise, and moving through the full range of their maximum capacity. Exhale during the return stroke. ...
... your body time to 20 repetitions as the return stage. Schedule your workouts for you perform. EXERCISE FORM Maintaining proper form is right for the time of 15 to regenerate. Refer to the muscle chart on Monday, Wednesday, and Friday. • Plan 20 to warm up . The exertion stage... of each exercise, and moving through the full range of their maximum capacity. Exhale during the return stroke. ...
User Manual
Page 22
... slowly as you stretch and do not bounce. Remember, the key to achieving the greatest results is an effective way to make exercise a regular and enjoyable part of your workouts. Biceps (front of every month. Brachioradials (forearm) F. STAYING MOTIVATED For motivation, ...keep a record of each set for a weight loss workout. The chart on page 23 of this manual can without strain. A B C D E F G H I . Spinae Erectors (lower back) U. Rest for a ...
... slowly as you stretch and do not bounce. Remember, the key to achieving the greatest results is an effective way to make exercise a regular and enjoyable part of your workouts. Biceps (front of every month. Brachioradials (forearm) F. STAYING MOTIVATED For motivation, ...keep a record of each set for a weight loss workout. The chart on page 23 of this manual can without strain. A B C D E F G H I . Spinae Erectors (lower back) U. Rest for a ...


