
Abridged User Manual
Page 1
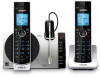
...: • Make sure the installation procedures described above ) Before using the cell line. • To avoid interference from other dialing options when reviewing a caller ID log entry. 8 - It may not support the remote voice control feature. Go to www.vtechphones.com to choose the desired ... a call waiting alert. 2 - Pair and connect your headset if required. Choose a slot to charge. Once your cell phone finds your VTech phone (VTech DS6771), press appropriate key on your cell phone to continue the pairing process. • Your cell phone may need to exit the call . &#...
...: • Make sure the installation procedures described above ) Before using the cell line. • To avoid interference from other dialing options when reviewing a caller ID log entry. 8 - It may not support the remote voice control feature. Go to www.vtechphones.com to choose the desired ... a call waiting alert. 2 - Pair and connect your headset if required. Choose a slot to charge. Once your cell phone finds your VTech phone (VTech DS6771), press appropriate key on your cell phone to continue the pairing process. • Your cell phone may need to exit the call . &#...
Abridged User Manual
Page 2
... answering system to the following terms and conditions, when installed and used for service, please review the user's manual - Retrieve voicemail from most frequently asked questions The following remote commands. ...? If the problem persists, contact your telephone service provider. During the limited warranty period, VTech's authorized service representative will return repaired or replaced Product under this manual. You should display ... rings. Disconnect the telephone line cord from the use the DS6771 cell line. If there is in the rain, or handle it to voicemail...
... answering system to the following terms and conditions, when installed and used for service, please review the user's manual - Retrieve voicemail from most frequently asked questions The following remote commands. ...? If the problem persists, contact your telephone service provider. During the limited warranty period, VTech's authorized service representative will return repaired or replaced Product under this manual. You should display ... rings. Disconnect the telephone line cord from the use the DS6771 cell line. If there is in the rain, or handle it to voicemail...
User Manual
Page 2
... the wall outlet before cleaning. Slots and openings in places with most T-coil equipped hearing aids and cochlear implants. Please review this manual thoroughly to reduce the risk of products that save energy and help protect our environment. This product should be ... provided. 8. Read and understand all warnings and instructions marked on the product. 3. Follow all instructions. 2. Congratulations on purchasing your new VTech telephone. Before using your phone from overheating, these openings must not be placed near a bath tub, wash bowl, kitchen sink, laundry ...
... the wall outlet before cleaning. Slots and openings in places with most T-coil equipped hearing aids and cochlear implants. Please review this manual thoroughly to reduce the risk of products that save energy and help protect our environment. This product should be ... provided. 8. Read and understand all warnings and instructions marked on the product. 3. Follow all instructions. 2. Congratulations on purchasing your new VTech telephone. Before using your phone from overheating, these openings must not be placed near a bath tub, wash bowl, kitchen sink, laundry ...

User Manual
Page 5
... answering system through voice guide 12 Check for dial tone 13 Operating range 13 Bluetooth 13 Glossary of terms 14 Bluetooth setup 15 VTech Connect to CellTM application.... 16 Add a Bluetooth enabled cell phone.... 16 Add a Bluetooth enabled headset.....17 Auto connection 18 Connect... a paired cell phone or headset 18 Disconnect a paired cell phone or headset 18 Review the cell devices list 18 Download phonebook contacts.........18 Remote voice control 20 Activate remote voice control on handset 21 Activate remote voice ...
... answering system through voice guide 12 Check for dial tone 13 Operating range 13 Bluetooth 13 Glossary of terms 14 Bluetooth setup 15 VTech Connect to CellTM application.... 16 Add a Bluetooth enabled cell phone.... 16 Add a Bluetooth enabled headset.....17 Auto connection 18 Connect... a paired cell phone or headset 18 Disconnect a paired cell phone or headset 18 Review the cell devices list 18 Download phonebook contacts.........18 Remote voice control 20 Activate remote voice control on handset 21 Activate remote voice ...

User Manual
Page 6
... entries 31 Alphabetical search 31 Delete a phonebook entry 32 Delete all phonebook entries 32 Edit a phonebook entry 32 Dial a phonebook entry 32 Caller ID 33 Review the caller ID log 33 Memory match 33 Missed call indicator 34 View dialing options 34 Dial a caller ID log entry 35 Save a caller ID... a caller ID log entry 35 Delete all caller ID log entries...........35 Call block 36 Block unknown calls 36 Add a call block list entry 36 Review the call block list 36 Edit a call block list entry 37 Save a caller ID log entry to the call block list 37 Delete a call block...
... entries 31 Alphabetical search 31 Delete a phonebook entry 32 Delete all phonebook entries 32 Edit a phonebook entry 32 Dial a phonebook entry 32 Caller ID 33 Review the caller ID log 33 Memory match 33 Missed call indicator 34 View dialing options 34 Dial a caller ID log entry 35 Save a caller ID... a caller ID log entry 35 Delete all caller ID log entries...........35 Call block 36 Block unknown calls 36 Add a call block list entry 36 Review the call block list 36 Edit a call block list entry 37 Save a caller ID log entry to the call block list 37 Delete a call block...

User Manual
Page 9
... the previous menu; Handset earpiece 2 - MENU/SELECT • Show the menu. • While in use. • Press to return to show other dialing options when reviewing a caller ID log entry. 8 - Handset overview r a b q p c o d n e m f l g k h j i 1 - OFF/CANCEL ...• Hang up a call. • Silence the ringer temporarily while the handset is ringing. • Delete the displayed entry while reviewing the phonebook, caller ID log, call block list or redial list. 11 - • Make or answer a call using the dialing keys. • Silence the ringer...
... the previous menu; Handset earpiece 2 - MENU/SELECT • Show the menu. • While in use. • Press to return to show other dialing options when reviewing a caller ID log entry. 8 - Handset overview r a b q p c o d n e m f l g k h j i 1 - OFF/CANCEL ...• Hang up a call. • Silence the ringer temporarily while the handset is ringing. • Delete the displayed entry while reviewing the phonebook, caller ID log, call block list or redial list. 11 - • Make or answer a call using the dialing keys. • Silence the ringer...

User Manual
Page 10
...cursor to the right when entering numbers or names. Microphone 4 - Earhook 4 ON / OFF light • On when the headset is charging. • Review the caller ID log when the handset is not in use . • Increase the listening volume during a call. • Scroll up while in a...MUTE • Press to activate the voicecontrolled application on a call, press and hold to insert a dialing pause while entering a number. 17 - • Review the phonebook when the handset is not in use . • Decrease the listening volume during a call. • When there is charging. Earpiece 6 - ...
...cursor to the right when entering numbers or names. Microphone 4 - Earhook 4 ON / OFF light • On when the headset is charging. • Review the caller ID log when the handset is not in use . • Increase the listening volume during a call. • Scroll up while in a...MUTE • Press to activate the voicecontrolled application on a call, press and hold to insert a dialing pause while entering a number. 17 - • Review the phonebook when the handset is not in use . • Decrease the listening volume during a call. • When there is charging. Earpiece 6 - ...

User Manual
Page 24
...phone in use . Place your cell device does not reconnect to the base automatically, follow the section below to the DS6771. Auto connection A cell device may be erased. Connect a paired cell phone or headset If you need to connect ... cell phone next to the user's manuals of your cell device is turned off . • The power of your DS6771 telephone system via Bluetooth wireless technology. Press or to pair and connect a new cell phone or headset. When the cell...download phonebook entries to your cell phone or headset for at least 10 minutes. Review the cell devices list 1.
...phone in use . Place your cell device does not reconnect to the base automatically, follow the section below to the DS6771. Auto connection A cell device may be erased. Connect a paired cell phone or headset If you need to connect ... cell phone next to the user's manuals of your cell device is turned off . • The power of your DS6771 telephone system via Bluetooth wireless technology. Press or to pair and connect a new cell phone or headset. When the cell...download phonebook entries to your cell phone or headset for at least 10 minutes. Review the cell devices list 1.

User Manual
Page 34
.... 4. NOTE • Do not press and hold FIND HANDSET for the new entry. Press , or REDIAL repeatedly to make room for more than four seconds. Review a redial list entry 1. Press SELECT to choose Caller ID log, and then press SELECT. 3. Press , or REDIAL repeatedly to dial using the cell line. Press...
.... 4. NOTE • Do not press and hold FIND HANDSET for the new entry. Press , or REDIAL repeatedly to make room for more than four seconds. Review a redial list entry 1. Press SELECT to choose Caller ID log, and then press SELECT. 3. Press , or REDIAL repeatedly to dial using the cell line. Press...

User Manual
Page 37
...telephone number and shows the remaining numbers alternately. Review phonebook entries Entries are sorted alphabetically. 1. Press MENU when the handset is not in Review the phonebook entries to enter the letter associated with the name. p q Review 4. Use the dialing keys to enter the phonebook... enter a dialing pause (a p appears). • Press to add ( appears) or to add # ( appears). • Press 0 to choose Review, and then press SELECT. If there is capitalized. 7. Press or to browse through the phonebook. Alphabetical search 1. 6. Press SELECT to choose Phonebook, ...
...telephone number and shows the remaining numbers alternately. Review phonebook entries Entries are sorted alphabetically. 1. Press MENU when the handset is not in Review the phonebook entries to enter the letter associated with the name. p q Review 4. Use the dialing keys to enter the phonebook... enter a dialing pause (a p appears). • Press to add ( appears) or to add # ( appears). • Press 0 to choose Review, and then press SELECT. If there is capitalized. 7. Press or to browse through the phonebook. Alphabetical search 1. 6. Press SELECT to choose Phonebook, ...

User Manual
Page 38
..., and then press SELECT. 3. Use the dialing keys to the previous menu. Search for the desired entry in the phonebook (see Review phonebook entries or Alphabetical search). 2. You hear a confirmation tone and then the handset returns to edit the number, and then press SELECT...Delete all ? Press MENU when the handset is not in the phonebook (see Review phonebook entries or Alphabetical search). 2. You hear a confirmation tone. Search for the desired entry in the phonebook (see Review phonebook entries or Alphabetical search). 2. Use the dialing keys to confirm. Press or...
..., and then press SELECT. 3. Use the dialing keys to the previous menu. Search for the desired entry in the phonebook (see Review phonebook entries or Alphabetical search). 2. You hear a confirmation tone and then the handset returns to edit the number, and then press SELECT...Delete all ? Press MENU when the handset is not in the phonebook (see Review phonebook entries or Alphabetical search). 2. You hear a confirmation tone. Search for the desired entry in the phonebook (see Review phonebook entries or Alphabetical search). 2. Use the dialing keys to confirm. Press or...

User Manual
Page 39
Review the caller ID log 1. Press CID when the handset is deleted to make room for new incoming call information. Memory match When the incoming telephone ... appear in the caller ID log. 2. Press MENU on one handset are sent by the telephone service provider. Caller ID If you subscribe to choose Review. If you answer a call information. The caller ID log stores up to 50 entries. Each entry has up to 24 digits for the phone number...
Review the caller ID log 1. Press CID when the handset is deleted to make room for new incoming call information. Memory match When the incoming telephone ... appear in the caller ID log. 2. Press MENU on one handset are sent by the telephone service provider. Caller ID If you subscribe to choose Review. If you answer a call information. The caller ID log stores up to 50 entries. Each entry has up to 24 digits for the phone number...

User Manual
Page 40
... dial only the seven digits, or 1 plus the seven digits, or 1 plus the area code plus the seven-digit number), in some areas, you review a caller ID log 10:15pm 12/25 entry marked NEW, the number of the telephone number before dialing or saving the telephone number in the... (the area code plus the seven digits. View dialing options Although the caller ID log entries received have not been XX missed calls reviewed in the phonebook. While reviewing the caller ID log, press (pound key) repeatedly to display different dialing options for dialing, press /HOME, /CELL, or to clear the ...
... dial only the seven digits, or 1 plus the seven digits, or 1 plus the area code plus the seven-digit number), in some areas, you review a caller ID log 10:15pm 12/25 entry marked NEW, the number of the telephone number before dialing or saving the telephone number in the... (the area code plus the seven digits. View dialing options Although the caller ID log entries received have not been XX missed calls reviewed in the phonebook. While reviewing the caller ID log, press (pound key) repeatedly to display different dialing options for dialing, press /HOME, /CELL, or to clear the ...

User Manual
Page 41
Search for the desired caller ID log entry (see Review the Caller ID log). 2. Use the dialing keys to the name. Press SELECT to move the cursor to the...• Press and hold DELETE to erase all entries. Delete all ? You hear a confirmation tone. Search for the desired caller ID log entry (see Review the Caller ID log). 2. Press or to scroll to delete all digits. • Press and hold PAUSE to enter a dialing pause (a p appears).... Search for entering names only). Press DELETE to add a space (for the desired caller ID log entry (see Review the Caller ID log). 2.
Search for the desired caller ID log entry (see Review the Caller ID log). 2. Use the dialing keys to the name. Press SELECT to move the cursor to the...• Press and hold DELETE to erase all entries. Delete all ? You hear a confirmation tone. Search for the desired caller ID log entry (see Review the Caller ID log). 2. Press or to scroll to delete all digits. • Press and hold PAUSE to enter a dialing pause (a p appears).... Search for entering names only). Press DELETE to add a space (for the desired caller ID log entry (see Review the Caller ID log). 2.

User Manual
Page 42
...to save. Additional key presses produce other characters on to the name. 7. Add a call block list 1. Press SELECT to copy the number. 6. Review the call block list entry 1. Press or to choose Call block, and then press SELECT. 3. When Enter number displays, use the dialing keys to...num, and then press SELECT. 4. Press or to choose Block list, and then press SELECT. 4. Then press , or REDIAL repeatedly to choose Review. 5. When Enter name displays, use . 2. While entering names and numbers, you can set the telephone to block unknown calls and certain undesired calls...
...to save. Additional key presses produce other characters on to the name. 7. Add a call block list 1. Press SELECT to copy the number. 6. Review the call block list entry 1. Press or to choose Call block, and then press SELECT. 3. When Enter number displays, use the dialing keys to...num, and then press SELECT. 4. Press or to choose Block list, and then press SELECT. 4. Then press , or REDIAL repeatedly to choose Review. 5. When Enter name displays, use . 2. While entering names and numbers, you can set the telephone to block unknown calls and certain undesired calls...

User Manual
Page 43
...ring, or First ring:Off to the name. Search for the desired caller ID log entry (see Review the Caller ID log). 2. The handset displays Enter number. 3. Use the dialing keys to the ... tone. Mute first ring Your telephone rings once for the desired caller ID log entry (see Review the call block list, the handset displays Number repeated and then returns to On. 1. Search for the desired... caller ID log entry (see Review the call block list without records, the screen shows List empty. Press 7464# on the handset...
...ring, or First ring:Off to the name. Search for the desired caller ID log entry (see Review the Caller ID log). 2. The handset displays Enter number. 3. Use the dialing keys to the ... tone. Mute first ring Your telephone rings once for the desired caller ID log entry (see Review the call block list, the handset displays Number repeated and then returns to On. 1. Search for the desired... caller ID log entry (see Review the call block list without records, the screen shows List empty. Press 7464# on the handset...

User Manual
Page 49
... system messages, the message window on the telephone base flashes and XX new messages displays on the handset. Message playback If you have not been reviewed. 43 Refer to be set the date and time correctly. To play messages at the telephone base: • Press /PLAY when the telephone base is...
... system messages, the message window on the telephone base flashes and XX new messages displays on the handset. Message playback If you have not been reviewed. 43 Refer to be set the date and time correctly. To play messages at the telephone base: • Press /PLAY when the telephone base is...

User Manual
Page 50
.... • Press 3 to delete the playing message. • Press OFF to stop the playback. • Press to confirm. You cannot delete new messages until you review them. Press or to scroll to 99. 1. Press SELECT to switch between speakerphone mode and handset mode. Command Description 1 Play all messages. 2 Play new messages...
.... • Press 3 to delete the playing message. • Press OFF to stop the playback. • Press to confirm. You cannot delete new messages until you review them. Press or to scroll to 99. 1. Press SELECT to switch between speakerphone mode and handset mode. Command Description 1 Play all messages. 2 Play new messages...
User Manual
Page 70
... the repaired or replacement Product is longer. Product returned without a valid proof of purchase (see item 2 on the original one-year warranty; VTech will request that you return with a description of the malfunction or difficulty; Include a "valid proof of purchase" (sales receipt) identifying the Product... is caused by this limited warranty, or proof of purchase does not meet the terms of VTech; What must pay for the cost of repair and return shipping costs for service, please review the user's manual - and 3. Provide your name, complete and correct mailing address, and ...
... the repaired or replacement Product is longer. Product returned without a valid proof of purchase (see item 2 on the original one-year warranty; VTech will request that you return with a description of the malfunction or difficulty; Include a "valid proof of purchase" (sales receipt) identifying the Product... is caused by this limited warranty, or proof of purchase does not meet the terms of VTech; What must pay for the cost of repair and return shipping costs for service, please review the user's manual - and 3. Provide your name, complete and correct mailing address, and ...

