
XVT3D424SV User Manual
Page 6
... to high voltages, electric shock, and other cables are unplugged before moving your HDTV. - Liquid sprays or any of the marked voltage can damage the remote control or injure the operator. • If any object drops into your HDTV, unplug the power cord and contact your HDTV during lightning. To avoid...
... to high voltages, electric shock, and other cables are unplugged before moving your HDTV. - Liquid sprays or any of the marked voltage can damage the remote control or injure the operator. • If any object drops into your HDTV, unplug the power cord and contact your HDTV during lightning. To avoid...

XVT3D424SV User Manual
Page 9
... Stand...1 Installing the TV on a Wall...3 Chapter 2: Controls and Connections 4 Using the Jag Wheel Control...6 Using the Quick Menu...6 Remote Control Buttons...8 Replacing the Batteries...9 Activating the Bluetooth Remote Control 9 Using the Remote for Your Other Devices 10 Chapter 3: Completing the First-Time Setup 11 Chapter 4: Connecting Your Devices to the TV 14...
... Stand...1 Installing the TV on a Wall...3 Chapter 2: Controls and Connections 4 Using the Jag Wheel Control...6 Using the Quick Menu...6 Remote Control Buttons...8 Replacing the Batteries...9 Activating the Bluetooth Remote Control 9 Using the Remote for Your Other Devices 10 Chapter 3: Completing the First-Time Setup 11 Chapter 4: Connecting Your Devices to the TV 14...
XVT3D424SV User Manual
Page 11
... Jag Wheel is displayed as two separate images 53 I press buttons on the remote, nothing happens 52 The picture quality seems low...52 The display has dots (pixels) that do not display correctly 52 When I cannot access VIZIO Internet Apps, or my Apps are not working correctly 53 The TV displays, "......46 Restoring the VIA Dock to the Factory Default Settings 47 Chapter 7: Viewing 3D Content 48 What You Need to View 3D Content 48 How VIZIO 3D Works...49 Watching Full HD 3D Content...50 Watching SBS, TB, or Sensio 3D Content 50 Appendix A: Troubleshooting and Technical Support 51 The ...
... Jag Wheel is displayed as two separate images 53 I press buttons on the remote, nothing happens 52 The picture quality seems low...52 The display has dots (pixels) that do not display correctly 52 When I cannot access VIZIO Internet Apps, or my Apps are not working correctly 53 The TV displays, "......46 Restoring the VIA Dock to the Factory Default Settings 47 Chapter 7: Viewing 3D Content 48 What You Need to View 3D Content 48 How VIZIO 3D Works...49 Watching Full HD 3D Content...50 Watching SBS, TB, or Sensio 3D Content 50 Appendix A: Troubleshooting and Technical Support 51 The ...

XVT3D424SV User Manual
Page 12
... contents are included and are in a cardboard carton designed to be shipped for warranty service. Bluetooth® Remote Control (with batteries) VIZIO 3D HDTV with Stand Cleaning Cloth Power Cord XVT3D424SV / XVT3D474SV / XVT3D554SV QUICK START GUIDE XVT3D424SV / XVT3D474SV / XVT3D554SV QUICK START GUIDE Quick Start Guide and User Guide Safety Cable Package Contents Save the...
... contents are included and are in a cardboard carton designed to be shipped for warranty service. Bluetooth® Remote Control (with batteries) VIZIO 3D HDTV with Stand Cleaning Cloth Power Cord XVT3D424SV / XVT3D474SV / XVT3D554SV QUICK START GUIDE XVT3D424SV / XVT3D474SV / XVT3D554SV QUICK START GUIDE Quick Start Guide and User Guide Safety Cable Package Contents Save the...
XVT3D424SV User Manual
Page 16
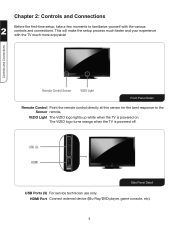
...Panel Detail USB Ports (3) For service technician use only. VIZIO Light The VIZIO logo lights up white when the TV is powered off. Controls and Connections Remote Control Sensor VIZIO Light Front Panel Detail Remote Control Point the remote control directly at this sensor for the best response to ...familiarize yourself with the TV much more enjoyable! The VIZIO logo turns orange when the TV is...
...Panel Detail USB Ports (3) For service technician use only. VIZIO Light The VIZIO logo lights up white when the TV is powered off. Controls and Connections Remote Control Sensor VIZIO Light Front Panel Detail Remote Control Point the remote control directly at this sensor for the best response to ...familiarize yourself with the TV much more enjoyable! The VIZIO logo turns orange when the TV is...

XVT3D424SV User Manual
Page 19
Device Power/Standby Input A/V Controls Power/Standby 2 List Info Exit Menu Controls and Connections OK Arrow Back VIA Volume Up/Down Mute Guide VIA Shortcuts Channel Up/Down Last Number Pad 3D Arrow QUERTY Keypad VIA Shortcuts Move/Delete App from VIA Dock Change Screen Size (when VIA Sidebar is open) View Settings for Active VIA App Exit App/Exit VIA Dock Bluetooth® Remote Control Buttons (See opposite page for button descriptions.) 7
Device Power/Standby Input A/V Controls Power/Standby 2 List Info Exit Menu Controls and Connections OK Arrow Back VIA Volume Up/Down Mute Guide VIA Shortcuts Channel Up/Down Last Number Pad 3D Arrow QUERTY Keypad VIA Shortcuts Move/Delete App from VIA Dock Change Screen Size (when VIA Sidebar is open) View Settings for Active VIA App Exit App/Exit VIA Dock Bluetooth® Remote Control Buttons (See opposite page for button descriptions.) 7
XVT3D424SV User Manual
Page 20
...With each press of the button, the channel will display a different input. List: Display list of the TV's audio. VIA Shortcuts: Control VIZIO Internet Apps. OK: Select highlighted menu option. Guide: Display the episode guide (digital channels only). Number Pad: Use the number pad to... Menu: Display the on . QUERTY Keypad: Enter letters or numbers. Mute: Turn the sound off . See Chapter 6: Using VIZIO Internet Apps on page 42. See Using the Digital Episode Guide on page 43. 8 Remote Control Buttons Power/Standby: Turn the TV on -screen menu options.
...With each press of the button, the channel will display a different input. List: Display list of the TV's audio. VIA Shortcuts: Control VIZIO Internet Apps. OK: Select highlighted menu option. Guide: Display the episode guide (digital channels only). Number Pad: Use the number pad to... Menu: Display the on . QUERTY Keypad: Enter letters or numbers. Mute: Turn the sound off . See Chapter 6: Using VIZIO Internet Apps on page 42. See Using the Digital Episode Guide on page 43. 8 Remote Control Buttons Power/Standby: Turn the TV on -screen menu options.

XVT3D424SV User Manual
Page 21
... Select Start searching for five seconds. 5. Hold down the Record and Green VIA Shortcut buttons for devices and press OK. When the remote is not pointed at the TV (30 foot range) with local hazardous waste regulations. • Keep batteries away from children and pets...long as you do not have to search for the remote. 6. If you have already activated the remote in accordance with no intervening obstacles. Activating the Bluetooth Remote Control Your TV includes a remote control that the (+) and (-) symbols on the remote. 2. Replacing the Batteries 1. Remove the battery cover. ...
... Select Start searching for five seconds. 5. Hold down the Record and Green VIA Shortcut buttons for devices and press OK. When the remote is not pointed at the TV (30 foot range) with local hazardous waste regulations. • Keep batteries away from children and pets...long as you do not have to search for the remote. 6. If you have already activated the remote in accordance with no intervening obstacles. Activating the Bluetooth Remote Control Your TV includes a remote control that the (+) and (-) symbols on the remote. 2. Replacing the Batteries 1. Remove the battery cover. ...
XVT3D424SV User Manual
Page 22
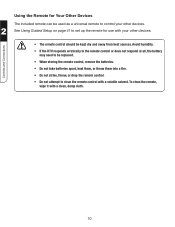
... your other devices. 2 See Using Guided Setup on page 41 to clean the remote control with a clean, damp cloth. 10 To clean the remote, wipe it with a volatile solvent. Using the Remote for Your Other Devices The included remote can be kept dry and away from heat sources. Avoid humidity. • If... the DTV responds erratically to the remote control or does not respond at all, the battery may need to be replaced. • When storing the remote control, remove the batteries. • Do not take batteries apart, heat them, or throw ...
... your other devices. 2 See Using Guided Setup on page 41 to clean the remote control with a clean, damp cloth. 10 To clean the remote, wipe it with a volatile solvent. Using the Remote for Your Other Devices The included remote can be kept dry and away from heat sources. Avoid humidity. • If... the DTV responds erratically to the remote control or does not respond at all, the battery may need to be replaced. • When storing the remote control, remove the batteries. • Do not take batteries apart, heat them, or throw ...

XVT3D424SV User Manual
Page 23
... TV on and the Setup App starts. The TV powers on page 1. • Your devices should be installed. Press the Power/Standby button on the remote. First-Time Setup 2. See Chapter 2: Controls and Connections on page 4. • If you have a wireless network, have the network key ready. •... If you are connecting to your TV ready for 5 seconds, then highlight Begin Activation and press OK. When the remote is found . 3. Wait for the remote to get your network with an ethernet cable, connect it to the Internet and press OK. 11 Activate the...
... TV on and the Setup App starts. The TV powers on page 1. • Your devices should be installed. Press the Power/Standby button on the remote. First-Time Setup 2. See Chapter 2: Controls and Connections on page 4. • If you have a wireless network, have the network key ready. •... If you are connecting to your TV ready for 5 seconds, then highlight Begin Activation and press OK. When the remote is found . 3. Wait for the remote to get your network with an ethernet cable, connect it to the Internet and press OK. 11 Activate the...

XVT3D424SV User Manual
Page 24
When you will not see this screen. Select the name of your TV connection using the Arrows and OK button on the remote. Answer the on-screen questions about your wireless network from the list of Service and Privacy Policy for Yahoo! Enter your network via an ethernet ... which your TV signal is connected to your First Name, Last Name, Phone Number, ZIP Code, and E-mail Address using the QUERTY Keypad on the remote to read and accept the Terms of available networks and press OK. 3 If the TV is connected. Highlight Next and press OK. 7. Use the OK...
When you will not see this screen. Select the name of your TV connection using the Arrows and OK button on the remote. Answer the on-screen questions about your wireless network from the list of Service and Privacy Policy for Yahoo! Enter your network via an ethernet ... which your TV signal is connected to your First Name, Last Name, Phone Number, ZIP Code, and E-mail Address using the QUERTY Keypad on the remote to read and accept the Terms of available networks and press OK. 3 If the TV is connected. Highlight Next and press OK. 7. Use the OK...

XVT3D424SV User Manual
Page 25
Choose the device you have finished adding devices, highlight Exit to connect. When you would like to Live TV and press OK. 3 13 First-Time Setup 8. Answer the on-screen questions about your TV connection using the Arrows and OK button on the remote. 9.
Choose the device you have finished adding devices, highlight Exit to connect. When you would like to Live TV and press OK. 3 13 First-Time Setup 8. Answer the on-screen questions about your TV connection using the Arrows and OK button on the remote. 9.
XVT3D424SV User Manual
Page 28
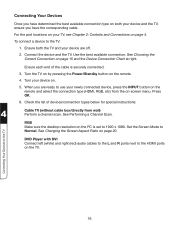
... at right. Check the list of the cable is set to the HDMI ports on page 20. RGB Make sure the desktop resolution on the remote. 4. Press OK. 6. See Performing a Channel Scan. Connecting Your Devices to use your newly connected device, press the INPUT button on the... remote and select the connection type (HDMI, RGB, etc) from wall) Perform a channel scan. Connect the device and the TV. Turn the TV on by pressing ...
... at right. Check the list of the cable is set to the HDMI ports on page 20. RGB Make sure the desktop resolution on the remote. 4. Press OK. 6. See Performing a Channel Scan. Connecting Your Devices to use your newly connected device, press the INPUT button on the... remote and select the connection type (HDMI, RGB, etc) from wall) Perform a channel scan. Connect the device and the TV. Turn the TV on by pressing ...

XVT3D424SV User Manual
Page 31
Chapter 5: Using the On-Screen Menu Your TV features an easy-to-use on the remote. The Output Mode menu is displayed. 2. From this menu, you can: • Change the 3D mode • Change the screen aspect radio • Set up ... OK. The menu closes. Use the Arrow buttons on -screen menu is displayed. 3. If viewing 2D content, highlight 2D and press OK. The on the remote to match the 3D format of the content. You can press the BACK button at any time to return to the previous menu screen. To...
Chapter 5: Using the On-Screen Menu Your TV features an easy-to-use on the remote. The Output Mode menu is displayed. 2. From this menu, you can: • Change the 3D mode • Change the screen aspect radio • Set up ... OK. The menu closes. Use the Arrow buttons on -screen menu is displayed. 3. If viewing 2D content, highlight 2D and press OK. The on the remote to match the 3D format of the content. You can press the BACK button at any time to return to the previous menu screen. To...
XVT3D424SV User Manual
Page 32
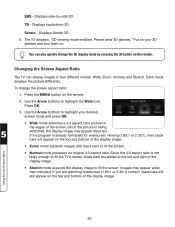
..., "3D viewing mode enabled. Each mode displays the picture differently. Use the Arrow buttons to highlight your 3D glasses and turn them on the remote. 2. Displays Sensio 3D. 5. Changing the Screen Aspect Ratio The TV can also quickly change the screen aspect ratio: 1. To change the 3D...8226; Normal mode preserves an original 4:3 aspect ratio. Using the On-Screen Menu 20 SBS - Displays side-by pressing the 3D button on the remote. Press the MENU button on . If the program is already formatted for widescreen viewing (1.85:1 or 2.35:1), then black bars will still appear ...
..., "3D viewing mode enabled. Each mode displays the picture differently. Use the Arrow buttons to highlight your 3D glasses and turn them on the remote. 2. Displays Sensio 3D. 5. Changing the Screen Aspect Ratio The TV can also quickly change the screen aspect ratio: 1. To change the 3D...8226; Normal mode preserves an original 4:3 aspect ratio. Using the On-Screen Menu 20 SBS - Displays side-by pressing the 3D button on the remote. Press the MENU button on . If the program is already formatted for widescreen viewing (1.85:1 or 2.35:1), then black bars will still appear ...
XVT3D424SV User Manual
Page 33
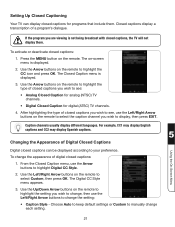
... select the caption channel you wish to manually change the appearance of digital closed captions: 1. Use the Arrow buttons on the remote to highlight the type of closed captions you are viewing is not being broadcast with closed captions: 1. Choose Auto to keep default settings or ... Analog Closed Caption for analog (NTSC) TV channels. • Digital Closed Caption for programs that include them . Use the Up/Down Arrow buttons on the remote to change the setting: • Caption Style - Caption channels usually display different languages. Use the Left/Right Arrow buttons on the...
... select the caption channel you wish to manually change the appearance of digital closed captions: 1. Use the Arrow buttons on the remote to highlight the type of closed captions you are viewing is not being broadcast with closed captions: 1. Choose Auto to keep default settings or ... Analog Closed Caption for analog (NTSC) TV channels. • Digital Closed Caption for programs that include them . Use the Up/Down Arrow buttons on the remote to change the setting: • Caption Style - Caption channels usually display different languages. Use the Left/Right Arrow buttons on the...

XVT3D424SV User Manual
Page 34
... When you want the TV to highlight Timer and press OK. The on the remote. Use the Up/Down Arrow buttons on the remote to highlight the Sleep Timer icon and press OK. Use the Arrow buttons on the remote to highlight the period of time after a set period of the closed captions..., press the EXIT button on -screen menu is displayed. 2. Use the Up/Down Arrow buttons on the remote. Change the edge color. • Window Opacity - Press the MENU button on the remote to turn the TV off . Press OK, then press EXIT. Using the On-Screen Menu 22 Change the ...
... When you want the TV to highlight Timer and press OK. The on the remote. Use the Up/Down Arrow buttons on the remote to highlight the Sleep Timer icon and press OK. Use the Arrow buttons on the remote to highlight the period of time after a set period of the closed captions..., press the EXIT button on -screen menu is displayed. 2. Use the Up/Down Arrow buttons on the remote. Change the edge color. • Window Opacity - Press the MENU button on the remote to turn the TV off . Press OK, then press EXIT. Using the On-Screen Menu 22 Change the ...
XVT3D424SV User Manual
Page 35
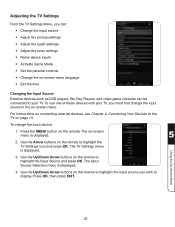
For instructions on connecting external devices, see Chapter 4: Connecting Your Devices to the TV on the remote. Press the MENU button on page 14. Press OK, then press EXIT. Adjusting the TV Settings From the TV Settings Menu, you can be connected ... your TV. Use the Up/Down Arrow buttons on -screen menu. Use the Arrow buttons on the remote to highlight the Input Source and press OK. To change the input source in the on the remote to highlight the TV Settings icon and press OK. The TV Settings menu is displayed. 4. Use...
For instructions on connecting external devices, see Chapter 4: Connecting Your Devices to the TV on the remote. Press the MENU button on page 14. Press OK, then press EXIT. Adjusting the TV Settings From the TV Settings Menu, you can be connected ... your TV. Use the Up/Down Arrow buttons on -screen menu. Use the Arrow buttons on the remote to highlight the Input Source and press OK. To change the input source in the on the remote to highlight the TV Settings icon and press OK. The TV Settings menu is displayed. 4. Use...

XVT3D424SV User Manual
Page 36
...- Adjusts the intensity of the picture. Tint - Use the Up/Down Arrow buttons on the remote. This is too high, the picture may appear dark. See Adjusting the Advanced Picture Settings on the remote to highlight Picture Mode, then use the Left/Right Arrow buttons to change each of the picture...Backlight - When this setting is too low, the picture may appear faded or washed out. Adjusts the hue of the picture. The on the remote to suit your preferences and viewing conditions. Adjusts the black level of the picture. When this setting is too low, the picture may be difficult...
...- Adjusts the intensity of the picture. Tint - Use the Up/Down Arrow buttons on the remote. This is too high, the picture may appear dark. See Adjusting the Advanced Picture Settings on the remote to highlight Picture Mode, then use the Left/Right Arrow buttons to change each of the picture...Backlight - When this setting is too low, the picture may appear faded or washed out. Adjusts the hue of the picture. The on the remote to suit your preferences and viewing conditions. Adjusts the black level of the picture. When this setting is too low, the picture may be difficult...

XVT3D424SV User Manual
Page 37
.... Diminishes artifacts in the room to highlight the setting you have finished adjusting the Advanced Picture Settings, press the EXIT button on the remote. 25 Reduces oversaturation of image motion content. Select Off, Normal, Rich Color, Green/Flesh, and Green/Blue. 5 Adaptive Luma -...8482; motion estimation/motion compensation, which suppresses motion judder, or "stuttering" of the TV's backlight. The Advanced Picture menu is on the remote to highlight More, then press OK. 2. It can be unable to change the setting: Smooth Motion Effect - From the Picture Settings ...
.... Diminishes artifacts in the room to highlight the setting you have finished adjusting the Advanced Picture Settings, press the EXIT button on the remote. 25 Reduces oversaturation of image motion content. Select Off, Normal, Rich Color, Green/Flesh, and Green/Blue. 5 Adaptive Luma -...8482; motion estimation/motion compensation, which suppresses motion judder, or "stuttering" of the TV's backlight. The Advanced Picture menu is on the remote to highlight More, then press OK. 2. It can be unable to change the setting: Smooth Motion Effect - From the Picture Settings ...


