
XVT3D424SV User Manual
Page 5
... instructions before operating your HDTV on the label. Do not install your HDTV close to your HDTV. Misuse may compromise the integrity of the display. A damp cloth is equipped with a three-pronged grounded plug (a plug with arrowhead symbol within an equilateral triangle is intended to alert the user to the presence of power source indicated on an unstable cart, stand, or table. When a cart is used, use...
... instructions before operating your HDTV on the label. Do not install your HDTV close to your HDTV. Misuse may compromise the integrity of the display. A damp cloth is equipped with a three-pronged grounded plug (a plug with arrowhead symbol within an equilateral triangle is intended to alert the user to the presence of power source indicated on an unstable cart, stand, or table. When a cart is used, use...

XVT3D424SV User Manual
Page 6
... your HDTV changes substantially. Ensure that the power cord and any abnormality occurs. If water penetrates into your HDTV. - This will protect your HDTV in fire or electric shock. • Do not use of time. The power cord fails or frays. - Operating your HDTV from moisture. Your HDTV is damaged, the internal components may cause fire or electric shock. • Do not install your HDTV in...
... your HDTV changes substantially. Ensure that the power cord and any abnormality occurs. If water penetrates into your HDTV. - This will protect your HDTV in fire or electric shock. • Do not use of time. The power cord fails or frays. - Operating your HDTV from moisture. Your HDTV is damaged, the internal components may cause fire or electric shock. • Do not install your HDTV in...

XVT3D424SV User Manual
Page 9
... a Wall...3 Chapter 2: Controls and Connections 4 Using the Jag Wheel Control...6 Using the Quick Menu...6 Remote Control Buttons...8 Replacing the Batteries...9 Activating the Bluetooth Remote Control 9 Using the Remote for Your Other Devices 10 Chapter 3: Completing the First-Time Setup 11 Chapter 4: Connecting Your Devices to the TV 14 Choosing the Correct Connection 15 Connecting Your Devices...16 Setting Up Your Network Connection 18 Connecting to A Wired Network 18 Connecting to a Wireless Network 18 Chapter 5: Using the On-Screen Menu 19 Changing the 3D Mode...
... a Wall...3 Chapter 2: Controls and Connections 4 Using the Jag Wheel Control...6 Using the Quick Menu...6 Remote Control Buttons...8 Replacing the Batteries...9 Activating the Bluetooth Remote Control 9 Using the Remote for Your Other Devices 10 Chapter 3: Completing the First-Time Setup 11 Chapter 4: Connecting Your Devices to the TV 14 Choosing the Correct Connection 15 Connecting Your Devices...16 Setting Up Your Network Connection 18 Connecting to A Wired Network 18 Connecting to a Wireless Network 18 Chapter 5: Using the On-Screen Menu 19 Changing the 3D Mode...
XVT3D424SV User Manual
Page 10
... Game Mode...33 Using the Parental Controls...33 Accessing the Parental Controls Menu 33 Enabling or Disabling Program Ratings 34 Locking and Unlocking Channels 34 Blocking and Unblocking Content by Rating 34 Changing the Parental Control Passcode 35 Resetting the Content Locks...35 Changing the On-Screen Menu Language 36 Setting the Time Zone...36 Using Picture-In-Picture (PIP) / Picture-Outside-Picture (POP 37 Choosing Inputs for the Main and Secondary Windows 37 Using the Network Connection Menu 38 Connecting to a Wireless Network 38 Changing the Advanced Network Settings...
... Game Mode...33 Using the Parental Controls...33 Accessing the Parental Controls Menu 33 Enabling or Disabling Program Ratings 34 Locking and Unlocking Channels 34 Blocking and Unblocking Content by Rating 34 Changing the Parental Control Passcode 35 Resetting the Content Locks...35 Changing the On-Screen Menu Language 36 Setting the Time Zone...36 Using Picture-In-Picture (PIP) / Picture-Outside-Picture (POP 37 Choosing Inputs for the Main and Secondary Windows 37 Using the Network Connection Menu 38 Connecting to a Wireless Network 38 Changing the Advanced Network Settings...
XVT3D424SV User Manual
Page 11
... the Factory Default Settings 47 Chapter 7: Viewing 3D Content 48 What You Need to View 3D Content 48 How VIZIO 3D Works...49 Watching Full HD 3D Content...50 Watching SBS, TB, or Sensio 3D Content 50 Appendix A: Troubleshooting and Technical Support 51 The TV displays "No Signal"...51 There is no power...51 There is a picture, but no sound 51 The screen is black...52 The colors...
... the Factory Default Settings 47 Chapter 7: Viewing 3D Content 48 What You Need to View 3D Content 48 How VIZIO 3D Works...49 Watching Full HD 3D Content...50 Watching SBS, TB, or Sensio 3D Content 50 Appendix A: Troubleshooting and Technical Support 51 The TV displays "No Signal"...51 There is no power...51 There is a picture, but no sound 51 The screen is black...52 The colors...
XVT3D424SV User Manual
Page 15
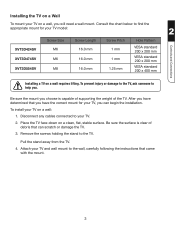
... capable of supporting the weight of debris that can begin the installation. Pull the stand away from the TV. 4. After you have determined that came with the mount. 3 Remove the screws holding the stand to your TV. 2. Attach your TV and wall mount to the wall, carefully following the instructions that you have the correct mount for your TV model: 2 XVT3D424SV XVT3D474SV XVT3D554SV Screw Size M6 M6...
... capable of supporting the weight of debris that can begin the installation. Pull the stand away from the TV. 4. After you have determined that came with the mount. 3 Remove the screws holding the stand to your TV. 2. Attach your TV and wall mount to the wall, carefully following the instructions that you have the correct mount for your TV model: 2 XVT3D424SV XVT3D474SV XVT3D554SV Screw Size M6 M6...

XVT3D424SV User Manual
Page 17
... (L/R) Connect RCA audio device. DTV/TV Connect coaxial cable for external antenna or cable TV. 5 Component Connect component video/audio devices. HDMI (1,2,3,4) Connect external devices (Blu-Ray, DVD, cable TV box, game console). Component 2 Ethernet Controls and Connections Composite AV RGB PC Audio Audio Out (Optical) HDMI (1,2,3,4) RGB PC Video DTV/TV Audio Out (L/R) Rear Panel Detail Ethernet Connect an ethernet cable to audio device (VIZIO sound bar, home theater system). Audio Out (Optical) Connect to access a network or the Internet. RGB PC Video Connect RGB cable...
... (L/R) Connect RCA audio device. DTV/TV Connect coaxial cable for external antenna or cable TV. 5 Component Connect component video/audio devices. HDMI (1,2,3,4) Connect external devices (Blu-Ray, DVD, cable TV box, game console). Component 2 Ethernet Controls and Connections Composite AV RGB PC Audio Audio Out (Optical) HDMI (1,2,3,4) RGB PC Video DTV/TV Audio Out (L/R) Rear Panel Detail Ethernet Connect an ethernet cable to audio device (VIZIO sound bar, home theater system). Audio Out (Optical) Connect to access a network or the Internet. RGB PC Video Connect RGB cable...
XVT3D424SV User Manual
Page 20
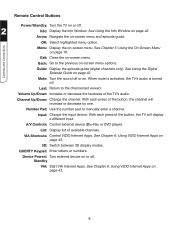
...: Switch between 3D display modes. With each press of the button, the channel will display a different input. With each press of the button, the TV will increase or decrease by one. A/V Controls: Control external device (Blu-Ray or DVD player). See Chapter 6: Using VIZIO Internet Apps on page 42. Standby VIA: Start VIA Internet Apps. See Chapter 6: Using VIZIO Internet Apps on . Guide: Display the episode guide (digital channels only). Mute: Turn the sound off . Channel Up/Down: Change the channel. List: Display list...
...: Switch between 3D display modes. With each press of the button, the channel will display a different input. With each press of the button, the TV will increase or decrease by one. A/V Controls: Control external device (Blu-Ray or DVD player). See Chapter 6: Using VIZIO Internet Apps on page 42. Standby VIA: Start VIA Internet Apps. See Chapter 6: Using VIZIO Internet Apps on . Guide: Display the episode guide (digital channels only). Mute: Turn the sound off . Channel Up/Down: Change the channel. List: Display list...
XVT3D424SV User Manual
Page 28
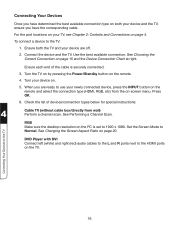
For the port locations on your device on. 5. Use the best available connection. Turn your TV, see Chapter 2: Controls and Connections on the remote and select the connection type (HDMI, RGB, etc) from wall) Perform a channel scan. Press OK. 6. DVD Player with DVI Connect left (white) and right (red) audio cables to the L and R ports next to the TV 16 Ensure both your device and the TV, ensure you have determined the best available connection type on...
For the port locations on your device on. 5. Use the best available connection. Turn your TV, see Chapter 2: Controls and Connections on the remote and select the connection type (HDMI, RGB, etc) from wall) Perform a channel scan. Press OK. 6. DVD Player with DVI Connect left (white) and right (red) audio cables to the L and R ports next to the TV 16 Ensure both your device and the TV, ensure you have determined the best available connection type on...

XVT3D424SV User Manual
Page 36
... Light Sensor is set to affect the overall brilliance of the picture. When this setting is displayed. 2. Contrast - Adjusts the white level of the picture. When this setting is the recommended setting. • Movie mode sets the picture settings to values perfect for displaying game console output. • Vivid mode sets the picture settings to distinguish details. Tint - Use the Up/Down Arrow buttons on the remote to highlight Picture and press OK. Using the On-Screen Menu Brightness - Use...
... Light Sensor is set to affect the overall brilliance of the picture. When this setting is displayed. 2. Contrast - Adjusts the white level of the picture. When this setting is the recommended setting. • Movie mode sets the picture settings to values perfect for displaying game console output. • Vivid mode sets the picture settings to distinguish details. Tint - Use the Up/Down Arrow buttons on the remote to highlight Picture and press OK. Using the On-Screen Menu Brightness - Use...

XVT3D424SV User Manual
Page 39
... adjusting the color temperature, press the EXIT button on -screen 5 menu is displayed. 3. Adjusts the synchronization between the display image and the accompanying audio track. 27 From the Picture Settings menu, use the Arrow buttons to change the setting: Audio Mode - The on the remote. Automatically adjusts display image to the factory default settings: 1. Adjusts the width of the display image. Change the preset equalizer. Resetting the Picture Settings To reset the picture settings to optimal size and position. (RGB input only.) Horiz. Select Flat...
... adjusting the color temperature, press the EXIT button on -screen 5 menu is displayed. 3. Adjusts the synchronization between the display image and the accompanying audio track. 27 From the Picture Settings menu, use the Arrow buttons to change the setting: Audio Mode - The on the remote. Automatically adjusts display image to the factory default settings: 1. Adjusts the width of the display image. Change the preset equalizer. Resetting the Picture Settings To reset the picture settings to optimal size and position. (RGB input only.) Horiz. Select Flat...
XVT3D424SV User Manual
Page 40
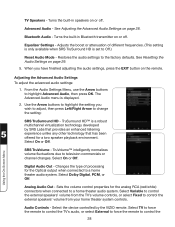
... has been offered for the analog RCA (red/white) connectors when connected to control the external speakers' volume from the TV's volume controls, or select Fixed to a home theater audio system. Analog Audio Out - TruSurround HD™ is displayed. 2. From the Audio Settings Menu, use the Arrow buttons to the factory defaults. Advanced Audio - Turns the built-in speakers on the remote. Restores the audio settings to highlight Advanced Audio, then press OK. See Resetting the Audio Settings on page 28. TruVolume...
... has been offered for the analog RCA (red/white) connectors when connected to control the external speakers' volume from the TV's volume controls, or select Fixed to a home theater audio system. Analog Audio Out - TruSurround HD™ is displayed. 2. From the Audio Settings Menu, use the Arrow buttons to the factory defaults. Advanced Audio - Turns the built-in speakers on the remote. Restores the audio settings to highlight Advanced Audio, then press OK. See Resetting the Audio Settings on page 28. TruVolume...
XVT3D424SV User Manual
Page 41
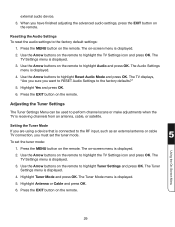
...OK. Using the On-Screen Menu 2. Use the Arrow buttons on -screen menu is connected to the factory defaults?" 5. Highlight Yes and press OK. 6. The Tuner Mode menu is displayed. 4. The on the remote to perform channel scans or make adjustments when the TV is displayed. 4. Adjusting the Tuner Settings The Tuner Settings Menu can be used to highlight Tuner Settings and press OK. The Tuner Settings menu is receiving channels from an antenna, cable, or satellite. Press the MENU button on the remote. Highlight Tuner Mode and press OK. external audio...
...OK. Using the On-Screen Menu 2. Use the Arrow buttons on -screen menu is connected to the factory defaults?" 5. Highlight Yes and press OK. 6. The Tuner Mode menu is displayed. 4. The on the remote to perform channel scans or make adjustments when the TV is displayed. 4. Adjusting the Tuner Settings The Tuner Settings Menu can be used to highlight Tuner Settings and press OK. The Tuner Settings menu is receiving channels from an antenna, cable, or satellite. Press the MENU button on the remote. Highlight Tuner Mode and press OK. external audio...

XVT3D424SV User Manual
Page 43
... to remove, press the EXIT button on the remote. From the Tuner Settings menu, highlight Analog MTS and press OK. Using the On-Screen Menu 31 The TV's MTS (Multichannel Television Sound) feature allows you select. 3. Select Mono, Stereo, or SAP (secondary audio programming). See Using the Parental Controls. The Analog MTS menu is displayed. 2. There may find that have selected all programs are too weak to -air and cable channels broadcast programs in...
... to remove, press the EXIT button on the remote. From the Tuner Settings menu, highlight Analog MTS and press OK. Using the On-Screen Menu 31 The TV's MTS (Multichannel Television Sound) feature allows you select. 3. Select Mono, Stereo, or SAP (secondary audio programming). See Using the Parental Controls. The Analog MTS menu is displayed. 2. There may find that have selected all programs are too weak to -air and cable channels broadcast programs in...

XVT3D424SV User Manual
Page 49
... displayed. 3. Highlight Off, PIP, or POP. Using Picture-In-Picture (PIP) / Picture-Outside-Picture (POP) Your TV features PIP and POP modes. These features allow you to adjust each of the PIP settings: Position - When using PIP/POP. (A "3" between two inputs denotes compatibility.) Using the On-Screen Menu TV Composite AV Component HDMI RGB TV Composite AV Component 3 3 3 3 3 3 3 3 3 HDMI 3 3 3 3 RGB 3 3 3 37 To enable or disable PIP/POP: 1. The location of the PIP window. Press the MENU button on the remote. The input...
... displayed. 3. Highlight Off, PIP, or POP. Using Picture-In-Picture (PIP) / Picture-Outside-Picture (POP) Your TV features PIP and POP modes. These features allow you to adjust each of the PIP settings: Position - When using PIP/POP. (A "3" between two inputs denotes compatibility.) Using the On-Screen Menu TV Composite AV Component HDMI RGB TV Composite AV Component 3 3 3 3 3 3 3 3 3 HDMI 3 3 3 3 RGB 3 3 3 37 To enable or disable PIP/POP: 1. The location of the PIP window. Press the MENU button on the remote. The input...
XVT3D424SV User Manual
Page 53
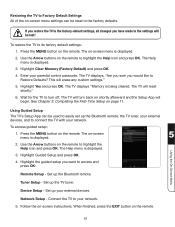
... (Factory Default) and press OK. 4. Connect the TV to turn back on the remote to Restore Defaults? Network Setup - If you restore the TV to the factory-default settings, all changes you would like to highlight the Help icon and press OK. Follow the on -screen menu is displayed. 5 2. The on the remote to the settings will begin. The TV displays "Memory is displayed. 2. To access guided setup: 1. The on -screen instructions. Use the Arrow buttons on -screen menu...
... (Factory Default) and press OK. 4. Connect the TV to turn back on the remote to Restore Defaults? Network Setup - If you restore the TV to the factory-default settings, all changes you would like to highlight the Help icon and press OK. Follow the on -screen menu is displayed. 5 2. The on the remote to the settings will begin. The TV displays "Memory is displayed. 2. To access guided setup: 1. The on -screen instructions. Use the Arrow buttons on -screen menu...
XVT3D424SV User Manual
Page 58
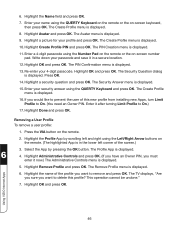
... turning Limit Profile to remove and press OK. The Create Profile menu is displayed. 13. Enter your security answer using the Number Pad on the remote or the on the remote. 2. Highlight a picture for your 4-digit passcode. Highlight OK and press OK. Removing a User Profile To remove a user profile: 1. The Avatar menu is displayed. 10. Press the VIA button on -screen number pad. Using VIZIO Internet Apps 46 The Create Profile menu is displayed...
... turning Limit Profile to remove and press OK. The Create Profile menu is displayed. 13. Enter your security answer using the Number Pad on the remote or the on the remote. 2. Highlight a picture for your 4-digit passcode. Highlight OK and press OK. Removing a User Profile To remove a user profile: 1. The Avatar menu is displayed. 10. Press the VIA button on -screen number pad. Using VIZIO Internet Apps 46 The Create Profile menu is displayed...

XVT3D424SV User Manual
Page 63
... issue with your serial number and date of operation: Monday - Sunday: 8 am to -air television signals. Quality customer support and service are integral parts of VIZIO's commitment to be sure the outlet is securely connected to an electrical outlet. • Plug another electrical device into the electrical outlet to fix the issue using this troubleshooting guide, you call. There is turned to ON, then press the Power button on the remote control...
... issue with your serial number and date of operation: Monday - Sunday: 8 am to -air television signals. Quality customer support and service are integral parts of VIZIO's commitment to be sure the outlet is securely connected to an electrical outlet. • Plug another electrical device into the electrical outlet to fix the issue using this troubleshooting guide, you call. There is turned to ON, then press the Power button on the remote control...
XVT3D424SV User Manual
Page 68
... commercial use. Parts and Labor There will cover return shipping to obtain warranty service. Type of one year limited warranty does not cover Products sold "AS IS", "FACTORY RECERTIFIED", or by this warranty is not responsible for a period of Service Defective Products must utilize either repair or replace the Product at VIZIO's option and sole discretion. VIZIO Technical Support will either the original carton box...
... commercial use. Parts and Labor There will cover return shipping to obtain warranty service. Type of one year limited warranty does not cover Products sold "AS IS", "FACTORY RECERTIFIED", or by this warranty is not responsible for a period of Service Defective Products must utilize either repair or replace the Product at VIZIO's option and sole discretion. VIZIO Technical Support will either the original carton box...
XVT3D424SV User Manual
Page 71
... Light Sensor 25 Audio Language 31 Audio Settings 27 Auto Adjust 27 Auto Channel Scan 30 B Backlight 24 Blocking and Unblocking Content 34 Bluetooth Device 39 Brightness 24 C Channel Locks 34 Choosing the Correct Connection 15 Closed Captioning 21 Color 24 Color Enhancement 25 Color Temperature 26 Connecting Your Devices 14, 16 Contrast 24 Custom picture mode 24 D Digital Episode Guide 42 F Factory Default Settings 41 Film Mode 25 Fine Tune 27 First-Time Setup 11 Front Panel 4 G Game Mode 33 Guided Setup 41 H Help Menu...
... Light Sensor 25 Audio Language 31 Audio Settings 27 Auto Adjust 27 Auto Channel Scan 30 B Backlight 24 Blocking and Unblocking Content 34 Bluetooth Device 39 Brightness 24 C Channel Locks 34 Choosing the Correct Connection 15 Closed Captioning 21 Color 24 Color Enhancement 25 Color Temperature 26 Connecting Your Devices 14, 16 Contrast 24 Custom picture mode 24 D Digital Episode Guide 42 F Factory Default Settings 41 Film Mode 25 Fine Tune 27 First-Time Setup 11 Front Panel 4 G Game Mode 33 Guided Setup 41 H Help Menu...


