
Quickstart Guide (English)
Page 2
Do not use a liquid or a spray cleaner on the power cord may result in the back and bottom of the cabinet are provided for your safety. Wait before turning on the top of time with doors and windows closed. Doing so could short circuit parts causing a fire or electric shock. Do not try to electrical earth. To prevent a fire or shock hazard, do not place any objects on your Unit to avoid causing fire, electric shock, or component damage. • Slots and openings in fire or electric shock. • Do not use , and maintenance. To totally disconnect power, unplug ...
Do not use a liquid or a spray cleaner on the power cord may result in the back and bottom of the cabinet are provided for your safety. Wait before turning on the top of time with doors and windows closed. Doing so could short circuit parts causing a fire or electric shock. Do not try to electrical earth. To prevent a fire or shock hazard, do not place any objects on your Unit to avoid causing fire, electric shock, or component damage. • Slots and openings in fire or electric shock. • Do not use , and maintenance. To totally disconnect power, unplug ...
Quickstart Guide (English)
Page 3
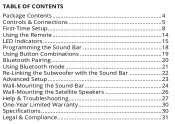
TABLE OF CONTENTS Package Contents 4 Controls & Connections 5 First-Time Setup 8 Using the Remote 14 LED Indicators 15 Programming the Sound Bar 18 Using Button Combinations 19 Bluetooth Pairing 20 Using Bluetooth mode 21 Re-Linking the Subwoofer with the Sound Bar 22 Advanced Setup 23 Wall-Mounting the Sound Bar 24 Wall-Mounting the Satellite Speakers 26 Help & Troubleshooting 27 One-Year Limited Warranty 30 Specifications 30 Legal & Compliance 31
TABLE OF CONTENTS Package Contents 4 Controls & Connections 5 First-Time Setup 8 Using the Remote 14 LED Indicators 15 Programming the Sound Bar 18 Using Button Combinations 19 Bluetooth Pairing 20 Using Bluetooth mode 21 Re-Linking the Subwoofer with the Sound Bar 22 Advanced Setup 23 Wall-Mounting the Sound Bar 24 Wall-Mounting the Satellite Speakers 26 Help & Troubleshooting 27 One-Year Limited Warranty 30 Specifications 30 Legal & Compliance 31
Quickstart Guide (English)
Page 4
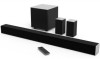
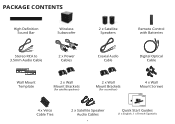
PACKAGE CONTENTS High Definition Sound Bar Wireless Subwoofer 2 x Satellite Speakers Remote Control with Batteries Stereo RCA to 3.5mm Audio Cable 2 x Power Cables Coaxial Audio Cable Digital Optical Cable Wall Mount Template 2 x Wall Mount Brackets (For satellite speakers) 2 x Wall Mount Brackets (For sound bar) 4 x Wall Mount Screws 4 x Velco Cable Ties 2 x Satellite Speaker Audio Cables 4 Quick Start Guides (1 x English, 1 x French-Spanish)
PACKAGE CONTENTS High Definition Sound Bar Wireless Subwoofer 2 x Satellite Speakers Remote Control with Batteries Stereo RCA to 3.5mm Audio Cable 2 x Power Cables Coaxial Audio Cable Digital Optical Cable Wall Mount Template 2 x Wall Mount Brackets (For satellite speakers) 2 x Wall Mount Brackets (For sound bar) 4 x Wall Mount Screws 4 x Velco Cable Ties 2 x Satellite Speaker Audio Cables 4 Quick Start Guides (1 x English, 1 x French-Spanish)
Quickstart Guide (English)
Page 5
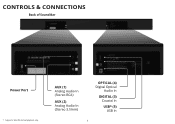
AUX (1) Analog Audio In (Stereo RCA) AUX (2) Analog Audio In (Stereo 3.5mm) OPTICAL (4) Digital Optical Audio In DIGITAL (3) Coaxial In USB* (5) USB In 5 CONTROLS & CONNECTIONS Back of Sound Bar Power Port * Supports .WAV file format playback only.
AUX (1) Analog Audio In (Stereo RCA) AUX (2) Analog Audio In (Stereo 3.5mm) OPTICAL (4) Digital Optical Audio In DIGITAL (3) Coaxial In USB* (5) USB In 5 CONTROLS & CONNECTIONS Back of Sound Bar Power Port * Supports .WAV file format playback only.
Quickstart Guide (English)
Page 6
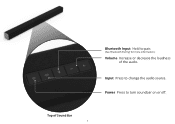
Input Press to turn soundbar on or off. Power Press to change the audio source. Top of the audio. Bluetooth Input Hold to pair. (See 'Bluetooth Pairing' for more information.) Volume Increase or decrease the loudness of Sound Bar 6
Input Press to turn soundbar on or off. Power Press to change the audio source. Top of the audio. Bluetooth Input Hold to pair. (See 'Bluetooth Pairing' for more information.) Volume Increase or decrease the loudness of Sound Bar 6

Quickstart Guide (English)
Page 7
Back of Subwoofer Back of Satellite Speaker Power Switch Power Port Satellite Speaker Ports (Connects to Satellite Speakers) Pairing Button LED Indicator 7 Satellite Speaker Port (Connects to Subwoofer)
Back of Subwoofer Back of Satellite Speaker Power Switch Power Port Satellite Speaker Ports (Connects to Satellite Speakers) Pairing Button LED Indicator 7 Satellite Speaker Port (Connects to Subwoofer)
Quickstart Guide (English)
Page 8
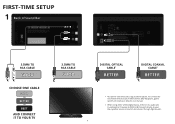
To connect the Sound Bar directly to your Blu-ray/other source, some TVs do not pass through digital audio. 8 FIRST-TIME SETUP 1 Back of the Digital Inputs, if there is no audio: (A) try setting the TV output to PCM or (B) Connect directly to your other devices (Blu-Ray player, game system, etc.) see your device's user manual. † When using either of Sound Bar 3.5MM TO RCA CABLE GOOD CHOOSE ONE CABLE GOOD OR BETTER OR BEST AND CONNECT IT TO YOUR TV 3.5MM TO RCA CABLE GOOD DIGITAL OPTICAL CABLE† BETTER DIGITAL COAXIAL CABLE† BETTER * Not all TVs have the audio ...
To connect the Sound Bar directly to your Blu-ray/other source, some TVs do not pass through digital audio. 8 FIRST-TIME SETUP 1 Back of the Digital Inputs, if there is no audio: (A) try setting the TV output to PCM or (B) Connect directly to your other devices (Blu-Ray player, game system, etc.) see your device's user manual. † When using either of Sound Bar 3.5MM TO RCA CABLE GOOD CHOOSE ONE CABLE GOOD OR BETTER OR BEST AND CONNECT IT TO YOUR TV 3.5MM TO RCA CABLE GOOD DIGITAL OPTICAL CABLE† BETTER DIGITAL COAXIAL CABLE† BETTER * Not all TVs have the audio ...
Quickstart Guide (English)
Page 9
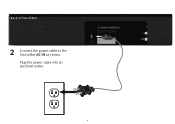
Plug the power cable into an electrical outlet. 9 Back of Sound Bar 2 Connect the power cable to the Sound Bar AC IN as shown.
Plug the power cable into an electrical outlet. 9 Back of Sound Bar 2 Connect the power cable to the Sound Bar AC IN as shown.
Quickstart Guide (English)
Page 10
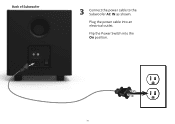
Flip the Power Switch into an electrical outlet. Plug the power cable into the On position. 10 Back of Subwoofer 3 Connect the power cable to the Subwoofer AC IN as shown.
Flip the Power Switch into an electrical outlet. Plug the power cable into the On position. 10 Back of Subwoofer 3 Connect the power cable to the Subwoofer AC IN as shown.
Quickstart Guide (English)
Page 11
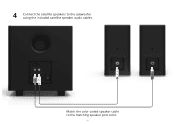
Match the color coded speaker cable to the subwoofer using the included satellite speaker audio cables. 4 Connect the satellite speakers to the matching speaker port color. 11
Match the color coded speaker cable to the subwoofer using the included satellite speaker audio cables. 4 Connect the satellite speakers to the matching speaker port color. 11
Quickstart Guide (English)
Page 12
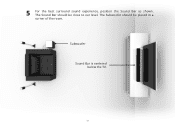
5 For the best surround sound experience, position the Sound Bar as shown. The Sound Bar should be close to ear level. The Subwoofer should be placed in a corner of the room. Subwoofer Sound Bar is centered below the TV. 12
5 For the best surround sound experience, position the Sound Bar as shown. The Sound Bar should be close to ear level. The Subwoofer should be placed in a corner of the room. Subwoofer Sound Bar is centered below the TV. 12
Quickstart Guide (English)
Page 13
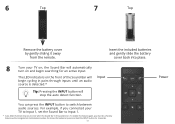
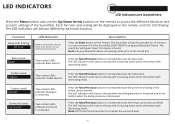
The LED indicators on and begin cycling in pairs through inputs until an audio source is first powered on. 6 Top 7 Top Remove the battery cover by gently sliding it away from the remote. Power You can press the INPUT button to Input 1. * Auto detect function only occurs once when the Sound Bar is detected.* Input Tip: Pressing the INPUT button will stop the auto detect function. To enable this feature again, you connected your TV on, the Sound Bar will automatically turn on the front of the Sound Bar will begin searching for 3 seconds. 13 Insert the included ...
The LED indicators on and begin cycling in pairs through inputs until an audio source is first powered on. 6 Top 7 Top Remove the battery cover by gently sliding it away from the remote. Power You can press the INPUT button to Input 1. * Auto detect function only occurs once when the Sound Bar is detected.* Input Tip: Pressing the INPUT button will stop the auto detect function. To enable this feature again, you connected your TV on, the Sound Bar will automatically turn on the front of the Sound Bar will begin searching for 3 seconds. 13 Insert the included ...
Quickstart Guide (English)
Page 14
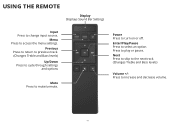
Menu Press to select an option. Enter/Play/Pause Press to access the menu settings. Press to increase and decrease volume. 14 Next Press to skip to the next track. (Changes Treble and Bass levels) Volume +/Press to play or pause. Power Press to mute/unmute. Previous Press to return to previous track. (Changes Treble and Bass levels) Up/Down Press to cycle through settings and options Mute Press to turn on or off. USING THE REMOTE Display Displays Sound Bar Settings Input Press to change input source.
Menu Press to select an option. Enter/Play/Pause Press to access the menu settings. Press to increase and decrease volume. 14 Next Press to skip to the next track. (Changes Treble and Bass levels) Volume +/Press to play or pause. Power Press to mute/unmute. Previous Press to return to previous track. (Changes Treble and Bass levels) Up/Down Press to cycle through settings and options Mute Press to turn on or off. USING THE REMOTE Display Displays Sound Bar Settings Input Press to change input source.
Quickstart Guide (English)
Page 15
... indicate Bass level 0. The Sound Bar will be displayed on the remote to Top and back continuously. You can now search for the Sound Bar (VIZIO SB4051) using your Bluetooth device into pairing mode prior to the bottom with increasing levels and to the Sound Bar. Note: Set your Bluetooth Device...
... indicate Bass level 0. The Sound Bar will be displayed on the remote to Top and back continuously. You can now search for the Sound Bar (VIZIO SB4051) using your Bluetooth device into pairing mode prior to the bottom with increasing levels and to the Sound Bar. Note: Set your Bluetooth Device...
Quickstart Guide (English)
Page 16
Subwoofer Levels Subwoofer Two center LEDs indicate Subwoofer level 0. Press the Next/Previous button to increase/decrease the amount of the subwoofer. Press the Next/Previous button to increase/decrease the level of audio delay. The LED indicators will move to the left. The LED indicators will move to the top with balance levels to the right and down with balance levels to the top with increasing levels and to increase/decrease the surround balance level on each side. When disabled (Off), all inputs will lower bass frequency levels to enable/disable Night Mode. When ...
Subwoofer Levels Subwoofer Two center LEDs indicate Subwoofer level 0. Press the Next/Previous button to increase/decrease the amount of the subwoofer. Press the Next/Previous button to increase/decrease the level of audio delay. The LED indicators will move to the left. The LED indicators will move to the top with balance levels to the right and down with balance levels to the top with increasing levels and to increase/decrease the surround balance level on each side. When disabled (Off), all inputs will lower bass frequency levels to enable/disable Night Mode. When ...
Quickstart Guide (English)
Page 17
... Next/Previous button to enable/disable Eco Power Mode. Press the Next/Previous button to enable/disable VIZIO TV Remotes. See the Program Remote section for more information. When enabled (On), you can use a VIZIO TV remote control to select and reset your Sound Bar. Function TV Remote VZtv Rmt On Eco...
... Next/Previous button to enable/disable Eco Power Mode. Press the Next/Previous button to enable/disable VIZIO TV Remotes. See the Program Remote section for more information. When enabled (On), you can use a VIZIO TV remote control to select and reset your Sound Bar. Function TV Remote VZtv Rmt On Eco...
Quickstart Guide (English)
Page 18
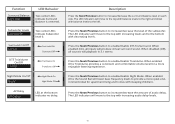
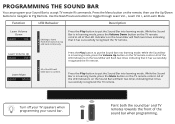
Function LED Behavior Description Learn Volume Down Learn Vol- (Waiting to learn) Flash from bottom to confirm. Learn Volume Up Learn Vol+ Press the Play button to put the Sound Bar into learning mode. While the Sound Bar is in learning mode, press the Mute button on the TV remote control. While the Sound Bar is in learning mode, press the Volume Down button on the remote, then use the Up/Down buttons to navigate to toggle through Learn Vol -, Learn Vol +, and Learn Mute. While the Sound Bar is in learning mode, press the Volume Up button on the Sound Bar will blink ...
Function LED Behavior Description Learn Volume Down Learn Vol- (Waiting to learn) Flash from bottom to confirm. Learn Volume Up Learn Vol+ Press the Play button to put the Sound Bar into learning mode. While the Sound Bar is in learning mode, press the Mute button on the TV remote control. While the Sound Bar is in learning mode, press the Volume Down button on the remote, then use the Up/Down buttons to navigate to toggle through Learn Vol -, Learn Vol +, and Learn Mute. While the Sound Bar is in learning mode, press the Volume Up button on the Sound Bar will blink ...

Quickstart Guide (English)
Page 19
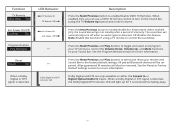
... power down after a period of inactivity. Note: This will remain powered on and adjust the volume of a VIZIO TV remote control to the factory default settings. VIZIO TV Remote Control Enable VIZIO TV Remote Disable VIZIO TV Remote Energy Star Enable Energy Star Disable Energy Star Enable/disable the use of the sound bar...
... power down after a period of inactivity. Note: This will remain powered on and adjust the volume of a VIZIO TV remote control to the factory default settings. VIZIO TV Remote Control Enable VIZIO TV Remote Disable VIZIO TV Remote Energy Star Enable Energy Star Disable Energy Star Enable/disable the use of the sound bar...
Quickstart Guide (English)
Page 20
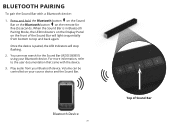
... Bluetooth button on the Sound Bar or the Bluetooth button on your Bluetooth device. You can be controlled on the remote for the Sound Bar (VIZIO SB3851) using your source device and the Sound Bar. BLUETOOTH PAIRING To pair the Sound Bar with the device. 3. For more information, refer to top and...
... Bluetooth button on the Sound Bar or the Bluetooth button on your Bluetooth device. You can be controlled on the remote for the Sound Bar (VIZIO SB3851) using your source device and the Sound Bar. BLUETOOTH PAIRING To pair the Sound Bar with the device. 3. For more information, refer to top and...
Quickstart Guide (English)
Page 21
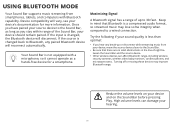
If the input is less than optimal: • If you hear any paired Bluetooth device will reconnect automatically. Your Sound Bar is a compressed audio format, so streamed music may improve Bluetooth range. If the source is changed , the Bluetooth device will vary, see your device's documentation for a smartphone. Try the following if your sound quality is changed back to Bluetooth, any break-up to 30 feet. Maximizing Signal A Bluetooth signal has a range of -sight between the Sound Bar and the source device. • Other wireless devices can damage your hearing. 21 Turning off or...
If the input is less than optimal: • If you hear any paired Bluetooth device will reconnect automatically. Your Sound Bar is a compressed audio format, so streamed music may improve Bluetooth range. If the source is changed , the Bluetooth device will vary, see your device's documentation for a smartphone. Try the following if your sound quality is changed back to Bluetooth, any break-up to 30 feet. Maximizing Signal A Bluetooth signal has a range of -sight between the Sound Bar and the source device. • Other wireless devices can damage your hearing. 21 Turning off or...