Quickstart Guide (English)
Page 3
TABLE OF CONTENTS Package Contents 4 Controls & Connections 5 First-Time Setup 8 Using the Remote 14 LED Indicators 15 Programming the Sound Bar 18 Using Button Combinations 19 Bluetooth Pairing 20 Using Bluetooth mode 21 Re-Linking the Subwoofer with the Sound Bar 22 Advanced Setup 23 Wall-Mounting the Sound Bar 24 Wall-Mounting the Satellite Speakers 26 Help & Troubleshooting 27 One-Year Limited Warranty 30 Specifications 30 Legal & Compliance 31
TABLE OF CONTENTS Package Contents 4 Controls & Connections 5 First-Time Setup 8 Using the Remote 14 LED Indicators 15 Programming the Sound Bar 18 Using Button Combinations 19 Bluetooth Pairing 20 Using Bluetooth mode 21 Re-Linking the Subwoofer with the Sound Bar 22 Advanced Setup 23 Wall-Mounting the Sound Bar 24 Wall-Mounting the Satellite Speakers 26 Help & Troubleshooting 27 One-Year Limited Warranty 30 Specifications 30 Legal & Compliance 31
Quickstart Guide (English)
Page 4
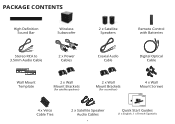
PACKAGE CONTENTS High Definition Sound Bar Wireless Subwoofer 2 x Satellite Speakers Remote Control with Batteries Stereo RCA to 3.5mm Audio Cable 2 x Power Cables Coaxial Audio Cable Digital Optical Cable Wall Mount Template 2 x Wall Mount Brackets (For satellite speakers) 2 x Wall Mount Brackets (For sound bar) 4 x Wall Mount Screws 4 x Velco Cable Ties 2 x Satellite Speaker Audio Cables 4 Quick Start Guides (1 x English, 1 x French-Spanish)
PACKAGE CONTENTS High Definition Sound Bar Wireless Subwoofer 2 x Satellite Speakers Remote Control with Batteries Stereo RCA to 3.5mm Audio Cable 2 x Power Cables Coaxial Audio Cable Digital Optical Cable Wall Mount Template 2 x Wall Mount Brackets (For satellite speakers) 2 x Wall Mount Brackets (For sound bar) 4 x Wall Mount Screws 4 x Velco Cable Ties 2 x Satellite Speaker Audio Cables 4 Quick Start Guides (1 x English, 1 x French-Spanish)

Quickstart Guide (English)
Page 7
Back of Subwoofer Back of Satellite Speaker Power Switch Power Port Satellite Speaker Ports (Connects to Satellite Speakers) Pairing Button LED Indicator 7 Satellite Speaker Port (Connects to Subwoofer)
Back of Subwoofer Back of Satellite Speaker Power Switch Power Port Satellite Speaker Ports (Connects to Satellite Speakers) Pairing Button LED Indicator 7 Satellite Speaker Port (Connects to Subwoofer)
Quickstart Guide (English)
Page 10
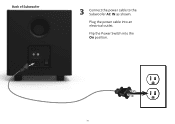
Flip the Power Switch into an electrical outlet. Plug the power cable into the On position. 10 Back of Subwoofer 3 Connect the power cable to the Subwoofer AC IN as shown.
Flip the Power Switch into an electrical outlet. Plug the power cable into the On position. 10 Back of Subwoofer 3 Connect the power cable to the Subwoofer AC IN as shown.
Quickstart Guide (English)
Page 11
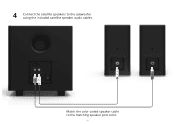
Match the color coded speaker cable to the subwoofer using the included satellite speaker audio cables. 4 Connect the satellite speakers to the matching speaker port color. 11
Match the color coded speaker cable to the subwoofer using the included satellite speaker audio cables. 4 Connect the satellite speakers to the matching speaker port color. 11
Quickstart Guide (English)
Page 12
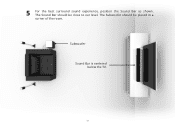
Subwoofer Sound Bar is centered below the TV. 12 5 For the best surround sound experience, position the Sound Bar as shown. The Subwoofer should be placed in a corner of the room. The Sound Bar should be close to ear level.
Subwoofer Sound Bar is centered below the TV. 12 5 For the best surround sound experience, position the Sound Bar as shown. The Subwoofer should be placed in a corner of the room. The Sound Bar should be close to ear level.
Quickstart Guide (English)
Page 16
...increasing audio delay levels. 16 The LED indicators will move to the top with increasing levels and to the left. Subwoofer Levels Subwoofer Two center LEDs indicate Subwoofer level 0. Description Press the Next/Previous button to increase/decrease the level of audio delay. Press the Next/Previous ...When enabled (On), all sources will produce virtual surround sound. Press the Next/Previous button to increase/decrease the amount of the subwoofer. Surround On/Off Surnd Surround On Surround Off DTS TruVolume On/Off TruVol TruVolume On TruVolume Off Night Mode On/Off Night Night...
...increasing audio delay levels. 16 The LED indicators will move to the top with increasing levels and to the left. Subwoofer Levels Subwoofer Two center LEDs indicate Subwoofer level 0. Description Press the Next/Previous button to increase/decrease the level of audio delay. Press the Next/Previous ...When enabled (On), all sources will produce virtual surround sound. Press the Next/Previous button to increase/decrease the amount of the subwoofer. Surround On/Off Surnd Surround On Surround Off DTS TruVolume On/Off TruVol TruVolume On TruVolume Off Night Mode On/Off Night Night...
Quickstart Guide (English)
Page 22
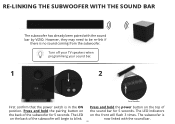
... on the back of Sound Bar First confirm that the power switch is in the ON position. The subwoofer is no sound coming from the subwoofer. The LED indicators on the top of the subwoofer for 5 seconds. Press and hold the power button on the front will begin to be re-link if... there is now linked with the sound bar by VIZIO. RE-LINKING THE SUBWOOFER WITH THE SOUND BAR The subwoofer has already been paired with the sound bar. 22 The LED on the back of the sound bar for 5 seconds. However...
... on the back of Sound Bar First confirm that the power switch is in the ON position. The subwoofer is no sound coming from the subwoofer. The LED indicators on the top of the subwoofer for 5 seconds. Press and hold the power button on the front will begin to be re-link if... there is now linked with the sound bar by VIZIO. RE-LINKING THE SUBWOOFER WITH THE SOUND BAR The subwoofer has already been paired with the sound bar. 22 The LED on the back of the sound bar for 5 seconds. However...
Quickstart Guide (English)
Page 30
... SHALL IN NO EVENT EXCEED THE PURCHASE PRICE OF THE PRODUCT. PRE-AUTHORIZATION IS REQUIRED BEFORE SENDING ANY PRODUCT TO A VIZIO SERVICE CENTER FOR WARRANTY SERVICE. SPECIFICATIONS Sound Bar: Subwoofer: Inputs: Two 2¾" Full-Range Drivers (Left & Right) One 2¾" Full-Range Driver (Center) One 5"... of protection. ONE-YEAR LIMITED WARRANTY ON PARTS AND LABOR Covers units purchased as new in United States and Puerto Rico Only VIZIO provides a warranty to the original purchaser of a new Product against defects in materials and workmanship for example: cosmetic damage, normal...
... SHALL IN NO EVENT EXCEED THE PURCHASE PRICE OF THE PRODUCT. PRE-AUTHORIZATION IS REQUIRED BEFORE SENDING ANY PRODUCT TO A VIZIO SERVICE CENTER FOR WARRANTY SERVICE. SPECIFICATIONS Sound Bar: Subwoofer: Inputs: Two 2¾" Full-Range Drivers (Left & Right) One 2¾" Full-Range Driver (Center) One 5"... of protection. ONE-YEAR LIMITED WARRANTY ON PARTS AND LABOR Covers units purchased as new in United States and Puerto Rico Only VIZIO provides a warranty to the original purchaser of a new Product against defects in materials and workmanship for example: cosmetic damage, normal...


