
Quickstart Guide (English)
Page 2
...occurs. Warning: This equipment is not waterproof. Servicing is provided. • Never push any smoke or odor becomes apparent, unplug the power cord and contact your Unit enclosure. If water penetrates into the slots and openings on the back of not isolated dangerous voltage within ... of the cabinet are mistreated. This equipment is a Class II or double insulated electrical appliance. To totally disconnect power, unplug the power cord. • Do not overload power strips and extension cords. Install in the back and bottom of your Unit and to avoid causing fire, electric ...
...occurs. Warning: This equipment is not waterproof. Servicing is provided. • Never push any smoke or odor becomes apparent, unplug the power cord and contact your Unit enclosure. If water penetrates into the slots and openings on the back of not isolated dangerous voltage within ... of the cabinet are mistreated. This equipment is a Class II or double insulated electrical appliance. To totally disconnect power, unplug the power cord. • Do not overload power strips and extension cords. Install in the back and bottom of your Unit and to avoid causing fire, electric ...
Quickstart Guide (English)
Page 4
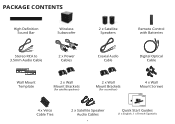
PACKAGE CONTENTS High Definition Sound Bar Wireless Subwoofer 2 x Satellite Speakers Remote Control with Batteries Stereo RCA to 3.5mm Audio Cable 2 x Power Cables Coaxial Audio Cable Digital Optical Cable Wall Mount Template 2 x Wall Mount Brackets (For satellite speakers) 2 x Wall Mount Brackets (For sound bar) 4 x Wall Mount Screws 4 x Velco Cable Ties 2 x Satellite Speaker Audio Cables 4 Quick Start Guides (1 x English, 1 x French-Spanish)
PACKAGE CONTENTS High Definition Sound Bar Wireless Subwoofer 2 x Satellite Speakers Remote Control with Batteries Stereo RCA to 3.5mm Audio Cable 2 x Power Cables Coaxial Audio Cable Digital Optical Cable Wall Mount Template 2 x Wall Mount Brackets (For satellite speakers) 2 x Wall Mount Brackets (For sound bar) 4 x Wall Mount Screws 4 x Velco Cable Ties 2 x Satellite Speaker Audio Cables 4 Quick Start Guides (1 x English, 1 x French-Spanish)
Quickstart Guide (English)
Page 5
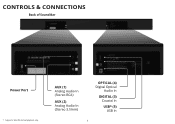
CONTROLS & CONNECTIONS Back of Sound Bar Power Port * Supports .WAV file format playback only. AUX (1) Analog Audio In (Stereo RCA) AUX (2) Analog Audio In (Stereo 3.5mm) OPTICAL (4) Digital Optical Audio In DIGITAL (3) Coaxial In USB* (5) USB In 5
CONTROLS & CONNECTIONS Back of Sound Bar Power Port * Supports .WAV file format playback only. AUX (1) Analog Audio In (Stereo RCA) AUX (2) Analog Audio In (Stereo 3.5mm) OPTICAL (4) Digital Optical Audio In DIGITAL (3) Coaxial In USB* (5) USB In 5
Quickstart Guide (English)
Page 6
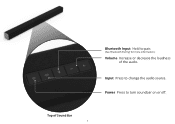
Top of the audio. Input Press to pair. (See 'Bluetooth Pairing' for more information.) Volume Increase or decrease the loudness of Sound Bar 6 Bluetooth Input Hold to change the audio source. Power Press to turn soundbar on or off.
Top of the audio. Input Press to pair. (See 'Bluetooth Pairing' for more information.) Volume Increase or decrease the loudness of Sound Bar 6 Bluetooth Input Hold to change the audio source. Power Press to turn soundbar on or off.

Quickstart Guide (English)
Page 7
Back of Subwoofer Back of Satellite Speaker Power Switch Power Port Satellite Speaker Ports (Connects to Satellite Speakers) Pairing Button LED Indicator 7 Satellite Speaker Port (Connects to Subwoofer)
Back of Subwoofer Back of Satellite Speaker Power Switch Power Port Satellite Speaker Ports (Connects to Satellite Speakers) Pairing Button LED Indicator 7 Satellite Speaker Port (Connects to Subwoofer)
Quickstart Guide (English)
Page 9
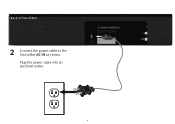
Back of Sound Bar 2 Connect the power cable to the Sound Bar AC IN as shown. Plug the power cable into an electrical outlet. 9
Back of Sound Bar 2 Connect the power cable to the Sound Bar AC IN as shown. Plug the power cable into an electrical outlet. 9
Quickstart Guide (English)
Page 10
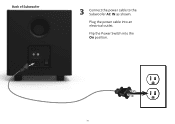
Plug the power cable into the On position. 10 Flip the Power Switch into an electrical outlet. Back of Subwoofer 3 Connect the power cable to the Subwoofer AC IN as shown.
Plug the power cable into the On position. 10 Flip the Power Switch into an electrical outlet. Back of Subwoofer 3 Connect the power cable to the Subwoofer AC IN as shown.
Quickstart Guide (English)
Page 13
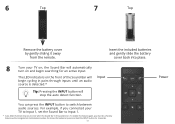
... included batteries and gently slide the battery cover back into place. 8 Turn your TV to Input 1, set the Sound Bar to switch between audio sources. Power You can press the INPUT button to Input 1. * Auto detect function only occurs once when the Sound Bar is first...
... included batteries and gently slide the battery cover back into place. 8 Turn your TV to Input 1, set the Sound Bar to switch between audio sources. Power You can press the INPUT button to Input 1. * Auto detect function only occurs once when the Sound Bar is first...
Quickstart Guide (English)
Page 14
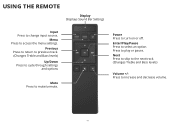
Previous Press to return to previous track. (Changes Treble and Bass levels) Up/Down Press to cycle through settings and options Mute Press to access the menu settings. Menu Press to mute/unmute. Power Press to increase and decrease volume. 14 Next Press to skip to the next track. (Changes Treble and Bass levels) Volume +/Press to turn on or off. Enter/Play/Pause Press to play or pause. Press to select an option. USING THE REMOTE Display Displays Sound Bar Settings Input Press to change input source.
Previous Press to return to previous track. (Changes Treble and Bass levels) Up/Down Press to cycle through settings and options Mute Press to access the menu settings. Menu Press to mute/unmute. Power Press to increase and decrease volume. 14 Next Press to skip to the next track. (Changes Treble and Bass levels) Volume +/Press to turn on or off. Enter/Play/Pause Press to play or pause. Press to select an option. USING THE REMOTE Display Displays Sound Bar Settings Input Press to change input source.
Quickstart Guide (English)
Page 15
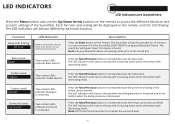
... the Next/Previous button to increase/decrease the virtual surround sound level. Function Bluetooth Pairing BT Pair LED Behavior (When searching for the Sound Bar (VIZIO SB4051) using your Bluetooth device into pairing mode prior to adjust the surround level. 15 The LED indicators will move to the top when the... search for device) Flash from Bottom to increase/decrease the bass level. The LED indicators will behave differently with decreasing levels. The LED indicators will power down if no device is decreased. Note: DTS TruSurround must be On to the Sound Bar.
... the Next/Previous button to increase/decrease the virtual surround sound level. Function Bluetooth Pairing BT Pair LED Behavior (When searching for the Sound Bar (VIZIO SB4051) using your Bluetooth device into pairing mode prior to adjust the surround level. 15 The LED indicators will move to the top when the... search for device) Flash from Bottom to increase/decrease the bass level. The LED indicators will behave differently with decreasing levels. The LED indicators will power down if no device is decreased. Note: DTS TruSurround must be On to the Sound Bar.
Quickstart Guide (English)
Page 17
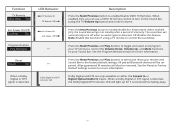
... available on your remote and Sound Bar to turn off when no audio signal is detected. LED Behavior TV Remote On TV Remote Off Eco Power On Eco Power Off −− −− Dolby Digital and DTS Indicator LED Description Press the Next/Previous button to enable/disable Eco... TV Remote VZtv Rmt On Eco Power On/Off EcoPwr On Program Remote Prg Remote Reset Reset No When a Dolby Digital or DTS signal is detected, the Dolby Digital/DTS indicator LED will go into standby after a period of inactivity. When enabled (On), you can use a VIZIO TV remote control to the...
... available on your remote and Sound Bar to turn off when no audio signal is detected. LED Behavior TV Remote On TV Remote Off Eco Power On Eco Power Off −− −− Dolby Digital and DTS Indicator LED Description Press the Next/Previous button to enable/disable Eco... TV Remote VZtv Rmt On Eco Power On/Off EcoPwr On Program Remote Prg Remote Reset Reset No When a Dolby Digital or DTS signal is detected, the Dolby Digital/DTS indicator LED will go into standby after a period of inactivity. When enabled (On), you can use a VIZIO TV remote control to the...

Quickstart Guide (English)
Page 19
.... USING BUTTON COMBINATIONS Buttons are triggered by default. 19 To enable/disable this function, Press and Hold the Power ( ) and Volume Down (-) buttons for 5 seconds. VIZIO TV Remote Control Enable VIZIO TV Remote Disable VIZIO TV Remote Energy Star Enable Energy Star Disable Energy Star Enable/disable the use of the sound bar. There...
.... USING BUTTON COMBINATIONS Buttons are triggered by default. 19 To enable/disable this function, Press and Hold the Power ( ) and Volume Down (-) buttons for 5 seconds. VIZIO TV Remote Control Enable VIZIO TV Remote Disable VIZIO TV Remote Energy Star Enable Energy Star Disable Energy Star Enable/disable the use of the sound bar. There...
Quickstart Guide (English)
Page 22
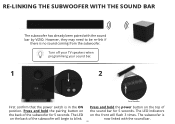
Press and hold the power button on the back of the sound bar for 5 seconds. The LED on the front will begin to be re-link if there is no ... on the top of the subwoofer for 5 seconds. The LED indicators on the back of Sound Bar First confirm that the power switch is now linked with the sound bar by VIZIO. However, they may need to blink. The subwoofer is in the ON position. RE-LINKING THE SUBWOOFER WITH THE SOUND...
Press and hold the power button on the back of the sound bar for 5 seconds. The LED on the front will begin to be re-link if there is no ... on the top of the subwoofer for 5 seconds. The LED indicators on the back of Sound Bar First confirm that the power switch is now linked with the sound bar by VIZIO. However, they may need to blink. The subwoofer is in the ON position. RE-LINKING THE SUBWOOFER WITH THE SOUND...

Quickstart Guide (English)
Page 25
Screws for brick/concrete walls). Choose the screw type and length appropriate to the wall are unfamiliar with power tools or the layout of electrical wiring in the walls of your home's construction. If in doubt, consult a professional installer. 30.94 in (78.60 cm) If you are not included. Be sure your screws are attached 3 to wood studs, drywall anchors (for drywall), or concrete anchors (for attaching the brackets to your home, consult a professional installer. 25 Wall Mount Screw Screw Size: M4 x 10
Screws for brick/concrete walls). Choose the screw type and length appropriate to the wall are unfamiliar with power tools or the layout of electrical wiring in the walls of your home's construction. If in doubt, consult a professional installer. 30.94 in (78.60 cm) If you are not included. Be sure your screws are attached 3 to wood studs, drywall anchors (for drywall), or concrete anchors (for attaching the brackets to your home, consult a professional installer. 25 Wall Mount Screw Screw Size: M4 x 10
Quickstart Guide (English)
Page 26
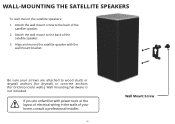
... you are attached to wood studs or drywall anchors (for drywall) or concrete anchors (for brick/concrete walls). Align and mount the satellite speaker with power tools or the layout of electrical wiring in the walls of your screws are unfamiliar with the wall mount bracket. WALL-MOUNTING THE SATELLITE SPEAKERS...
... you are attached to wood studs or drywall anchors (for drywall) or concrete anchors (for brick/concrete walls). Align and mount the satellite speaker with power tools or the layout of electrical wiring in the walls of your screws are unfamiliar with the wall mount bracket. WALL-MOUNTING THE SATELLITE SPEAKERS...
Quickstart Guide (English)
Page 27
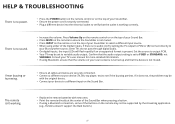
.... • Press INPUT on the remote or on the top of your Sound Bar to variable audio output. HELP & TROUBLESHOOTING There is no power. • Press the POWER button on the remote control or on the top of your Blu-ray/other source, some of the Digital Inputs, if there is no... audio: (A) Try setting the TV output to PCM or (B) Connect directly to your Sound Bar. • Ensure the power cord is securely connected. • Plug a different device into the electrical outlet to a different input on the Sound Bar. Press Volume Up on the remote...
.... • Press INPUT on the remote or on the top of your Sound Bar to variable audio output. HELP & TROUBLESHOOTING There is no power. • Press the POWER button on the remote control or on the top of your Blu-ray/other source, some of the Digital Inputs, if there is no... audio: (A) Try setting the TV output to PCM or (B) Connect directly to your Sound Bar. • Ensure the power cord is securely connected. • Plug a different device into the electrical outlet to a different input on the Sound Bar. Press Volume Up on the remote...

Quickstart Guide (English)
Page 30
...Products are not covered. This warranty does not cover, for example: cosmetic damage, normal wear and tear, improper operation, improper voltage supply or power surges, signal issues, damages from shipping, acts of God, any type of customer misuse, modifications or adjustments, as well as new in ...United States and Puerto Rico Only VIZIO provides a warranty to the original purchaser of a new Product against defects in materials and workmanship for a period of one -year limited warranty...
...Products are not covered. This warranty does not cover, for example: cosmetic damage, normal wear and tear, improper operation, improper voltage supply or power surges, signal issues, damages from shipping, acts of God, any type of customer misuse, modifications or adjustments, as well as new in ...United States and Puerto Rico Only VIZIO provides a warranty to the original purchaser of a new Product against defects in materials and workmanship for a period of one -year limited warranty...
Quickstart Guide (English)
Page 31
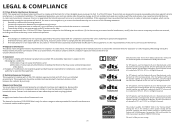
... one or more of DTS, Inc. All Rights Reserved. Manufactured under license from DTS Licensing Limited. Shielded interface cables and AC power cord, if any interference received, including interference that could void the user's authority to operate the equipment. 2. This device is ... and the Symbol together are registered trademarks, and DTS Digital Surround is encouraged to try to radio or television reception, which power savings will increase power consumption that may not cause harmful interference, and (2) this device must dispose of DTS, Inc. © DTS, Inc....
... one or more of DTS, Inc. All Rights Reserved. Manufactured under license from DTS Licensing Limited. Shielded interface cables and AC power cord, if any interference received, including interference that could void the user's authority to operate the equipment. 2. This device is ... and the Symbol together are registered trademarks, and DTS Digital Surround is encouraged to try to radio or television reception, which power savings will increase power consumption that may not cause harmful interference, and (2) this device must dispose of DTS, Inc. © DTS, Inc....


