
M420SV User Manual
Page 2
... qualify for ENERGY STAR rating. Manufactured under license from Dolby Laboratories. StudioSound HD technology is the setting in the "factory default" setting and this is incorporated under license from SRS Labs, Inc. Changing the factory default picture settings or enabling other features will be achieved. SRS StudioSound HD is a trademark of HDMI Licensing...
... qualify for ENERGY STAR rating. Manufactured under license from Dolby Laboratories. StudioSound HD technology is the setting in the "factory default" setting and this is incorporated under license from SRS Labs, Inc. Changing the factory default picture settings or enabling other features will be achieved. SRS StudioSound HD is a trademark of HDMI Licensing...
M420SV User Manual
Page 3
... Panel Buttons 4 Front Panel 4 Remote Control 5 VIA Shortcut Buttons 6 Replacing the Batteries 6 Connecting Your Devices 7 Before You Begin 7 Connecting Your Devices 7 Setting Up Your Network Connection 9 Connecting to A Wired Network 9 Connecting to a Wireless Network 9 Completing the First-Time Setup 10 Using the On-Screen Menu 11... the Content Locks 25 Changing the Names of the Inputs 26 Changing the On-Screen Menu Language 26 Setting the Time Zone 27 Adjusting the CEC Settings 27 Turning the VIZIO Logo On or Off 28 Using the Help Menu 28 Displaying System Information 28
... Panel Buttons 4 Front Panel 4 Remote Control 5 VIA Shortcut Buttons 6 Replacing the Batteries 6 Connecting Your Devices 7 Before You Begin 7 Connecting Your Devices 7 Setting Up Your Network Connection 9 Connecting to A Wired Network 9 Connecting to a Wireless Network 9 Completing the First-Time Setup 10 Using the On-Screen Menu 11... the Content Locks 25 Changing the Names of the Inputs 26 Changing the On-Screen Menu Language 26 Setting the Time Zone 27 Adjusting the CEC Settings 27 Turning the VIZIO Logo On or Off 28 Using the Help Menu 28 Displaying System Information 28
M420SV User Manual
Page 4
...Settings 29 Using Guided Setup 29 Using the Digital Episode Guide 30 Using the Info Window 30 Using the USB Media Player 31 Using the USB Media Player 31 Connecting a USB Thumb Drive to the TV 31 Playing USB Media 31 Using VIZIO...User Profile 36 Removing a User Profile 37 Restoring the VIA Dock to the Factory Default Settings 37 Troubleshooting & Technical Support 38 The TV displays "No Signal 38 There is no ...is distorted 39 The display image does not cover the entire screen 39 M420SV / M470SV / M550SV The TV has pixels (dots) that are always dark or always lit 39 I see "noise...
...Settings 29 Using Guided Setup 29 Using the Digital Episode Guide 30 Using the Info Window 30 Using the USB Media Player 31 Using the USB Media Player 31 Connecting a USB Thumb Drive to the TV 31 Playing USB Media 31 Using VIZIO...User Profile 36 Removing a User Profile 37 Restoring the VIA Dock to the Factory Default Settings 37 Troubleshooting & Technical Support 38 The TV displays "No Signal 38 There is no ...is distorted 39 The display image does not cover the entire screen 39 M420SV / M470SV / M550SV The TV has pixels (dots) that are always dark or always lit 39 I see "noise...
M420SV User Manual
Page 8
... Remember, the screen of time, unplug the TV from the wall outlet and disconnect the antenna or cable system. Analog-only television sets that the antenna or cable system is electrically grounded to provide some protection against voltage surges and static charges. Ground Clamp Antenna Lead In... of the TV during a lightning storm or when it could fall into such power lines or circuits. M420SV / M470SV / M550SV Television Antenna Connection Protection If an outside antenna/satellite dish or cable system is to be connected to earth in the building installation. Power ...
... Remember, the screen of time, unplug the TV from the wall outlet and disconnect the antenna or cable system. Analog-only television sets that the antenna or cable system is electrically grounded to provide some protection against voltage surges and static charges. Ground Clamp Antenna Lead In... of the TV during a lightning storm or when it could fall into such power lines or circuits. M420SV / M470SV / M550SV Television Antenna Connection Protection If an outside antenna/satellite dish or cable system is to be connected to earth in the building installation. Power ...
M420SV User Manual
Page 13
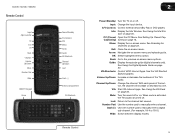
... by one. VIA: Start VIA Internet Apps. Info: Display the Info Window. VIA Shortcuts: Control VIZIO Internet Apps. Channel Up/Down: Change the channel. Mute: Turn the sound off . Number Pad:...turned off or on. Dash (-): Use with number pad to the previous on -screen menu. See Setting Up Closed CapCaptioning) tioning on -screen menu and episode guide. Arrow: Navigate the on page 13. ... OK: Select highlighted menu option. With each press of the TV's audio. M420SV / M470SV / M550SV Remote Control Input App Launcher CC Exit OK Back V Button Volume Up/Down Mute Number Pad Wide ...
... by one. VIA: Start VIA Internet Apps. Info: Display the Info Window. VIA Shortcuts: Control VIZIO Internet Apps. Channel Up/Down: Change the channel. Mute: Turn the sound off . Number Pad:...turned off or on. Dash (-): Use with number pad to the previous on -screen menu. See Setting Up Closed CapCaptioning) tioning on -screen menu and episode guide. Arrow: Navigate the on page 13. ... OK: Select highlighted menu option. With each press of the TV's audio. M420SV / M470SV / M550SV Remote Control Input App Launcher CC Exit OK Back V Button Volume Up/Down Mute Number Pad Wide ...
M420SV User Manual
Page 14
...with local hazardous waste regulations. • Keep batteries away from VIA Dock Change Screen Size (when VIA Sidebar is open) View Settings for Active VIA App Exit App/Exit VIA Dock VIA Shortcut Buttons Replacing the Batteries 1. Insert two AAA batteries into the remote control.... 2 VIA Shortcut Buttons Move/Delete App from children and pets. 6 M420SV / M470SV / M550SV Replace the battery cover. • Use only good quality batteries. • Inserting the batteries incorrectly may result in cracking or leakage that the ...
...with local hazardous waste regulations. • Keep batteries away from VIA Dock Change Screen Size (when VIA Sidebar is open) View Settings for Active VIA App Exit App/Exit VIA Dock VIA Shortcut Buttons Replacing the Batteries 1. Insert two AAA batteries into the remote control.... 2 VIA Shortcut Buttons Move/Delete App from children and pets. 6 M420SV / M470SV / M550SV Replace the battery cover. • Use only good quality batteries. • Inserting the batteries incorrectly may result in cracking or leakage that the ...
M420SV User Manual
Page 15
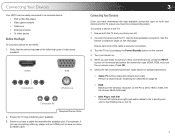
... with DVI Connect left (white) and right (red) audio cables to the L and R ports next to 1920 x 1080. Check the list of the cable is set to the HDMI ports on . 5. Verify that matches the available port. Turn the TV on by pressing the Power/Standby button on the next page.... Use the best available connection. Set the Screen Mode to Normal. • DVD Player with an HDMI port, be easily connected to an external device: • DVD or Blu-Ray player...
... with DVI Connect left (white) and right (red) audio cables to the L and R ports next to 1920 x 1080. Check the list of the cable is set to the HDMI ports on . 5. Verify that matches the available port. Turn the TV on by pressing the Power/Standby button on the next page.... Use the best available connection. Set the Screen Mode to Normal. • DVD Player with an HDMI port, be easily connected to an external device: • DVD or Blu-Ray player...

M420SV User Manual
Page 17
...; A router or modem with an available ethernet port • A high-speed internet connection 2. Connecting to a Wireless Network To connect to configure the TV. M420SV / M470SV / M550SV 3 Setting Up Your Network Connection Your TV is internet-ready, and can use VIA apps to deliver popular online content to your TV. Ensure you have...
...; A router or modem with an available ethernet port • A high-speed internet connection 2. Connecting to a Wireless Network To connect to configure the TV. M420SV / M470SV / M550SV 3 Setting Up Your Network Connection Your TV is internet-ready, and can use VIA apps to deliver popular online content to your TV. Ensure you have...

M420SV User Manual
Page 18
See Installing the TV on page 9. See Setting Up Your Network Connection on page 1. • Your devices should be connected. The TV powers on -screen keyboard. If you are finished, highlight Next and ...
See Installing the TV on page 9. See Setting Up Your Network Connection on page 1. • Your devices should be connected. The TV powers on -screen keyboard. If you are finished, highlight Next and ...

M420SV User Manual
Page 19
... this menu, you can: • Change the input source • Set the screen aspect radio • Set up closed captioning • Activate the sleep timer • Adjust the picture settings • Use the PIP feature • Adjust the network settings • Change TV settings • Access the help menu Changing the Input Source External devices... the on -screen menu, you must first change the input device: 1. While navigating the on -screen menu by pressing the VIA button and selecting HDTV Settings from the VIA Dock, then pressing OK.
... this menu, you can: • Change the input source • Set the screen aspect radio • Set up closed captioning • Activate the sleep timer • Adjust the picture settings • Use the PIP feature • Adjust the network settings • Change TV settings • Access the help menu Changing the Input Source External devices... the on -screen menu, you must first change the input device: 1. While navigating the on -screen menu by pressing the VIA button and selecting HDTV Settings from the VIA Dock, then pressing OK.

M420SV User Manual
Page 20
Original Content Format 480p/480i (4:3) 720p (16:9) 1080p/1080i (16:9) RGB (4:3) RGB (16:9) Normal Wide Zoom Panoramic Stretch 12 Use the table below to the content's original format. 5 M420SV / M470SV / M550SV Setting the Screen Aspect Ratio The TV can display images in red will not be visible on your content type. Areas in five different modes: Normal, Wide, Zoom, Panoramic, and Stretch. Each mode displays content according to determine the best aspect ratio for your TV screen.
Original Content Format 480p/480i (4:3) 720p (16:9) 1080p/1080i (16:9) RGB (4:3) RGB (16:9) Normal Wide Zoom Panoramic Stretch 12 Use the table below to the content's original format. 5 M420SV / M470SV / M550SV Setting the Screen Aspect Ratio The TV can display images in red will not be visible on your content type. Areas in five different modes: Normal, Wide, Zoom, Panoramic, and Stretch. Each mode displays content according to determine the best aspect ratio for your TV screen.

M420SV User Manual
Page 21
M420SV / M470SV / M550SV 5 Changing the Screen Aspect Ratio The TV can display closed captions: 1. Press OK. 3. If you are added to the left and right of the display ... (NTSC) TV channels. • Digital Closed Caption for programs that include them . Images may display Spanish captions. 13 Press the MENU button on the remote. 2. Setting Up Closed Captioning Your TV can display images in four different modes: Normal, Wide, Zoom, and Panoramic. Use the Arrow buttons to fill the screen...
M420SV / M470SV / M550SV 5 Changing the Screen Aspect Ratio The TV can display closed captions: 1. Press OK. 3. If you are added to the left and right of the display ... (NTSC) TV channels. • Digital Closed Caption for programs that include them . Images may display Spanish captions. 13 Press the MENU button on the remote. 2. Setting Up Closed Captioning Your TV can display images in four different modes: Normal, Wide, Zoom, and Panoramic. Use the Arrow buttons to fill the screen...
M420SV User Manual
Page 22
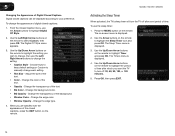
... closed captions can be displayed according to highlight the Sleep Timer icon and press OK. When you are satisfied with the appearance of time after a set period of the background. • Window Color - The Sleep Timer menu is displayed. 2. The Digital CC Style menu appears. 3. Change the edge...remote to select Custom, then press OK. Change the transparency of time. Change the edge color. • Window Opacity - M420SV / M470SV / M550SV Activating the Sleep Timer When activated, the TV's sleep timer will turn off after which you wish to change, then use the Left/ Right ...
... closed captions can be displayed according to highlight the Sleep Timer icon and press OK. When you are satisfied with the appearance of time after a set period of the background. • Window Color - The Sleep Timer menu is displayed. 2. The Digital CC Style menu appears. 3. Change the edge...remote to select Custom, then press OK. Change the transparency of time. Change the edge color. • Window Opacity - M420SV / M470SV / M550SV Activating the Sleep Timer When activated, the TV's sleep timer will turn off after which you wish to change, then use the Left/ Right ...
M420SV User Manual
Page 23
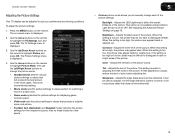
...allows you to OFF. Adjusts the black level of picture elements. Adjusts the white level of the picture. Adjusts the hue of the picture. This setting is displayed. 3. The on page 16. This option is not available unless Ambient Light Sensor is too low, the picture may appear faded or... their respective sports. Tint - however, it will produce the best picture in the most cases. M420SV / M470SV / M550SV Adjusting the Picture Settings Your TV display can be difficult to suit your preferences and viewing conditions. Press the MENU button on the remote to values that does ...
...allows you to OFF. Adjusts the black level of picture elements. Adjusts the white level of the picture. Adjusts the hue of the picture. This setting is displayed. 3. The on page 16. This option is not available unless Ambient Light Sensor is too low, the picture may appear faded or... their respective sports. Tint - however, it will produce the best picture in the most cases. M420SV / M470SV / M550SV Adjusting the Picture Settings Your TV display can be difficult to suit your preferences and viewing conditions. Press the MENU button on the remote to values that does ...
M420SV User Manual
Page 24
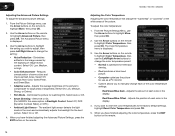
...; Normal is displayed. 3. Use the Arrow buttons on the remote. Use the Arrow buttons on the remote to the factory default settings, highlight Reset Color Temperature and press OK. 5. Adjusts the position of brightness. If you to highlight Color Temperature, then press OK...and Green/Blue. • Adaptive Luma - To adjust the color temperature: 1. 5 M420SV / M470SV / M550SV Adjusting the Advanced Picture Settings To adjust the advanced picture settings: 1. From the Picture Settings menu, use the Left/Right Arrow buttons to change the "warmness" or "coolness" of the white areas of...
...; Normal is displayed. 3. Use the Arrow buttons on the remote. Use the Arrow buttons on the remote to the factory default settings, highlight Reset Color Temperature and press OK. 5. Adjusts the position of brightness. If you to highlight Color Temperature, then press OK...and Green/Blue. • Adaptive Luma - To adjust the color temperature: 1. 5 M420SV / M470SV / M550SV Adjusting the Advanced Picture Settings To adjust the advanced picture settings: 1. From the Picture Settings menu, use the Left/Right Arrow buttons to change the "warmness" or "coolness" of the white areas of...
M420SV User Manual
Page 25
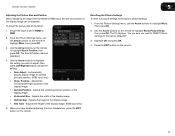
... • Horiz. Use the Arrow buttons on the remote to highlight Reset Picture Mode, then press OK. The Size & Position menu is set to change the setting: • Auto Adjust - Adjusts the horizontal (left/right) position of the display image. • Fine Tune - Ensure the input is...the factory defaults?" 3. The TV displays, "Are you sure you want to RESET Picture Settings to highlight More, then press OK. 3. Highlight OK and press OK. 4. Position - M420SV / M470SV / M550SV 5 Adjusting the Picture Size and Position When displaying an image from the HDMI or RGB input...
... • Horiz. Use the Arrow buttons on the remote to highlight Reset Picture Mode, then press OK. The Size & Position menu is set to change the setting: • Auto Adjust - Adjusts the horizontal (left/right) position of the display image. • Fine Tune - Ensure the input is...the factory defaults?" 3. The TV displays, "Are you sure you want to RESET Picture Settings to highlight More, then press OK. 3. Highlight OK and press OK. 4. Position - M420SV / M470SV / M550SV 5 Adjusting the Picture Size and Position When displaying an image from the HDMI or RGB input...

M420SV User Manual
Page 26
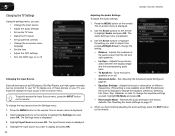
..., featuring both an ethernet port and built-in high-speed 802.11n. Select Off, PIP, or POP. • Source - Choose the size of the PIP settings: • PIP Mode - Using the Network Connection Menu Your TV is displayed. 2. The Network Connection menu is being broadcast: 1. Use the Arrow and OK ... name (SSID) is displayed. 3. The on-screen menu is the network's SSID) and press OK. 4. Use the Arrow buttons on the remote. 5 M420SV / M470SV / M550SV Using the PIP (Picture-In-Picture) Feature The PIP feature on your TV allows you want to hear on the TV speakers. Use this is...
..., featuring both an ethernet port and built-in high-speed 802.11n. Select Off, PIP, or POP. • Source - Choose the size of the PIP settings: • PIP Mode - Using the Network Connection Menu Your TV is displayed. 2. The Network Connection menu is being broadcast: 1. Use the Arrow and OK ... name (SSID) is displayed. 3. The on-screen menu is the network's SSID) and press OK. 4. Use the Arrow buttons on the remote. 5 M420SV / M470SV / M550SV Using the PIP (Picture-In-Picture) Feature The PIP feature on your TV allows you want to hear on the TV speakers. Use this is...

M420SV User Manual
Page 27
...on the remote, enter your network, these are displayed at the bottom of the other settings. • IP Address - Changing the Advanced Network Settings Advanced users can fine-tune the network settings using the Manual Setup feature. Use the Arrow and OK buttons to adjust each...network's password, then highlight Connect and press OK. (If you would like to change advanced network settings: 1. From the Network Connection menu, highlight Test Connection and press OK. 2. M420SV / M470SV / M550SV 5 To connect to the TV. • Subnet Mask - The Network Connection menu is displayed....
...on the remote, enter your network, these are displayed at the bottom of the other settings. • IP Address - Changing the Advanced Network Settings Advanced users can fine-tune the network settings using the Manual Setup feature. Use the Arrow and OK buttons to adjust each...network's password, then highlight Connect and press OK. (If you would like to change advanced network settings: 1. From the Network Connection menu, highlight Test Connection and press OK. 2. M420SV / M470SV / M550SV 5 To connect to the TV. • Subnet Mask - The Network Connection menu is displayed....
M420SV User Manual
Page 28
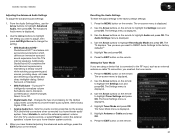
...the built-in the on -screen menu is displayed. 2. 5 M420SV / M470SV / M550SV Changing the TV Settings Using the settings menu, you want to display and press OK. 20 Adjusting the Audio Settings To adjust the audio settings: 1. Highlight Input Source and press OK. Press the MENU button on page 21. ... input source • Adjust the audio settings • Set up the TV tuner • Name the TV inputs • Set up parental controls • Change the on-screen menu language • Set the time • Adjust the CEC settings • Turn the VIZIO logo on or off Changing the Input ...
...the built-in the on -screen menu is displayed. 2. 5 M420SV / M470SV / M550SV Changing the TV Settings Using the settings menu, you want to display and press OK. 20 Adjusting the Audio Settings To adjust the audio settings: 1. Highlight Input Source and press OK. Press the MENU button on page 21. ... input source • Adjust the audio settings • Set up the TV tuner • Name the TV inputs • Set up parental controls • Change the on-screen menu language • Set the time • Adjust the CEC settings • Turn the VIZIO logo on or off Changing the Input ...
M420SV User Manual
Page 29
... Off. • Digital Audio Out - Press the MENU button on the remote. M420SV / M470SV / M550SV Adjusting the Advanced Audio Settings To adjust the advanced audio settings: 1. Select Surround or Standard. • SRS TruVolume - When you want to RESET Audio Settings to highlight Reset Audio Mode and press OK. The TV displays, "Are you sure...
... Off. • Digital Audio Out - Press the MENU button on the remote. M420SV / M470SV / M550SV Adjusting the Advanced Audio Settings To adjust the advanced audio settings: 1. Select Surround or Standard. • SRS TruVolume - When you want to RESET Audio Settings to highlight Reset Audio Mode and press OK. The TV displays, "Are you sure...


