M420SV User Manual
Page 9
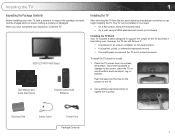
.... Use a phillips-head screwdriver to inspect the package contents. To prevent scratches or damage to support the weight of the TV. Push the base into the hole on an uneven, unstable, or non-level surface • It is pushed, pulled, or otherwise improperly moved • If...inspecting the package contents you have completed your new TV, take a moment to tighten the 4 screws. When you can begin installing the TV. VIZIO LCD HDTV with Batteries 2. Installing the TV 1 Inspecting the Package Contents Before installing your inspection, install the TV. Place the TV screen-down ...
.... Use a phillips-head screwdriver to inspect the package contents. To prevent scratches or damage to support the weight of the TV. Push the base into the hole on an uneven, unstable, or non-level surface • It is pushed, pulled, or otherwise improperly moved • If...inspecting the package contents you have completed your new TV, take a moment to tighten the 4 screws. When you can begin installing the TV. VIZIO LCD HDTV with Batteries 2. Installing the TV 1 Inspecting the Package Contents Before installing your inspection, install the TV. Place the TV screen-down ...
M420SV User Manual
Page 10
...: Screw Size: Screw Length: Screw Pitch: Hole Pattern: M420SV M6 10mm 1.0mm 200mm (V) x 400mm (H) M470SV M6 10mm 1.0mm 400mm (V) x 400mm (H) M550SV M8 10mm 1.25mm 400mm (V) x 400mm (H) Installing a TV on a flat, level, and stable surface. 5. To ensure proper ventilation, leave at least 1" ... etc). Specifications for your TV on a clean, flat, stable surface. Attach the plastic cover. 4. Using a philips-head screwdriver, remove the base by loosening and removing the screws. 4. See Appendix A - Move the TV with a UL-listed wall mount bracket rated for your mount.
...: Screw Size: Screw Length: Screw Pitch: Hole Pattern: M420SV M6 10mm 1.0mm 200mm (V) x 400mm (H) M470SV M6 10mm 1.0mm 400mm (V) x 400mm (H) M550SV M8 10mm 1.25mm 400mm (V) x 400mm (H) Installing a TV on a flat, level, and stable surface. 5. To ensure proper ventilation, leave at least 1" ... etc). Specifications for your TV on a clean, flat, stable surface. Attach the plastic cover. 4. Using a philips-head screwdriver, remove the base by loosening and removing the screws. 4. See Appendix A - Move the TV with a UL-listed wall mount bracket rated for your mount.
M420SV User Manual
Page 33
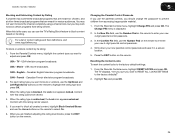
..., highlight RESET LOCKS and press OK. USA - French - When the rating type is the case, you want to RESET ALL LOCKS SETTINGS to block content based on the remote to the factory-default settings: 1. When this rating can use the Up/Down and Left/Right Arrow buttons on the remote. Press.... The TV displays, "Are you sure you are meant for children, and at other times broadcast programs that are meant for mature audiences. M420SV / M470SV / M550SV 5 Blocking and Unblocking Content by its rating.
..., highlight RESET LOCKS and press OK. USA - French - When the rating type is the case, you want to RESET ALL LOCKS SETTINGS to block content based on the remote to the factory-default settings: 1. When this rating can use the Up/Down and Left/Right Arrow buttons on the remote. Press.... The TV displays, "Are you sure you are meant for children, and at other times broadcast programs that are meant for mature audiences. M420SV / M470SV / M550SV 5 Blocking and Unblocking Content by its rating.

M420SV User Manual
Page 35
...: • CEC Function - To enable, disable, or adjust CEC settings: 1. Use the Arrow and OK buttons to give you the most accurate location-based information, such as weather or news. 8. Press the MENU button on the remote. The Settings menu is displayed. The Time Zone menu is displayed. 5.... Press the EXIT button on the remote. See your time zone and press OK. 6. M420SV / M470SV / M550SV 5 Setting the Time Zone To ensure the correct time is displayed when you press the INFO button, set the TV's time zone: To have the...
...: • CEC Function - To enable, disable, or adjust CEC settings: 1. Use the Arrow and OK buttons to give you the most accurate location-based information, such as weather or news. 8. Press the MENU button on the remote. The Settings menu is displayed. The Time Zone menu is displayed. 5.... Press the EXIT button on the remote. See your time zone and press OK. 6. M420SV / M470SV / M550SV 5 Setting the Time Zone To ensure the correct time is displayed when you press the INFO button, set the TV's time zone: To have the...

M420SV User Manual
Page 51
...a processing fee covering the cost of performing such distribution, such as the cost of media, shipping and handling upon request made to VIZIO at www.VIZIO.com. VIZIO offers to provide source code to you on , the user is furnished to do so, subject to the following conditions: THE SOFTWARE... a Class B digital device, pursuant to Part 15 of the user to correct such interference. USA: UL Canada: CSA Germany: VDE UK: BASE/BS Japan: Electric Appliance Control Act Open Source Software Notice Your VIA device may contain GPL executables and LGPL libraries that is the responsibilities of...
...a processing fee covering the cost of performing such distribution, such as the cost of media, shipping and handling upon request made to VIZIO at www.VIZIO.com. VIZIO offers to provide source code to you on , the user is furnished to do so, subject to the following conditions: THE SOFTWARE... a Class B digital device, pursuant to Part 15 of the user to correct such interference. USA: UL Canada: CSA Germany: VDE UK: BASE/BS Japan: Electric Appliance Control Act Open Source Software Notice Your VIA device may contain GPL executables and LGPL libraries that is the responsibilities of...

M420SV QSG
Page 2
PACKAGE CONTENTS VIZIO LCD HDTV with Base 1 Remote Control with Batteries Cleaning Cloth Safety Cable Power Cord User Manual and Quick Start Guide
PACKAGE CONTENTS VIZIO LCD HDTV with Base 1 Remote Control with Batteries Cleaning Cloth Safety Cable Power Cord User Manual and Quick Start Guide

M420SV QSG
Page 4
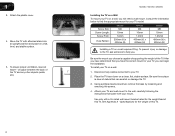
Use a phillips-head screwdriver to the screen, place the TV on the bottom of the TV. To prevent scratches or damage to tighten the 4 screws. Push the base into the hole on a soft surface, such as carpet, rug, or blanket. INSTALLING THE BASE 1 2 Place the TV screen-down on a clean, flat surface.
Use a phillips-head screwdriver to the screen, place the TV on the bottom of the TV. To prevent scratches or damage to tighten the 4 screws. Push the base into the hole on a soft surface, such as carpet, rug, or blanket. INSTALLING THE BASE 1 2 Place the TV screen-down on a clean, flat surface.

M420SV QSG
Page 5
Move the TV with attached base into an upright position and place on a flat, level, and stable surface. 3 4 Attach the plastic cover.
Move the TV with attached base into an upright position and place on a flat, level, and stable surface. 3 4 Attach the plastic cover.

