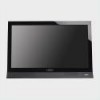
M260MV Quick Start Guide
Page 1
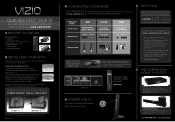
...AUDIO RGB PC COMPONENT (BETTER) Y Pb/Cb Pr/Cr L R BACK OF TV DTV/TV AV (GOOD) V L R YOUR VIZIO TV EVEN HAS EASY TO ACCESS SIDE INPUTS USB 4 POWER THE TV Turn on your TV. ©2010 VIZIO Inc. 3 CONNECTING TO DEVICES YOU DESERVE THE BEST! You may be required). 3....be heard, it means that the rear connectors remain accessible. M190VA / M190VA-W / M220VA / M220VA-W M260VA / M260VA-W LCD LED HDTV 1 BEFORE YOU BEGIN What's In the Box • VIZIO HDTV • VIZIO Remote Control (including 2 AA batteries) • User Manual (read Safety Guidelines) • Registration Card...
...AUDIO RGB PC COMPONENT (BETTER) Y Pb/Cb Pr/Cr L R BACK OF TV DTV/TV AV (GOOD) V L R YOUR VIZIO TV EVEN HAS EASY TO ACCESS SIDE INPUTS USB 4 POWER THE TV Turn on your TV. ©2010 VIZIO Inc. 3 CONNECTING TO DEVICES YOU DESERVE THE BEST! You may be required). 3....be heard, it means that the rear connectors remain accessible. M190VA / M190VA-W / M220VA / M220VA-W M260VA / M260VA-W LCD LED HDTV 1 BEFORE YOU BEGIN What's In the Box • VIZIO HDTV • VIZIO Remote Control (including 2 AA batteries) • User Manual (read Safety Guidelines) • Registration Card...
M260MV Quick Start Guide
Page 2
... the manufacturer's warranty expires so you need a 3, 4 or 5-digit code. Visit us online at: www.VIZIO.com or Call: (888) 849. 4623 For more information. www.VIZIO.com HELP TOPICS PROGRAM YOUR CABLE OR SATELLITE REMOTE Call your Cable or Satellite provider to your remote repeatedly until... off after being run once, but press the button slower this does not work, try plugging the TV directly into the wall. M190VA, M190VA-W M220VA, M220VA-W LCD LED HDTV QUICKSTART GUIDE M260VA, M260VA-W 5 SETUP (Cont.) 1. Begin the scan for optimal energy savings. Use the arrows to navigate ...
... the manufacturer's warranty expires so you need a 3, 4 or 5-digit code. Visit us online at: www.VIZIO.com or Call: (888) 849. 4623 For more information. www.VIZIO.com HELP TOPICS PROGRAM YOUR CABLE OR SATELLITE REMOTE Call your Cable or Satellite provider to your remote repeatedly until... off after being run once, but press the button slower this does not work, try plugging the TV directly into the wall. M190VA, M190VA-W M220VA, M220VA-W LCD LED HDTV QUICKSTART GUIDE M260VA, M260VA-W 5 SETUP (Cont.) 1. Begin the scan for optimal energy savings. Use the arrows to navigate ...
M260VA-W User Manuals
Page 4
...unit, size of the grounding conductors, location of antenna discharge unit, connection to grounding electrodes, and requirements of time, unplug the TV from the wall outlet and disconnect the antenna or cable system. After the switch, analog-only television sets that the antenna or ...out when they will turn off their analog signal and switch to digitalonly broadcasting. Remember, the screen of processing digital broadcasts. VIZIO VA SERIES User Manual Television Antenna Connection Protection External Television Antenna Grounding If an outside antenna/satellite dish or cable system is to...
...unit, size of the grounding conductors, location of antenna discharge unit, connection to grounding electrodes, and requirements of time, unplug the TV from the wall outlet and disconnect the antenna or cable system. After the switch, analog-only television sets that the antenna or ...out when they will turn off their analog signal and switch to digitalonly broadcasting. Remember, the screen of processing digital broadcasts. VIZIO VA SERIES User Manual Television Antenna Connection Protection External Television Antenna Grounding If an outside antenna/satellite dish or cable system is to...

M260VA-W User Manuals
Page 5
... CONTROL 13 Installing the Batteries ...13 Remote Control Range...13 VIZIO Remote Control Precautions ...13 Remote Control Buttons ...14 CHAPTER 4 GETTING STARTED...15 CHAPTER 5 USING YOUR HDTV FOR THE FIRST TIME 16 Select Input Source ...16 Watching a TV Program ...16 Viewing Digital TV Program Information 17 INFO Button ...17 CHAPTER 6 CONNECTING EQUIPMENT 18...
... CONTROL 13 Installing the Batteries ...13 Remote Control Range...13 VIZIO Remote Control Precautions ...13 Remote Control Buttons ...14 CHAPTER 4 GETTING STARTED...15 CHAPTER 5 USING YOUR HDTV FOR THE FIRST TIME 16 Select Input Source ...16 Watching a TV Program ...16 Viewing Digital TV Program Information 17 INFO Button ...17 CHAPTER 6 CONNECTING EQUIPMENT 18...
M260VA-W User Manuals
Page 6
VIZIO VA SERIES User Manual Input ...28 PC Settings ...29 Timer Menu ...30 Photo Menu ...30 Wide Menu ...31 Audio Menu ...33 Picture Menu ...34 Parental Menu ...36 Help Menu ...38 System Info ...38 CC (Closed Caption) Menu ...38 CHAPTER 9 MAINTENANCE AND TROUBLESHOOTING 39 Cleaning the TV and Remote Control ...39 Troubleshooting Guide ...39 Telephone & Technical Support ...42 Compliance...42 FCC Class B Radio Interference Statement 43 CHAPTER 10 SPECIFICATIONS ...44 Preset PC Resolutions ...47 CHAPTER 11 WARRANTY...49 Index ...51 6 www.VIZIO.com
VIZIO VA SERIES User Manual Input ...28 PC Settings ...29 Timer Menu ...30 Photo Menu ...30 Wide Menu ...31 Audio Menu ...33 Picture Menu ...34 Parental Menu ...36 Help Menu ...38 System Info ...38 CC (Closed Caption) Menu ...38 CHAPTER 9 MAINTENANCE AND TROUBLESHOOTING 39 Cleaning the TV and Remote Control ...39 Troubleshooting Guide ...39 Telephone & Technical Support ...42 Compliance...42 FCC Class B Radio Interference Statement 43 CHAPTER 10 SPECIFICATIONS ...44 Preset PC Resolutions ...47 CHAPTER 11 WARRANTY...49 Index ...51 6 www.VIZIO.com
M260VA-W User Manuals
Page 7
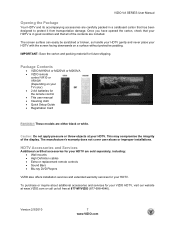
... These models are either black or white. Package Contents • VIZIO M190VA or M220VA or M260VA • VIZIO remote control VR10 or VR10W (Depending on a surface without protective padding. Version 2/3/2010 7 www.VIZIO.com This may compromise the integrity of the contents are included. The... cables • Extra or replacement remote controls • Sound Bars • Blu-ray DVD Players VIZIO also offers installation services and extended warranty services for your TV color) • 2 AA batteries for future shipping. The screen surface can easily be scratched or ...
... These models are either black or white. Package Contents • VIZIO M190VA or M220VA or M260VA • VIZIO remote control VR10 or VR10W (Depending on a surface without protective padding. Version 2/3/2010 7 www.VIZIO.com This may compromise the integrity of the contents are included. The... cables • Extra or replacement remote controls • Sound Bars • Blu-ray DVD Players VIZIO also offers installation services and extended warranty services for your TV color) • 2 AA batteries for future shipping. The screen surface can easily be scratched or ...
M260VA-W User Manuals
Page 8
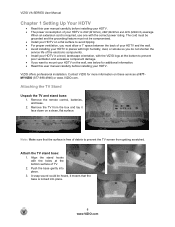
... your HDTV is locked into place. 3. Attach the TV stand base: 1. VIZIO offers professional installation. Attaching the TV Stand Unpack the TV and stand base: 1. Note: Make sure that the base is 25W (M190VA), 28W (M220VA and 44W (M260VA) average. Remove the TV from getting scratched. Align the stand hooks with the ... or smoke so you want to mount your HDTV on these services at the bottom to prevent the TV screen from the box and lay it face down on a clean, flat surface. VIZIO VA SERIES User Manual Chapter 1 Setting Up Your HDTV • Read this user manual carefully before ...
... your HDTV is locked into place. 3. Attach the TV stand base: 1. VIZIO offers professional installation. Attaching the TV Stand Unpack the TV and stand base: 1. Note: Make sure that the base is 25W (M190VA), 28W (M220VA and 44W (M260VA) average. Remove the TV from getting scratched. Align the stand hooks with the ... or smoke so you want to mount your HDTV on these services at the bottom to prevent the TV screen from the box and lay it face down on a clean, flat surface. VIZIO VA SERIES User Manual Chapter 1 Setting Up Your HDTV • Read this user manual carefully before ...
M260VA-W User Manuals
Page 9
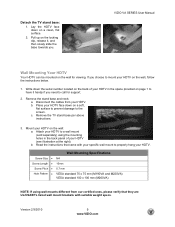
... base towards you. Remove the stand base and neck: a. Attach your HDTV on page 1 to mount your HDTV to the screen. Detach the TV stand base: 1. Mount your HDTV. Screw Size • Screw Length • Screw Pitch • Hole Pattern • Wall Mounting Specifications M4...standard 75 x 75 mm (M190VA and M220VA) VESA standard 100 x 100 mm (M260VA) NOTE: If using the mounting holes in the space provided on the wall, follow the instructions below. 1. b. Version 2/3/2010 9 www.VIZIO.com Lay the HDTV face down on a soft, flat surface to prevent damage to...
... base towards you. Remove the stand base and neck: a. Attach your HDTV on page 1 to mount your HDTV to the screen. Detach the TV stand base: 1. Mount your HDTV. Screw Size • Screw Length • Screw Pitch • Hole Pattern • Wall Mounting Specifications M4...standard 75 x 75 mm (M190VA and M220VA) VESA standard 100 x 100 mm (M260VA) NOTE: If using the mounting holes in the space provided on the wall, follow the instructions below. 1. b. Version 2/3/2010 9 www.VIZIO.com Lay the HDTV face down on a soft, flat surface to prevent damage to...
M260VA-W User Manuals
Page 10
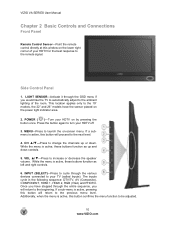
... While the menu is active, these buttons function as left and right controls. 6. VOL ▲/▼-Press to be adjusted. 10 www.VIZIO.com Press the button again to the beginning. LIGHT SENSOR-Activate it through the various devices connected to the previous menu level. While the ...is active, these buttons function as up or down controls. 5. Once you would like the TV to automatically adjust to the ambient lighting of your HDTV on by pressing the button once. VIZIO VA SERIES User Manual Chapter 2 Basic Controls and Connections Front Panel Remote Control Sensor-Point ...
... While the menu is active, these buttons function as left and right controls. 6. VOL ▲/▼-Press to be adjusted. 10 www.VIZIO.com Press the button again to the beginning. LIGHT SENSOR-Activate it through the various devices connected to the previous menu level. While the ...is active, these buttons function as up or down controls. 5. Once you would like the TV to automatically adjust to the ambient lighting of your HDTV on by pressing the button once. VIZIO VA SERIES User Manual Chapter 2 Basic Controls and Connections Front Panel Remote Control Sensor-Point ...
M260VA-W User Manuals
Page 11
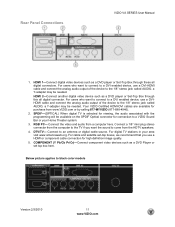
... (877-698-4946). 2. HDMI 2-Connect another digital video device such as a DVD player or Set-Top Box through this all digital connectors. RGB PC- DTV/TV- Your VIZIO Certified HDMI-DVI cables are available for high definition image quality. 5. Connect the video and audio from the computer to the...
... (877-698-4946). 2. HDMI 2-Connect another digital video device such as a DVD player or Set-Top Box through this all digital connectors. RGB PC- DTV/TV- Your VIZIO Certified HDMI-DVI cables are available for high definition image quality. 5. Connect the video and audio from the computer to the...

M260VA-W User Manuals
Page 13
...a fire or lead to local hazardous waste regulations. • Keep the batteries away from heat sources. Replace the battery cover. Version 2/3/2010 13 www.VIZIO.com Make sure that may cause a fire or lead to personal injury. • Dispose of time, remove the batteries. • Do not take the... for Inserting the Batteries: • Only use AA batteries. • Do not mix new and old batteries. Avoid humidity. • If the TV responds erratically to undue physical stress, such as striking or dropping it with the (+) and (-) symbols inside the battery compartment. 3.
...a fire or lead to local hazardous waste regulations. • Keep the batteries away from heat sources. Replace the battery cover. Version 2/3/2010 13 www.VIZIO.com Make sure that may cause a fire or lead to personal injury. • Dispose of time, remove the batteries. • Do not take the... for Inserting the Batteries: • Only use AA batteries. • Do not mix new and old batteries. Avoid humidity. • If the TV responds erratically to undue physical stress, such as striking or dropping it with the (+) and (-) symbols inside the battery compartment. 3.
M260VA-W User Manuals
Page 14
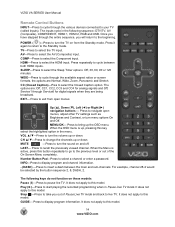
... Panoramic and Stretch. Press to exit from the Standby mode. Press to navigate open menus. Press to bring up or down . The following sequence: DTV/TV, AV (Composite), COMPONENT, HDMI 1, HDMI 2, RGB and USB. Play (►)-Press to select the Sleep Timer options: Off, 30, 60, 90 ...the AV (Composite) input. Once you have stepped through the various devices connected to your TV (called Inputs). AV-Press to display program information. When the OSD menu is active, press this model. 14 www.VIZIO.com INFO-Press to display program and channel information. - (DASH) -Press to insert...
... Panoramic and Stretch. Press to exit from the Standby mode. Press to navigate open menus. Press to bring up or down . The following sequence: DTV/TV, AV (Composite), COMPONENT, HDMI 1, HDMI 2, RGB and USB. Play (►)-Press to select the Sleep Timer options: Off, 30, 60, 90 ...the AV (Composite) input. Once you have stepped through the various devices connected to your TV (called Inputs). AV-Press to display program information. When the OSD menu is active, press this model. 14 www.VIZIO.com INFO-Press to display program and channel information. - (DASH) -Press to insert...

M260VA-W User Manuals
Page 15
... the best picture and most efficient energy usage. • Select the signal input (Antenna or Cable) • Scan your Menu language • Select the TV to Home Mode for detailed steps). 4. Turn on your HDTV. Use the Arrow and MENU/OK buttons to easily setup your... Insert the batteries into an AC wall socket. 3. The Setup Wizard will : • Choose your TV channels (unless you turn on your new HDTV. 1. Follow the on-screen directions to navigate through the setup App. VIZIO VA SERIES User Manual Chapter 4 Getting Started Your HDTV has a built-in setup Wizard that runs...
... the best picture and most efficient energy usage. • Select the signal input (Antenna or Cable) • Scan your Menu language • Select the TV to Home Mode for detailed steps). 4. Turn on your HDTV. Use the Arrow and MENU/OK buttons to easily setup your... Insert the batteries into an AC wall socket. 3. The Setup Wizard will : • Choose your TV channels (unless you turn on your new HDTV. 1. Follow the on-screen directions to navigate through the setup App. VIZIO VA SERIES User Manual Chapter 4 Getting Started Your HDTV has a built-in setup Wizard that runs...
M260VA-W User Manuals
Page 16
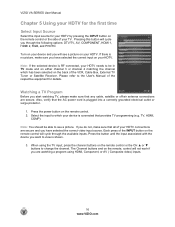
...will cycle you want to which has been selected on the back of the VCR, Cable Box, External TV Tuner or Satellite Receiver. When using HDMI, Component, or AV ( Composite video) inputs. 16 www.VIZIO.com Note: If the selected device is RF connected, your device is shown. 3. Press the power... make sure you have selected the correct video input source. If you do not, make sure that provides TV programming (e.g. Turn on your HDTV. Please refer to see a picture on your TV. VIZIO VA SERIES User Manual Chapter 5 Using your HDTV for the first time Select Input Source Select the input ...
...will cycle you want to which has been selected on the back of the VCR, Cable Box, External TV Tuner or Satellite Receiver. When using HDMI, Component, or AV ( Composite video) inputs. 16 www.VIZIO.com Note: If the selected device is RF connected, your device is shown. 3. Press the power... make sure you have selected the correct video input source. If you do not, make sure that provides TV programming (e.g. Turn on your HDTV. Please refer to see a picture on your TV. VIZIO VA SERIES User Manual Chapter 5 Using your HDTV for the first time Select Input Source Select the input ...

M260VA-W User Manuals
Page 17
Each press of the INFO button will display more information about the program: Press a second time, you press the INFO button, an information header is shown over the picture for a few seconds. VIZIO VA SERIES User Manual Viewing Digital TV Program Information INFO Button When you will see the following display: Press a third time and the display should be as shown below Version 2/3/2010 17 www.VIZIO.com
Each press of the INFO button will display more information about the program: Press a second time, you press the INFO button, an information header is shown over the picture for a few seconds. VIZIO VA SERIES User Manual Viewing Digital TV Program Information INFO Button When you will see the following display: Press a third time and the display should be as shown below Version 2/3/2010 17 www.VIZIO.com
M260VA-W User Manuals
Page 18
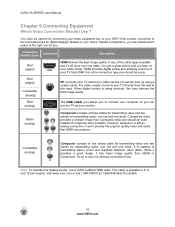
... coaxial cable, this input. The RGB (VGA) port allows you to the most advanced for details. 18 www.VIZIO.com Note: To maintain the display quality, use the TV as your HDTV from the wall to use one white. You have six options for connecting your video equipment box...when possible. HDMI provides digital quality and amazing sound so if your cable clutter. When digital content is available in 6, 8, and 12 foot lengths. VIZIO VA SERIES User Manual Chapter 6 Connecting Equipment Which Video Connection Should I Use ? While it provides a good image, it won't provide the superior...
... coaxial cable, this input. The RGB (VGA) port allows you to the most advanced for details. 18 www.VIZIO.com Note: To maintain the display quality, use the TV as your HDTV from the wall to use one white. You have six options for connecting your video equipment box...when possible. HDMI provides digital quality and amazing sound so if your cable clutter. When digital content is available in 6, 8, and 12 foot lengths. VIZIO VA SERIES User Manual Chapter 6 Connecting Equipment Which Video Connection Should I Use ? While it provides a good image, it won't provide the superior...
M260VA-W User Manuals
Page 21
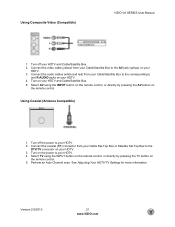
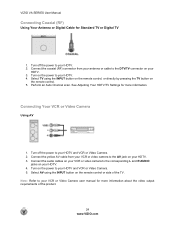
... the AV button on your HDTV and Cable/Satellite Box. 5. Perform an Auto Channel scan. See Adjusting Your HDTV/TV Settings for more information. Version 2/3/2010 21 www.VIZIO.com Connect the coaxial (RF) connector from your Cable/Satellite Box to the AV jack (yellow) on your HDTV.... corresponding L and R AUDIO jacks on your HDTV. 4. Turn on the remote control. 5. Using Composite Video (Compatible) VIZIO VA SERIES User Manual 1. Turn off the power to the DTV/TV connector on your HDTV. 3. Connect the audio cables (white and red) from your Cable/Satellite Box to your HDTV. ...
... the AV button on your HDTV and Cable/Satellite Box. 5. Perform an Auto Channel scan. See Adjusting Your HDTV/TV Settings for more information. Version 2/3/2010 21 www.VIZIO.com Connect the coaxial (RF) connector from your Cable/Satellite Box to the AV jack (yellow) on your HDTV.... corresponding L and R AUDIO jacks on your HDTV. 4. Turn on the remote control. 5. Using Composite Video (Compatible) VIZIO VA SERIES User Manual 1. Turn off the power to the DTV/TV connector on your HDTV. 3. Connect the audio cables (white and red) from your Cable/Satellite Box to your HDTV. ...
M260VA-W User Manuals
Page 24
... power to your HDTV and VCR or Video Camera. 5. Note: Refer to the DTV/TV connector on the remote control. 5. Select TV using the INPUT button on the remote control or side of the product. 24 www.VIZIO.com Connect the yellow AV cable from your HDTV. 3. Select AV using the INPUT button... on the remote control, or directly by pressing the TV button on your VCR or Video Camera user manual for more information. See...
... power to your HDTV and VCR or Video Camera. 5. Note: Refer to the DTV/TV connector on the remote control. 5. Select TV using the INPUT button on the remote control or side of the product. 24 www.VIZIO.com Connect the yellow AV cable from your HDTV. 3. Select AV using the INPUT button... on the remote control, or directly by pressing the TV button on your VCR or Video Camera user manual for more information. See...
M260VA-W User Manuals
Page 25
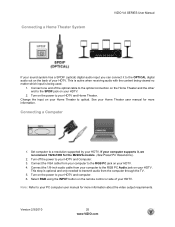
...your computer to a resolution supported by your HDTV. Note: Refer to the OPTICAL digital audio out on your HDTV. 4. Connecting a Home Theater System VIZIO VA SERIES User Manual If your sound system has a SPDIF (optical) digital audio input you can connect it , we recommend 1920x1080 for the M220VA ...more information. This step is being used. 1. Turn on your HDTV and computer. 6. Connect the 1/8-inch audio cable from the computer through the TV. 5. Turn off the power to the RGB PC Audio jack on the power to transmit audio from your computer to your HDTV. Connect one ...
...your computer to a resolution supported by your HDTV. Note: Refer to the OPTICAL digital audio out on your HDTV. 4. Connecting a Home Theater System VIZIO VA SERIES User Manual If your sound system has a SPDIF (optical) digital audio input you can connect it , we recommend 1920x1080 for the M220VA ...more information. This step is being used. 1. Turn on your HDTV and computer. 6. Connect the 1/8-inch audio cable from the computer through the TV. 5. Turn off the power to the RGB PC Audio jack on the power to transmit audio from your computer to your HDTV. Connect one ...
M260VA-W User Manuals
Page 26
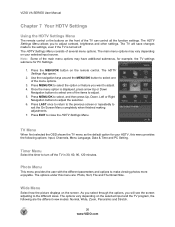
...: Normal, Wide, Zoom, Panoramic and Stretch. 26 www.VIZIO.com The HDTV Settings Menu consists of the TV can control all the function settings. Press EXIT to adjust the selection. 6. TV Menu When first selected the OSD shows the TV menu as the default option for PC Settings. 1. Wide ...different parameters and options to exit the On Screen Menu completely when finished making adjustments. 7. The TV will see the screen adjusting to turn off . Note: Some of the menu options. 3. VIZIO VA SERIES User Manual Chapter 7 Your HDTV Settings Using the HDTV Settings Menu The remote control ...
...: Normal, Wide, Zoom, Panoramic and Stretch. 26 www.VIZIO.com The HDTV Settings Menu consists of the TV can control all the function settings. Press EXIT to adjust the selection. 6. TV Menu When first selected the OSD shows the TV menu as the default option for PC Settings. 1. Wide ...different parameters and options to exit the On Screen Menu completely when finished making adjustments. 7. The TV will see the screen adjusting to turn off . Note: Some of the menu options. 3. VIZIO VA SERIES User Manual Chapter 7 Your HDTV Settings Using the HDTV Settings Menu The remote control ...


