
Download
Page 3
... or component damage, switch off the power before operating your investment beyond the standard warranty, VIZIO offers on your new VIZIO HDTV. If the provided plug does not fit into your outlet, consult an electrician for your TV. • Read these instructions. • Keep these instructions in accordance with the manufacturer's instructions. •...
... or component damage, switch off the power before operating your investment beyond the standard warranty, VIZIO offers on your new VIZIO HDTV. If the provided plug does not fit into your outlet, consult an electrician for your TV. • Read these instructions. • Keep these instructions in accordance with the manufacturer's instructions. •...
Download
Page 4
...short circuit parts causing a fire or electric shock. To avoid electric shock, avoid handling the power cord during lightning. Operating your TV. • Your TV should be replaced when using different voltage than the specified voltage may be sure these openings are not sure of the type of...from damage due to avoid causing fire, electric shock, or component damage. • A distance of the display. Never spill liquids on your TV close to persons. • Do not overload power strips and extension cords. This may form in the back and bottom of time. The ...
...short circuit parts causing a fire or electric shock. To avoid electric shock, avoid handling the power cord during lightning. Operating your TV. • Your TV should be replaced when using different voltage than the specified voltage may be sure these openings are not sure of the type of...from damage due to avoid causing fire, electric shock, or component damage. • A distance of the display. Never spill liquids on your TV close to persons. • Do not overload power strips and extension cords. This may form in the back and bottom of time. The ...
Download
Page 5
...8226; The mains plug or appliance coupler is required, contact your dealer and refer all servicing to qualified service personnel. • WARNING: Keep your TV yourself. The power cord fails or frays. - h• The lightning flash with liquids, such as sunshine, fire or the like. • If... any way. - If water penetrates into your TV. Do not expose your TV yourself. • Avoid using dropped or damaged appliances. The performance of your dealer. • Do not attempt to repair or...
...8226; The mains plug or appliance coupler is required, contact your dealer and refer all servicing to qualified service personnel. • WARNING: Keep your TV yourself. The power cord fails or frays. - h• The lightning flash with liquids, such as sunshine, fire or the like. • If... any way. - If water penetrates into your TV. Do not expose your TV yourself. • Avoid using dropped or damaged appliances. The performance of your dealer. • Do not attempt to repair or...
Download
Page 7
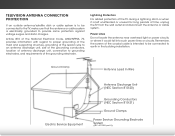
...Power Lines Do not locate the antenna near overhead light or power circuits, or where it is intended to be connected to the TV, make sure that the antenna or cable system is electrically grounded to provide some protection against voltage surges and static charges. Lightning ...Protection For added protection of the TV during a lightning storm or when it could fall into such power lines or circuits. Ground Clamp Antenna Lead In Wire Electric Service Equipment...
...Power Lines Do not locate the antenna near overhead light or power circuits, or where it is intended to be connected to the TV, make sure that the antenna or cable system is electrically grounded to provide some protection against voltage surges and static charges. Lightning ...Protection For added protection of the TV during a lightning storm or when it could fall into such power lines or circuits. Ground Clamp Antenna Lead In Wire Electric Service Equipment...
Download
Page 8
...Menu 28 Connecting to a Wireless Network 28 Changing the Advanced Network Settings 29 Testing Your Network Connection 29 Changing the TV Settings 30 Changing the Input Source 30 Setting the Tuner Mode 31 Scanning for Channels 31 Adding New Channels 32 Skipping...Changing the Parental Control Passcode 36 Resetting the Content Locks 36 Changing the Names of Contents Installing the TV 3 Inspecting the Package Contents 3 Installing the TV 3 Installing the TV Stand 3 Installing the TV on a Wall 5 Controls and Connections 6 Front Panel 8 Remote Control 9 Replacing the Batteries 10...
...Menu 28 Connecting to a Wireless Network 28 Changing the Advanced Network Settings 29 Testing Your Network Connection 29 Changing the TV Settings 30 Changing the Input Source 30 Setting the Tuner Mode 31 Scanning for Channels 31 Adding New Channels 32 Skipping...Changing the Parental Control Passcode 36 Resetting the Content Locks 36 Changing the Names of Contents Installing the TV 3 Inspecting the Package Contents 3 Installing the TV 3 Installing the TV Stand 3 Installing the TV on a Wall 5 Controls and Connections 6 Front Panel 8 Remote Control 9 Replacing the Batteries 10...
Download
Page 9
... the CEC Settings 38 Turning the Power Indicator On or Off 38 Using the Help Menu 39 Displaying System Information 39 Resetting the TV Settings 40 Restoring the TV to Factory Default Settings 40 Performing a Service Check 40 Using Guided Setup 41 Using the Info Window 42 Using the USB Media Player... 43 Using the USB Media Player 43 Connecting a USB Thumb Drive to the TV 43 Playing USB Media 43 Using VIZIO Internet Apps 45 Using the VIA Shortcut Buttons 45 Using the VIA Dock 45 Moving an App on the VIA Dock 45...
... the CEC Settings 38 Turning the Power Indicator On or Off 38 Using the Help Menu 39 Displaying System Information 39 Resetting the TV Settings 40 Restoring the TV to Factory Default Settings 40 Performing a Service Check 40 Using Guided Setup 41 Using the Info Window 42 Using the USB Media Player... 43 Using the USB Media Player 43 Connecting a USB Thumb Drive to the TV 43 Playing USB Media 43 Using VIZIO Internet Apps 45 Using the VIA Shortcut Buttons 45 Using the VIA Dock 45 Moving an App on the VIA Dock 45...
Download
Page 10
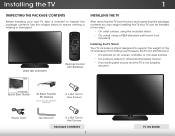
... you can still fall over . However, the TV can begin installing the TV. Use the images below to inspect the package contents. Installing the TV 1 Inspecting the Package Contents Before installing your new TV, take a moment to ensure nothing is not properly secured VIZIO QUICK START GUIDE Model: E551d-A0 Quick Start Guide 2x Basic Theater 3D...
... you can still fall over . However, the TV can begin installing the TV. Use the images below to inspect the package contents. Installing the TV 1 Inspecting the Package Contents Before installing your new TV, take a moment to ensure nothing is not properly secured VIZIO QUICK START GUIDE Model: E551d-A0 Quick Start Guide 2x Basic Theater 3D...

Download
Page 11
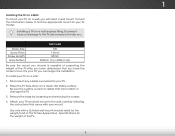
Align the base with the bottom of the TV to secure the neck piece. 3. Using the included hex wrench, tighten four (4) M4 12mm hex screws into the holes on the back of the TV and slide it into place as shown. 2. Align the neck piece with the neck and tighten three (3) M4 16mm hex screws using the included hex wrench. 4 1 To install the base: 1.
Align the base with the bottom of the TV to secure the neck piece. 3. Using the included hex wrench, tighten four (4) M4 12mm hex screws into the holes on the back of the TV and slide it into place as shown. 2. Align the neck piece with the neck and tighten three (3) M4 16mm hex screws using the included hex wrench. 4 1 To install the base: 1.
Download
Page 12
...Be sure the surface is capable of supporting the weight of the TV. Disconnect any cables connected to find the appropriate mount for the weight of this TV. 5 See Appendix A - Screw Size: Screw Pitch: Screw Length: Hole Pattern: E551d-A0 M6 1.0mm 20mm 400mm (V) x 400mm (H) Be sure the mount... you . Attach your TV and wall mount to help you choose is clear of debris...
...Be sure the surface is capable of supporting the weight of the TV. Disconnect any cables connected to find the appropriate mount for the weight of this TV. 5 See Appendix A - Screw Size: Screw Pitch: Screw Length: Hole Pattern: E551d-A0 M6 1.0mm 20mm 400mm (V) x 400mm (H) Be sure the mount... you . Attach your TV and wall mount to help you choose is clear of debris...
Download
Page 14
Turn TV off or on -screen menu. Open the on . Increase or decrease volume level. 2 INPUT MENU CH ^ CH VOL ^ VOL ^ ^ POWER - MENU - Change the channel. INPUT - CHANNEL UP/DOWN - VOLUME UP/DOWN - Change input source. Side Panel 7
Turn TV off or on -screen menu. Open the on . Increase or decrease volume level. 2 INPUT MENU CH ^ CH VOL ^ VOL ^ ^ POWER - MENU - Change the channel. INPUT - CHANNEL UP/DOWN - VOLUME UP/DOWN - Change input source. Side Panel 7
Download
Page 16
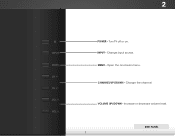
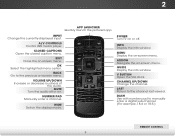
Exit Close the on -screen menu. Power Turn TV on or off or on. Menu Display the on -screen menu. Channel Up/Down Change the channel. Closed Captions Open the closed caption menu. Ok ...
Exit Close the on -screen menu. Power Turn TV on or off or on. Menu Display the on -screen menu. Channel Up/Down Change the channel. Closed Captions Open the closed caption menu. Ok ...
Download
Page 18
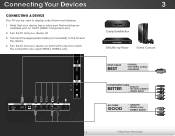
..., Component, etc). 2. Verify that matches an available port on . Connecting Your Devices Connecting A Device Your TV can be used (HDMI-1, HDMI-2, etc). 1 2 (ARC) CABLE / ANTENNA 3 Cable/Satellite Box DVD/Blu-ray Player Game Console HDMI CABLE BEST • DIGITAL • HD ... • ANALOG • VIDEO (480i)* • STEREO AUDIO 11 * Maximum Resolution Connect the appropriate cable (not included) to display output from most devices. 1. Set the TV's input to match the connection you used to the...
..., Component, etc). 2. Verify that matches an available port on . Connecting Your Devices Connecting A Device Your TV can be used (HDMI-1, HDMI-2, etc). 1 2 (ARC) CABLE / ANTENNA 3 Cable/Satellite Box DVD/Blu-ray Player Game Console HDMI CABLE BEST • DIGITAL • HD ... • ANALOG • VIDEO (480i)* • STEREO AUDIO 11 * Maximum Resolution Connect the appropriate cable (not included) to display output from most devices. 1. Set the TV's input to match the connection you used to the...

Download
Page 19
... transmits crystal-clear digital video along with color information split up three different ways over the red and white connectors. Colors are designed to your TV. HDMI-connected devices have the ability to 1080P • HD Audio • Digital Connection • Audio and Video Signals Y L R COMPONENT VIDEO R L Pr/Cr Pb/Cb...
... transmits crystal-clear digital video along with color information split up three different ways over the red and white connectors. Colors are designed to your TV. HDMI-connected devices have the ability to 1080P • HD Audio • Digital Connection • Audio and Video Signals Y L R COMPONENT VIDEO R L Pr/Cr Pb/Cb...

Download
Page 20
... your device on the TV (Optical, 3.5mm, etc). 2. Turn the TV and your audio device off. 3. Connecting an Audio Device Your TV can output sound to the TV and the device. 4. Connect the appropriate cable (not included) to an audio device, such as a receiver or sound bar. 1. Verify ...that your device has a video port that matches an available port on . 3 Home Audio Receiver VIZIO Sound Bar 1 2 (ARC...
... your device on the TV (Optical, 3.5mm, etc). 2. Turn the TV and your audio device off. 3. Connecting an Audio Device Your TV can output sound to the TV and the device. 4. Connect the appropriate cable (not included) to an audio device, such as a receiver or sound bar. 1. Verify ...that your device has a video port that matches an available port on . 3 Home Audio Receiver VIZIO Sound Bar 1 2 (ARC...

Download
Page 21
.../SPDIF cables transmit audio signals as pulses of light through a single HDMI cable. Audio signals are digitally transmitted between devices. Audio Return Channel-enabled (ARC) TVs allow audio to your audio device. Audio signals are sent over an already connected HDMI cable, eliminating the need for a separate audio cable. HDMI CABLE...
.../SPDIF cables transmit audio signals as pulses of light through a single HDMI cable. Audio signals are digitally transmitted between devices. Audio Return Channel-enabled (ARC) TVs allow audio to your audio device. Audio signals are sent over an already connected HDMI cable, eliminating the need for a separate audio cable. HDMI CABLE...

Download
Page 22
...Your Home Audio Receiver HDMI Your Blu-Ray Player 15 Your Blu-Ray Player RCA (Audio) Your TV HDMI Your TV HDMI VIZIO Internet Apps With an HDMI ARC setup, the audio connection between your TV with an all-digital audio/video connection. ARC Without HDMI ARC With HDMI ARC Built-in Tuner ...Built-in Tuner VIZIO Internet Apps Without an HDMI ARC setup, your TV will transmit audio signal to and from the built-in tuner and VIA apps to your home audio receiver through a seperate audio...
...Your Home Audio Receiver HDMI Your Blu-Ray Player 15 Your Blu-Ray Player RCA (Audio) Your TV HDMI Your TV HDMI VIZIO Internet Apps With an HDMI ARC setup, the audio connection between your TV with an all-digital audio/video connection. ARC Without HDMI ARC With HDMI ARC Built-in Tuner ...Built-in Tuner VIZIO Internet Apps Without an HDMI ARC setup, your TV will transmit audio signal to and from the built-in tuner and VIA apps to your home audio receiver through a seperate audio...

Download
Page 23
It can be connected to configure the TV. Use the Guided Network Setup to your home network with a Wired or Wireless connection. Ensure you have a router or modem broadcasting as high-speed wireless ... page 41. Use the Guided Network Setup to the Ethernet port on the back of the TV. Connect an Ethernet cable to your Network Your TV is internet-ready. Connecting to your router and to configure the TV. Ethernet Cable 1 2 (ARC) CABLE / ANTENNA 16 Router / Modem 3 Connecting to a Wireless Network 1. Connecting to a Wired...
It can be connected to configure the TV. Use the Guided Network Setup to your home network with a Wired or Wireless connection. Ensure you have a router or modem broadcasting as high-speed wireless ... page 41. Use the Guided Network Setup to the Ethernet port on the back of the TV. Connect an Ethernet cable to your Network Your TV is internet-ready. Connecting to your router and to configure the TV. Ethernet Cable 1 2 (ARC) CABLE / ANTENNA 16 Router / Modem 3 Connecting to a Wireless Network 1. Connecting to a Wired...

Download
Page 24
... your network with an ethernet cable, connect it to the ethernet port on the remote. 8. The First-Time Setup is complete. 17 The TV powers on the TV, the Setup App will guide you through each of Service and Privacy Policy for use. When you are connecting to highlight Home Use and... First-Time Setup 4 The first time you turn on and the Setup App starts. 2. Use the Up/Down Arrow buttons on the remote to your TV ready for Yahoo! When you are finished, highlight Next and press OK. 5. Use the Left/Right Arrow buttons on the remote to Live...
... your network with an ethernet cable, connect it to the ethernet port on the remote. 8. The First-Time Setup is complete. 17 The TV powers on the TV, the Setup App will guide you through each of Service and Privacy Policy for use. When you are connecting to highlight Home Use and... First-Time Setup 4 The first time you turn on and the Setup App starts. 2. Use the Up/Down Arrow buttons on the remote to your TV ready for Yahoo! When you are finished, highlight Next and press OK. 5. Use the Left/Right Arrow buttons on the remote to Live...
Download
Page 25
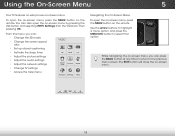
...8226; Activate the sleep timer • Adjust the picture settings • Adjust the audio settings • Adjust the network settings • Change TV settings • Access the help menu VIZIO ABC 3D Wide CC Sleep Timer Picture Audio Network Settings Help Navigating the On-Screen Menu To open the on-screen menu... Use the Arrow buttons to highlight a menu option, and press the MENU/OK button to select that option. Using the On-Screen Menu 5 Your TV features an easy-to-use on -screen menu by pressing the VIA button and selecting HDTV Settings from the VIA Dock, then pressing OK.
...8226; Activate the sleep timer • Adjust the picture settings • Adjust the audio settings • Adjust the network settings • Change TV settings • Access the help menu VIZIO ABC 3D Wide CC Sleep Timer Picture Audio Network Settings Help Navigating the On-Screen Menu To open the on-screen menu... Use the Arrow buttons to highlight a menu option, and press the MENU/OK button to select that option. Using the On-Screen Menu 5 Your TV features an easy-to-use on -screen menu by pressing the VIA button and selecting HDTV Settings from the VIA Dock, then pressing OK.
Download
Page 26
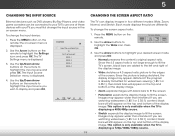
...; Input WidWeidestretcChCes a 4:3 aspect ratio picture to highlight the input source and press OK. Screen Mode 2. Use the Arrow buttons to your TV.To use one of the display image. Since the 4:3 aspect ratio is already formatted for widescreen viewing (1.85:1 or Sleep Timer 2.3P5ic:... Blu-Ray Players, and video game consoles can display images in the on-screen menu. To change the screen aspect ratio: 1. VIZIO Input Source Selection TV AV/Component HDMI-1 HDMI-2 HDMI-3 HDMI-4 4. Each mode displays the picture differently. To change the input device: 1. Press WiOdeK....
...; Input WidWeidestretcChCes a 4:3 aspect ratio picture to highlight the input source and press OK. Screen Mode 2. Use the Arrow buttons to your TV.To use one of the display image. Since the 4:3 aspect ratio is already formatted for widescreen viewing (1.85:1 or Sleep Timer 2.3P5ic:... Blu-Ray Players, and video game consoles can display images in the on-screen menu. To change the screen aspect ratio: 1. VIZIO Input Source Selection TV AV/Component HDMI-1 HDMI-2 HDMI-3 HDMI-4 4. Each mode displays the picture differently. To change the input device: 1. Press WiOdeK....


