

Download
Page 2
... are incorporated under license from SRS Labs, Inc. Manufactured under license from Dolby Laboratories. This product qualifies for ENERGY STAR rating. Changing the factory default picture settings or enabling other features will increase power consumption that could exceed the limits necessary to qualify for ENERGY STAR in the "factory default...
... are incorporated under license from SRS Labs, Inc. Manufactured under license from Dolby Laboratories. This product qualifies for ENERGY STAR rating. Changing the factory default picture settings or enabling other features will increase power consumption that could exceed the limits necessary to qualify for ENERGY STAR in the "factory default...
Download
Page 8
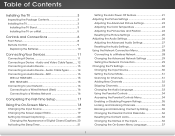
... Activating the Sleep Timer 21 Setting the Auto Power Off Feature 21 Adjusting the Picture Settings 22 Adjusting the Advanced Picture Settings 23 Adjusting the Color Temperature 24 Adjusting the Picture Size and Position 24 Resetting the Picture Settings 25 Adjusting the Audio Settings 26 Adjusting the Advanced Audio Settings 27 Resetting the Audio Settings 27 Using the Network Connection Menu...
... Activating the Sleep Timer 21 Setting the Auto Power Off Feature 21 Adjusting the Picture Settings 22 Adjusting the Advanced Picture Settings 23 Adjusting the Color Temperature 24 Adjusting the Picture Size and Position 24 Resetting the Picture Settings 25 Adjusting the Audio Settings 26 Adjusting the Advanced Audio Settings 27 Resetting the Audio Settings 27 Using the Network Connection Menu...
Download
Page 9
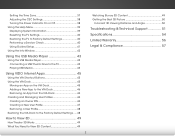
...Using the Help Menu 39 Displaying System Information 39 Resetting the TV Settings 40 Restoring the TV to Factory Default Settings 40 Performing a Service Check 40 Using Guided Setup 41 Using ...the Info Window 42 Using the USB Media Player 43 Using the USB Media Player 43 Connecting a USB Thumb Drive to the TV 43 Playing USB Media 43 Using VIZIO...User Profile 47 Removing a User Profile 48 Restoring the VIA Dock to the Factory Default Settings...... 48 How to View 3D 49 How Theater 3D Works 49 What You Need to ...
...Using the Help Menu 39 Displaying System Information 39 Resetting the TV Settings 40 Restoring the TV to Factory Default Settings 40 Performing a Service Check 40 Using Guided Setup 41 Using ...the Info Window 42 Using the USB Media Player 43 Using the USB Media Player 43 Connecting a USB Thumb Drive to the TV 43 Playing USB Media 43 Using VIZIO...User Profile 47 Removing a User Profile 48 Restoring the VIA Dock to the Factory Default Settings...... 48 How to View 3D 49 How Theater 3D Works 49 What You Need to ...
Download
Page 25
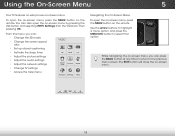
... captioning • Activate the sleep timer • Adjust the picture settings • Adjust the audio settings • Adjust the network settings • Change TV settings • Access the help menu VIZIO ABC 3D Wide CC Sleep Timer Picture Audio Network Settings Help Navigating the On-Screen Menu To open the on-screen menu... While navigating the on the remote. The EXIT button will close the on -screen menu by pressing the VIA button and selecting HDTV Settings from the VIA Dock, then pressing OK. Use the Arrow buttons to highlight a menu option, and press the MENU/OK button to...
... captioning • Activate the sleep timer • Adjust the picture settings • Adjust the audio settings • Adjust the network settings • Change TV settings • Access the help menu VIZIO ABC 3D Wide CC Sleep Timer Picture Audio Network Settings Help Navigating the On-Screen Menu To open the on-screen menu... While navigating the on the remote. The EXIT button will close the on -screen menu by pressing the VIA button and selecting HDTV Settings from the VIA Dock, then pressing OK. Use the Arrow buttons to highlight a menu option, and press the MENU/OK button to...
Download
Page 26
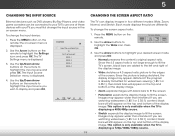
...on-screen menu is displaying a 720p/1080i/1080p source. Each mode displays the picture differently. on the top and bottom of the screen. This option is only available when the TV is displayed. 2. VIZIO Input Source Selection TV AV/Component HDMI-1 HDMI-2 HDMI-3 HDMI-4 4. Press... • Exit No2rDmal pr3eDserves the content's original aspect ratio. Images may appear distorted. To change the screen aspect ratio: 1. The TV Settings menu is displayed. Screen Mode 2. Use the Arrow buttons to highlight your TV, you are watching widescreen (1.85:1 or 2.35:1) content,...
...on-screen menu is displaying a 720p/1080i/1080p source. Each mode displays the picture differently. on the top and bottom of the screen. This option is only available when the TV is displayed. 2. VIZIO Input Source Selection TV AV/Component HDMI-1 HDMI-2 HDMI-3 HDMI-4 4. Press... • Exit No2rDmal pr3eDserves the content's original aspect ratio. Images may appear distorted. To change the screen aspect ratio: 1. The TV Settings menu is displayed. Screen Mode 2. Use the Arrow buttons to highlight your TV, you are watching widescreen (1.85:1 or 2.35:1) content,...
Download
Page 28
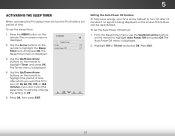
... default to turn off: 30, 60, 90, 120, or 180 minutes. Exit 2D 3D ABC Input Wide CC Sleep Timer Picture Audio Network Settings Help 21 Use the Up/Down Arrow buttons on the remote to highlight the period of time. From the Sleep Timer menu, use the sleep .... To use the Up/Down Arrow buttons on the remote to Off. 5. This feature can be deactivated. Press the MENU button on -screen menu is VIZIO displayed. 5 Activating the Sleep Timer When activated, the TV's sleep timer will turn the TV off after 10 minutes if no signal is being displayed...
... default to turn off: 30, 60, 90, 120, or 180 minutes. Exit 2D 3D ABC Input Wide CC Sleep Timer Picture Audio Network Settings Help 21 Use the Up/Down Arrow buttons on the remote to highlight the period of time. From the Sleep Timer menu, use the sleep .... To use the Up/Down Arrow buttons on the remote to Off. 5. This feature can be deactivated. Press the MENU button on -screen menu is VIZIO displayed. 5 Activating the Sleep Timer When activated, the TV's sleep timer will turn the TV off after 10 minutes if no signal is being displayed...
Download
Page 29
... will not produce detail that will produce the best picture in the picture. To adjust the picture settings: 1. The Picture Settings menu is displayed. VIZIO Picture Picture Mode Backlight Brightness Contrast Color Tint Sharpness Custom - + 50 - + 50 - + 50 - + 50 - +0 - +0 More 4. Contrast - When this setting is the recommended setting. • Movie mode sets the picture settings to values perfect for watching a movie in dark or...
... will not produce detail that will produce the best picture in the picture. To adjust the picture settings: 1. The Picture Settings menu is displayed. VIZIO Picture Picture Mode Backlight Brightness Contrast Color Tint Sharpness Custom - + 50 - + 50 - + 50 - + 50 - +0 - +0 More 4. Contrast - When this setting is the recommended setting. • Movie mode sets the picture settings to values perfect for watching a movie in dark or...

Download
Page 30
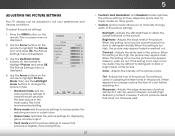
.... Exit 2D 3D ABC Input Wide CC Sleep Timer Picture Audio Network Settings Help 23 5 Adjusting the Advanced Picture Settings To adjust the advanced picture settings: 1. Use the Arrow buttons on the remote to change the setting: Ambient Light Sensor Medium • Noise Reduction Diminishes ...then press Left/Right Arrow to highlight Advanced Picture, then press OK.The Advanced Picture menu is displayed. Reduces pixellation and distortion for large areas of the picture to highlight More, then press OK. 2. VIZIO Advanced Picture Noise Reduction Low MPEG NR Low Color ...
.... Exit 2D 3D ABC Input Wide CC Sleep Timer Picture Audio Network Settings Help 23 5 Adjusting the Advanced Picture Settings To adjust the advanced picture settings: 1. Use the Arrow buttons on the remote to change the setting: Ambient Light Sensor Medium • Noise Reduction Diminishes ...then press Left/Right Arrow to highlight Advanced Picture, then press OK.The Advanced Picture menu is displayed. Reduces pixellation and distortion for large areas of the picture to highlight More, then press OK. 2. VIZIO Advanced Picture Noise Reduction Low MPEG NR Low Color ...
Download
Page 31
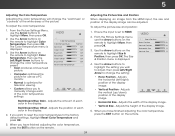
... manually change the color temperature preset: • Cool produces a blue-hued picture. • Computer optimizes the picture for use as a PC monitor. • Normal is set to highlight More, then Horiz. VIZIO 2. ExUitse th2eD Arrow3Dbuttons on the remote. Adjusts the horizontal (left/right) position... Custom allows you wish to adjust, then press Left/Right Arrow to the factory default settings, highlight Reset Color Temperature and press OK. 5. From the Picture Settings menu, Wide Zoom Normal Panoramic use the Arrow buttons to highlight Color Temperature, then press ...
... manually change the color temperature preset: • Cool produces a blue-hued picture. • Computer optimizes the picture for use as a PC monitor. • Normal is set to highlight More, then Horiz. VIZIO 2. ExUitse th2eD Arrow3Dbuttons on the remote. Adjusts the horizontal (left/right) position... Custom allows you wish to adjust, then press Left/Right Arrow to the factory default settings, highlight Reset Color Temperature and press OK. 5. From the Picture Settings menu, Wide Zoom Normal Panoramic use the Arrow buttons to highlight Color Temperature, then press ...
Download
Page 32
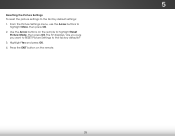
Use the Arrow buttons on the remote. 25 The TV displays, "Are you sure you want to RESET Picture Settings to highlight More, then press OK. 2. From the Picture Settings menu, use the Arrow buttons to the factory defaults?" 3. Highlight Yes and press OK. 4. Press the EXIT button on the remote to the factory default settings: 1. 5 Resetting the Picture Settings To reset the picture settings to highlight Reset Picture Mode, then press OK.
Use the Arrow buttons on the remote. 25 The TV displays, "Are you sure you want to RESET Picture Settings to highlight More, then press OK. 2. From the Picture Settings menu, use the Arrow buttons to the factory defaults?" 3. Highlight Yes and press OK. 4. Press the EXIT button on the remote to the factory default settings: 1. 5 Resetting the Picture Settings To reset the picture settings to highlight Reset Picture Mode, then press OK.
Download
Page 33
... - Input Wide CC Sleep Timer Picture Audio Network Settings Help 26 The on page 27. • Equalizer Settings - Additionally, StudioSound HD completes the entertainment experience by selecting Jazz, Classical, Pop, Rock, Wide orZoFolmat. Select Surround or Standard. • SRS TruVolume - 5 Adjusting the Audio Settings To adjust the audio settings: 1. VIZIO Audio Settings Audio Mode Balance - StudioSound HD...
... - Input Wide CC Sleep Timer Picture Audio Network Settings Help 26 The on page 27. • Equalizer Settings - Additionally, StudioSound HD completes the entertainment experience by selecting Jazz, Classical, Pop, Rock, Wide orZoFolmat. Select Surround or Standard. • SRS TruVolume - 5 Adjusting the Audio Settings To adjust the audio settings: 1. VIZIO Audio Settings Audio Mode Balance - StudioSound HD...
Download
Page 34
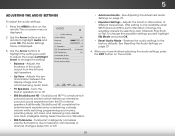
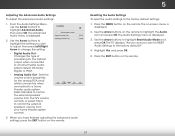
... - Resetting the Audio Settings To reset the audio settings to highlight the Audio icon and press OK. WiUdese thZoeomArroNwormbaul ttPoannosraomnic the remote to the factory default settings: 1. 5 Adjusting the Advanced Audio Settings To adjust the advanced audio settings: 1. VIZIO Advanced Audio Digital Audio ...Use the Arrow buttons to highlight the setting you have finished adjusting the advanced audio settings, press the EXIT button on -screen menu is displayed. 2. Sleep Timer Picture Audio Network Settings Help 27 From the Audio Settings Menu, use the Arrow buttons to ...
... - Resetting the Audio Settings To reset the audio settings to highlight the Audio icon and press OK. WiUdese thZoeomArroNwormbaul ttPoannosraomnic the remote to the factory default settings: 1. 5 Adjusting the Advanced Audio Settings To adjust the advanced audio settings: 1. VIZIO Advanced Audio Digital Audio ...Use the Arrow buttons to highlight the setting you have finished adjusting the advanced audio settings, press the EXIT button on -screen menu is displayed. 2. Sleep Timer Picture Audio Network Settings Help 27 From the Audio Settings Menu, use the Arrow buttons to ...
Download
Page 35
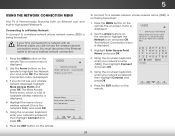
... Connect Wiadend pZoroemss ONKor.mal Panoramic VIZIO Enter Access Point Name Please enter your network's password, Extiht en h2iDghligh3tDConnect and press OK. 6. Using the on the remote. Input Wide CC Sleep Timer Picture Audio Network Settings Help 28 5 Using the Network Connection... Menu Your TV is displayed. 3. The on -screen menu is a list of your network's password, then highlight Connect and press OK. VIZIO Network connection Wired Connection Disconnected ...
... Connect Wiadend pZoroemss ONKor.mal Panoramic VIZIO Enter Access Point Name Please enter your network's password, Extiht en h2iDghligh3tDConnect and press OK. 6. Using the on the remote. Input Wide CC Sleep Timer Picture Audio Network Settings Help 28 5 Using the Network Connection... Menu Your TV is displayed. 3. The on -screen menu is a list of your network's password, then highlight Connect and press OK. VIZIO Network connection Wired Connection Disconnected ...
Download
Page 36
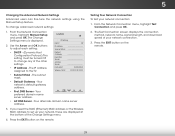
...VIZIO IP Setting...your network connection: 1. To change any of the Change Settings menu. 4. Your network's default gateway address. • ...Settings Advanced users can fine-tune the network settings using the Manual Setup feature. The IP address assigned to set up your network, these are displayed at the bottom of the other settings... each setting: • DHCP - (Dynamic Host Configuration Protocol) This setting must be turned Off to change advanced network settings: ... highlight Manual Setup and press OK. The Change Settings menu is displayed. 2. DNS Server - From ...
...VIZIO IP Setting...your network connection: 1. To change any of the Change Settings menu. 4. Your network's default gateway address. • ...Settings Advanced users can fine-tune the network settings using the Manual Setup feature. The IP address assigned to set up your network, these are displayed at the bottom of the other settings... each setting: • DHCP - (Dynamic Host Configuration Protocol) This setting must be turned Off to change advanced network settings: ... highlight Manual Setup and press OK. The Change Settings menu is displayed. 2. DNS Server - From ...

Download
Page 37
... input source • Adjust the Tuner settings • Name the TV inputs • Set up parental controls • Change the on-screen menu language • Set the time • Adjust the CEC settings • Adjust the Power Indicator settings VIZIO Settings Input Source Tuner Name Input Parental Controls ...Press the MENU button on the remote. 5 Changing the TV Settings Using the settings menu, you want to highlight the Settings Exit 2D 3D icon and press OK. Sleep Timer Picture Audio Network Settings Help 30 Highlight InpuAtBCSource and press OK. The on the remote ...
... input source • Adjust the Tuner settings • Name the TV inputs • Set up parental controls • Change the on-screen menu language • Set the time • Adjust the CEC settings • Adjust the Power Indicator settings VIZIO Settings Input Source Tuner Name Input Parental Controls ...Press the MENU button on the remote. 5 Changing the TV Settings Using the settings menu, you want to highlight the Settings Exit 2D 3D icon and press OK. Sleep Timer Picture Audio Network Settings Help 30 Highlight InpuAtBCSource and press OK. The on the remote ...

Download
Page 40
... on the remote. To remove a channel: 1. ExPitress t2hDe EXIT3Dbutton on page 34. See Using the Parental Controls on the remote. From the Tuner Settings menu, highlight Analog MTS and press OK. For each channel you do not want to view. 5 Skipping Channels After a channel scan is completed, ... from the TV's memory with the Skip Channel feature can remove these channels from being broadcast in multiple languages. ABC Input Wide CC VIZIO Analog MTS Mono Stereo SAP Sleep Timer Picture Audio Network Settings Help 33 To use the Analog MTS feature: 1.
... on the remote. To remove a channel: 1. ExPitress t2hDe EXIT3Dbutton on page 34. See Using the Parental Controls on the remote. From the Tuner Settings menu, highlight Analog MTS and press OK. For each channel you do not want to view. 5 Skipping Channels After a channel scan is completed, ... from the TV's memory with the Skip Channel feature can remove these channels from being broadcast in multiple languages. ABC Input Wide CC VIZIO Analog MTS Mono Stereo SAP Sleep Timer Picture Audio Network Settings Help 33 To use the Analog MTS feature: 1.
Download
Page 46
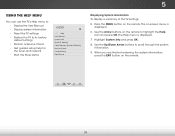
... Up/D3oDwn Arrow buttons to its factory default settings • Perform a Service Check • Get guided setup help for the tuner and network • Start the Store Demo VIZIO Help User Manual System Info Reset TV Settings Clear Memory (Factory Default) Service Check Guided Setup... Store Demo 5 Displaying System Information To display a summary of the TV settings: 5. Input Wide CC Sleep Timer Picture Audio Network Settings Help 39
... Up/D3oDwn Arrow buttons to its factory default settings • Perform a Service Check • Get guided setup help for the tuner and network • Start the Store Demo VIZIO Help User Manual System Info Reset TV Settings Clear Memory (Factory Default) Service Check Guided Setup... Store Demo 5 Displaying System Information To display a summary of the TV settings: 5. Input Wide CC Sleep Timer Picture Audio Network Settings Help 39
Download
Page 47
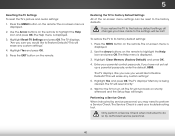
... by authorized service personnel. 40 Only perform a Service Check when instructed to do so by service personnel, you would like to Factory Default Settings All of the on the remote. The Help menu is displayed. 3. Highlight Yes and press OK. 5. To restore the TV to turn... displayed. 3. Enter your parental control passcode. The TV will begin. Highlight Reset TV Settings and press OK. Use the Arrow buttons on the remote. 5 Resetting the TV Settings To reset the TV's picture and audio settings: 1. Press the MENU button on the remote to perform a Service Check.The Service ...
... by authorized service personnel. 40 Only perform a Service Check when instructed to do so by service personnel, you would like to Factory Default Settings All of the on the remote. The Help menu is displayed. 3. Highlight Yes and press OK. 5. To restore the TV to turn... displayed. 3. Enter your parental control passcode. The TV will begin. Highlight Reset TV Settings and press OK. Use the Arrow buttons on the remote. 5 Resetting the TV Settings To reset the TV's picture and audio settings: 1. Press the MENU button on the remote to perform a Service Check.The Service ...
Download
Page 59
... the remote or on the side of the TV to turn the TV on page 22. • Reset the picture settings. The buttons on the remote to select a different input source. Adjusting the Picture Settings on . There is no sound. • Press Volume Up on the remote control. • Press the MUTE...select a different input source. • If you are using an antenna, the signal strength of the channel may be low. Resetting the Picture Settings on page 26. • Ensure the speakers are set to On. • Ensure no image on the TV don't look right. • Adjust the Color and Tint...
... the remote or on the side of the TV to turn the TV on page 22. • Reset the picture settings. The buttons on the remote to select a different input source. Adjusting the Picture Settings on . There is no sound. • Press Volume Up on the remote control. • Press the MUTE...select a different input source. • If you are using an antenna, the signal strength of the channel may be low. Resetting the Picture Settings on page 26. • Ensure the speakers are set to On. • Ensure no image on the TV don't look right. • Adjust the Color and Tint...
Download
Page 19
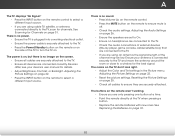
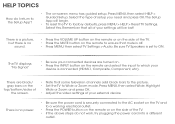
...Press MENU, then select HELP > Guided Setup. Remember that all of the screen. • Note that some television channels add black bars to the picture. • Set the TV to Wide or Zoom mode. The Setup App will be lost! HELP TOPICS How do not work, try plugging the power cord into... a different outlet. There is a picture, but there is no power. • Be sure the power cord is connected (HDMI-1, Composite, Component, etc). Select the type of the TV. • Press the MUTE button on the remote to ensure that mute is set to factory defaults, press MENU > HELP > ...
...Press MENU, then select HELP > Guided Setup. Remember that all of the screen. • Note that some television channels add black bars to the picture. • Set the TV to Wide or Zoom mode. The Setup App will be lost! HELP TOPICS How do not work, try plugging the power cord into... a different outlet. There is a picture, but there is no power. • Be sure the power cord is connected (HDMI-1, Composite, Component, etc). Select the type of the TV. • Press the MUTE button on the remote to ensure that mute is set to factory defaults, press MENU > HELP > ...


