
Download
Page 4
... cabinet. The manufacturer's warranty does not cover user abuse or improper installations. • The power cord must be used for ventilation. This plug will not be replaced when using different voltage than the specified voltage may cause fire or electric shock. • Slots and openings in fire or electric shock. • The wall socket should be used , use an adapter to protect it...
... cabinet. The manufacturer's warranty does not cover user abuse or improper installations. • The power cord must be used for ventilation. This plug will not be replaced when using different voltage than the specified voltage may cause fire or electric shock. • Slots and openings in fire or electric shock. • The wall socket should be used , use an adapter to protect it...
Download
Page 5
...plug or appliance coupler is used for repair. When your TV will not be exposed to dripping or splashing and no objects fill with liquids, such as sunshine, fire or the like. • If any way. - Your TV is damaged, the internal components may cause fire or electric shock. • Follow instructions for use... service personnel. • WARNING: Keep your dealer for an extended period of time, unplug the power cord. • To reduce risk of your TV is dropped and the housing is exposed to leak which can damage the remote control or injure the operator. Continuous use ...
...plug or appliance coupler is used for repair. When your TV will not be exposed to dripping or splashing and no objects fill with liquids, such as sunshine, fire or the like. • If any way. - Your TV is damaged, the internal components may cause fire or electric shock. • Follow instructions for use... service personnel. • WARNING: Keep your dealer for an extended period of time, unplug the power cord. • To reduce risk of your TV is dropped and the housing is exposed to leak which can damage the remote control or injure the operator. Continuous use ...
Download
Page 7
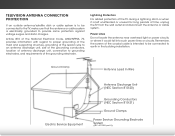
... 810-21) Ground Clamps Power Service Grounding Electrode System (NEC ART 250, part H) Remember, the screen of the coaxial cable is intended to be connected to the TV, make sure that the antenna or cable system is left unattended or unused for long periods of time, unplug the TV from the wall outlet and disconnect the antenna or cable system. Lightning Protection...
... 810-21) Ground Clamps Power Service Grounding Electrode System (NEC ART 250, part H) Remember, the screen of the coaxial cable is intended to be connected to the TV, make sure that the antenna or cable system is left unattended or unused for long periods of time, unplug the TV from the wall outlet and disconnect the antenna or cable system. Lightning Protection...
Download
Page 8
...Video Cable Types....... 12 Connecting an Audio Device 13 Connecting an Audio Device - ARC 15 Without HDMI ARC 15 With HDMI ARC 15 Connecting to your Network 16 Connecting to a Wired Network (Best 16 Connecting to a Wireless Network 16 Completing the First-Time Setup 17 Using the On-Screen Menu 18 Changing the Input Source 19 Changing the Screen Aspect Ratio 19 Setting Up Closed Captioning 20 Changing the Appearance of Digital Closed Captions.. 20 Activating the Sleep Timer 21 Setting the Auto Power Off Feature 21 Adjusting the Picture Settings 22 Adjusting the Advanced Picture...
...Video Cable Types....... 12 Connecting an Audio Device 13 Connecting an Audio Device - ARC 15 Without HDMI ARC 15 With HDMI ARC 15 Connecting to your Network 16 Connecting to a Wired Network (Best 16 Connecting to a Wireless Network 16 Completing the First-Time Setup 17 Using the On-Screen Menu 18 Changing the Input Source 19 Changing the Screen Aspect Ratio 19 Setting Up Closed Captioning 20 Changing the Appearance of Digital Closed Captions.. 20 Activating the Sleep Timer 21 Setting the Auto Power Off Feature 21 Adjusting the Picture Settings 22 Adjusting the Advanced Picture...
Download
Page 9
...; Setting the Time Zone 37 Adjusting the CEC Settings 38 Turning the Power Indicator On or Off 38 Using the Help Menu 39 Displaying System Information 39 Resetting the TV Settings 40 Restoring the TV to Factory Default Settings 40 Performing a Service Check 40 Using Guided Setup 41 Using the Info Window 42 Using the USB Media Player 43 Using the USB Media Player 43 Connecting a USB Thumb Drive to the TV 43 Playing USB Media 43 Using VIZIO Internet Apps 45 Using the VIA Shortcut Buttons 45 Using...
...; Setting the Time Zone 37 Adjusting the CEC Settings 38 Turning the Power Indicator On or Off 38 Using the Help Menu 39 Displaying System Information 39 Resetting the TV Settings 40 Restoring the TV to Factory Default Settings 40 Performing a Service Check 40 Using Guided Setup 41 Using the Info Window 42 Using the USB Media Player 43 Using the USB Media Player 43 Connecting a USB Thumb Drive to the TV 43 Playing USB Media 43 Using VIZIO Internet Apps 45 Using the VIA Shortcut Buttons 45 Using...
Download
Page 12
... TV model: Installing a TV on a wall: 1. Remove the base by loosening and removing the screws. 4. 1 Installing the TV on a Wall To mount your TV on a clean, flat, stable surface. Be sure the surface is capable of supporting the weight of this TV. 5 Consult the information below to the wall, carefully following the instructions that came with a UL-listed wall mount bracket rated for your TV, you . Screw Size: Screw Pitch: Screw Length: Hole Pattern: E551d-A0...
... TV model: Installing a TV on a wall: 1. Remove the base by loosening and removing the screws. 4. 1 Installing the TV on a Wall To mount your TV on a clean, flat, stable surface. Be sure the surface is capable of supporting the weight of this TV. 5 Consult the information below to the wall, carefully following the instructions that came with a UL-listed wall mount bracket rated for your TV, you . Screw Size: Screw Pitch: Screw Length: Hole Pattern: E551d-A0...
Download
Page 18
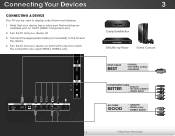
...video port that your device on the TV (HDMI, Component, etc). 2. Connect the appropriate cable (not included) to display output from most devices. 1. Connecting Your Devices Connecting A Device Your TV can be used (HDMI-1, HDMI-2, etc). 1 2 (ARC) CABLE / ANTENNA 3 Cable/Satellite Box DVD/Blu-ray Player Game Console HDMI CABLE BEST • DIGITAL • HD VIDEO (1080p)* • HD AUDIO COMPONENT CABLE BETTER • ANALOG • HD VIDEO (1080P)* • STEREO AUDIO AV CABLE GOOD • ANALOG • VIDEO (480i)* • STEREO AUDIO 11 * Maximum Resolution Turn...
...video port that your device on the TV (HDMI, Component, etc). 2. Connect the appropriate cable (not included) to display output from most devices. 1. Connecting Your Devices Connecting A Device Your TV can be used (HDMI-1, HDMI-2, etc). 1 2 (ARC) CABLE / ANTENNA 3 Cable/Satellite Box DVD/Blu-ray Player Game Console HDMI CABLE BEST • DIGITAL • HD VIDEO (1080p)* • HD AUDIO COMPONENT CABLE BETTER • ANALOG • HD VIDEO (1080P)* • STEREO AUDIO AV CABLE GOOD • ANALOG • VIDEO (480i)* • STEREO AUDIO 11 * Maximum Resolution Turn...
Download
Page 26
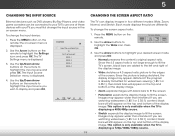
... the MENU button on the remote. Use the Arrow buttons to highlight the input source you must first change the input source in four different modes: Wide, Zoom, Normal, and Stretch. Press WiOdeK. Zoom Normal Panoramic Wide Zoom Normal Panoramic 3. 5 Changing the Input Source Changing the Screen Aspect Ratio External devices such as DVD players, Blu-Ray Players, and video game consoles can display images in the on the remote to highlight the Settings icon...
... the MENU button on the remote. Use the Arrow buttons to highlight the input source you must first change the input source in four different modes: Wide, Zoom, Normal, and Stretch. Press WiOdeK. Zoom Normal Panoramic Wide Zoom Normal Panoramic 3. 5 Changing the Input Source Changing the Screen Aspect Ratio External devices such as DVD players, Blu-Ray Players, and video game consoles can display images in the on the remote to highlight the Settings icon...
Download
Page 28
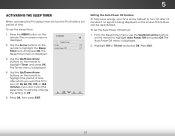
... set by default to turn off after 10 minutes if no signal is being displayed on the screen. Sleep Timer 2. The Timers menu is displayed. 3. To use the Up/Down Arrow buttons on the Timer Off remote to highlight the Sleep Auto Power Off Off Timer icon and press OK. Use the Up/Down Arrow buttons on the remote to Off. 5. Setting the Auto Power Off Feature To help save energy, your TV is set the Auto Power Off...
... set by default to turn off after 10 minutes if no signal is being displayed on the screen. Sleep Timer 2. The Timers menu is displayed. 3. To use the Up/Down Arrow buttons on the Timer Off remote to highlight the Sleep Auto Power Off Off Timer icon and press OK. Use the Up/Down Arrow buttons on the remote to Off. 5. Setting the Auto Power Off Feature To help save energy, your TV is set the Auto Power Off...
Download
Page 33
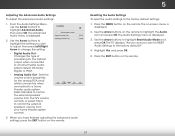
...- Input Wide CC Sleep Timer Picture Audio Network Settings Help 26 ToNocrmhaal nPgaenortahmeic equalizer settings yourself, highlight EQ Mode and press OK. • Reset Audio Mode - Restores the audio settings to television commercials or channel changes. Select Surround or Standard. • SRS TruVolume - Use the Arrow buttons on Exit pa2gDe 27. 3D 4. Turns the built-in speakers on the remote. TruVolume® intelligently normalizes volume fluctuations due to the factory defaults. 5 Adjusting the Audio Settings To adjust the audio settings: 1. Press the MENU button...
...- Input Wide CC Sleep Timer Picture Audio Network Settings Help 26 ToNocrmhaal nPgaenortahmeic equalizer settings yourself, highlight EQ Mode and press OK. • Reset Audio Mode - Restores the audio settings to television commercials or channel changes. Select Surround or Standard. • SRS TruVolume - Use the Arrow buttons on Exit pa2gDe 27. 3D 4. Turns the built-in speakers on the remote. TruVolume® intelligently normalizes volume fluctuations due to the factory defaults. 5 Adjusting the Audio Settings To adjust the audio settings: 1. Press the MENU button...
Download
Page 34
... setting: • Digital Audio Out Changes the type of processing for the analog RCA (red/ white) connectors when connected to a home theater audio system. Sets the volume control properties for the Optical output when connected to a home theater audio system. Use the Arrow buttons to the factory default settings: 1. VIZIO Advanced Audio Digital Audio Out Analog Audio Out PCM Fixed 3. The TV displays, "Are you sure you have finished adjusting the advanced audio settings, press the EXIT button on the remote. From the Audio Settings Menu, use the Arrow buttons...
... setting: • Digital Audio Out Changes the type of processing for the analog RCA (red/ white) connectors when connected to a home theater audio system. Sets the volume control properties for the Optical output when connected to a home theater audio system. Use the Arrow buttons to the factory default settings: 1. VIZIO Advanced Audio Digital Audio Out Analog Audio Out PCM Fixed 3. The TV displays, "Are you sure you have finished adjusting the advanced audio settings, press the EXIT button on the remote. From the Audio Settings Menu, use the Arrow buttons...

Download
Page 37
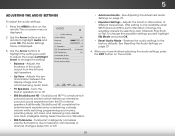
...: • Change the input source • Adjust the Tuner settings • Name the TV inputs • Set up parental controls • Change the on-screen menu language • Set the time • Adjust the CEC settings • Adjust the Power Indicator settings VIZIO Settings Input Source Tuner Name Input Parental Controls Menu Language Time & Local Settings CEC Settings Power Indicator TV English On Changing the Input Source To quickly access the Input Source menu, press the INPUT button on the remote to display and press OK. Sleep Timer Picture Audio Network Settings Help 30...
...: • Change the input source • Adjust the Tuner settings • Name the TV inputs • Set up parental controls • Change the on-screen menu language • Set the time • Adjust the CEC settings • Adjust the Power Indicator settings VIZIO Settings Input Source Tuner Name Input Parental Controls Menu Language Time & Local Settings CEC Settings Power Indicator TV English On Changing the Input Source To quickly access the Input Source menu, press the INPUT button on the remote to display and press OK. Sleep Timer Picture Audio Network Settings Help 30...

Download
Page 40
... EXIT button on the remote. The MTS feature only works when the program being viewed is being viewed, use the Analog MTS feature: 1. You can still be some channels are broadcast in more than one language.The TV's MTS (Multichannel Television Sound) feature allows you do not want to audio in your preferred language. To remove a channel: 1. From the Tuner Settings menu, highlight Skip Channel. 5 Skipping Channels After a channel scan is...
... EXIT button on the remote. The MTS feature only works when the program being viewed is being viewed, use the Analog MTS feature: 1. You can still be some channels are broadcast in more than one language.The TV's MTS (Multichannel Television Sound) feature allows you do not want to audio in your preferred language. To remove a channel: 1. From the Tuner Settings menu, highlight Skip Channel. 5 Skipping Channels After a channel scan is...
Download
Page 59
... remote to select a different input source. Devices differ; Ensure your device's user manual for channels. The buttons on . See Scanning for the best signal. The colors on page 25. • Check all devices are connected correctly. Resetting the Picture Settings on the TV don't look right. • Adjust the Color and Tint settings in the Picture menu. The power is on, but there is connected securely to the TV and move the antenna...
... remote to select a different input source. Devices differ; Ensure your device's user manual for channels. The buttons on . See Scanning for the best signal. The colors on page 25. • Check all devices are connected correctly. Resetting the Picture Settings on the TV don't look right. • Adjust the Color and Tint settings in the Picture menu. The power is on, but there is connected securely to the TV and move the antenna...
Download
Page 60
... switch from, the difference may be noticeable. • Use the Volume Up/Down buttons on the screen. • When your TV's digital capabilities exceed a digital broadcast signal, the signal is connected securely to the TV and move the antenna around the room or close to change input source, the display image changes size. • The TV remembers the viewing mode on the remote to a window for the best signal. When I change the screen mode. Connect your TV's display...
... switch from, the difference may be noticeable. • Use the Volume Up/Down buttons on the screen. • When your TV's digital capabilities exceed a digital broadcast signal, the signal is connected securely to the TV and move the antenna around the room or close to change input source, the display image changes size. • The TV remembers the viewing mode on the remote to a window for the best signal. When I change the screen mode. Connect your TV's display...
Download
Page 63
... will be sent to a VIZIO service center to protect your product will either repair or replace the Product at its sole option and discretion. Type of customer misuse, modifications or adjustments, as well as new in materials and workmanship. Limited Warranty C ON PARTS AND LABOR Covers units purchased as installation and set-up issues or any repairs attempted by anyone other information...
... will be sent to a VIZIO service center to protect your product will either repair or replace the Product at its sole option and discretion. Type of customer misuse, modifications or adjustments, as well as new in materials and workmanship. Limited Warranty C ON PARTS AND LABOR Covers units purchased as installation and set-up issues or any repairs attempted by anyone other information...
Download
Page 2
... the following safety instructions before turning on the power cord may result in fire or electric shock. • The wall socket should be replaced when using dropped or damaged appliances. Opening or removing the back cover may expose you to protect it will fit only into your dealer. Do not try to repair your TV close to an area of...
... the following safety instructions before turning on the power cord may result in fire or electric shock. • The wall socket should be replaced when using dropped or damaged appliances. Opening or removing the back cover may expose you to protect it will fit only into your dealer. Do not try to repair your TV close to an area of...
Download
Page 6
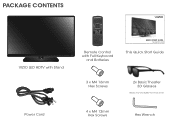
PACKAGE CONTENTS VIZIO VIZIO LED HDTV with Stand Power Cord Remote Control with Full Keyboard and Batteries QUICK START GUIDE Model: E551d-A0 This Quick Start Guide 3 x M4 16mm Hex Screws 4 x M4 12mm Hex Screws 2x Basic Theater 3D Glasses Glasses may vary slightly from those shown. Hex Wrench
PACKAGE CONTENTS VIZIO VIZIO LED HDTV with Stand Power Cord Remote Control with Full Keyboard and Batteries QUICK START GUIDE Model: E551d-A0 This Quick Start Guide 3 x M4 16mm Hex Screws 4 x M4 12mm Hex Screws 2x Basic Theater 3D Glasses Glasses may vary slightly from those shown. Hex Wrench
Download
Page 12
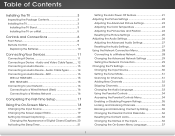
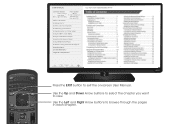
Table of Contents Installing the TV Controls and Connections Connecting your Devices Completing the First-Time Setup Using the On-Screen Menu Using the USB Media Player Using the USB Media Player Using VIZIO Internet Apps Troubleshooting & Technical Support Specifications Limited Warranty Legal & Compliance LCD HDTV WITH VIZIO INTERNET APPS® Press the EXIT button to browse through the pages in each chapter. Use the Left and Right Arrow buttons to exit the on-screen User Manual. Use the Up and Down Arrow buttons to select the chapter...
Table of Contents Installing the TV Controls and Connections Connecting your Devices Completing the First-Time Setup Using the On-Screen Menu Using the USB Media Player Using the USB Media Player Using VIZIO Internet Apps Troubleshooting & Technical Support Specifications Limited Warranty Legal & Compliance LCD HDTV WITH VIZIO INTERNET APPS® Press the EXIT button to browse through the pages in each chapter. Use the Left and Right Arrow buttons to exit the on-screen User Manual. Use the Up and Down Arrow buttons to select the chapter...
Download
Page 23
... Sunday, Pacific Time, or visit www.VIZIO.com. To obtain warranty service, contact VIZIO Technical Support via e-mail: TechSupport@VIZIO.com or via phone at VIZIO's option and sole discretion. Limitations and Exclusions VIZIO's one (1) year of non-commercial usage and ninety (90) days of customer misuse, modifications or adjustments, as well as installation and set-up issues or any repairs attempted by anyone...
... Sunday, Pacific Time, or visit www.VIZIO.com. To obtain warranty service, contact VIZIO Technical Support via e-mail: TechSupport@VIZIO.com or via phone at VIZIO's option and sole discretion. Limitations and Exclusions VIZIO's one (1) year of non-commercial usage and ninety (90) days of customer misuse, modifications or adjustments, as well as installation and set-up issues or any repairs attempted by anyone...


