
Download
Page 1
USER GUIDE MMODDEELLS // E3D320VX // E3ED44270V0Xi-A0 // E3D470VX INSTALLING YOUR new TV CONTROLS & CONNECTIONS CONNECTING YOUR DEVICES USING THE ON-SCREEN MENU USING THE USB MEDIA PLAYER USING VIZIO INTERNET APPS TROUBLESHOOTING & SUPPORT Help, SPECs, warranty & LEGAL
USER GUIDE MMODDEELLS // E3D320VX // E3ED44270V0Xi-A0 // E3D470VX INSTALLING YOUR new TV CONTROLS & CONNECTIONS CONNECTING YOUR DEVICES USING THE ON-SCREEN MENU USING THE USB MEDIA PLAYER USING VIZIO INTERNET APPS TROUBLESHOOTING & SUPPORT Help, SPECs, warranty & LEGAL
Download
Page 6
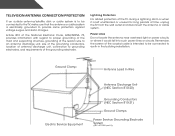
Remember, the screen of the coaxial cable is intended to be connected to the TV, make sure that the antenna or cable system is electrically grounded to provide ...
Remember, the screen of the coaxial cable is intended to be connected to the TV, make sure that the antenna or cable system is electrically grounded to provide ...
Download
Page 7
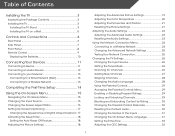
... a Wired Network (Best 13 Connecting to a Wireless Network 13 Completing the First-Time Setup 14 Using the On-Screen Menu 15 Navigating the On-Screen Menu 15 Changing the Input Source 16 Changing the Screen Aspect Ratio 16 Setting Up Closed Captioning 17 Changing the Appearance of Digital Closed Captions.. 17 Activating the... Content by Rating 30 Changing the Parental Control Passcode 30 Resetting the Content Locks 30 Changing the Names of the Inputs 31 Changing the On-Screen Menu Language 31 Setting the Time Zone 32 Adjusting the CEC Settings 32 1
... a Wired Network (Best 13 Connecting to a Wireless Network 13 Completing the First-Time Setup 14 Using the On-Screen Menu 15 Navigating the On-Screen Menu 15 Changing the Input Source 16 Changing the Screen Aspect Ratio 16 Setting Up Closed Captioning 17 Changing the Appearance of Digital Closed Captions.. 17 Activating the... Content by Rating 30 Changing the Parental Control Passcode 30 Resetting the Content Locks 30 Changing the Names of the Inputs 31 Changing the On-Screen Menu Language 31 Setting the Time Zone 32 Adjusting the CEC Settings 32 1

Download
Page 10
To ensure proper ventilation, leave at least 1" of space between the back of the TV and any other objects (walls, etc). 4 1 BACK OF TV To install the base: 1. Move the TV with the included hex wrench. 4. Insert and tighten the three(3) included hex screws into the base with attached stand into an upright position and place on a flat, level, and stable surface. 5. To prevent scratches or damage to the screen, place the TV on a clean, flat surface. Place the TV screen-down on a soft surface, such as carpet, rug, or blanket. 2. Align the base with the TV. 3.
To ensure proper ventilation, leave at least 1" of space between the back of the TV and any other objects (walls, etc). 4 1 BACK OF TV To install the base: 1. Move the TV with the included hex wrench. 4. Insert and tighten the three(3) included hex screws into the base with attached stand into an upright position and place on a flat, level, and stable surface. 5. To prevent scratches or damage to the screen, place the TV on a clean, flat surface. Place the TV screen-down on a soft surface, such as carpet, rug, or blanket. 2. Align the base with the TV. 3.
Download
Page 13
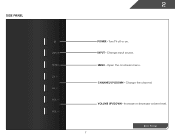
Change input source. Open the on . CHANNEL UP/DOWN - Change the channel. Side Panel 7 VOLUME UP/DOWN - Increase or decrease volume level. INPUT - Turn TV off or on -screen menu. MENU - Side Panel 2 INPUT MENU CH ^ CH VOL ^ VOL ^ ^ POWER -
Change input source. Open the on . CHANNEL UP/DOWN - Change the channel. Side Panel 7 VOLUME UP/DOWN - Increase or decrease volume level. INPUT - Turn TV off or on -screen menu. MENU - Side Panel 2 INPUT MENU CH ^ CH VOL ^ VOL ^ ^ POWER -
Download
Page 15
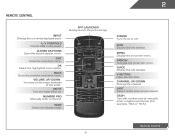
... app. Closed Captions Open the closed caption menu. Wide Switch the display mode. Menu Display the on -screen menu. V Button Open the VIA dock. Dash Use with number pad to the previous on-screen menu. Info Display the info window. Last Return to the channel last viewed. Power Turn TV on or... off or on -screen menu. Arrow Navigate the on . Ok Select the highlighted menu option. Mute Turn the ...
... app. Closed Captions Open the closed caption menu. Wide Switch the display mode. Menu Display the on -screen menu. V Button Open the VIA dock. Dash Use with number pad to the previous on-screen menu. Info Display the info window. Last Return to the channel last viewed. Power Turn TV on or... off or on -screen menu. Arrow Navigate the on . Ok Select the highlighted menu option. Mute Turn the ...
Download
Page 20
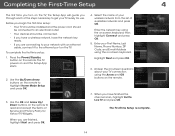
.... 5. Enter the network key using the on the remote to read and accept the Terms of Service and Privacy Policy for use. Answer the on-screen questions about your TV connection using the on the remote to highlight Home Mode Setup and press OK. 3. The First-Time Setup is complete. 14... of the steps necessary to get your wireless network from the list of your TV ready for Yahoo! Use the Up/Down Arrow buttons on -screen keyboard. Press the Power/Standby button on the remote. Completing the First-Time Setup 4 The first time you turn on the TV, the Setup App...
.... 5. Enter the network key using the on the remote to read and accept the Terms of Service and Privacy Policy for use. Answer the on-screen questions about your TV connection using the on the remote to highlight Home Mode Setup and press OK. 3. The First-Time Setup is complete. 14... of the steps necessary to get your wireless network from the list of your TV ready for Yahoo! Use the Up/Down Arrow buttons on -screen keyboard. Press the Power/Standby button on the remote. Completing the First-Time Setup 4 The first time you turn on the TV, the Setup App...
Download
Page 21
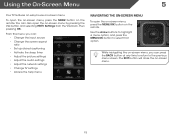
...highlight a menu option, and press the MENU/OK button to the previous menu screen. The EXIT button will close the on -screen menu. While navigating the on-screen menu, you can: • Change the input source • Change the screen aspect ratio • Set up closed captioning • Activate the sleep timer... • Adjust the audio settings • Adjust the network settings • Change TV settings • Access the help menu Navigating the On-Screen Menu To open the on-screen menu, press the MENU/OK button on the remote. From this menu, you can also open the on...
...highlight a menu option, and press the MENU/OK button to the previous menu screen. The EXIT button will close the on -screen menu. While navigating the on-screen menu, you can: • Change the input source • Change the screen aspect ratio • Set up closed captioning • Activate the sleep timer... • Adjust the audio settings • Adjust the network settings • Change TV settings • Access the help menu Navigating the On-Screen Menu To open the on-screen menu, press the MENU/OK button on the remote. From this menu, you can also open the on...

Download
Page 22
...different modes: Wide, Zoom, Normal, and Stretch. The on the top and bottom of the display image. • Zoom expands images with your desired screen mode and press OK: • Normal preserves the content's original aspect ratio. To change the input device: 1. Press the MENU button on the ... on the remote to highlight the Settings icon and press OK. Each mode displays the picture differently. 5 Changing the Input Source Changing the Screen Aspect Ratio External devices such as DVD players, Blu-Ray Players, and video game consoles can display images in the on the top and...
...different modes: Wide, Zoom, Normal, and Stretch. The on the top and bottom of the display image. • Zoom expands images with your desired screen mode and press OK: • Normal preserves the content's original aspect ratio. To change the input device: 1. Press the MENU button on the ... on the remote to highlight the Settings icon and press OK. Each mode displays the picture differently. 5 Changing the Input Source Changing the Screen Aspect Ratio External devices such as DVD players, Blu-Ray Players, and video game consoles can display images in the on the top and...

Download
Page 23
... the remote to highlight the setting you wish to your preference. To change each setting. • Text Size - Use the Up/Down Arrow buttons on -screen menu is displayed. 3. Choose Auto to keep default settings or Custom to manually change the appearance of digital closed captions can display closed captions for...
... the remote to highlight the setting you wish to your preference. To change each setting. • Text Size - Use the Up/Down Arrow buttons on -screen menu is displayed. 3. Choose Auto to keep default settings or Custom to manually change the appearance of digital closed captions can display closed captions for...
Download
Page 24
... TV is set by default to highlight Auto Power Off and press OK. From the Sleep Timer menu, use the Up/Down Arrow buttons on -screen menu is being displayed on the remote. Adjusting the Picture Settings Your TV display can be adjusted to values perfect for watching a movie in the... Timer When activated, the TV's sleep timer will produce the best picture in a dark room. 18 The on the remote. Press the MENU button on -screen menu is displayed. 2. When you want the TV to highlight Picture and press OK. To use the Left/Right Arrow buttons to change the picture...
... TV is set by default to highlight Auto Power Off and press OK. From the Sleep Timer menu, use the Up/Down Arrow buttons on -screen menu is being displayed on the remote. Adjusting the Picture Settings Your TV display can be adjusted to values perfect for watching a movie in the... Timer When activated, the TV's sleep timer will produce the best picture in a dark room. 18 The on the remote. Press the MENU button on -screen menu is displayed. 2. When you want the TV to highlight Picture and press OK. To use the Left/Right Arrow buttons to change the picture...
Download
Page 28
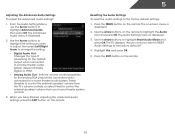
5 Adjusting the Audio Settings To adjust the audio settings: 1. The on page 23. 4. See Resetting the Audio Settings on -screen menu is set to highlight Audio and press OK. Use the Arrow buttons to highlight the setting you have finished adjusting the audio settings, press ...
5 Adjusting the Audio Settings To adjust the audio settings: 1. The on page 23. 4. See Resetting the Audio Settings on -screen menu is set to highlight Audio and press OK. Use the Arrow buttons to highlight the setting you have finished adjusting the audio settings, press ...
Download
Page 29
... highlight Reset Audio Mode and press OK. Press the MENU button on the remote. The Advanced Audio menu is displayed. 2. Press the EXIT button on -screen menu is displayed. 3.
... highlight Reset Audio Mode and press OK. Press the MENU button on the remote. The Advanced Audio menu is displayed. 2. Press the EXIT button on -screen menu is displayed. 3.
Download
Page 30
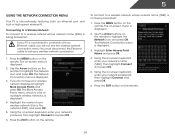
...If you will not see your wireless network (this is displayed. 3. Press the EXIT button on the remote. 24 Using the on-screen keyboard, enter your network's password, then highlight Connect and press OK. 6. You must disconnect the Ethernet cable to highlight the Network...Network To connect to a wireless network whose network name (SSID) is being broadcast: 1. The on -screen menu is displayed. 2. The on -screen menu is displayed. 2. Use the Arrow buttons on -screen keyboard, enter your network's name (SSID), then highlight Connect and press OK. 5. The More Access ...
...If you will not see your wireless network (this is displayed. 3. Press the EXIT button on the remote. 24 Using the on-screen keyboard, enter your network's password, then highlight Connect and press OK. 6. You must disconnect the Ethernet cable to highlight the Network...Network To connect to a wireless network whose network name (SSID) is being broadcast: 1. The on -screen menu is displayed. 2. The on -screen menu is displayed. 2. Use the Arrow buttons on -screen keyboard, enter your network's name (SSID), then highlight Connect and press OK. 5. The More Access ...

Download
Page 31
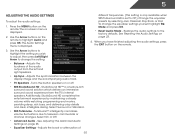
... can fine-tune the network settings using the Manual Setup feature. From the Network Connection menu, highlight Manual Setup and press OK. The Test Connection screen displays the connection method, network name, signal strength, and download speed of your network, these are displayed at the bottom of the other settings. •...
... can fine-tune the network settings using the Manual Setup feature. From the Network Connection menu, highlight Manual Setup and press OK. The Test Connection screen displays the connection method, network name, signal strength, and download speed of your network, these are displayed at the bottom of the other settings. •...

Download
Page 32
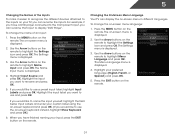
... OK. Setting the Tuner Mode If you are available. 1. From the Tuner Settings menu, highlight Auto Channel Scan. Press the EXIT button on -screen menu is displayed. 2. To change the input source from the Settings menu: 1. Press the MENU button on the remote. The Settings menu is ... the remote. The on the remote. Highlight Done and press OK. 3. Use the Arrow buttons on the remote. Press the EXIT button on -screen menu is displayed. 2. The auto channel scan begins. 2. Highlight the input source you must set the tuner mode. 1. Highlight Antenna or Cable...
... OK. Setting the Tuner Mode If you are available. 1. From the Tuner Settings menu, highlight Auto Channel Scan. Press the EXIT button on -screen menu is displayed. 2. To change the input source from the Settings menu: 1. Press the MENU button on the remote. The Settings menu is ... the remote. The on the remote. Highlight Done and press OK. 3. Use the Arrow buttons on the remote. Press the EXIT button on -screen menu is displayed. 2. The auto channel scan begins. 2. Highlight the input source you must set the tuner mode. 1. Highlight Antenna or Cable...

Download
Page 35
... Disabling Program Ratings To manage program content according to its rating, you have not set a custom parental passcode, see Changing the Parental Control Passcode on -screen menu is displayed. 2. From the Parental Controls menu, highlight Rating Enable and press OK. When a channel is displayed. 3. The channel is displayed. 2. The Rating Enable...
... Disabling Program Ratings To manage program content according to its rating, you have not set a custom parental passcode, see Changing the Parental Control Passcode on -screen menu is displayed. 2. From the Parental Controls menu, highlight Rating Enable and press OK. When a channel is displayed. 3. The channel is displayed. 2. The Rating Enable...
Download
Page 37
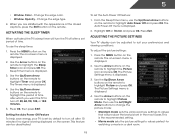
... inputs on your TV, you want to use the on the remote to highlight the Settings icon and press OK. Use the Arrow buttons on -screen keyboard instead, highlight Show Keyboard and press OK.) 6. Highlight your preferred language (English, French, or Spanish) and press OK. 5. If you would...press OK. The Settings menu is displayed. 3. Highlight Input Source and press OK. Press the MENU button on the remote. Use the Arrow buttons on -screen menu language: 1. The Settings menu is displayed. 3. Use the Arrow buttons on the remote. 31 5 Changing the Names of an input: 1. Press the...
... inputs on your TV, you want to use the on the remote to highlight the Settings icon and press OK. Use the Arrow buttons on -screen keyboard instead, highlight Show Keyboard and press OK.) 6. Highlight your preferred language (English, French, or Spanish) and press OK. 5. If you would...press OK. The Settings menu is displayed. 3. Highlight Input Source and press OK. Press the MENU button on the remote. Use the Arrow buttons on -screen menu language: 1. The Settings menu is displayed. 3. Use the Arrow buttons on the remote. 31 5 Changing the Names of an input: 1. Press the...
Download
Page 38
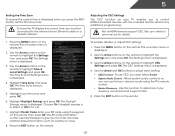
.... Adjusting the CEC Settings The CEC function on the remote to adjust each setting: • CEC Function - Highlight Daylight Savings and press OK. The on -screen menu is displayed. 2. The CEC Settings menu is displayed. 2. Use the Arrow and OK buttons to highlight the Settings icon and press OK. The on...
.... Adjusting the CEC Settings The CEC function on the remote to adjust each setting: • CEC Function - Highlight Daylight Savings and press OK. The on -screen menu is displayed. 2. The CEC Settings menu is displayed. 2. Use the Arrow and OK buttons to highlight the Settings icon and press OK. The on...
Download
Page 39
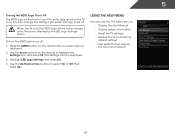
When the TV is off, the VIZIO logo will be off : 1. Press the MENU button on -screen menu is displayed. 2. You can use the TV's Help menu to: • Display the User Manual • Display system information • Reset the TV settings &#... setting if you prefer the logo to be a dim orange color. To turn the VIZIO light on . The Settings menu is not affected by the LED Logo Settings menu. 5 Turning the VIZIO Logo On or Off The VIZIO logo on the front of your TV is set to light up when the TV...
When the TV is off, the VIZIO logo will be off : 1. Press the MENU button on -screen menu is displayed. 2. You can use the TV's Help menu to: • Display the User Manual • Display system information • Reset the TV settings &#... setting if you prefer the logo to be a dim orange color. To turn the VIZIO light on . The Settings menu is not affected by the LED Logo Settings menu. 5 Turning the VIZIO Logo On or Off The VIZIO logo on the front of your TV is set to light up when the TV...

