Download
Page 3
...them for future reference. To purchase an extended warranty service plan, visit www.VIZIO.com. When you to alert you see this Manual When you either: • Register your VIZIO product at www.VIZIO.com • Complete and mail the enclosed registration card Extended Warranties For ... amplifiers) that you see this apparatus near any ventilation openings. Keep these instructions before operating your investment beyond the standard warranty, VIZIO offers on or pinched, particularly at (877) 878-4946. It is designed and manufactured to protect your TV. The wide blade...
...them for future reference. To purchase an extended warranty service plan, visit www.VIZIO.com. When you to alert you see this Manual When you either: • Register your VIZIO product at www.VIZIO.com • Complete and mail the enclosed registration card Extended Warranties For ... amplifiers) that you see this apparatus near any ventilation openings. Keep these instructions before operating your investment beyond the standard warranty, VIZIO offers on or pinched, particularly at (877) 878-4946. It is designed and manufactured to protect your TV. The wide blade...
Download
Page 15
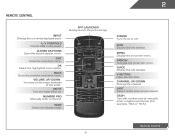
... launch the pictured app. Channel Up/Down Change the channel. Menu Display the on -screen menu. Exit Close the on -screen menu. Last Return to manually enter a digital sub-channel. (For example, 18-4 or 18-5.) Remote Control 9 Ok Select the highlighted menu option. Number Pad... Manually enter a channel. Mute Turn the audio off . Arrow Navigate the on -screen menu. A/V Controls Control USB media player. Back Go to the previous on -screen ...
... launch the pictured app. Channel Up/Down Change the channel. Menu Display the on -screen menu. Exit Close the on -screen menu. Last Return to manually enter a digital sub-channel. (For example, 18-4 or 18-5.) Remote Control 9 Ok Select the highlighted menu option. Number Pad... Manually enter a channel. Mute Turn the audio off . Arrow Navigate the on -screen menu. A/V Controls Control USB media player. Back Go to the previous on -screen ...

Download
Page 23
... background. 17 Use the Up/Down Arrow buttons on the remote to select the caption channel you wish to see , use the Arrow buttons to manually change the setting: • Caption Style - Change the transparency of closed captions, the TV will not display them .
... background. 17 Use the Up/Down Arrow buttons on the remote to select the caption channel you wish to see , use the Arrow buttons to manually change the setting: • Caption Style - Change the transparency of closed captions, the TV will not display them .
Download
Page 25
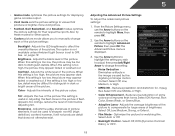
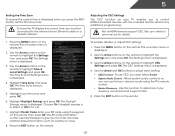
... orange, reduce the level of the picture colors. Adjusts the edge sharpness of the picture. Use the Arrow buttons to highlight the setting you to manually change the setting: • Noise Reduction Diminishes artifacts in the image caused by the digitizing of image motion content. Reduces pixellation and distortion for watching...
... orange, reduce the level of the picture colors. Adjusts the edge sharpness of the picture. Use the Arrow buttons to highlight the setting you to manually change the setting: • Noise Reduction Diminishes artifacts in the image caused by the digitizing of image motion content. Reduces pixellation and distortion for watching...
Download
Page 26
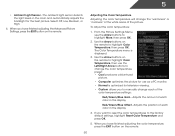
... Arrow buttons to change the color temperature preset: • Cool produces a blue-hued picture. • Computer optimizes the picture for use the Arrow buttons to manually change the "warmness" or "coolness" of the white areas of the color temperature settings: Red/Green/Blue Gain - The ambient light sensor detects the light...
... Arrow buttons to change the color temperature preset: • Cool produces a blue-hued picture. • Computer optimizes the picture for use the Arrow buttons to manually change the "warmness" or "coolness" of the white areas of the color temperature settings: Red/Green/Blue Gain - The ambient light sensor detects the light...

Download
Page 31
5 Changing the Advanced Network Settings Advanced users can fine-tune the network settings using the Manual Setup feature. DNS Server - The Change Settings menu is displayed. 2. The IP address assigned to set up your network connection: 1. Your preferred ...Change Settings menu. 4. Your network's default gateway address. • Pref. To change any of your network connection. 3. From the Network Connection menu, highlight Manual Setup and press OK. Use the Arrow and OK buttons to adjust each setting: • DHCP - (Dynamic Host Configuration Protocol) This setting must be ...
5 Changing the Advanced Network Settings Advanced users can fine-tune the network settings using the Manual Setup feature. DNS Server - The Change Settings menu is displayed. 2. The IP address assigned to set up your network connection: 1. Your preferred ...Change Settings menu. 4. Your network's default gateway address. • Pref. To change any of your network connection. 3. From the Network Connection menu, highlight Manual Setup and press OK. Use the Arrow and OK buttons to adjust each setting: • DHCP - (Dynamic Host Configuration Protocol) This setting must be ...
Download
Page 38
... all HDMI devices support CEC. Use the Arrow buttons on your device's audio using the keypad on the remote to determine if your device's user manual for details. 1. The Time & Local Settings menu is displayed. 2. The ZIP code information is often used by VIA Apps to highlight CEC Settings and press...
... all HDMI devices support CEC. Use the Arrow buttons on your device's audio using the keypad on the remote to determine if your device's user manual for details. 1. The Time & Local Settings menu is displayed. 2. The ZIP code information is often used by VIA Apps to highlight CEC Settings and press...
Download
Page 39
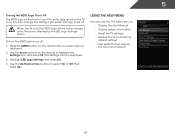
... on the remote. Use the Arrow buttons on the remote to light up when the TV is on -screen menu is off, the VIZIO logo will be off : 1. The Settings menu is not affected by the LED Logo Settings menu. This is displayed. 3. Press the MENU button on or ... for the tuner and network 33 When the TV is displayed. 2. The on . You can use the TV's Help menu to: • Display the User Manual • Display system information • Reset the TV settings • Restore the TV to select On or Off, then press OK.
... on the remote. Use the Arrow buttons on the remote to light up when the TV is on -screen menu is off, the VIZIO logo will be off : 1. The Settings menu is not affected by the LED Logo Settings menu. This is displayed. 3. Press the MENU button on or ... for the tuner and network 33 When the TV is displayed. 2. The on . You can use the TV's Help menu to: • Display the User Manual • Display system information • Reset the TV settings • Restore the TV to select On or Off, then press OK.
Download
Page 50
.... • Press the Power/Standby button on the remote or on the side of the TV to turn the TV on. Ensure your device's user manual for details. • Adjust Brightness, Contrast, or Backlight. See Scanning for Channels on page 26 There is no power. • Ensure the TV is plugged...
.... • Press the Power/Standby button on the remote or on the side of the TV to turn the TV on. Ensure your device's user manual for details. • Adjust Brightness, Contrast, or Backlight. See Scanning for Channels on page 26 There is no power. • Ensure the TV is plugged...
Download
Page 4
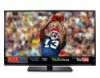
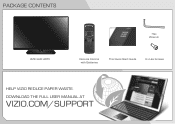
PACKAGE CONTENTS VIZIO LED HDTV Hex Wrench Remote Control with Batteries This Quick Start Guide 3 x Hex Screws HELP VIZIO REDUCE PAPER WASTE. DOWNLOAD THE FULL USER MANUAL AT VIZIO.COM/SUPPORT
PACKAGE CONTENTS VIZIO LED HDTV Hex Wrench Remote Control with Batteries This Quick Start Guide 3 x Hex Screws HELP VIZIO REDUCE PAPER WASTE. DOWNLOAD THE FULL USER MANUAL AT VIZIO.COM/SUPPORT
Download
Page 6
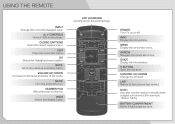
NUMBER PAD Manually enter a channel. INFO Display the info window. CHANNEL UP/DOWN Change the channel. EXIT Close the on -screen menu. VOLUME UP/DOWN Increase or decrease ... THE REMOTE INPUT Change the currently-displayed input. OK Select the highlighted menu option. WIDE Switch the display mode. DASH Use with number pad to manually enter a digital sub-channel. (For example, 18-4 or 18-5.) BATTERY COMPARTMENT Insert 2 AAA batteries here. POWER Turn TV on or off or on -screen menu...
NUMBER PAD Manually enter a channel. INFO Display the info window. CHANNEL UP/DOWN Change the channel. EXIT Close the on -screen menu. VOLUME UP/DOWN Increase or decrease ... THE REMOTE INPUT Change the currently-displayed input. OK Select the highlighted menu option. WIDE Switch the display mode. DASH Use with number pad to manually enter a digital sub-channel. (For example, 18-4 or 18-5.) BATTERY COMPARTMENT Insert 2 AAA batteries here. POWER Turn TV on or off or on -screen menu...

