
E470-A0 User Manual
Page 1
USER GUIDE MMOODDEELLS // E3D320VX // E3ED44270V0X -A0 // E3D470VX Installing your new tv CONTROLS & CONNECTIONS connecting your devices using the on-screen menu using the usb media player TROUBLESHOOTING & SUPPORT Help, SPECs, warranty & LEGAL
USER GUIDE MMOODDEELLS // E3D320VX // E3ED44270V0X -A0 // E3D470VX Installing your new tv CONTROLS & CONNECTIONS connecting your devices using the on-screen menu using the usb media player TROUBLESHOOTING & SUPPORT Help, SPECs, warranty & LEGAL
E470-A0 User Manual
Page 3
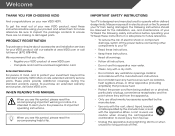
...8226; Clean only with the apparatus. Product Registration To purchase or inquire about accessories and installation services for Choosing VIZIO And congratulations on your new VIZIO HDTV. We recommend that you to the presence of electric shock or component damage, switch off the power before... reference. • To reduce the risk of important operating instructions. Important Safety Instructions Your TV is intended to alert you either: • Register your VIZIO product at www.VIZIO.com • Complete and mail the enclosed registration card Extended Warranties For peace of your...
...8226; Clean only with the apparatus. Product Registration To purchase or inquire about accessories and installation services for Choosing VIZIO And congratulations on your new VIZIO HDTV. We recommend that you to the presence of electric shock or component damage, switch off the power before... reference. • To reduce the risk of important operating instructions. Important Safety Instructions Your TV is intended to alert you either: • Register your VIZIO product at www.VIZIO.com • Complete and mail the enclosed registration card Extended Warranties For peace of your...
E470-A0 User Manual
Page 4
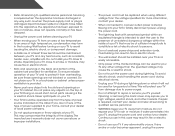
...local power company. • Do not apply pressure or throw objects at least three feet should be maintained between your TV. • Your TV should be installed near your TV and easily accessible. • Only power of the cabinet are not blocked or covered. If repair is intended to ...not cover user abuse or improper installations. • The power cord must be of sufficient magnitude to constitute a risk of power source indicated on your TV. For more information, contact your dealer. • When connected to a power outlet, power is provided. • Never push any objects on ...
...local power company. • Do not apply pressure or throw objects at least three feet should be maintained between your TV. • Your TV should be installed near your TV and easily accessible. • Only power of the cabinet are not blocked or covered. If repair is intended to ...not cover user abuse or improper installations. • The power cord must be of sufficient magnitude to constitute a risk of power source indicated on your TV. For more information, contact your dealer. • When connected to a power outlet, power is provided. • Never push any objects on ...
E470-A0 User Manual
Page 5
...apparatus shall not be used as sunshine, fire or the like. • If any way. - Unplug the power cord immediately and contact your TV, hold the AC/DC power adapter, not the cord. Ensure that may function abnormally. Incorrect polarities may damage the wires inside the cord and ...cause fire or electric shock. Your TV is exposed to leak which can damage the remote control or injure the operator. These servicing instructions are qualified to dripping or splashing and...
...apparatus shall not be used as sunshine, fire or the like. • If any way. - Unplug the power cord immediately and contact your TV, hold the AC/DC power adapter, not the cord. Ensure that may function abnormally. Incorrect polarities may damage the wires inside the cord and ...cause fire or electric shock. Your TV is exposed to leak which can damage the remote control or injure the operator. These servicing instructions are qualified to dripping or splashing and...
E470-A0 User Manual
Page 6
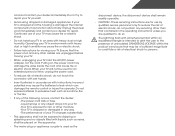
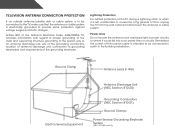
Remember, the screen of the coaxial cable is intended to be connected to the TV, make sure that the antenna or cable system is electrically grounded to provide some protection against voltage surges and static charges. Power Lines Do not ... circuits, or where it is left unattended or unused for long periods of time, unplug the TV from the wall outlet and disconnect the antenna or cable system. Lightning Protection For added protection of the TV during a lightning storm or when it could fall into such power lines or circuits. Television...
Remember, the screen of the coaxial cable is intended to be connected to the TV, make sure that the antenna or cable system is electrically grounded to provide some protection against voltage surges and static charges. Power Lines Do not ... circuits, or where it is left unattended or unused for long periods of time, unplug the TV from the wall outlet and disconnect the antenna or cable system. Lightning Protection For added protection of the TV during a lightning storm or when it could fall into such power lines or circuits. Television...
E470-A0 User Manual
Page 7
...19 Resetting the Picture Settings 19 Adjusting the Audio Settings 19 Adjusting the Advanced Audio Settings 20 Resetting the Audio Settings 21 Changing the TV Settings 21 Changing the Input Source 21 Setting the Tuner Mode 22 Scanning for Channels 22 Adding New Channels 22 Skipping Channels 23 Changing...27 Setting the Time Zone 27 Adjusting the CEC Settings 28 Using the Help Menu 28 Displaying System Information 29 Resetting the TV Settings 29 Restoring the TV to Factory Default Settings 29 Using the Setup Wizard 30 Using the Info Window 31 Using USB Photo Slideshow 32 Using ...
...19 Resetting the Picture Settings 19 Adjusting the Audio Settings 19 Adjusting the Advanced Audio Settings 20 Resetting the Audio Settings 21 Changing the TV Settings 21 Changing the Input Source 21 Setting the Tuner Mode 22 Scanning for Channels 22 Adding New Channels 22 Skipping Channels 23 Changing...27 Setting the Time Zone 27 Adjusting the CEC Settings 28 Using the Help Menu 28 Displaying System Information 29 Resetting the TV Settings 29 Restoring the TV to Factory Default Settings 29 Using the Setup Wizard 30 Using the Info Window 31 Using USB Photo Slideshow 32 Using ...
E470-A0 User Manual
Page 8
Connecting a USB Thumb Drive to the TV 32 Playing USB Media 32 Troubleshooting & Technical Support 34 Specifications 37 Limited Warranty 38 Legal & Compliance 39 2
Connecting a USB Thumb Drive to the TV 32 Playing USB Media 32 Troubleshooting & Technical Support 34 Specifications 37 Limited Warranty 38 Legal & Compliance 39 2
E470-A0 User Manual
Page 9
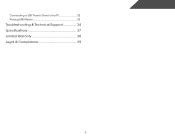
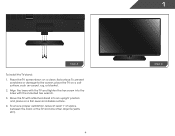
...secured MODEL E470-A0 VIZIO QUICK START GUIDE LED + HD PICTURE SLIM FRAME DESIGN VIZIO LED HDTV FULL USER MANUAL AVAILABLE AT VIZIO.COM Quick Start Guide Hex Wrench Power Cord Remote Control with Batteries 3x Hex Screws Package Contents 3 TV on Stand Installing the TV After removing the TV from ...level surface • It is pushed, pulled, or otherwise improperly moved • If an earthquake occurs and the TV is missing or damaged. However, the TV can still fall over . Your TV can be installed in two ways: • On a flat surface, using the included stand • On ...
...secured MODEL E470-A0 VIZIO QUICK START GUIDE LED + HD PICTURE SLIM FRAME DESIGN VIZIO LED HDTV FULL USER MANUAL AVAILABLE AT VIZIO.COM Quick Start Guide Hex Wrench Power Cord Remote Control with Batteries 3x Hex Screws Package Contents 3 TV on Stand Installing the TV After removing the TV from ...level surface • It is pushed, pulled, or otherwise improperly moved • If an earthquake occurs and the TV is missing or damaged. However, the TV can still fall over . Your TV can be installed in two ways: • On a flat surface, using the included stand • On ...
E470-A0 User Manual
Page 10
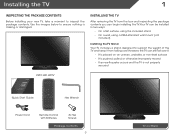
Step 2 To install the TV stand: 1. To ensure proper ventilation, leave at least 1" of space between the back of the TV and any other objects (walls, etc). 4 1 Step 3 Align the base with the TV and tighten the hex screw into the base with attached stand into an upright position and place on a flat, level, and stable surface. 4. Place the TV screen-down on a soft surface, such as carpet, rug, or blanket. 2. Move the TV with the included hex wrench. 3. To prevent scratches or damage to the screen, place the TV on a clean, flat surface.
Step 2 To install the TV stand: 1. To ensure proper ventilation, leave at least 1" of space between the back of the TV and any other objects (walls, etc). 4 1 Step 3 Align the base with the TV and tighten the hex screw into the base with attached stand into an upright position and place on a flat, level, and stable surface. 4. Place the TV screen-down on a soft surface, such as carpet, rug, or blanket. 2. Move the TV with the included hex wrench. 3. To prevent scratches or damage to the screen, place the TV on a clean, flat surface.
E470-A0 User Manual
Page 11
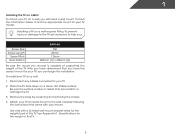
...for the weight of this TV. Use only with your TV. 2. Specifications for your TV model: Installing a TV on a clean, flat, stable surface. See Appendix A - Consult the information below to help you can scratch or damage the TV. 3. Screw Size: Screw Length: Screw Pitch: Hole Pattern: E470-A0 M6 20mm 1.0mm 400mm ...(V) x 400mm (H) Be sure the mount you will need a wall mount. 1 Installing the TV on a Wall To mount your TV on a wall, you choose is clear...
...for the weight of this TV. Use only with your TV. 2. Specifications for your TV model: Installing a TV on a clean, flat, stable surface. See Appendix A - Consult the information below to help you can scratch or damage the TV. 3. Screw Size: Screw Length: Screw Pitch: Hole Pattern: E470-A0 M6 20mm 1.0mm 400mm ...(V) x 400mm (H) Be sure the mount you will need a wall mount. 1 Installing the TV on a Wall To mount your TV on a wall, you choose is clear...

E470-A0 User Manual
Page 12
... Out - Connect optical/SPDIF audio device, such as home audio receiver. Controls and Connections 2 Rear Panel USB HDMI (BEST) 1 2 (ARC) COMPONENT (BETTER) Y V COMPOSITE (GOOD) DTV / TV CABLE / ANTENNA USB OPTICAL OUT SIDE HDMI (BEST) HDMI (BEST) 1 3 2AUDIO OUT 3 PCOAPUTDICIOAL 6 USB - HDMI - Connect RCA audio cable to view photo slideshow. HDMI - Connect...
... Out - Connect optical/SPDIF audio device, such as home audio receiver. Controls and Connections 2 Rear Panel USB HDMI (BEST) 1 2 (ARC) COMPONENT (BETTER) Y V COMPOSITE (GOOD) DTV / TV CABLE / ANTENNA USB OPTICAL OUT SIDE HDMI (BEST) HDMI (BEST) 1 3 2AUDIO OUT 3 PCOAPUTDICIOAL 6 USB - HDMI - Connect RCA audio cable to view photo slideshow. HDMI - Connect...
E470-A0 User Manual
Page 14
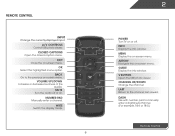
... the channel last viewed. Channel Up/Down Change the channel. Back Go to the previous on -screen menu. WIDE Switch the display mode. 8 2 Power Turn TV on or off or on. Info Display the info window. Volume Up/Down Increase or decrease loudness of the audio. Remote Control Input Change the...
... the channel last viewed. Channel Up/Down Change the channel. Back Go to the previous on -screen menu. WIDE Switch the display mode. 8 2 Power Turn TV on or off or on. Info Display the info window. Volume Up/Down Increase or decrease loudness of the audio. Remote Control Input Change the...
E470-A0 User Manual
Page 16
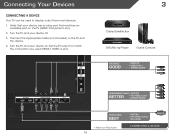
...OUT SIDE HDMI (BEST) HDMI (BEST) 1 3 2AUDIO OUT 3 HDMI (BEST) 1 2 (ARC) COMPONENT (BETTER) Y V COMPOSITE (GOOD) DTV / TV CABLE / ANTENNA PCOAPUTDICIOAL 3 Cable/Satellite Box DVD/Blu-ray Player Game Console AV CABLE GOOD • ANALOG • VIDEO (480i)* • STEREO AUDIO COMPONENT ... CONNECTING A DEVICE Connecting Your Devices Connecting A Device Your TV can be used (HDMI-1, HDM1-2, etc). Set the TV's input to match the connection you used to the TV and the device. 4. Verify that your device off. Turn the TV and your device has a video port that matches an...
...OUT SIDE HDMI (BEST) HDMI (BEST) 1 3 2AUDIO OUT 3 HDMI (BEST) 1 2 (ARC) COMPONENT (BETTER) Y V COMPOSITE (GOOD) DTV / TV CABLE / ANTENNA PCOAPUTDICIOAL 3 Cable/Satellite Box DVD/Blu-ray Player Game Console AV CABLE GOOD • ANALOG • VIDEO (480i)* • STEREO AUDIO COMPONENT ... CONNECTING A DEVICE Connecting Your Devices Connecting A Device Your TV can be used (HDMI-1, HDM1-2, etc). Set the TV's input to match the connection you used to the TV and the device. 4. Verify that your device off. Turn the TV and your device has a video port that matches an...
E470-A0 User Manual
Page 17
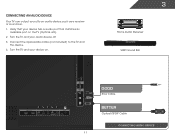
... your audio device off. 3. Connecting an audio device Your TV can output sound to the TV and the device. 4. Turn the TV and your device on the TV (Optical, etc). 2. Connect the appropriate cable (not included) to an audio device, such as a receiver or sound bar. 1. USB HDMI (...BEST) 1 2 (ARC) COMPONENT (BETTER) Y V COMPOSITE (GOOD) DTV / TV CABLE / ANTENNA USB OPTICAL OUT SIDE HDMI (BEST) HDMI (BEST) 1 3 2AUDIO OUT 3 PCOAPUTDICIOAL 11 3 Home Audio Receiver VIZIO Sound Bar GOOD RCA Cable BETTER Optical/SPDIF Cable CONNECTING AUDIO DEVICE Verify that your device has...
... your audio device off. 3. Connecting an audio device Your TV can output sound to the TV and the device. 4. Turn the TV and your device on the TV (Optical, etc). 2. Connect the appropriate cable (not included) to an audio device, such as a receiver or sound bar. 1. USB HDMI (...BEST) 1 2 (ARC) COMPONENT (BETTER) Y V COMPOSITE (GOOD) DTV / TV CABLE / ANTENNA USB OPTICAL OUT SIDE HDMI (BEST) HDMI (BEST) 1 3 2AUDIO OUT 3 PCOAPUTDICIOAL 11 3 Home Audio Receiver VIZIO Sound Bar GOOD RCA Cable BETTER Optical/SPDIF Cable CONNECTING AUDIO DEVICE Verify that your device has...
E470-A0 User Manual
Page 18
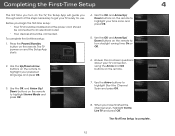
... OK. 5. Use the Up/Down Arrow buttons on the remote to highlight your preferred language and press OK. 6. Answer the on-screen questions about your TV ready for use. Use the Arrow buttons to highlight Home Mode and press OK. 7. Press the Power/Standby button on the remote. Use the OK... buttons on and the Setup App starts. 4. To complete the first-time setup: 1. Completing the First-Time Setup 4 The first time you turn on the TV, the Setup App will guide you through each of the steps necessary to turn daylight saving time On or Off. 2.
... OK. 5. Use the Up/Down Arrow buttons on the remote to highlight your preferred language and press OK. 6. Answer the on-screen questions about your TV ready for use. Use the Arrow buttons to highlight Home Mode and press OK. 7. Press the Power/Standby button on the remote. Use the OK... buttons on and the Setup App starts. 4. To complete the first-time setup: 1. Completing the First-Time Setup 4 The first time you turn on the TV, the Setup App will guide you through each of the steps necessary to turn daylight saving time On or Off. 2.
E470-A0 User Manual
Page 19
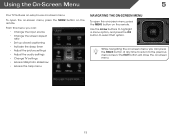
Using the On-Screen Menu 5 Your TV features an easy-to-use on -screen menu. From this menu, you can : • Change the input source • Change the screen aspect ratio • ...Set up closed captioning • Activate the sleep timer • Adjust the picture settings • Adjust the audio settings • Change TV settings • Access USB photo slideshow • Access the help menu Navigating the On-Screen MCeCnu To open the on-screen menu, press the MENU...
Using the On-Screen Menu 5 Your TV features an easy-to-use on -screen menu. From this menu, you can : • Change the input source • Change the screen aspect ratio • ...Set up closed captioning • Activate the sleep timer • Adjust the picture settings • Adjust the audio settings • Change TV settings • Access USB photo slideshow • Access the help menu Navigating the On-Screen MCeCnu To open the on-screen menu, press the MENU...
E470-A0 User Manual
Page 20
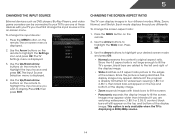
Press the MENU button on the remote to highlight the input source and press OK. Use the Up/Down Arrow buttons on the remote. The TV Settings menu is being stretched, the display image may appear wider than intended. Each mode displays the picture differently. Press OK. 3. Since the... is already formatted for widescreen viewing (1.85:1 or 2.35:1), then black bars will appear on -screen menu is not large enough to fill the TV's screen, black bars are watching widescreen (1.85:1 or 2.35:1) content, black bars will still appear on the remote to fill the screen. Use...
Press the MENU button on the remote to highlight the input source and press OK. Use the Up/Down Arrow buttons on the remote. The TV Settings menu is being stretched, the display image may appear wider than intended. Each mode displays the picture differently. Press OK. 3. Since the... is already formatted for widescreen viewing (1.85:1 or 2.35:1), then black bars will appear on -screen menu is not large enough to fill the TV's screen, black bars are watching widescreen (1.85:1 or 2.35:1) content, black bars will still appear on the remote to fill the screen. Use...

E470-A0 User Manual
Page 21
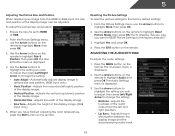
... menu is displayed. 2. After highlighting the type of closed captions you wish to see : • Analog Closed Caption for analog (NTSC) TV channels. • Digital Closed Caption for programs that include them . Caption channels usually display different languages. For example, CC1 may display English ...the caption channel you wish to change each setting. • Text Size - Change the transparency of closed captions for digital (ATSC) TV channels. 4. Changing the Appearance of Digital Closed Captions Digital closed captions can display closed captions you wish to see , use the ...
... menu is displayed. 2. After highlighting the type of closed captions you wish to see : • Analog Closed Caption for analog (NTSC) TV channels. • Digital Closed Caption for programs that include them . Caption channels usually display different languages. For example, CC1 may display English ...the caption channel you wish to change each setting. • Text Size - Change the transparency of closed captions for digital (ATSC) TV channels. 4. Changing the Appearance of Digital Closed Captions Digital closed captions can display closed captions you wish to see , use the ...
E470-A0 User Manual
Page 22
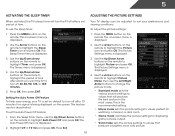
...the remote to highlight the Picture icon and press OK. Use the Up/Down Arrow buttons on the remote to turn the TV off after which you want the TV to highlight Auto Power Off and press OK. To use the Left/Right Arrow buttons to change the picture mode: •...settings: 1. This is being displayed on the remote to highlight the period of time. 5 Activating the Sleep Timer Adjusting the Picture Settings When activated, the TV's sleep timer will produce the best picture in a dark room. • Game mode optimizes the picture settings for displaying game console output. • ...
...the remote to highlight the Picture icon and press OK. Use the Up/Down Arrow buttons on the remote to turn the TV off after which you want the TV to highlight Auto Power Off and press OK. To use the Left/Right Arrow buttons to change the picture mode: •...settings: 1. This is being displayed on the remote to highlight the period of time. 5 Activating the Sleep Timer Adjusting the Picture Settings When activated, the TV's sleep timer will produce the best picture in a dark room. • Game mode optimizes the picture settings for displaying game console output. • ...
E470-A0 User Manual
Page 25
... Settings To adjust the audio settings: 1. Automatically adjusts display image to the factory defaults?" 3. Adjusts the height of the display image. • Horizontal Size - The TV displays, "Are you sure you wish to adjust, then press Left/Right Arrow to change the setting: • Auto Adjust - Use the Arrow buttons on...
... Settings To adjust the audio settings: 1. Automatically adjusts display image to the factory defaults?" 3. Adjusts the height of the display image. • Horizontal Size - The TV displays, "Are you sure you wish to adjust, then press Left/Right Arrow to change the setting: • Auto Adjust - Use the Arrow buttons on...


