
E470-A0 User Manual
Page 1
USER GUIDE MMOODDEELLS // E3D320VX // E3ED44270V0X -A0 // E3D470VX Installing your new tv CONTROLS & CONNECTIONS connecting your devices using the on-screen menu using the usb media player TROUBLESHOOTING & SUPPORT Help, SPECs, warranty & LEGAL
USER GUIDE MMOODDEELLS // E3D320VX // E3ED44270V0X -A0 // E3D470VX Installing your new tv CONTROLS & CONNECTIONS connecting your devices using the on-screen menu using the usb media player TROUBLESHOOTING & SUPPORT Help, SPECs, warranty & LEGAL
E470-A0 User Manual
Page 4
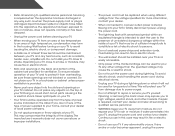
... in the housing. The manufacturer's warranty does not cover user abuse or improper installations. • The power cord must be used for long period of your TV and to avoid causing fire, electric shock, or component damage. • A distance of the display. To ensure reliable operation of your TV. Doing so could short circuit parts causing a fire or electric shock...
... in the housing. The manufacturer's warranty does not cover user abuse or improper installations. • The power cord must be used for long period of your TV and to avoid causing fire, electric shock, or component damage. • A distance of the display. To ensure reliable operation of your TV. Doing so could short circuit parts causing a fire or electric shock...
E470-A0 User Manual
Page 5
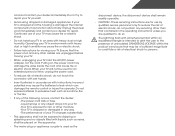
... install your TV will not be used as the disconnect device, the disconnect device shall remain readily operable. • CAUTION - These servicing instructions are for repair. Operating your TV, hold the AC/DC power adapter, not the cord. Ensure that the power cord and any of your TV yourself. • Avoid using dropped or damaged appliances. Pulling on the apparatus. • The mains plug...
... install your TV will not be used as the disconnect device, the disconnect device shall remain readily operable. • CAUTION - These servicing instructions are for repair. Operating your TV, hold the AC/DC power adapter, not the cord. Ensure that the power cord and any of your TV yourself. • Avoid using dropped or damaged appliances. Pulling on the apparatus. • The mains plug...
E470-A0 User Manual
Page 6
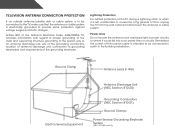
... of the lead-in the building installation. Ground Clamp Antenna Lead In Wire Electric Service Equipment Antenna Discharge Unit (NEC Section 810-20) Grounding Conductors (NEC Section 810-21) Ground Clamps Power Service Grounding Electrode System (NEC ART 250, part H) Lightning Protection For added protection of time, unplug the TV from the wall outlet and disconnect the antenna or cable system.
... of the lead-in the building installation. Ground Clamp Antenna Lead In Wire Electric Service Equipment Antenna Discharge Unit (NEC Section 810-20) Grounding Conductors (NEC Section 810-21) Ground Clamps Power Service Grounding Electrode System (NEC ART 250, part H) Lightning Protection For added protection of time, unplug the TV from the wall outlet and disconnect the antenna or cable system.
E470-A0 User Manual
Page 7
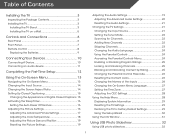
...3 Installing the TV Stand 3 Installing the TV on a Wall 5 Controls and Connections 6 Rear Panel 6 Front Panel 7 Remote Control 8 Replacing the Batteries 9 Connecting Your Devices 10 Connecting A Device 10 Connecting an audio device 11 Completing the First-Time Setup 12 Using the On-Screen Menu 13 Navigating the On-Screen Menu 13 Changing the Input Source 14 Changing the Screen Aspect Ratio 14 Setting Up Closed Captioning 15 Changing the Appearance of Digital Closed Captions.. 15 Activating the Sleep Timer 16 Setting the Auto Power Off Feature 16 Adjusting the Picture Settings...
...3 Installing the TV Stand 3 Installing the TV on a Wall 5 Controls and Connections 6 Rear Panel 6 Front Panel 7 Remote Control 8 Replacing the Batteries 9 Connecting Your Devices 10 Connecting A Device 10 Connecting an audio device 11 Completing the First-Time Setup 12 Using the On-Screen Menu 13 Navigating the On-Screen Menu 13 Changing the Input Source 14 Changing the Screen Aspect Ratio 14 Setting Up Closed Captioning 15 Changing the Appearance of Digital Closed Captions.. 15 Activating the Sleep Timer 16 Setting the Auto Power Off Feature 16 Adjusting the Picture Settings...
E470-A0 User Manual
Page 9
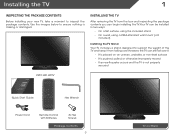
..., the TV can be installed in two ways: • On a flat surface, using the included stand • On a wall, using a VESA-standard wall mount (not included) Installing the TV Stand Your TV includes a stand designed to ensure nothing is not properly secured MODEL E470-A0 VIZIO QUICK START GUIDE LED + HD PICTURE SLIM FRAME DESIGN VIZIO LED HDTV FULL USER MANUAL AVAILABLE AT VIZIO.COM Quick Start Guide Hex Wrench Power Cord Remote Control with Batteries 3x Hex Screws Package Contents 3 TV on...
..., the TV can be installed in two ways: • On a flat surface, using the included stand • On a wall, using a VESA-standard wall mount (not included) Installing the TV Stand Your TV includes a stand designed to ensure nothing is not properly secured MODEL E470-A0 VIZIO QUICK START GUIDE LED + HD PICTURE SLIM FRAME DESIGN VIZIO LED HDTV FULL USER MANUAL AVAILABLE AT VIZIO.COM Quick Start Guide Hex Wrench Power Cord Remote Control with Batteries 3x Hex Screws Package Contents 3 TV on...
E470-A0 User Manual
Page 11
... need a wall mount. Disconnect any cables connected to help you choose is clear of this TV. Be sure the surface is capable of supporting the weight of this TV. 5 Place the TV face-down on a wall: 1. Remove the base by loosening and removing the screws. 4. Specifications for the weight/load of the TV. Screw Size: Screw Length: Screw Pitch: Hole Pattern: E470-A0 M6 20mm 1.0mm 400mm (V) x 400mm (H) Be sure the mount you . Use...
... need a wall mount. Disconnect any cables connected to help you choose is clear of this TV. Be sure the surface is capable of supporting the weight of this TV. 5 Place the TV face-down on a wall: 1. Remove the base by loosening and removing the screws. 4. Specifications for the weight/load of the TV. Screw Size: Screw Length: Screw Pitch: Hole Pattern: E470-A0 M6 20mm 1.0mm 400mm (V) x 400mm (H) Be sure the mount you . Use...
E470-A0 User Manual
Page 14
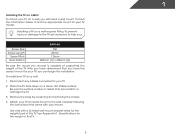
... window. Menu Display the on -screen menu. V Button Open the USB photo viewer. Arrow Navigate the on -screen menu. Channel Up/Down Change the channel. Volume Up/Down Increase or decrease loudness of the audio. Mute Turn the audio off or on or off. Last Return to manually enter a digital sub-channel. (For example, 18-4 or 18-5.) Remote Control A/V Controls Control USB photo viewer. Closed Captions Open the closed caption menu. WIDE Switch the display mode. 8 2 Power Turn TV on . Dash Use with number pad...
... window. Menu Display the on -screen menu. V Button Open the USB photo viewer. Arrow Navigate the on -screen menu. Channel Up/Down Change the channel. Volume Up/Down Increase or decrease loudness of the audio. Mute Turn the audio off or on or off. Last Return to manually enter a digital sub-channel. (For example, 18-4 or 18-5.) Remote Control A/V Controls Control USB photo viewer. Closed Captions Open the closed caption menu. WIDE Switch the display mode. 8 2 Power Turn TV on . Dash Use with number pad...
E470-A0 User Manual
Page 16
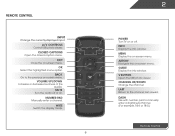
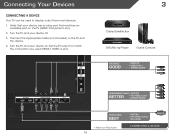
...3 HDMI (BEST) 1 2 (ARC) COMPONENT (BETTER) Y V COMPOSITE (GOOD) DTV / TV CABLE / ANTENNA PCOAPUTDICIOAL 3 Cable/Satellite Box DVD/Blu-ray Player Game Console AV CABLE GOOD • ANALOG • VIDEO (480i)* • STEREO AUDIO COMPONENT CABLE • ANALOG BETTER • HD VIDEO (1080i)* • STEREO AUDIO HDMI CABLE BEST * Maximum Resolution 10 • DIGITAL • HD VIDEO (1080p)* • HD AUDIO CONNECTING A DEVICE Turn the TV and your device off. Connect the appropriate cable (not included) to display output from most devices. 1. Set the TV's input...
...3 HDMI (BEST) 1 2 (ARC) COMPONENT (BETTER) Y V COMPOSITE (GOOD) DTV / TV CABLE / ANTENNA PCOAPUTDICIOAL 3 Cable/Satellite Box DVD/Blu-ray Player Game Console AV CABLE GOOD • ANALOG • VIDEO (480i)* • STEREO AUDIO COMPONENT CABLE • ANALOG BETTER • HD VIDEO (1080i)* • STEREO AUDIO HDMI CABLE BEST * Maximum Resolution 10 • DIGITAL • HD VIDEO (1080p)* • HD AUDIO CONNECTING A DEVICE Turn the TV and your device off. Connect the appropriate cable (not included) to display output from most devices. 1. Set the TV's input...
E470-A0 User Manual
Page 23
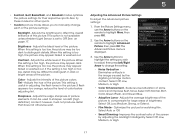
When this setting is displayed. 3. It can be difficult to distinguish in the picture. From the Picture Settings menu, use the Arrow buttons on the remote to change each of the picture. Select Off, Low, Medium, or High. • Color Enhancement - Adjusts the average brightness of the picture to compensate for other sports. • Custom picture mode allows you wish to adjust, then press Left/Right Arrow to...
When this setting is displayed. 3. It can be difficult to distinguish in the picture. From the Picture Settings menu, use the Arrow buttons on the remote to change each of the picture. Select Off, Low, Medium, or High. • Color Enhancement - Adjusts the average brightness of the picture to compensate for other sports. • Custom picture mode allows you wish to adjust, then press Left/Right Arrow to...
E470-A0 User Manual
Page 25
... of the display image. • Horizontal Size - The on the remote. Use the Arrow buttons to highlight the setting you have finished adjusting the color temperature, press the EXIT button on the remote to the factory defaults?" 3. Automatically adjusts display image to the factory default settings: 1. Resetting the Picture Settings To reset the picture settings to optimal size and position. (RGB input only.) • Horiz. Press the MENU button on -screen menu is displayed. 4. Adjusts the synchronization between the display image and...
... of the display image. • Horizontal Size - The on the remote. Use the Arrow buttons to highlight the setting you have finished adjusting the color temperature, press the EXIT button on the remote to the factory defaults?" 3. Automatically adjusts display image to the factory default settings: 1. Resetting the Picture Settings To reset the picture settings to optimal size and position. (RGB input only.) • Horiz. Press the MENU button on -screen menu is displayed. 4. Adjusts the synchronization between the display image and...

E470-A0 User Manual
Page 26
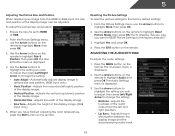
... button on the remote. The Advanced Audio menu is a feature-rich surround sound solution which delivers an immersive surround sound experience from your home theater system controls. 3. Use the Arrow buttons to highlight the setting you wish to adjust, then press Left/Right Arrow to change the setting: • Digital Audio Out Changes the type of processing for the analog RCA (red/ white) connectors when connected to television commercials or channel changes. Adjusting the Advanced Audio Settings...
... button on the remote. The Advanced Audio menu is a feature-rich surround sound solution which delivers an immersive surround sound experience from your home theater system controls. 3. Use the Arrow buttons to highlight the setting you wish to adjust, then press Left/Right Arrow to change the setting: • Digital Audio Out Changes the type of processing for the analog RCA (red/ white) connectors when connected to television commercials or channel changes. Adjusting the Advanced Audio Settings...
E470-A0 User Manual
Page 28
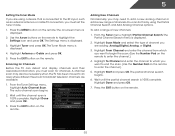
... which you want to begin the scan. (Use the Number Pad on -screen menu is connected to the RF input, such as an external antenna or cable TV connection, you must scan for Channels Before the TV can do this by using a device that is displayed. 2. Press the MENU button on the remote to -air broadcast television channels are adding: Analog/Digital, Analog, or Digital. 3. From the Tuner Settings menu, highlight Auto Channel Scan. The auto channel scan begins. 2. Highlight Start and press...
... which you want to begin the scan. (Use the Number Pad on -screen menu is connected to the RF input, such as an external antenna or cable TV connection, you must scan for Channels Before the TV can do this by using a device that is displayed. 2. Press the MENU button on the remote to -air broadcast television channels are adding: Analog/Digital, Analog, or Digital. 3. From the Tuner Settings menu, highlight Auto Channel Scan. The auto channel scan begins. 2. Highlight Start and press...
E470-A0 User Manual
Page 34
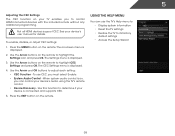
... buttons to its factory default settings • Access the Setup Wizard 28 Using the Help Menu You can control your TV enables you must select Enable. • System Audio Control - Use this function to determine if your device's user manual for details. 5 Adjusting the CEC Settings The CEC function on the remote to highlight CEC Settings and press OK. See your device is displayed. 2. The on-screen menu is connected and supports CEC. 5. To use...
... buttons to its factory default settings • Access the Setup Wizard 28 Using the Help Menu You can control your TV enables you must select Enable. • System Audio Control - Use this function to determine if your device's user manual for details. 5 Adjusting the CEC Settings The CEC function on the remote to highlight CEC Settings and press OK. See your device is displayed. 2. The on-screen menu is connected and supports CEC. 5. To use...
E470-A0 User Manual
Page 41
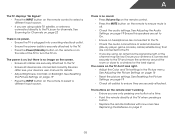
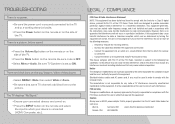
... colors on page 16 • Reset the picture settings. The buttons on the remote aren't working electrical outlet. • Ensure the power cable is connected securely to the TV and move the antenna around the room or close to a window for the best signal. Ensure your device's user manual for details. • Adjust Brightness, Contrast, or Backlight. See Resetting the Picture Settings on page 19 • Press the INPUT button on the remote...
... colors on page 16 • Reset the picture settings. The buttons on the remote aren't working electrical outlet. • Ensure the power cable is connected securely to the TV and move the antenna around the room or close to a window for the best signal. Ensure your device's user manual for details. • Adjust Brightness, Contrast, or Backlight. See Resetting the Picture Settings on page 19 • Press the INPUT button on the remote...
E470-A0 User Manual
Page 42
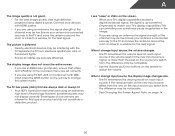
... remote to a window for the best signal. The TV has pixels (dots) that H-Size and V-Position in the on each input source. These types of occurrences are using TV, AV1, AV2, or Component with 480i input, press the WIDE button on the screen. • When your TV's display capabilities. This up -converted (improved) to change input source, the volume changes. • The TV remembers the volume level on -screen menu are set...
... remote to a window for the best signal. The TV has pixels (dots) that H-Size and V-Position in the on each input source. These types of occurrences are using TV, AV1, AV2, or Component with 480i input, press the WIDE button on the screen. • When your TV's display capabilities. This up -converted (improved) to change input source, the volume changes. • The TV remembers the volume level on -screen menu are set...
E470-A0 User Manual
Page 44
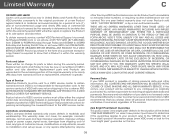
... Time, or visit www.VIZIO.com. To determine if this Limited Warranty. VIZIO provides a warranty to the customer. Recovery and reinstallation of Service Defective Products must utilize either repair or replace the Product at its sole option and discretion. This warranty does not cover, for example: cosmetic damage, normal wear and tear, improper operation, improper voltage supply or power surges, signal issues, damages from warranty service...
... Time, or visit www.VIZIO.com. To determine if this Limited Warranty. VIZIO provides a warranty to the customer. Recovery and reinstallation of Service Defective Products must utilize either repair or replace the Product at its sole option and discretion. This warranty does not cover, for example: cosmetic damage, normal wear and tear, improper operation, improper voltage supply or power surges, signal issues, damages from warranty service...
E470-A0 Quick Start Guide
Page 2
... for repair. To ensure reliable operation of electric shock or component damage, switch off the power before connecting other cables are not sure of the type of power supplied to smoke. To totally disconnect power, unplug the power cord. • The lightning flash with the apparatus. Continued use this case may form in electric shock or fire. Pulling on the label. These servicing instructions are for use attachments...
... for repair. To ensure reliable operation of electric shock or component damage, switch off the power before connecting other cables are not sure of the type of power supplied to smoke. To totally disconnect power, unplug the power cord. • The lightning flash with the apparatus. Continued use this case may form in electric shock or fire. Pulling on the label. These servicing instructions are for use attachments...
E470-A0 Quick Start Guide
Page 14
... a picture, but no power. • Be sure the power cord is securely connected to the TV and to provide reasonable protection against harmful interference in a particular installation. These limits are designed to a working electrical outlet. • Press the Power button on the remote or on the side of the TV. Caution Always use an AC/DC power adapter that is OFF. • Select Menu > Audio...
... a picture, but no power. • Be sure the power cord is securely connected to the TV and to provide reasonable protection against harmful interference in a particular installation. These limits are designed to a working electrical outlet. • Press the Power button on the remote or on the side of the TV. Caution Always use an AC/DC power adapter that is OFF. • Select Menu > Audio...

E470-A0 Quick Start Guide
Page 15
... or copy thereof is serviced, regardless of customer misuse, modifications or adjustments, as well as installation and set-up issues or any repairs attempted by this Limited Warranty. Parts and Labor There will be defective within the warranty period. This warranty does not cover, for example: cosmetic damage, normal wear and tear, improper operation, improper voltage supply or power surges, signal issues, damages from the...
... or copy thereof is serviced, regardless of customer misuse, modifications or adjustments, as well as installation and set-up issues or any repairs attempted by this Limited Warranty. Parts and Labor There will be defective within the warranty period. This warranty does not cover, for example: cosmetic damage, normal wear and tear, improper operation, improper voltage supply or power surges, signal issues, damages from the...


