User Manual
Page 3
... the safety purpose of the polarized or grounding-type plug. To purchase an extended warranty service plan, visit www.VIZIO.com. When you either: • Register your VIZIO product at plugs, convenience receptacles, and the point where they exit from the apparatus. • Only use attachments...within defined design limits. If the provided plug does not fit into your outlet, consult an electrician for future reference. When Reading this Manual When you to your TV. • Read these instructions. • Keep these instructions before operating your TV. Install in electric shock...
... the safety purpose of the polarized or grounding-type plug. To purchase an extended warranty service plan, visit www.VIZIO.com. When you either: • Register your VIZIO product at plugs, convenience receptacles, and the point where they exit from the apparatus. • Only use attachments...within defined design limits. If the provided plug does not fit into your outlet, consult an electrician for future reference. When Reading this Manual When you to your TV. • Read these instructions. • Keep these instructions before operating your TV. Install in electric shock...
User Manual
Page 15
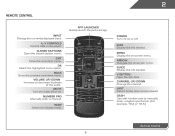
... Increase or decrease loudness of the audio. Arrow Navigate the on . V Button Open the VIA dock. Wide Switch the display mode. Last Return to manually enter a digital sub-channel. (For example, 18-4 or 18-5.) Remote Control 8 Mute Turn the audio off . Power Turn TV on -screen menu...Change the currently-displayed input. Back Go to the previous on or off or on -screen menu. Info Display the info window. Number Pad Manually enter a channel. App launcher Quickly launch the pictured app. Guide Display the info window. Channel Up/Down Change the channel. A/V Controls ...
... Increase or decrease loudness of the audio. Arrow Navigate the on . V Button Open the VIA dock. Wide Switch the display mode. Last Return to manually enter a digital sub-channel. (For example, 18-4 or 18-5.) Remote Control 8 Mute Turn the audio off . Power Turn TV on -screen menu...Change the currently-displayed input. Back Go to the previous on or off or on -screen menu. Info Display the info window. Number Pad Manually enter a channel. App launcher Quickly launch the pictured app. Guide Display the info window. Channel Up/Down Change the channel. A/V Controls ...
User Manual
Page 24
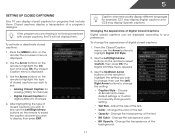
... Custom, then press OK. Change the transparency of closed captions you wish to change , then use the Left/Right Arrow buttons on the remote to manually change the appearance of digital closed captions: 1.
... Custom, then press OK. Change the transparency of closed captions you wish to change , then use the Left/Right Arrow buttons on the remote to manually change the appearance of digital closed captions: 1.
User Manual
Page 26
... level of brightness. Use the Arrow buttons to highlight the setting you to distinguish details. See on page 19. It can be too dark to manually change the setting: • Noise Reduction Diminishes artifacts in dark or bright areas of the picture. Adjusts the average brightness of the picture to OFF...
... level of brightness. Use the Arrow buttons to highlight the setting you to distinguish details. See on page 19. It can be too dark to manually change the setting: • Noise Reduction Diminishes artifacts in dark or bright areas of the picture. Adjusts the average brightness of the picture to OFF...
User Manual
Page 27
... reset the color temperatures to the factory default settings, highlight Reset Color Temperature and press OK. 5. From the Picture Menu, use the Arrow buttons to manually change the color temperature preset: • Cool produces a blue-hued picture. • Computer optimizes the picture for their respective sports. Adjusts the position of each...
... reset the color temperatures to the factory default settings, highlight Reset Color Temperature and press OK. 5. From the Picture Menu, use the Arrow buttons to manually change the color temperature preset: • Cool produces a blue-hued picture. • Computer optimizes the picture for their respective sports. Adjusts the position of each...
User Manual
Page 32
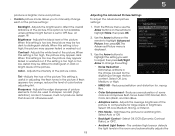
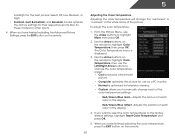
From the Network Connection menu, highlight Manual Setup and press OK. Use the Arrow and OK buttons to adjust each setting: • DHCP - (Dynamic Host Configuration Protocol) This setting must be turned ... the remote. 25 Press the EXIT button on the remote. 5 Changing the Advanced Network Settings Advanced users can fine-tune the network settings using the Manual Setup feature. If you need the RJ45 (ethernet) MAC address or the Wireless MAC address to the TV. • Subnet Mask - Your preferred domain name...
From the Network Connection menu, highlight Manual Setup and press OK. Use the Arrow and OK buttons to adjust each setting: • DHCP - (Dynamic Host Configuration Protocol) This setting must be turned ... the remote. 25 Press the EXIT button on the remote. 5 Changing the Advanced Network Settings Advanced users can fine-tune the network settings using the Manual Setup feature. If you need the RJ45 (ethernet) MAC address or the Wireless MAC address to the TV. • Subnet Mask - Your preferred domain name...
User Manual
Page 39
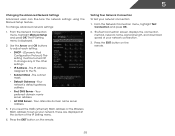
... is on, you must be connected to the internet via an Ethernet cable or a wireless network. Use this function to determine if your device's user manual for details. 1. The Settings menu is displayed. 5. Press the MENU button on the remote to highlight the Settings icon and press OK. Use the Arrow...
... is on, you must be connected to the internet via an Ethernet cable or a wireless network. Use this function to determine if your device's user manual for details. 1. The Settings menu is displayed. 5. Press the MENU button on the remote to highlight the Settings icon and press OK. Use the Arrow...
User Manual
Page 40
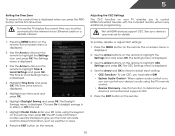
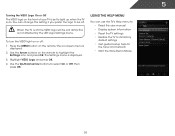
... can change this setting if you prefer the logo to be a lit dimly. You can use the TV's Help menu to: • Read the user manual • Display system information • Reset the TV settings • Restore the TV to its factory default settings • Get guided setup help for the... the remote to highlight the Settings icon and press OK. Use the Arrow buttons on the remote. Highlight VIZIO Logo and press OK. 4. The on . 5 Turning the VIZIO Logo On or Off The VIZIO logo on the front of your TV is set to light up when the TV is on -screen menu...
... can change this setting if you prefer the logo to be a lit dimly. You can use the TV's Help menu to: • Read the user manual • Display system information • Reset the TV settings • Restore the TV to its factory default settings • Get guided setup help for the... the remote to highlight the Settings icon and press OK. Use the Arrow buttons on the remote. Highlight VIZIO Logo and press OK. 4. The on . 5 Turning the VIZIO Logo On or Off The VIZIO logo on the front of your TV is set to light up when the TV is on -screen menu...
User Manual
Page 52
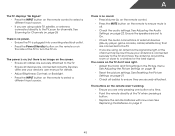
.... See Replacing the Batteries on the TV don't look right. • Adjust the Color and Tint settings in the Picture menu. Ensure your device's user manual for channels. See Adjusting the Picture Settings on page 22. Ensure the speakers are set to On. • Check the audio connections of external devices...
.... See Replacing the Batteries on the TV don't look right. • Adjust the Color and Tint settings in the Picture menu. Ensure your device's user manual for channels. See Adjusting the Picture Settings on page 22. Ensure the speakers are set to On. • Check the audio connections of external devices...

