
Brochure
Page 2
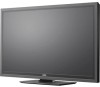
..." CLASS LCD HDTV WITH VIZIO INTERNET APPS® E422AR TV SPECIFICATIONS Screen Size Viewable TV Type Refresh Rate Maximum Resolution Internet Connectivity Remote Control Type Ambient Light Sensor Energy Star Qualified Certifications Wall-Mountable WARRANTY 1 year 42" 42" CCFL 60Hz 1920 x 1080 802.11n single band XRT110 Yes Energy Star 5.3 UL, CUL, FCC Class B, HDMI 1.4 incl. CEC/ARC, App certificates, Vizio AQ, Vizio PQ, Dolby Digital 300mm [V] x 300mm [H] CONNECTIONS HDMI Inputs Component Video Inputs Composite Inputs RF Antenna Input USB Ports PC Input Audio Outputs Number of vizio inc...
..." CLASS LCD HDTV WITH VIZIO INTERNET APPS® E422AR TV SPECIFICATIONS Screen Size Viewable TV Type Refresh Rate Maximum Resolution Internet Connectivity Remote Control Type Ambient Light Sensor Energy Star Qualified Certifications Wall-Mountable WARRANTY 1 year 42" 42" CCFL 60Hz 1920 x 1080 802.11n single band XRT110 Yes Energy Star 5.3 UL, CUL, FCC Class B, HDMI 1.4 incl. CEC/ARC, App certificates, Vizio AQ, Vizio PQ, Dolby Digital 300mm [V] x 300mm [H] CONNECTIONS HDMI Inputs Component Video Inputs Composite Inputs RF Antenna Input USB Ports PC Input Audio Outputs Number of vizio inc...

User Manual
Page 4
Overloading can be installed near your TV and easily accessible. • Only power of your TV close to qualified service personnel. Operating your TV. To ensure reliable operation of your TV. Do not place any heat source, such as when the power-supply cord or plug is always flowing ...for long period of electric shock to persons. • Do not overload power strips and extension cords. The manufacturer's warranty does not cover user abuse or improper installations. • The power cord must be maintained between your TV. • When moving the cart/apparatus...
Overloading can be installed near your TV and easily accessible. • Only power of your TV close to qualified service personnel. Operating your TV. To ensure reliable operation of your TV. Do not place any heat source, such as when the power-supply cord or plug is always flowing ...for long period of electric shock to persons. • Do not overload power strips and extension cords. The manufacturer's warranty does not cover user abuse or improper installations. • The power cord must be maintained between your TV. • When moving the cart/apparatus...
User Manual
Page 5
... apparatus. • The mains plug or appliance coupler is damaged, the internal components may function abnormally. The power cord fails or frays. - If water penetrates into your TV away from moisture. These servicing instructions are for an extended period of time, unplug the power cord. • To reduce risk of your dealer. h• The lightning flash with heavy dust or...
... apparatus. • The mains plug or appliance coupler is damaged, the internal components may function abnormally. The power cord fails or frays. - If water penetrates into your TV away from moisture. These servicing instructions are for an extended period of time, unplug the power cord. • To reduce risk of your dealer. h• The lightning flash with heavy dust or...
User Manual
Page 7
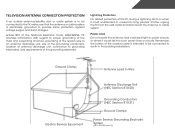
..., size of the grounding conductors, location of antenna discharge unit, connection to grounding electrodes, and requirements of the TV during a lightning storm or when it could fall into such power lines or circuits. Remember, the screen of time, unplug the TV from the wall outlet and disconnect the antenna or cable system. Television Antenna Connection Protection If an outside antenna/satellite dish or cable...
..., size of the grounding conductors, location of antenna discharge unit, connection to grounding electrodes, and requirements of the TV during a lightning storm or when it could fall into such power lines or circuits. Remember, the screen of time, unplug the TV from the wall outlet and disconnect the antenna or cable system. Television Antenna Connection Protection If an outside antenna/satellite dish or cable...
User Manual
Page 8
...21 Adjusting the Audio Settings 22 Adjusting the Advanced Audio Settings 23 Resetting the Audio Settings 23 Using the Network Connection Menu 24 Connecting to a Wireless Network 24 Changing the Advanced Network Settings 25 Testing Your Network Connection 25 Changing the TV Settings 26 Changing the Input Source 26 Setting the Tuner Mode 26 Scanning for Channels 26 Adding New Channels 27 Skipping Channels 28 Changing the Audio Language 28 Using the Parental Controls 29 Accessing the Parental Controls Menu 29 Enabling or Disabling Program Ratings 29 Locking and Unlocking Channels...
...21 Adjusting the Audio Settings 22 Adjusting the Advanced Audio Settings 23 Resetting the Audio Settings 23 Using the Network Connection Menu 24 Connecting to a Wireless Network 24 Changing the Advanced Network Settings 25 Testing Your Network Connection 25 Changing the TV Settings 26 Changing the Input Source 26 Setting the Tuner Mode 26 Scanning for Channels 26 Adding New Channels 27 Skipping Channels 28 Changing the Audio Language 28 Using the Parental Controls 29 Accessing the Parental Controls Menu 29 Enabling or Disabling Program Ratings 29 Locking and Unlocking Channels...
User Manual
Page 9
Adjusting the CEC Settings 32 Turning the VIZIO Logo On or Off 33 Using the Help Menu 33 Displaying System Information 34 Resetting the TV Settings 34 Restoring the TV to Factory Default Settings 34 Using Guided Setup 35 Using the Info Window 36 Using the USB Media Player 37 Using the USB Media Player 37 Connecting a USB Thumb Drive to the TV 37 Playing USB Media 37 Using VIZIO Internet Apps 40 Using the VIA Shortcut Buttons 40 Using the VIA Dock 40 Moving an...
Adjusting the CEC Settings 32 Turning the VIZIO Logo On or Off 33 Using the Help Menu 33 Displaying System Information 34 Resetting the TV Settings 34 Restoring the TV to Factory Default Settings 34 Using Guided Setup 35 Using the Info Window 36 Using the USB Media Player 37 Using the USB Media Player 37 Connecting a USB Thumb Drive to the TV 37 Playing USB Media 37 Using VIZIO Internet Apps 40 Using the VIA Shortcut Buttons 40 Using the VIA Dock 40 Moving an...
User Manual
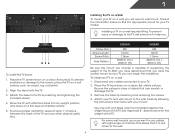
Page 11
... cables connected to the TV by loosening and removing the screws. 4. E322AR E422AR Screw Size: Screw Length: Screw Pitch: Hole Pattern: M6 12mm 1.0mm 200mm (V) x 200mm (H) M6 12mm 1.0mm 300mm (V) x 300mm (H) Be sure the mount you choose is clear of debris that you will need a wall mount. After you . Move the TV with right-angle connectors. Be sure the surface is capable of supporting the weight...
... cables connected to the TV by loosening and removing the screws. 4. E322AR E422AR Screw Size: Screw Length: Screw Pitch: Hole Pattern: M6 12mm 1.0mm 200mm (V) x 200mm (H) M6 12mm 1.0mm 300mm (V) x 300mm (H) Be sure the mount you choose is clear of debris that you will need a wall mount. After you . Move the TV with right-angle connectors. Be sure the surface is capable of supporting the weight...
User Manual
Page 15
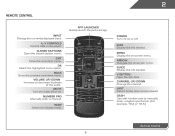
... audio off or on or off. Power Turn TV on . Guide Display the info window. Exit Close the on -screen menu. Info Display the info window. V Button Open the VIA dock. Ok Select the highlighted menu option. Last Return to manually enter a digital sub-channel. (For example, 18-4 or 18-5.) Remote Control 8 Back Go to the previous on -screen menu. Dash Use with number pad to the channel last viewed. Closed Captions Open the closed caption menu. Volume...
... audio off or on or off. Power Turn TV on . Guide Display the info window. Exit Close the on -screen menu. Info Display the info window. V Button Open the VIA dock. Ok Select the highlighted menu option. Last Return to manually enter a digital sub-channel. (For example, 18-4 or 18-5.) Remote Control 8 Back Go to the previous on -screen menu. Dash Use with number pad to the channel last viewed. Closed Captions Open the closed caption menu. Volume...
User Manual
Page 17
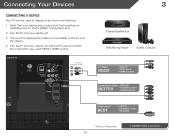
... a video port that your device off. 3. Set the TV's input to component inputs: 3 Cable/Satellite Box DVD/Blu-ray Player Game Console AV CABLE GOOD • ANALOG • VIDEO (480i)* • STEREO AUDIO COMPONENT CABLE • ANALOG BETTER • HD VIDEO (1080i)* • STEREO AUDIO HDMI CABLE BEST • DIGITAL • HD VIDEO (1080p)* • HD AUDIO * Maximum Resolution 10 CONNECTING A DEVICE Verify that matches an available port on . Turn the TV and your device on the TV (HDMI, Component, etc). 2. Connecting Your...
... a video port that your device off. 3. Set the TV's input to component inputs: 3 Cable/Satellite Box DVD/Blu-ray Player Game Console AV CABLE GOOD • ANALOG • VIDEO (480i)* • STEREO AUDIO COMPONENT CABLE • ANALOG BETTER • HD VIDEO (1080i)* • STEREO AUDIO HDMI CABLE BEST • DIGITAL • HD VIDEO (1080p)* • HD AUDIO * Maximum Resolution 10 CONNECTING A DEVICE Verify that matches an available port on . Turn the TV and your device on the TV (HDMI, Component, etc). 2. Connecting Your...
User Manual
Page 23
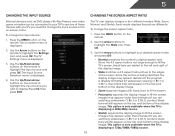
..., black bars will still appear on the remote to highlight the Settings icon and press OK. Since the picture is displayed. 3. Images may appear wider than intended. 5 Changing the Input Source Changing the Screen Aspect Ratio External devices such as DVD players, Blu-Ray Players, and video game consoles can display images in the on the top and bottom of the display image. The Input Source Selection menu is displaying a 480i/480p source...
..., black bars will still appear on the remote to highlight the Settings icon and press OK. Since the picture is displayed. 3. Images may appear wider than intended. 5 Changing the Input Source Changing the Screen Aspect Ratio External devices such as DVD players, Blu-Ray Players, and video game consoles can display images in the on the top and bottom of the display image. The Input Source Selection menu is displaying a 480i/480p source...
User Manual
Page 25
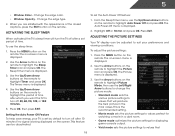
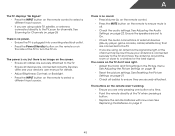
... closed captions, press the EXIT button on -screen menu is displayed. 3. Use the Arrow buttons on -screen menu is displayed. 4. Use the Arrow buttons on the remote to suit your TV is the recommended setting. • Movie mode sets the picture settings to values perfect for watching a movie in the most cases. Change the edge type. 4. Activating the Sleep Timer When activated, the TV's sleep timer will produce the best picture in a dark room. • Game mode optimizes the picture settings...
... closed captions, press the EXIT button on -screen menu is displayed. 3. Use the Arrow buttons on -screen menu is displayed. 4. Use the Arrow buttons on the remote to suit your TV is the recommended setting. • Movie mode sets the picture settings to values perfect for watching a movie in the most cases. Change the edge type. 4. Activating the Sleep Timer When activated, the TV's sleep timer will produce the best picture in a dark room. • Game mode optimizes the picture settings...
User Manual
Page 26
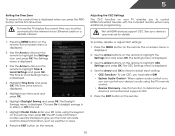
... Auto or Off. • Backlight Control - Use the Arrow buttons to highlight the setting you to manually change the setting: • Noise Reduction Diminishes artifacts in the picture. Adjusts the intensity of the picture colors. however, it will not produce detail that does not otherwise exist. 19 1. Select Off, DCR (Dynamic Contrast Ratio), or OPC. • Ambient Light Sensor - The ambient light sensor detects the light levels...
... Auto or Off. • Backlight Control - Use the Arrow buttons to highlight the setting you to manually change the setting: • Noise Reduction Diminishes artifacts in the picture. Adjusts the intensity of the picture colors. however, it will not produce detail that does not otherwise exist. 19 1. Select Off, DCR (Dynamic Contrast Ratio), or OPC. • Ambient Light Sensor - The ambient light sensor detects the light levels...
User Manual
Page 29
.... Change the audio mode. Change the equalizer presets by maintaining a steady volume while watching programming and movies, providing deep, rich bass, and delivering crisp details and clear, intelligible dialog. See Resetting the Audio Settings on the remote to Standard.) • Reset Audio Mode - The on-screen menu is displayed. 3. Use the Arrow buttons on page 23. 4. Adjust the boost or attenuation of the audio output from the TV's internal speakers. This setting is...
.... Change the audio mode. Change the equalizer presets by maintaining a steady volume while watching programming and movies, providing deep, rich bass, and delivering crisp details and clear, intelligible dialog. See Resetting the Audio Settings on the remote to Standard.) • Reset Audio Mode - The on-screen menu is displayed. 3. Use the Arrow buttons on page 23. 4. Adjust the boost or attenuation of the audio output from the TV's internal speakers. This setting is...

User Manual
Page 30
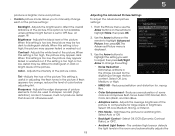
...MENU button on -screen menu is displayed. 2. The Audio Settings menu is displayed. 2. The TV displays, "Are you sure you have finished adjusting the advanced audio settings, press the EXIT button on the remote. 5 Resetting the Audio Settings To reset the audio settings to a home theater audio system. Select Off, Dolby Digital, or PCM. • Analog Audio Out - Use the Arrow buttons to the factory defaults?" 4. The on the remote. Sets the volume control properties for the Optical output when connected to the factory default settings: 1. Adjusting the Advanced Audio Settings...
...MENU button on -screen menu is displayed. 2. The Audio Settings menu is displayed. 2. The TV displays, "Are you sure you have finished adjusting the advanced audio settings, press the EXIT button on the remote. 5 Resetting the Audio Settings To reset the audio settings to a home theater audio system. Select Off, Dolby Digital, or PCM. • Analog Audio Out - Use the Arrow buttons to the factory defaults?" 4. The on the remote. Sets the volume control properties for the Optical output when connected to the factory default settings: 1. Adjusting the Advanced Audio Settings...
User Manual
Page 33
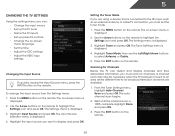
... external antenna or cable TV connection, you must scan for Channels Before the TV can : • Change the input source • Set up the TV tuner • Name the TV inputs • Set up parental controls • Change the on-screen menu language • Set the time • Adjust the CEC settings • Adjust the VIZIO logo settings Changing the Input Source To quickly access the Input Source menu, press the INPUT button on -screen menu is displayed. 2. Press the EXIT button on -screen menu is displayed. 4. Highlight the input source you must set the tuner mode...
... external antenna or cable TV connection, you must scan for Channels Before the TV can : • Change the input source • Set up the TV tuner • Name the TV inputs • Set up parental controls • Change the on-screen menu language • Set the time • Adjust the CEC settings • Adjust the VIZIO logo settings Changing the Input Source To quickly access the Input Source menu, press the INPUT button on -screen menu is displayed. 2. Press the EXIT button on -screen menu is displayed. 4. Highlight the input source you must set the tuner mode...
User Manual
Page 35
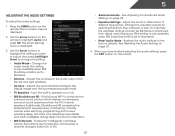
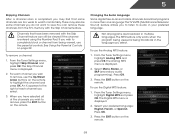
... to remove, use the parental controls. From the Tuner Settings menu, highlight Digital MTS and press OK. The Digital MTS menu is displayed. 2. Channels that some channels you select. Changing the Audio Language Some digital free-to-air and cable channels broadcast programs in more than one language.The TV's MTS (Multichannel Television Sound) feature allows you may also be viewed if the channel is entered using the Number Pad. Select Mono, Stereo, or SAP (secondary audio programming...
... to remove, use the parental controls. From the Tuner Settings menu, highlight Digital MTS and press OK. The Digital MTS menu is displayed. 2. Channels that some channels you select. Changing the Audio Language Some digital free-to-air and cable channels broadcast programs in more than one language.The TV's MTS (Multichannel Television Sound) feature allows you may also be viewed if the channel is entered using the Number Pad. Select Mono, Stereo, or SAP (secondary audio programming...
User Manual
Page 39
.... • System Audio Control - Press the MENU button on the remote. The Daylight Savings menu is displayed. 4. Press the EXIT button on the remote. Press the MENU button on the remote to control HDMI-connected devices with the included remote without any additional programming. Use the Arrow buttons on the remote. Highlight Postal Code. The Settings menu is displayed. 2. When system audio control is connected and supports CEC. 5. Use the Arrow buttons on , you the most accurate location-based information, such as...
.... • System Audio Control - Press the MENU button on the remote. The Daylight Savings menu is displayed. 4. Press the EXIT button on the remote. Press the MENU button on the remote to control HDMI-connected devices with the included remote without any additional programming. Use the Arrow buttons on the remote. Highlight Postal Code. The Settings menu is displayed. 2. When system audio control is connected and supports CEC. 5. Use the Arrow buttons on , you the most accurate location-based information, such as...
User Manual
Page 52
... to turn the TV on the remote aren't working. • Ensure you are using an antenna, the signal strength of external devices (Blu-ray player, game console, cable/satellite box) that are connected to the TV. • If you are using cable TV, satellite, or antenna connected directly to ensure they are connected correctly. See Adjusting the Picture Settings on page 9 45 The colors on page 22. See Resetting the Picture Settings on the screen...
... to turn the TV on the remote aren't working. • Ensure you are using an antenna, the signal strength of external devices (Blu-ray player, game console, cable/satellite box) that are connected to the TV. • If you are using cable TV, satellite, or antenna connected directly to ensure they are connected correctly. See Adjusting the Picture Settings on page 9 45 The colors on page 22. See Resetting the Picture Settings on the screen...
User Manual
Page 53
... the best image quality, view high-definition programs using an antenna, the signal strength of occurences are securely attached. Separate the TV from , the difference may be noticable. • Use the Volume Up/Down buttons on the remote to adjust the volume. When I change the screen mode. When I change input source, the volume changes. • The TV remembers the volume level on the remote to change input source, the display image changes size. • The TV remembers the viewing mode...
... the best image quality, view high-definition programs using an antenna, the signal strength of occurences are securely attached. Separate the TV from , the difference may be noticable. • Use the Volume Up/Down buttons on the remote to adjust the volume. When I change the screen mode. When I change input source, the volume changes. • The TV remembers the volume level on the remote to change input source, the display image changes size. • The TV remembers the viewing mode...
User Manual
Page 56
... VARY FROM STATE TO STATE.THIS WARRANTY IS SUBJECT TO CHANGE WITHOUT NOTICE. To obtain warranty service, contact VIZIO Technical Support via e-mail: TechSupport@VIZIO.com or via phone at VIZIO's option and sole discretion. This warranty does not cover, for example: cosmetic damage, normal wear and tear, improper operation, improper voltage supply or power surges, signal issues, damages from 6:00AM to 9:00PM Monday...
... VARY FROM STATE TO STATE.THIS WARRANTY IS SUBJECT TO CHANGE WITHOUT NOTICE. To obtain warranty service, contact VIZIO Technical Support via e-mail: TechSupport@VIZIO.com or via phone at VIZIO's option and sole discretion. This warranty does not cover, for example: cosmetic damage, normal wear and tear, improper operation, improper voltage supply or power surges, signal issues, damages from 6:00AM to 9:00PM Monday...


