
Brochure
Page 1
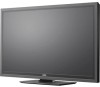
... get the latest news, sports and weather. It's your entertainment, your monthly electricity bill - all at an amazing value. E422AR A SCREEN TO FIT YOUR LIFE VIZIO 42" CLASS LCD HDTV WITH VIZIO INTERNET APPS® VIZIO's 42" Class LCD HDTV with built-in WiFi , and boasts 1080p Full HD for low energy usage. And don...
... get the latest news, sports and weather. It's your entertainment, your monthly electricity bill - all at an amazing value. E422AR A SCREEN TO FIT YOUR LIFE VIZIO 42" CLASS LCD HDTV WITH VIZIO INTERNET APPS® VIZIO's 42" Class LCD HDTV with built-in WiFi , and boasts 1080p Full HD for low energy usage. And don...

Brochure
Page 2
... USB Ports PC Input Audio Outputs Number of vizio inc. all rights reserved. 42" CLASS LCD HDTV WITH VIZIO INTERNET APPS® E422AR TV SPECIFICATIONS Screen Size Viewable TV Type Refresh... are subject to change without Stand 25.5 lbs Shipping Dimensions 48.5" x 27.7" x 7.4" Shipping Weight 35.3 lbs Trademarksshownarethepropertyoftheirrespectiveowners.Imagesusedareforillustrationpurposesonly.Vizio,thevlogo,wherevisionmeetsvalue,razorledandotherviziotrademarksare the intellectual property of Speakers / Watts Surround / Simulated Surround 3 1 1 (shared with component) 1 1 ...
... USB Ports PC Input Audio Outputs Number of vizio inc. all rights reserved. 42" CLASS LCD HDTV WITH VIZIO INTERNET APPS® E422AR TV SPECIFICATIONS Screen Size Viewable TV Type Refresh... are subject to change without Stand 25.5 lbs Shipping Dimensions 48.5" x 27.7" x 7.4" Shipping Weight 35.3 lbs Trademarksshownarethepropertyoftheirrespectiveowners.Imagesusedareforillustrationpurposesonly.Vizio,thevlogo,wherevisionmeetsvalue,razorledandotherviziotrademarksare the intellectual property of Speakers / Watts Surround / Simulated Surround 3 1 1 (shared with component) 1 1 ...

User Manual
Page 1
USER GUIDE MOMDODEELLSS // E3D320VX // E3DE43202VX2AR // E3DE44702VX2AR INSTALLING YOUR new TV CONTROLS & CONNECTIONS CONNECTING YOUR DEVICES USING THE ON-SCREEN MENU USING THE USB MEDIA PLAYER USING VIZIO INTERNET APPS TROUBLESHOOTING & SUPPORT Help, SPECs, warranty & LEGAL
USER GUIDE MOMDODEELLSS // E3D320VX // E3DE43202VX2AR // E3DE44702VX2AR INSTALLING YOUR new TV CONTROLS & CONNECTIONS CONNECTING YOUR DEVICES USING THE ON-SCREEN MENU USING THE USB MEDIA PLAYER USING VIZIO INTERNET APPS TROUBLESHOOTING & SUPPORT Help, SPECs, warranty & LEGAL
User Manual
Page 9
Adjusting the CEC Settings 32 Turning the VIZIO Logo On or Off 33 Using the Help Menu 33 Displaying System Information 34 Resetting the TV Settings 34 Restoring the TV to Factory Default ... Thumb Drive to the TV 37 Playing USB Media 37 Using VIZIO Internet Apps 40 Using the VIA Shortcut Buttons 40 Using the VIA Dock 40 Moving an App on the VIA Dock 40 Adding a New App to the VIA Dock 41 Removing an App from the VIA Dock 41 Creating and Managing User Profiles...
Adjusting the CEC Settings 32 Turning the VIZIO Logo On or Off 33 Using the Help Menu 33 Displaying System Information 34 Resetting the TV Settings 34 Restoring the TV to Factory Default ... Thumb Drive to the TV 37 Playing USB Media 37 Using VIZIO Internet Apps 40 Using the VIA Shortcut Buttons 40 Using the VIA Dock 40 Moving an App on the VIA Dock 40 Adding a New App to the VIA Dock 41 Removing an App from the VIA Dock 41 Creating and Managing User Profiles...
User Manual
Page 15
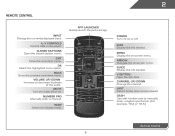
.... Menu Display the on -screen menu. A/V Controls Control USB media player. Ok Select the highlighted menu option. Number Pad Manually enter a channel. App launcher Quickly launch the pictured app. Exit Close the on -screen menu. Back Go to the previous on or off or on -screen menu. Power Turn TV on -screen...
.... Menu Display the on -screen menu. A/V Controls Control USB media player. Ok Select the highlighted menu option. Number Pad Manually enter a channel. App launcher Quickly launch the pictured app. Exit Close the on -screen menu. Back Go to the previous on or off or on -screen menu. Power Turn TV on -screen...
User Manual
Page 21
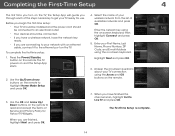
... scan, highlight Exit to read and accept the Terms of Service and Privacy Policy for use. Press the Power/Standby button on and the Setup App starts. 2. TV Widgets. Enter the network key using the on-screen keyboard. When you have the network key ready. • If you are finished, highlight... network from the list of available networks and press OK. Completing the First-Time Setup 4 The first time you turn on the TV, the Setup App will guide you through each of the steps necessary to get your TV ready for Yahoo! To complete the first-time setup: 1. Use the OK...
... scan, highlight Exit to read and accept the Terms of Service and Privacy Policy for use. Press the Power/Standby button on and the Setup App starts. 2. TV Widgets. Enter the network key using the on-screen keyboard. When you have the network key ready. • If you are finished, highlight... network from the list of available networks and press OK. Completing the First-Time Setup 4 The first time you turn on the TV, the Setup App will guide you through each of the steps necessary to get your TV ready for Yahoo! To complete the first-time setup: 1. Use the OK...
User Manual
Page 39
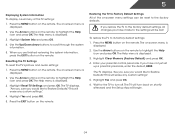
... as weather or news. 8. See your ZIP code using the TV's remote control. • Device Discovery - The on -screen menu is often used by VIA Apps to give you to the internet via an Ethernet cable or a wireless network. The Time & Local Settings menu is displayed. 3. Press the MENU button on...
... as weather or news. 8. See your ZIP code using the TV's remote control. • Device Discovery - The on -screen menu is often used by VIA Apps to give you to the internet via an Ethernet cable or a wireless network. The Time & Local Settings menu is displayed. 3. Press the MENU button on...
User Manual
Page 41
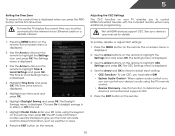
.... Highlight Clear Memory (Factory Default) and press OK. 4. Wait for the TV to Restore Defaults? Use the Arrow buttons on shortly afterward and the Setup App will erase any custom settings." 4. To restore the TV to highlight the Help icon and press OK. Enter your parental control passcode. The TV displays...
.... Highlight Clear Memory (Factory Default) and press OK. 4. Wait for the TV to Restore Defaults? Use the Arrow buttons on shortly afterward and the Setup App will erase any custom settings." 4. To restore the TV to highlight the Help icon and press OK. Enter your parental control passcode. The TV displays...
User Manual
Page 42
5 Using Guided Setup The TV's Setup App can be used to easily set up the TV tuner. • Network Setup - Set up the TV tuner or to your network. Follow the on ...
5 Using Guided Setup The TV's Setup App can be used to easily set up the TV tuner. • Network Setup - Set up the TV tuner or to your network. Follow the on ...
User Manual
Page 47
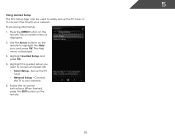
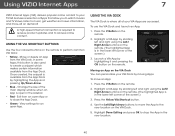
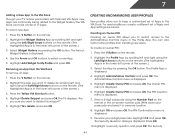
... a snippet, which makes certain information available from an open App. Press the V Button on the VIA Dock. 5. Use the Left/Right Arrow buttons to move an App: 1. Moving an App on demand! Using VIZIO Internet Apps 7 VIZIO Internet Apps (VIA) delivers popular online content to your TV.VIA features... a selection of Apps that allow you to watch movies and TV shows, listen to music,...
... a snippet, which makes certain information available from an open App. Press the V Button on the VIA Dock. 5. Use the Left/Right Arrow buttons to move an App: 1. Moving an App on demand! Using VIZIO Internet Apps 7 VIZIO Internet Apps (VIA) delivers popular online content to your TV.VIA features... a selection of Apps that allow you to watch movies and TV shows, listen to music,...
User Manual
Page 48
.... The Owner PIN menu is displayed. 7. The PIN Creation menu is displayed. 6. Highlight OK and press OK. To add a new App: 1. Use the Arrow and OK buttons to the Administrative Controls menu in the lower left and right using the Left/Right Arrow buttons on... OK. 10. The Security Question dialog is displayed. 5. Creating and Managing User Profiles User profiles allow you create, a different set of 17 Apps. The Profile App is displayed. 4. Highlight OK and press OK. Widget Gallery is displayed. 4. Write down your 4-digit passcode. The VIA Dock can also restrict...
.... The Owner PIN menu is displayed. 7. The PIN Creation menu is displayed. 6. Highlight OK and press OK. To add a new App: 1. Use the Arrow and OK buttons to the Administrative Controls menu in the lower left and right using the Left/Right Arrow buttons on... OK. 10. The Security Question dialog is displayed. 5. Creating and Managing User Profiles User profiles allow you create, a different set of 17 Apps. The Profile App is displayed. 4. Highlight OK and press OK. Widget Gallery is displayed. 4. Write down your 4-digit passcode. The VIA Dock can also restrict...

User Manual
Page 49
...displayed. 4. Enter your profile and press OK. Press the V Button on the remote. (The highlighted App is displayed. 9. Highlight the Profile App by pressing the OK button. Press OK. 14. The Profile App is displayed. 15. The Create Profile menu is displayed. 5. Highlight a picture for your security answer ... the QWERTY Keyboard and press OK. Enter your 4-digit passcode. Highlight Done and press OK. Select the App by scrolling left corner of this new profile from installing new Apps, turn Limit Profile to On.) 17. Highlight Administrative Controls and press OK. (If you have an Owner...
...displayed. 4. Enter your profile and press OK. Press the V Button on the remote. (The highlighted App is displayed. 9. Highlight the Profile App by pressing the OK button. Press OK. 14. The Profile App is displayed. 15. The Create Profile menu is displayed. 5. Highlight a picture for your security answer ... the QWERTY Keyboard and press OK. Enter your 4-digit passcode. Highlight Done and press OK. Select the App by scrolling left corner of this new profile from installing new Apps, turn Limit Profile to On.) 17. Highlight Administrative Controls and press OK. (If you have an Owner...
User Manual
Page 50
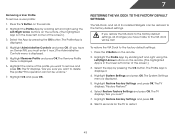
... Remove Profile and press OK. This operation cannot be restored to remove and press OK. To restore the VIA Dock to restart. 43 Select the App by pressing the OK button. Highlight System Settings and press OK. Highlight OK and press OK. Restoring the VIA Dock to the Factory Default Settings... want to the VIA dock will be lost! The TV displays, "Are you must enter it now.) The Administrative Controls menu is displayed. 4. Select the App by pressing the OK button. Highlight Administrative Controls and press OK. (If you have made to delete this profile? The Profile...
... Remove Profile and press OK. This operation cannot be restored to remove and press OK. To restore the VIA Dock to restart. 43 Select the App by pressing the OK button. Highlight System Settings and press OK. Highlight OK and press OK. Restoring the VIA Dock to the Factory Default Settings... want to the VIA dock will be lost! The TV displays, "Are you must enter it now.) The Administrative Controls menu is displayed. 4. Select the App by pressing the OK button. Highlight Administrative Controls and press OK. (If you have made to delete this profile? The Profile...


