
Brochure
Page 1
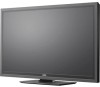
E422AR A SCREEN TO FIT YOUR LIFE VIZIO 42" CLASS LCD HDTV WITH VIZIO INTERNET APPS® VIZIO's 42" Class LCD HDTV with built-in WiFi , and boasts 1080p Full HD for low energy usage. FULL HD 1080P resolution delivers ultimate detail. product features and specifications are subject to change your favorite movies and TV... to music, change without notice. © 2012 vizio inc. VIZIO INTERNET APPS® Using the latest wireless technology you the best of vizio inc. rev 10262010 And don't worry about your way. this TV also meets ENERGY STAR® guidelines for a superior...
E422AR A SCREEN TO FIT YOUR LIFE VIZIO 42" CLASS LCD HDTV WITH VIZIO INTERNET APPS® VIZIO's 42" Class LCD HDTV with built-in WiFi , and boasts 1080p Full HD for low energy usage. FULL HD 1080P resolution delivers ultimate detail. product features and specifications are subject to change your favorite movies and TV... to music, change without notice. © 2012 vizio inc. VIZIO INTERNET APPS® Using the latest wireless technology you the best of vizio inc. rev 10262010 And don't worry about your way. this TV also meets ENERGY STAR® guidelines for a superior...

Brochure
Page 2
... 25.5 lbs Shipping Dimensions 48.5" x 27.7" x 7.4" Shipping Weight 35.3 lbs Trademarksshownarethepropertyoftheirrespectiveowners.Imagesusedareforillustrationpurposesonly.Vizio,thevlogo,wherevisionmeetsvalue,razorledandotherviziotrademarksare the intellectual property of vizio inc. all rights reserved. rev 10262010 42" CLASS LCD HDTV WITH VIZIO INTERNET APPS® E422AR TV SPECIFICATIONS Screen Size Viewable TV Type Refresh Rate Maximum Resolution Internet Connectivity Remote Control Type Ambient Light Sensor...
... 25.5 lbs Shipping Dimensions 48.5" x 27.7" x 7.4" Shipping Weight 35.3 lbs Trademarksshownarethepropertyoftheirrespectiveowners.Imagesusedareforillustrationpurposesonly.Vizio,thevlogo,wherevisionmeetsvalue,razorledandotherviziotrademarksare the intellectual property of vizio inc. all rights reserved. rev 10262010 42" CLASS LCD HDTV WITH VIZIO INTERNET APPS® E422AR TV SPECIFICATIONS Screen Size Viewable TV Type Refresh Rate Maximum Resolution Internet Connectivity Remote Control Type Ambient Light Sensor...

User Manual
Page 1
USER GUIDE MOMDODEELLSS // E3D320VX // E3DE43202VX2AR // E3DE44702VX2AR INSTALLING YOUR new TV CONTROLS & CONNECTIONS CONNECTING YOUR DEVICES USING THE ON-SCREEN MENU USING THE USB MEDIA PLAYER USING VIZIO INTERNET APPS TROUBLESHOOTING & SUPPORT Help, SPECs, warranty & LEGAL
USER GUIDE MOMDODEELLSS // E3D320VX // E3DE43202VX2AR // E3DE44702VX2AR INSTALLING YOUR new TV CONTROLS & CONNECTIONS CONNECTING YOUR DEVICES USING THE ON-SCREEN MENU USING THE USB MEDIA PLAYER USING VIZIO INTERNET APPS TROUBLESHOOTING & SUPPORT Help, SPECs, warranty & LEGAL
User Manual
Page 3
... • Do not use this symbol, please read the accompanying important warning or notice. Important Safety Instructions Your TV is intended to the presence of your new VIZIO product, read the accompanying helpful tip. If the provided plug does not fit into your outlet, consult an electrician... for future reference. Be sure to inspect the package contents to protect your TV. To get the most out of important operating instructions. To purchase an extended warranty service plan, visit www.VIZIO.com. Read the following instructions should be observed for your safety. Keep these...
... • Do not use this symbol, please read the accompanying important warning or notice. Important Safety Instructions Your TV is intended to the presence of your new VIZIO product, read the accompanying helpful tip. If the provided plug does not fit into your outlet, consult an electrician... for future reference. Be sure to inspect the package contents to protect your TV. To get the most out of important operating instructions. To purchase an extended warranty service plan, visit www.VIZIO.com. Read the following instructions should be observed for your safety. Keep these...

User Manual
Page 4
...for ventilation. Any other voltage than the voltage specified. This will fit only into the slots and openings on your TV. • Your TV should be installed near your TV. Doing so could short circuit parts causing a fire or electric shock. This may cause fire or electric shock. ...to constitute a risk of power supplied to persons. • Do not overload power strips and extension cords. To ensure reliable operation of your TV. • When moving the cart/apparatus combination to avoid injury from overheating, be used for long periods of the grounded plug. •...
...for ventilation. Any other voltage than the voltage specified. This will fit only into the slots and openings on your TV. • Your TV should be installed near your TV. Doing so could short circuit parts causing a fire or electric shock. This may cause fire or electric shock. ...to constitute a risk of power supplied to persons. • Do not overload power strips and extension cords. To ensure reliable operation of your TV. • When moving the cart/apparatus combination to avoid injury from overheating, be used for long periods of the grounded plug. •...
User Manual
Page 5
...be exposed to dripping or splashing and no objects filled with wet hands. • Insert batteries in any other hazards. When your TV in the operating instructions unless you to qualified service personnel. • WARNING: Keep your dealer and refer all servicing to high voltages...qualified to do so. If repair is damaged, the internal components may function abnormally. These servicing instructions are unplugged before moving your TV changes substantially. • This apparatus shall not be of sufficient magnitude to constitute a risk of electric shock, do not perform any...
...be exposed to dripping or splashing and no objects filled with wet hands. • Insert batteries in any other hazards. When your TV in the operating instructions unless you to qualified service personnel. • WARNING: Keep your dealer and refer all servicing to high voltages...qualified to do so. If repair is damaged, the internal components may function abnormally. These servicing instructions are unplugged before moving your TV changes substantially. • This apparatus shall not be of sufficient magnitude to constitute a risk of electric shock, do not perform any...
User Manual
Page 6
...12, 2009. DTV Transition Advisory The nationwide switch to digital-only broadcasting. Analog-only TVs should continue to receive over-the-air TV. No extra converter box is needed. Analog-only television sets that receive TV programming through an antenna now need a converter box to continue to work as appropriate: FCC (US...) Web: www.ntia.doc.gov Phone: 1-888-DTV-2009 (1-888-388-2009) List of US Television Stations www.high-techproductions.com/usTVstations.htm Your TV comes with cable and satellite TV services, gaming consoles, VCRs, DVD players, and similar products.
...12, 2009. DTV Transition Advisory The nationwide switch to digital-only broadcasting. Analog-only TVs should continue to receive over-the-air TV. No extra converter box is needed. Analog-only television sets that receive TV programming through an antenna now need a converter box to continue to work as appropriate: FCC (US...) Web: www.ntia.doc.gov Phone: 1-888-DTV-2009 (1-888-388-2009) List of US Television Stations www.high-techproductions.com/usTVstations.htm Your TV comes with cable and satellite TV services, gaming consoles, VCRs, DVD players, and similar products.
User Manual
Page 7
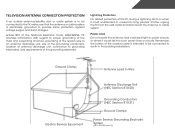
... or when it could fall into such power lines or circuits. Remember, the screen of the coaxial cable is intended to be connected to the TV, make sure that the antenna or cable system is electrically grounded to earth in wire to an antenna discharge unit, size of the grounding conductors... the National Electrical Code, ANSI/NFPSA 70, provides information with regard to proper grounding of the mast and supporting structure, grounding of time, unplug the TV from the wall outlet and disconnect the antenna or cable system.
... or when it could fall into such power lines or circuits. Remember, the screen of the coaxial cable is intended to be connected to the TV, make sure that the antenna or cable system is electrically grounded to earth in wire to an antenna discharge unit, size of the grounding conductors... the National Electrical Code, ANSI/NFPSA 70, provides information with regard to proper grounding of the mast and supporting structure, grounding of time, unplug the TV from the wall outlet and disconnect the antenna or cable system.
User Manual
Page 8
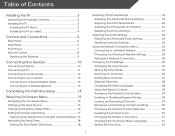
Table of Contents Installing the TV 3 Inspecting the Package Contents 3 Installing the TV 3 Installing the TV Stand 3 Installing the TV on a Wall 4 Controls and Connections 5 Rear Panel 5 Side Panel 6 Front Panel 7 Remote Control 8 Replacing the Batteries 9 Connecting Your Devices 10 Connecting... Connection Menu 24 Connecting to a Wireless Network 24 Changing the Advanced Network Settings 25 Testing Your Network Connection 25 Changing the TV Settings 26 Changing the Input Source 26 Setting the Tuner Mode 26 Scanning for Channels 26 Adding New Channels 27 Skipping Channels ...
Table of Contents Installing the TV 3 Inspecting the Package Contents 3 Installing the TV 3 Installing the TV Stand 3 Installing the TV on a Wall 4 Controls and Connections 5 Rear Panel 5 Side Panel 6 Front Panel 7 Remote Control 8 Replacing the Batteries 9 Connecting Your Devices 10 Connecting... Connection Menu 24 Connecting to a Wireless Network 24 Changing the Advanced Network Settings 25 Testing Your Network Connection 25 Changing the TV Settings 26 Changing the Input Source 26 Setting the Tuner Mode 26 Scanning for Channels 26 Adding New Channels 27 Skipping Channels ...
User Manual
Page 9
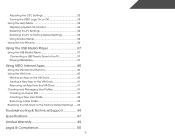
Adjusting the CEC Settings 32 Turning the VIZIO Logo On or Off 33 Using the Help Menu 33 Displaying System Information 34 Resetting the TV Settings 34 Restoring the TV to Factory Default Settings 34 Using Guided Setup 35 Using the Info Window 36 Using the USB Media Player 37 Using the USB... Media Player 37 Connecting a USB Thumb Drive to the TV 37 Playing USB Media 37 Using VIZIO Internet Apps 40 Using the VIA Shortcut Buttons 40 Using the VIA Dock 40 Moving an App on the VIA Dock 40...
Adjusting the CEC Settings 32 Turning the VIZIO Logo On or Off 33 Using the Help Menu 33 Displaying System Information 34 Resetting the TV Settings 34 Restoring the TV to Factory Default Settings 34 Using Guided Setup 35 Using the Info Window 36 Using the USB Media Player 37 Using the USB... Media Player 37 Connecting a USB Thumb Drive to the TV 37 Playing USB Media 37 Using VIZIO Internet Apps 40 Using the VIA Shortcut Buttons 40 Using the VIA Dock 40 Moving an App on the VIA Dock 40...
User Manual
Page 10
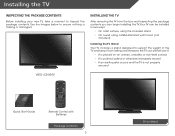
... missing or damaged. Use the images below to ensure nothing is not properly secured VIZIO LCD HDTV Quick Start Guide Remote Control with Batteries Package Contents 3 TV on Stand Your TV can be installed in two ways: • On a flat surface, using the included stand • On a ... VESA-standard wall mount (not included) Installing the TV Stand Your TV includes a stand designed to inspect the package contents. Installing the TV Inspecting the Package Contents Before installing your new TV, take a moment to support the weight of the TV and keep it from the box and inspecting the ...
... missing or damaged. Use the images below to ensure nothing is not properly secured VIZIO LCD HDTV Quick Start Guide Remote Control with Batteries Package Contents 3 TV on Stand Your TV can be installed in two ways: • On a flat surface, using the included stand • On a ... VESA-standard wall mount (not included) Installing the TV Stand Your TV includes a stand designed to inspect the package contents. Installing the TV Inspecting the Package Contents Before installing your new TV, take a moment to support the weight of the TV and keep it from the box and inspecting the ...
User Manual
Page 11
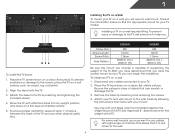
... wall mount to the wall, carefully following the instructions that you will need a wall mount. See Appendix B - 1 Installing the TV on a Wall To mount your TV on a wall: 1. E322AR E422AR Screw Size: Screw Length: Screw Pitch: Hole Pattern: M6 12mm 1.0mm 200mm (V) x 200mm (H) M6 12mm 1.0mm 300mm (V) x 300mm (H) Be sure the mount you...
... wall mount to the wall, carefully following the instructions that you will need a wall mount. See Appendix B - 1 Installing the TV on a Wall To mount your TV on a wall: 1. E322AR E422AR Screw Size: Screw Length: Screw Pitch: Hole Pattern: M6 12mm 1.0mm 200mm (V) x 200mm (H) M6 12mm 1.0mm 300mm (V) x 300mm (H) Be sure the mount you...
User Manual
Page 13
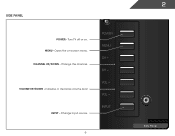
MENU CH + CH - Change input source. INPUT 6 2 Side Panel MENU - Open the on . Change the channel. Side Panel POWER - VOLUME UP/DOWN - Turn TV off or on -screen menu. CHANNEL UP/DOWN - Increase or decrease volume level INPUT -
MENU CH + CH - Change input source. INPUT 6 2 Side Panel MENU - Open the on . Change the channel. Side Panel POWER - VOLUME UP/DOWN - Turn TV off or on -screen menu. CHANNEL UP/DOWN - Increase or decrease volume level INPUT -
User Manual
Page 15
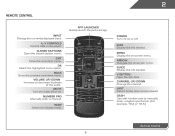
... with number pad to the channel last viewed. A/V Controls Control USB media player. Exit Close the on or off or on -screen menu. Power Turn TV on -screen menu. Info Display the info window. Guide Display the info window. Channel Up/Down Change the channel. Mute Turn the audio off . V Button...
... with number pad to the channel last viewed. A/V Controls Control USB media player. Exit Close the on or off or on -screen menu. Power Turn TV on -screen menu. Info Display the info window. Guide Display the info window. Channel Up/Down Change the channel. Mute Turn the audio off . V Button...
User Manual
Page 17
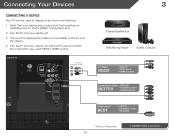
... be used to match the connection you used (HDMI-1, HDM1-2, etc). Set the TV's input to display output from most devices. 1. BACK OF TV Connect to the TV and the device. 4. Connect the appropriate cable (not included) to component inputs: 3 Cable/Satellite Box DVD/Blu-ray ...HDMI CABLE BEST • DIGITAL • HD VIDEO (1080p)* • HD AUDIO * Maximum Resolution 10 CONNECTING A DEVICE Turn the TV and your device on the TV (HDMI, Component, etc). 2. Turn the TV and your device has a video port that matches an available port on . Verify that your device off. 3.
... be used to match the connection you used (HDMI-1, HDM1-2, etc). Set the TV's input to display output from most devices. 1. BACK OF TV Connect to the TV and the device. 4. Connect the appropriate cable (not included) to component inputs: 3 Cable/Satellite Box DVD/Blu-ray ...HDMI CABLE BEST • DIGITAL • HD VIDEO (1080p)* • HD AUDIO * Maximum Resolution 10 CONNECTING A DEVICE Turn the TV and your device on the TV (HDMI, Component, etc). 2. Turn the TV and your device has a video port that matches an available port on . Verify that your device off. 3.

User Manual
Page 18
Connect a 3.5mm cable (not included) to display output from a personal computer. To use your PC and the RGB port on the back of the TV. See Appendix B - This cable transmits audio. 3. Connecting A PC Your TV can be used to your PC and the PC Audio In port on the back of the TV. Connect an RGB cable (not included) to match the resolution of your TV. Set your PC's resolution to your TV as a PC display: 1. This cable transmits video. 2. Specifications. 3 Personal Computer RGB Cable (For Video) 3.5mm Cable (For Audio) CONNECTING A PC 11
Connect a 3.5mm cable (not included) to display output from a personal computer. To use your PC and the RGB port on the back of the TV. See Appendix B - This cable transmits audio. 3. Connecting A PC Your TV can be used to your PC and the PC Audio In port on the back of the TV. Connect an RGB cable (not included) to match the resolution of your TV. Set your PC's resolution to your TV as a PC display: 1. This cable transmits video. 2. Specifications. 3 Personal Computer RGB Cable (For Video) 3.5mm Cable (For Audio) CONNECTING A PC 11

User Manual
Page 19
Turn the TV and your device has a audio port that matches an available port on . 3 Home Audio Receiver VIZIO Sound Bar GOOD 3.5mm Cable BETTER Optical/SPDIF Cable CONNECTING AUDIO DEVICE 12 Connect the appropriate cable (not included) to an audio device, such as a receiver or sound bar. 1. Turn the TV and your device on the TV (Optical, 3.5mm, etc). 2. Connecting an audio device Your TV can output sound to the TV and the device. 4. Verify that your audio device off. 3.
Turn the TV and your device has a audio port that matches an available port on . 3 Home Audio Receiver VIZIO Sound Bar GOOD 3.5mm Cable BETTER Optical/SPDIF Cable CONNECTING AUDIO DEVICE 12 Connect the appropriate cable (not included) to an audio device, such as a receiver or sound bar. 1. Turn the TV and your device on the TV (Optical, 3.5mm, etc). 2. Connecting an audio device Your TV can output sound to the TV and the device. 4. Verify that your audio device off. 3.

User Manual
Page 20
...-speed wireless signal (802.11n recommended). 2. Connect an ethernet cable to your router and to the ethernet port on page 35 Connecting to configure the TV. Ethernet Cable Router / Modem CONNECTING TO A WIRED NETWORK 13 Use the Guided Network Setup to a Wired Network (Best) 1. 3 Connecting to your home network with... a Wired or Wireless connection. It can be connected to your network Your TV is internet-ready. Use the Guided Network Setup to a Wireless Network 1. See Using Guided Setup on page 35.
...-speed wireless signal (802.11n recommended). 2. Connect an ethernet cable to your router and to the ethernet port on page 35 Connecting to configure the TV. Ethernet Cable Router / Modem CONNECTING TO A WIRED NETWORK 13 Use the Guided Network Setup to a Wired Network (Best) 1. 3 Connecting to your home network with... a Wired or Wireless connection. It can be connected to your network Your TV is internet-ready. Use the Guided Network Setup to a Wireless Network 1. See Using Guided Setup on page 35.
User Manual
Page 21
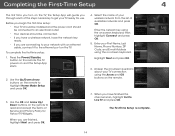
.../Standby button on and the Setup App starts. 2. Use the Up/Down Arrow buttons on the remote to read and accept the Terms of your TV connection using the Arrow and OK buttons on the remote. 7. Answer the on-screen questions about your wireless network from the list of the steps... First Name, Last Name, Phone Number, ZIP Code, and E-mail Address using the on the remote to highlight Home Mode Setup and press OK. 3. The TV powers on the remote. When you have the network key ready. • If you through each of available networks and press OK. Enter the network...
.../Standby button on and the Setup App starts. 2. Use the Up/Down Arrow buttons on the remote to read and accept the Terms of your TV connection using the Arrow and OK buttons on the remote. 7. Answer the on-screen questions about your wireless network from the list of the steps... First Name, Last Name, Phone Number, ZIP Code, and E-mail Address using the on the remote to highlight Home Mode Setup and press OK. 3. The TV powers on the remote. When you have the network key ready. • If you through each of available networks and press OK. Enter the network...
User Manual
Page 22
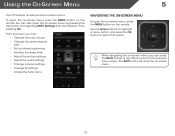
...; Set up closed captioning • Activate the sleep timer • Adjust the picture settings • Adjust the audio settings • Change network settings • Change TV settings • Access the help menu Navigating the On-Screen Menu To open the on-screen menu, press the MENU button on -screen menu. 15... on-screen menu by pressing the VIA button and selecting HDTV Settings from the VIA Dock, then pressing OK. Using the On-Screen Menu 5 Your TV features an easy-to select that option.
...; Set up closed captioning • Activate the sleep timer • Adjust the picture settings • Adjust the audio settings • Change network settings • Change TV settings • Access the help menu Navigating the On-Screen Menu To open the on-screen menu, press the MENU button on -screen menu. 15... on-screen menu by pressing the VIA button and selecting HDTV Settings from the VIA Dock, then pressing OK. Using the On-Screen Menu 5 Your TV features an easy-to select that option.


