Download
Page 2
... Interface are incorporated under license from SRS Labs, Inc. Changing the factory default picture settings or enabling other features will be achieved. This product qualifies for ENERGY STAR in the "factory default" setting and this is the setting in which power savings will increase power consumption that could exceed the limits necessary to...
... Interface are incorporated under license from SRS Labs, Inc. Changing the factory default picture settings or enabling other features will be achieved. This product qualifies for ENERGY STAR in the "factory default" setting and this is the setting in which power savings will increase power consumption that could exceed the limits necessary to...
Download
Page 7
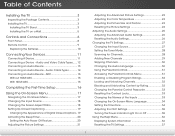
...23 Adjusting the Picture Size and Position 23 Resetting the Picture Settings 24 Adjusting the Audio Settings 25 Adjusting the Advanced Audio Settings 26 Resetting the Audio Settings 26 Changing the TV Settings 27 Changing the Input Source 27 Setting the Tuner Mode 28 Scanning for Channels 28 Adding New ... Cable Types 14 Connecting an Audio Device - Table of the Inputs 33 Changing the On-Screen Menu Language 34 Setting the Time Zone 34 Adjusting the CEC Settings 35 Turning the Power Indicator Light On or Off 35 Using the Help Menu 36 Displaying System Information 36 Resetting...
...23 Adjusting the Picture Size and Position 23 Resetting the Picture Settings 24 Adjusting the Audio Settings 25 Adjusting the Advanced Audio Settings 26 Resetting the Audio Settings 26 Changing the TV Settings 27 Changing the Input Source 27 Setting the Tuner Mode 28 Scanning for Channels 28 Adding New ... Cable Types 14 Connecting an Audio Device - Table of the Inputs 33 Changing the On-Screen Menu Language 34 Setting the Time Zone 34 Adjusting the CEC Settings 35 Turning the Power Indicator Light On or Off 35 Using the Help Menu 36 Displaying System Information 36 Resetting...

Download
Page 8
Restoring the TV to Factory Default Settings 37 Performing a Service Check 37 Using Guided Setup 38 Using the Info Window 39 Using the USB Media Player 40 Using the USB Media Player 40 Connecting a USB Thumb Drive to the TV 40 Playing USB Media 40 Troubleshooting & Technical Support 42 Specifications 45 Limited Warranty 47 Legal & Compliance 48 2
Restoring the TV to Factory Default Settings 37 Performing a Service Check 37 Using Guided Setup 38 Using the Info Window 39 Using the USB Media Player 40 Using the USB Media Player 40 Connecting a USB Thumb Drive to the TV 40 Playing USB Media 40 Troubleshooting & Technical Support 42 Specifications 45 Limited Warranty 47 Legal & Compliance 48 2

Download
Page 16
... COMPONENT CABLE BETTER • ANALOG • HD VIDEO (1080P)* • STEREO AUDIO AV CABLE GOOD • ANALOG • VIDEO (480i)* • STEREO AUDIO * Maximum Resolution Set the TV's input to match the connection you used to the TV and the device. 4. Verify that your device off. 3.
... COMPONENT CABLE BETTER • ANALOG • HD VIDEO (1080P)* • STEREO AUDIO AV CABLE GOOD • ANALOG • VIDEO (480i)* • STEREO AUDIO * Maximum Resolution Set the TV's input to match the connection you used to the TV and the device. 4. Verify that your device off. 3.
Download
Page 22
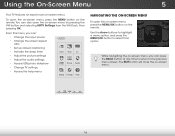
...Change the screen aspect ratio • Set up closed captioning • Activate the sleep timer • Adjust the picture settings • Adjust the audio settings • Access USB photo slideshow • Change TV settings • Access the help menu VIZIO ABC Input Wide CC Sleep Timer ...Picture Audio Media Settings Help Navigating the On-Screen Menu To open...
...Change the screen aspect ratio • Set up closed captioning • Activate the sleep timer • Adjust the picture settings • Adjust the audio settings • Access USB photo slideshow • Change TV settings • Access the help menu VIZIO ABC Input Wide CC Sleep Timer ...Picture Audio Media Settings Help Navigating the On-Screen Menu To open...
Download
Page 23
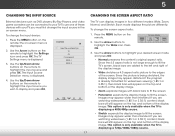
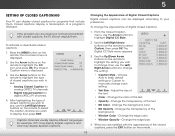
... fill the screen. This option is only available when the TV is displayed. Press the MENU button on the remote to highlight the Settings icon and press OK. VIZIO Input Source Selection TV AV Component HDMI-1 HDMI-2 4. Press the MENU button on -screen menu is already formatted for widescreen viewing (1....video game consoles can display images in the on the top and bottom of the display image. To change the screen aspect ratio: 1. The TV Settings menu is not large enough to fill the TV's screen, black bars are watching widescreen (1.85:1 or 2.35:1) content, black bars will still ...
... fill the screen. This option is only available when the TV is displayed. Press the MENU button on the remote to highlight the Settings icon and press OK. VIZIO Input Source Selection TV AV Component HDMI-1 HDMI-2 4. Press the MENU button on -screen menu is already formatted for widescreen viewing (1....video game consoles can display images in the on the top and bottom of the display image. To change the screen aspect ratio: 1. The TV Settings menu is not large enough to fill the TV's screen, black bars are watching widescreen (1.85:1 or 2.35:1) content, black bars will still ...
Download
Page 24
... languages. Change the edge type. 4. The Closed Caption menu is not being broadcast with the appearance of closed captions: 1. VIZIO Digital CC Style Caption Style Custom Text Size As Broadcast Color As Broadcast Opacity As Broadcast 3. Adjust the size of the background... Caption for analog (NTSC) TV channels. • Digital Closed Caption for programs that include them . Change the background color. 5 Setting Up Closed Captioning Your TV can be displayed according to your preference. Closed captions display a transcription of digital closed captions you wish to...
... languages. Change the edge type. 4. The Closed Caption menu is not being broadcast with the appearance of closed captions: 1. VIZIO Digital CC Style Caption Style Custom Text Size As Broadcast Color As Broadcast Opacity As Broadcast 3. Adjust the size of the background... Caption for analog (NTSC) TV channels. • Digital Closed Caption for programs that include them . Change the background color. 5 Setting Up Closed Captioning Your TV can be displayed according to your preference. Closed captions display a transcription of digital closed captions you wish to...

Download
Page 25
... displayed on the remote to highlight Timer and press OK. Use the Up/Down Arrow buttons on the Timer Off remote to turn off after a set period of time after which you want the TV to turn the TV off after 10 minutes if no signal is... VIZIO displayed. Exit 2D 3D ABC Input Wide CC Sleep Timer Picture Audio Network Settings Help 19 Use the Arrow buttons on the remote to highlight Auto Power Off and press OK. 5 Activating...
... displayed on the remote to highlight Timer and press OK. Use the Up/Down Arrow buttons on the Timer Off remote to turn off after a set period of time after which you want the TV to turn the TV off after 10 minutes if no signal is... VIZIO displayed. Exit 2D 3D ABC Input Wide CC Sleep Timer Picture Audio Network Settings Help 19 Use the Arrow buttons on the remote to highlight Auto Power Off and press OK. 5 Activating...
Download
Page 26
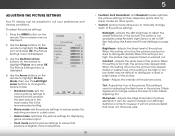
... that will not produce detail that produce a brighter, more vivid picture. 20 • Football, Golf, Basketball, and Baseball modes optimize the picture settings for other sports. • Custom picture mode allows you to OFF. VIZIO Picture Settings Picture Mode Backlight Brightness Contrast Color Tint Sharpness Custom - + 50 - + 50 - + 50 - + 50 - +0 - +0 More 4. When this...
... that will not produce detail that produce a brighter, more vivid picture. 20 • Football, Golf, Basketball, and Baseball modes optimize the picture settings for other sports. • Custom picture mode allows you to OFF. VIZIO Picture Settings Picture Mode Backlight Brightness Contrast Color Tint Sharpness Custom - + 50 - + 50 - + 50 - + 50 - +0 - +0 More 4. When this...
Download
Page 27
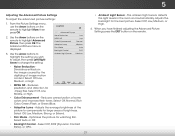
VIZIO Advanced Picture Noise Reduction Low MPEG NR Low Color Enhancement Normal Adaptive Luma Medium Film Mode Auto Backlight Control DCR 3. Reduces oversaturation of brightness. Select ... image caused by the digitizing of the picture to highlight More, then press OK. 2. Adjusts the average brightness of image motion content. From the Picture Settings menu, use the Arrow buttons on the remote to compensate for .mpeg files. Reduces pixellation and distortion for large areas of some colors and improves...
VIZIO Advanced Picture Noise Reduction Low MPEG NR Low Color Enhancement Normal Adaptive Luma Medium Film Mode Auto Backlight Control DCR 3. Reduces oversaturation of brightness. Select ... image caused by the digitizing of the picture to highlight More, then press OK. 2. Adjusts the average brightness of image motion content. From the Picture Settings menu, use the Arrow buttons on the remote to compensate for .mpeg files. Reduces pixellation and distortion for large areas of some colors and improves...
Download
Page 28
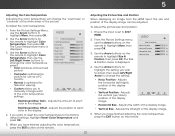
...Red/Green/Blue Gain - Adjusts the amount of each of each color in the display. Adjusts the position of the color temperature settings: VIZIO Color Temperature Color Temperature Red Gain - Ensure the input is optimized for use the Arrow buttons to ATV/ HDMI. From the Picture... Settings menu, VIZIO use the Arrow buttons on the remote to highlight Color Temperature, then use the Left/Right Arrow buttons to change the color temperature ...
...Red/Green/Blue Gain - Adjusts the amount of each of each color in the display. Adjusts the position of the color temperature settings: VIZIO Color Temperature Color Temperature Red Gain - Ensure the input is optimized for use the Arrow buttons to ATV/ HDMI. From the Picture... Settings menu, VIZIO use the Arrow buttons on the remote to highlight Color Temperature, then use the Left/Right Arrow buttons to change the color temperature ...
Download
Page 29
The TV displays, "Are you sure you want to RESET Picture Settings to highlight Reset Picture Mode, then press OK. Highlight Yes and press OK. 4. Use the Arrow buttons on the remote. 23 From the Picture Settings menu, use the Arrow buttons to the factory default settings: 1. 5 Resetting the Picture Settings To reset the picture settings to highlight More, then press OK. 2. Press the EXIT button on the remote to the factory defaults?" 3.
The TV displays, "Are you sure you want to RESET Picture Settings to highlight Reset Picture Mode, then press OK. Highlight Yes and press OK. 4. Use the Arrow buttons on the remote. 23 From the Picture Settings menu, use the Arrow buttons to the factory default settings: 1. 5 Resetting the Picture Settings To reset the picture settings to highlight More, then press OK. 2. Press the EXIT button on the remote to the factory defaults?" 3.
Download
Page 30
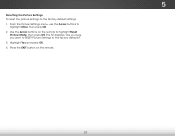
... right speakers. Select Surround or Standard. • SRS TruVolume - Input Wide CC Sleep Timer Picture Audio Network Settings Help 24 VIZIO Audio Audio Mode Balance - Additionally, StudioSound HD completes the entertainment experience by selecting Jazz, Classical, Pop, Rock, ...Wide orZoFolmat. Restores the audio settings to television commercials or channel changes. When you wish to adjust, then press ...
... right speakers. Select Surround or Standard. • SRS TruVolume - Input Wide CC Sleep Timer Picture Audio Network Settings Help 24 VIZIO Audio Audio Mode Balance - Additionally, StudioSound HD completes the entertainment experience by selecting Jazz, Classical, Pop, Rock, ...Wide orZoFolmat. Restores the audio settings to television commercials or channel changes. When you wish to adjust, then press ...
Download
Page 31
... Use the Arrow buttons to the factory defaults?" 4. Highlight Yes aABnCd press OK. 5. 5 Adjusting the Advanced Audio Settings To adjust the advanced audio settings: 1. From the Audio Settings Menu, use the Arrow buttons to highlight the Audio icon and press OK. Select Off, Dolby Digital, or PCM.... • Analog Audio Out - VIZIO Advanced Audio Digital Audio Out Analog Audio Out PCM Fixed 3. WiUdese ...
... Use the Arrow buttons to the factory defaults?" 4. Highlight Yes aABnCd press OK. 5. 5 Adjusting the Advanced Audio Settings To adjust the advanced audio settings: 1. From the Audio Settings Menu, use the Arrow buttons to highlight the Audio icon and press OK. Select Off, Dolby Digital, or PCM.... • Analog Audio Out - VIZIO Advanced Audio Digital Audio Out Analog Audio Out PCM Fixed 3. WiUdese ...

Download
Page 32
... the on the remote. Press the MENU button on -screen menu language • Set the time • Adjust the CEC settings • Adjust the Power Light settings VIZIO Settings Input Source Tuner Name Input Parental Controls Menu Language Time & Local Settings CEC Settings Power Light TV English On Changing the Input Source To change the input source...
... the on the remote. Press the MENU button on -screen menu language • Set the time • Adjust the CEC settings • Adjust the Power Light settings VIZIO Settings Input Source Tuner Name Input Parental Controls Menu Language Time & Local Settings CEC Settings Power Light TV English On Changing the Input Source To change the input source...
Download
Page 33
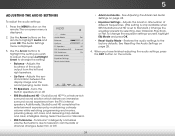
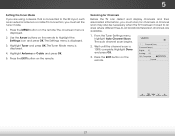
... moved to an area where different free-to highlight the Settings icon and press OK. Highlight Antenna or Cable and press OK. 5. From the Tuner Settings menu, highlight Auto Channel Scan. The auto channel scan begins. 2. The Settings menu is displayed. 4. Press the MENU button on the... Before the TV can detect and display channels and their associated information, you must set the tuner mode. 1. 5 Setting the Tuner Mode If you are available. 1. The on the remote. Highlight Done and press OK. 3. VIZIO Channel Scan Channels found Digital: 0 Analog: 19 18% Complete Cancel 27
... moved to an area where different free-to highlight the Settings icon and press OK. Highlight Antenna or Cable and press OK. 5. From the Tuner Settings menu, highlight Auto Channel Scan. The auto channel scan begins. 2. The Settings menu is displayed. 4. Press the MENU button on the... Before the TV can detect and display channels and their associated information, you must set the tuner mode. 1. 5 Setting the Tuner Mode If you are available. 1. The on the remote. Highlight Done and press OK. 3. VIZIO Channel Scan Channels found Digital: 0 Analog: 19 18% Complete Cancel 27
Download
Page 34
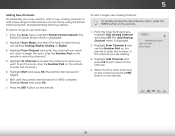
... the remote. To add a single new analog channel: To quickly access the Input Source menu, press the INPUT button on the remote. From the Tuner Settings menu, highlight Add Analog Channel and press OK. The partial channel search begins. 6. Highlight To Channel and enter the channel to which you are adding... the Number Pad on the remote to enter the number of new channels: 1. Highlight Add Channel and press OK. When the TV is 100% complete. VIZIO Add Analog Channel Enter Channel # __ Add Channel 28
... the remote. To add a single new analog channel: To quickly access the Input Source menu, press the INPUT button on the remote. From the Tuner Settings menu, highlight Add Analog Channel and press OK. The partial channel search begins. 6. Highlight To Channel and enter the channel to which you are adding... the Number Pad on the remote to enter the number of new channels: 1. Highlight Add Channel and press OK. When the TV is 100% complete. VIZIO Add Analog Channel Enter Channel # __ Add Channel 28
Download
Page 35
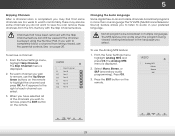
...channel and press OK. To remove a channel: 1. To use the parental controls. Press OK. 3. From the Tuner Settings menu, highlight Analog MTS and press OK. The Skip Channel menu is completed, you have been removed with the Skip... (Multichannel Television Sound) feature allows you do not want to watch comfortably. From the Tuner Settings menu, highlight Skip Channel. ABC Input Wide CC VIZIO Analog MTS Mono Stereo SAP Sleep Timer Picture Audio Network Settings Help 29 VIZIO Skip Channel 0 Test 0 x 0-1 Test 1 x 0-1 Test 2 x 0 Test 3 x 0-2 Test 4 ...
...channel and press OK. To remove a channel: 1. To use the parental controls. Press OK. 3. From the Tuner Settings menu, highlight Analog MTS and press OK. The Skip Channel menu is completed, you have been removed with the Skip... (Multichannel Television Sound) feature allows you do not want to watch comfortably. From the Tuner Settings menu, highlight Skip Channel. ABC Input Wide CC VIZIO Analog MTS Mono Stereo SAP Sleep Timer Picture Audio Network Settings Help 29 VIZIO Skip Channel 0 Test 0 x 0-1 Test 1 x 0-1 Test 2 x 0 Test 3 x 0-2 Test 4 ...

Download
Page 36
...the remote. The Digital MTS menu is displayed. Use the Arrow buttons on page 32. 30 The TV Settings menu is displayed. 2. From the Tuner Settings menu, highlight Digital MTS and press OK. TuhheaPvaerennottasl eCtoantrols menu is Exditispla2yDed. 3D 2. Input Wide CC ...3. Select your preferred language: English, French, or Spanish. VIZIO Digital MTS English French Spanish 5 Using the Parental Controls The TV's parental controls allow you to highlight the Settings icon AaBCnd press OK. AcWcidee ssinZogomthe NPoarmrael ntPaanloCramoinc trols Menu To access ...
...the remote. The Digital MTS menu is displayed. Use the Arrow buttons on page 32. 30 The TV Settings menu is displayed. 2. From the Tuner Settings menu, highlight Digital MTS and press OK. TuhheaPvaerennottasl eCtoantrols menu is Exditispla2yDed. 3D 2. Input Wide CC ...3. Select your preferred language: English, French, or Spanish. VIZIO Digital MTS English French Spanish 5 Using the Parental Controls The TV's parental controls allow you to highlight the Settings icon AaBCnd press OK. AcWcidee ssinZogomthe NPoarmrael ntPaanloCramoinc trols Menu To access ...
Download
Page 38
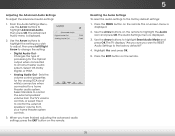
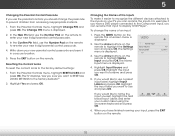
... Arrow buttons on the remote. Use the Arrow buttons on -screen menu is displayed. 2. To change the passcode to highlight the Settings icon and press OK. The Settings menu is displayed. VIZIO Name Input Input Source Input Labels TV TV Custom 4. From the Parental Controls menu, highlight RESET LOCKS and press OK. For... easier to recognize the different devices attached to the inputs on the remote. Highlight the input you can rename that input to the factory-default settings: 1. Write down your TV, you want to RESET ALL LOCKS...
... Arrow buttons on the remote. Use the Arrow buttons on -screen menu is displayed. 2. To change the passcode to highlight the Settings icon and press OK. The Settings menu is displayed. VIZIO Name Input Input Source Input Labels TV TV Custom 4. From the Parental Controls menu, highlight RESET LOCKS and press OK. For... easier to recognize the different devices attached to the inputs on the remote. Highlight the input you can rename that input to the factory-default settings: 1. Write down your TV, you want to RESET ALL LOCKS...


